

About queue listeners
A queue listener allows you to monitor a “listener queue” for the arrival of data. Data arrives in the form of JSON packages – placed on the queue either by an external system, or at submission of a web form. Queue listeners are used to provide Accelerator with message queuing capabilities. Message queues are used when:
-
Retrieving web events state data
-
Submitting web forms
-
Populating the Real-Time cache
Queue listener supporting configurations
In order to use a queue listener within Accelerator, you need to configure a few steps, which are outlined below. Some of the steps are predefined within Accelerator as part of the implementation.
The high-level configuration steps are as follows:
-
Create an audience definition with attributes and repeater parameter fields.
-
Configure an interaction with queue listener and queue activity.
-
Configure offers to be used by the queue activity.
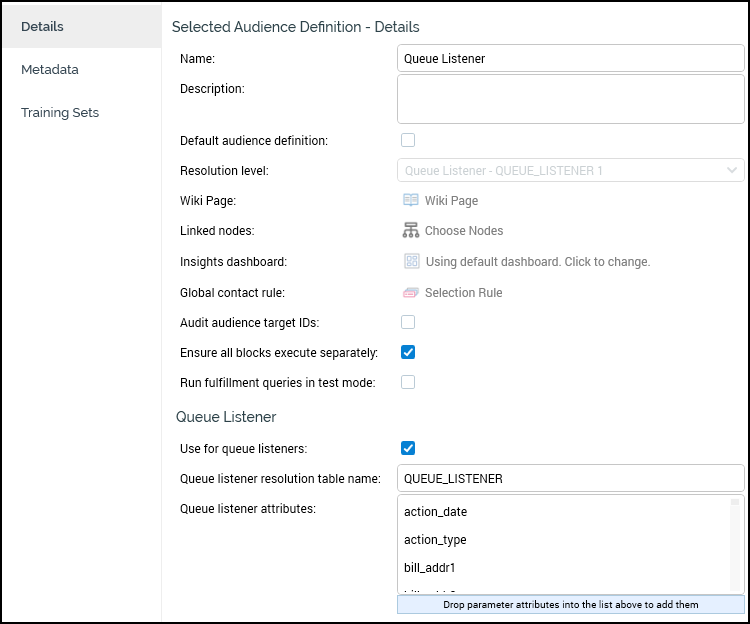
Create an audience definition with attributes
-
Navigate to the configuration panel and go to Audience Definitions.
-
Once there, add a new Audience that will be used for a queue listener.
-
Check the option to Use for queue listeners for this audience to allow for the addition of attributes needed for the JSON file being passed.
-
Populate the Queue listener resolution table name, which will be used in the configuration in the interaction designer in later steps.
-
-
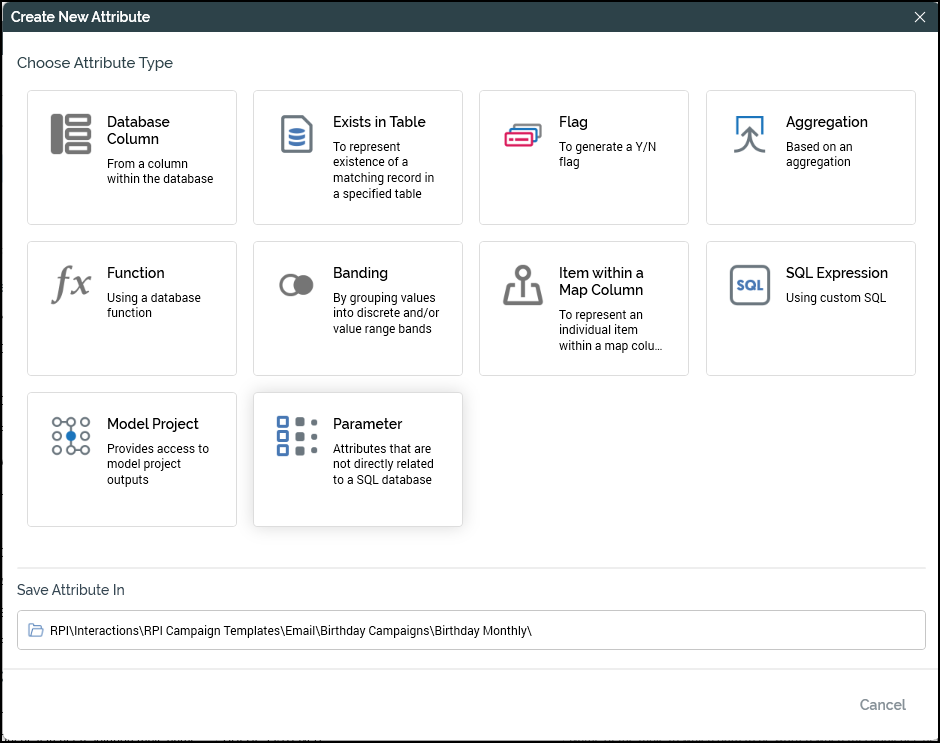
Before completing the Audience definition, you need to create and configure the required attributes and repeater parameters. This can be done following these steps:
-
In the middle-left of the screen, click the blue “plus” button.

-
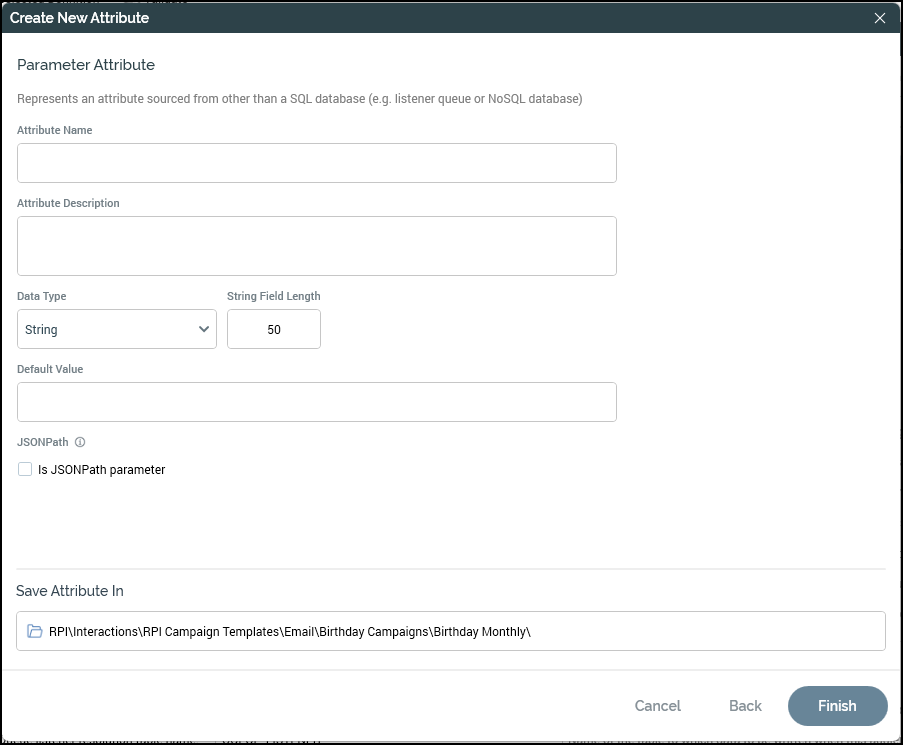
Within the next screen, you need to click Parameter and then provide the following information about the attribute:
-
-
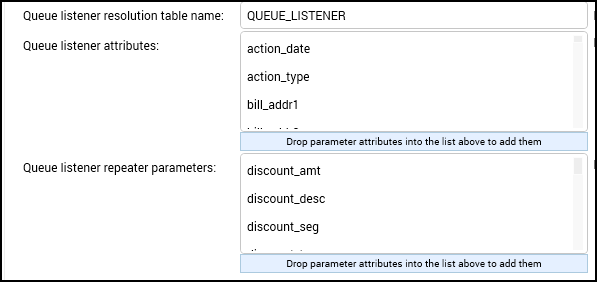
After you have created all the necessary attributes, you need to add them to the proper location within the audience (attributes or repeater parameters). This is done by dragging them from the attribute location into one of the below locations:
-
After this step is complete, click the “save” button on the top-left of the screen:
Create an interaction with queue listener and queue activity
-
Now that the audience and attributes have been created, you’re now able to create an interaction using them as follows:
-
Within the RPI dashboard, click the Interaction Designer button:

-
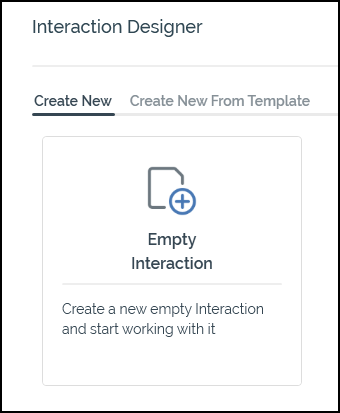
Once in the Interaction Designer, select Create New and click Empty Interaction:
-
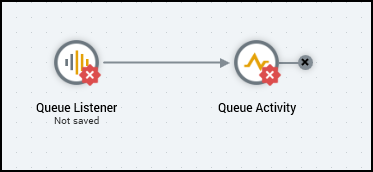
After you name the new interaction, next you’ll drag in “Queue Listener” from the palette. This also brings the “Queue Activity” with it:
-
-
A queue activity allows for the execution of an offer following its upstream queue listener’s receipt of data via a JSON package arriving on the listener queue (and the optional customization of its offer’s content based on the data received, using parameter attributes).
-
You can only attach a queue activity to a queue listener.
-
A queue activity cannot be attached to more than one queue listener.
-
You cannot add a queue activity downstream from another queue activity.
-
You also cannot add any other activities downstream from a queue activity.
-
-
A queue listener allows you to monitor a “listener queue” for the arrival of data. Data arrives in the form of JSON packages – placed on the queue either by an external system, or at submission of a web form. Downstream queue activities can then use this data to execute offers.
-
You might typically use a queue listener for sending an email, for example after a customer makes a purchase or when a web form is submitted in a landing page.
-
A validation error raised if a queue listener workflow contains two or more queue activities that use different audience definitions.
-
-
With these in place, you need to configure them to work with the audience/attributes that were created in previous steps.
-
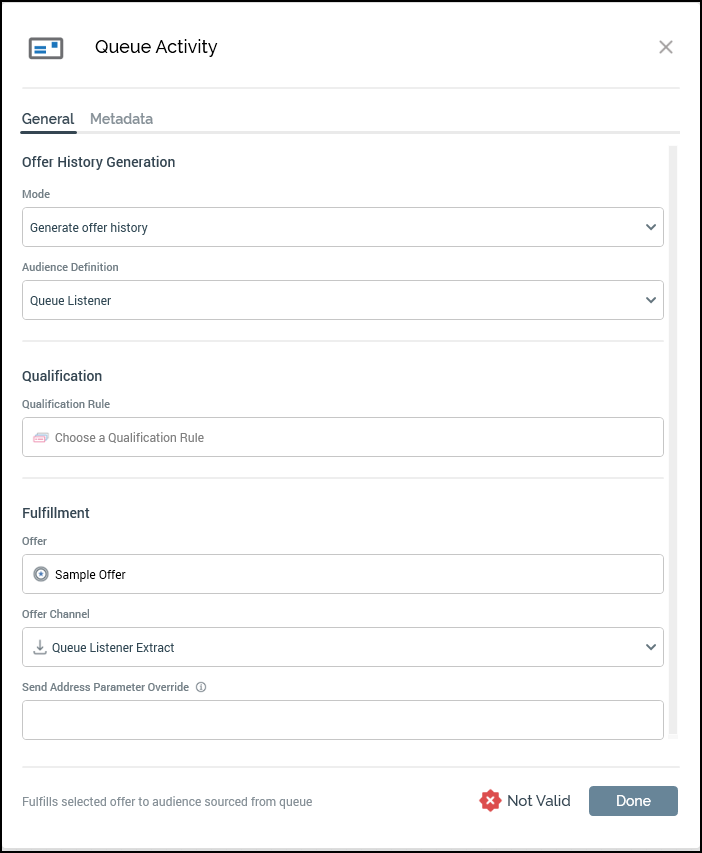
Double-click Queue Activity to configure it. The following screen will pop up:
-
The Offer History Generation section exposes the following properties:
-
Mode:
-
Generate offer history: this option is selected by default. When selected, the Audience Definition property is displayed; on execution of the queue activity, a record will be added to the offer history table defined by the selected audience definition.
-
Don't generate offer history: when selected, on execution of the queue activity, an offer history record is not written.
-
-
Audience Definition: this dropdown is only displayed when Generate offer history is selected. It lists only queue listener audience definitions. Other audience definitions are not shown. If a default queue listener audience definition has been selected, it is selected by default.
-
-
The Fulfillment section exposes the following properties:
-
Offer: provision of an offer with which to configure the queue activity. This is mandatory (unless a Control channel has been selected). The selected offer must be valid. You can choose an offer by browsing, or by using drag and drop. The selected offer must support at least one non-broadcast delivery method. You can also initiate the creation of a new offer. Once an offer has been selected, you can open its latest version in the Offer Designer. You can also clear your selection. A validation error will be raised in the event of selecting a data onboarding offer.
-
Offer Channel: this dropdown field lists only those channels supported by the currently selected offer's delivery method(s). Broadcast channels are not shown. You can select a Control channel without first selecting an offer.
-
Send Address Parameter Override: this optional text field is blank by default. When set, it allows you to specify that another field in the supplied JSON payload will also serve as the payload's
SendAddress. By attaching multiple queue activities to queue listener, each with different send address, you can fulfill multiple offers through the submission of a single JSON payload. Only a single row is added to the queue listener resolution table when you do so, with one offer history row per offer fulfillment/contact. The same resolution key is used for all offer history records.
-
-
-
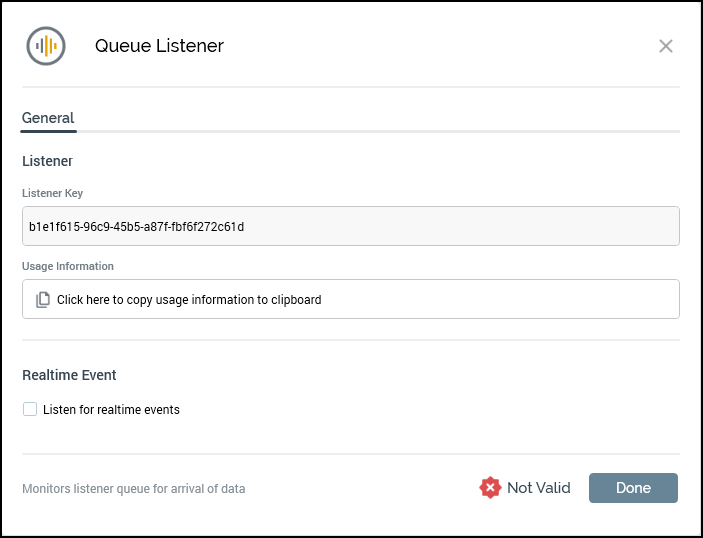
Now that the Queue Activity has been configured, it is time to configure the Queue Listener. The following information will walk you through the information to complete this:
-
Listener Key: a read-only GUID value that is unique to the current queue listener. The queue listener's listener key is used when placing messages onto the listener queue; messages that contain a unique listener key value are processed by the queue listener matching the supplied value.
-
Usage Information: click the Click here to copy usage information to clipboard button to copy details about how external parties can place messages on the listener queue for processing by queue listeners:
-
There are three ways for external systems to integrate with this queue listener.

1) Via the Interaction API web service

2) Via the Interaction Realtime API web service

3) By placing messages directly onto the queue

INTERACTION API WEB SERVICE

Endpoint     : https://local.redpoint.io/interaction/api/triggers/queue

NB. The message header must contain a valid bearer token

INTERACTION REALTIME API WEB SERVICE

Endpoint     : https://rpgtest.accelerator.redpoint.io/api/events/queue

NB. The message header must contain the RPIAuthKey setting configured for this service.

DIRECT TO QUEUE

The queue type and path is configured in the Server Workbench

MESSAGE BODY

The message is the same for all three methods e.g.:

{

  "TriggerKey": "96e9b29e-a9bd-4501-8bb7-0f45578d464f",

  "SendAddress": "e.g. email address",

  "Parameters": {

    "bill_addr1": "null",

    "bill_addr2": "null",

    "bill_city": "null",

    "bill_first_name": "null",

    "bill_last_name": "null",

    "bill_state": "null",

    "bill_zip": "00000-0000",

    "carrier": "null",

    "coupon_amt": "0.00",

    "email": "null",

    "merch_total": "0",

    "name_first": "null",

    "name_last": "null",

    "order_date": "1/1/1900 12:00:00 AM",

    "order_number": "0",

    "order_status": "null",

    "order_total": "0.00",

    "pay_amt1": "0.00",

    "pay_amt2": "0.00",

    "pay_amt3": "0.00",

    "pay_amt4": "0.00",

    "pay_amt5": "0.00",

    "pay_exp1": "12/11/2018 12:00:00 AM",

    "pay_exp2": "12/11/2018 12:00:00 AM",

    "pay_exp3": "12/11/2018 12:00:00 AM",

    "pay_exp4": "12/12/2018 12:00:00 AM",

    "pay_exp5": "12/11/2018 12:00:00 AM",

    "pay_name1": "null",

    "pay_name2": "null",

    "pay_name3": "null",

    "pay_name4": "null",

    "pay_name5": "null",

    "pay_num1": "0",

    "pay_num2": "0",

    "pay_num3": "0",

    "pay_num4": "0",

    "pay_num5": "0",

    "pay_type1": "null",

    "pay_type2": "null",

    "pay_type3": "null",

    "pay_type4": "null",

    "pay_type5": "null",

    "ship_addr1": "null",

    "ship_addr2": "null",

    "ship_city": "null",

    "ship_first_name": "null",

    "ship_last_name": "null",

    "ship_state": "null",

    "ship_to_store": "N",

    "ship_zip": "00000-0000",

    "shipping": "0.00",

    "store_address_1": "x",

    "store_city": "x",

    "store_id": "0",

    "store_state": "x",

    "total_cost": "x",

    "transaction_id": "0",

    "tax": "0.00"

  },

  "RepeaterParameters": [

    {

      "discount_amt": "0.00",

      "discount_seq": "null",

      "discount_type": "null",

      "item_description": "x",

      "item_price": "0",

      "item_qty": "x",

      "item_sku": "x",

      "item_tax": "0",

      "item_total": "0.00",

      "order_item_id": "0",

      "product_image_url": "null",

      "product_url": "null",

      "unit_price": "0.00",

      "discount_desc": "null"

    }

  ]

}
Testing queue listener within Postman and RPI
Now that the setup portion of the queue listener is complete within RPI, you can test within Postman with the following steps:
-
Within the Postman application, provide the following information under the Header section for the queue listener to pick up data being sent:

-
Content-Type:application/json -
RPIAuthKey: this is the value shown in the above JSON information asTriggerKey
-
-
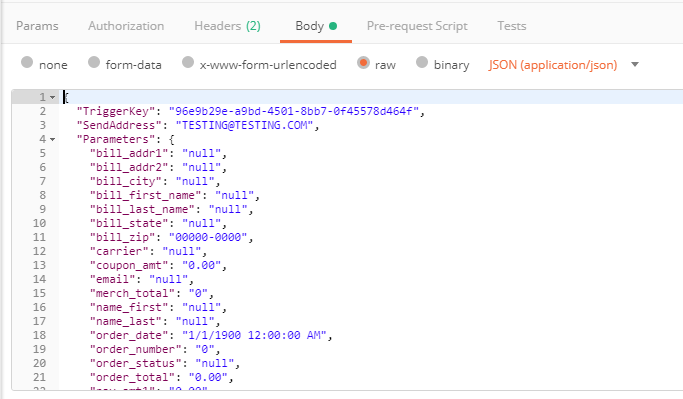
Next under the Body section, paste the above JSON into this section. This will provide the parameters to Postman that will be coming through in the payload.
For Testing, enter your own email address into the SendAddress field.
-
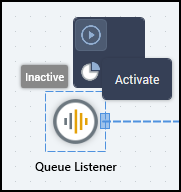
After completing this, you can go back into RPI and set your Queue Listener Interaction to an Active State. While in the interaction, click the Queue Listener and then click the “Play” button.
-
Once this is in an Active state, you can test within Postman by clicking the Send button in the top-right of the screen.
-
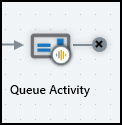
Now that a test has been fired off to RPI, you can now see that the count on you Queue Activity increased and picked up this test:
-
Also, you should have received an email to the provided email address in the JSON file.