Overview
The dynamic sender feature in Redpoint Interaction (RPI) allows you to dynamically personalize the sender email name and email address when sending out emails using native RPI email connectors.
The information for which channels that support it can be found in the supported connectors page.
Prerequisites
-
Ensure native connector supports dynamic senders.
-
Each of the used domains have DNS records configured.
Dynamic sender configuration details
In order to use this feature, you need a table that associates a unique Sender ID to a sender name and email.
We’ve included an example of the Data Definition Language (DDL) for the dynamic sender table below. This table has a single sender name with different sender emails depending on if the message is for marketing purposes or transactional use. This can be expanded to include a different sender name as well for marketing vs. transactional emails if desired.
USE [<database>]
GO
/****** Object: Table [dbo].[DYNAMIC_SENDER_NAME_EMAIL] Script Date: 3/1/2023 5:14:12 PM ******/

SET ANSI_NULLS ON
GO
SET QUOTED_IDENTIFIER ON
GO
CREATE TABLE [dbo].[DYNAMIC_SENDER_NAME_EMAIL](
[sender_id] [nvarchar](250) NULL,
[sender_name] [nvarchar](250) NULL,
[sender_email_marketing] [nvarchar](250) NULL,
[sender_email_transactional] [nvarchar](250) NULL
) ON [PRIMARY]

GO
The Sender ID depends on which sender name and address should be assigned to the outbound message. The value of the sender_id depends on the requirements of the dynamic sender information that you want to achieve.
Examples of Sender ID:
-
Business unit code
-
Zip code
-
Location ID
Configure the dynamic sender table in RPI
Once you create the dynamic sender table in RPI, you’ll need to bring the attributes into RPI and configure the joins to use the attributes from the table. We recommend that you join the dynamic sender table to the offer history table to optimize performance and minimize the configuration steps if the dynamic table is being used for different resolutions/audience definitions.
Configure audience definition to use dynamic sender table
Once you create the attributes and bring them into RPI, you’ll need to determine what audience definitions to use in relation to the dynamic table. You’ll need to ensure that the field from the audience resolution table or other table joined to the resolution is mapped to be stored in the offer history table. If the table is not the base, then you need to ensure that you’ll get a single unique value stored in offer history for the join to the dynamic table to provide consistent results.
Configure joins to the dynamic sender table
Now that offer history has a reference field that you can join to the dynamic table on Sender_ID, you can create that simple join from offer history to your dynamic sender table.
Once you have the simple join configured you can proceed to make a multi-join from the resolution table of any and all of the audience definitions that will use this dynamic table.
Using the dynamic sender attributes in an email offer
Now that you have brought in the attributes and configured the table and the associated joins, you’re ready to use the attributes in an email offer.
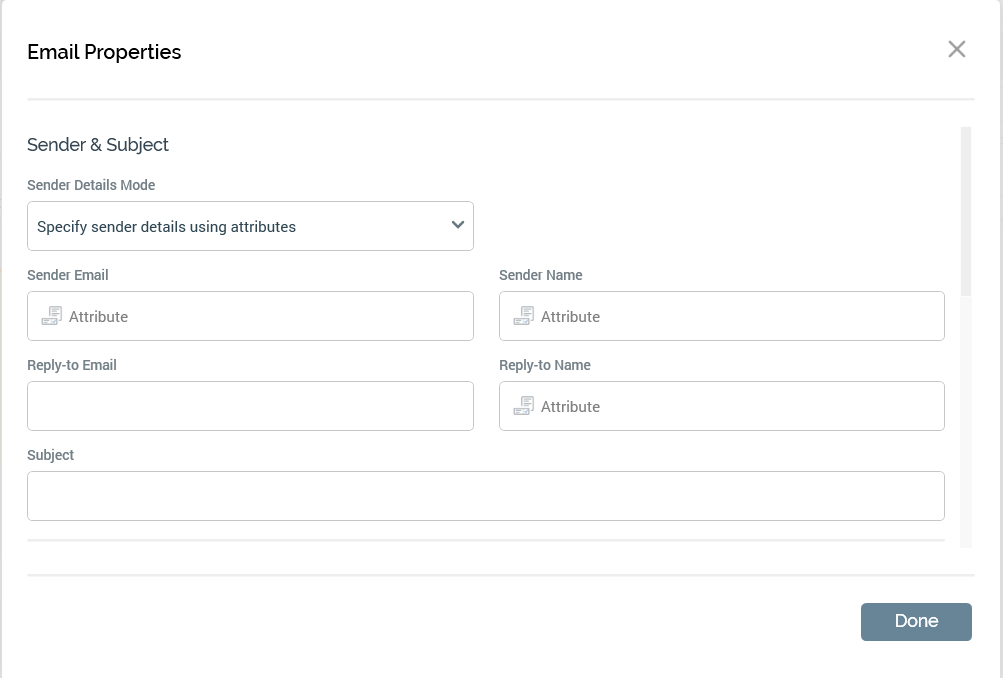
-
Within the email offer, set the sender details mode to Specify sender details using attributes.
-
Then drag and drop the appropriate attributes to the Sender Email and Sender Name.
At this point you can send emails with dynamic sender emails and names.