

Overview
The Calculate tool performs one or more calculations using existing field values, numbers, strings, mathematical operations, and a variety of other functions. For each calculation, you enter an expression to calculate, and a field to which the result will be assigned.
Using this tool you can:
-
Change the value of an existing field in each record
-
Create a new field and give it a value
-
Change the value of local variables
The Calculate tool performs its calculations in sequence. This means that new fields can be referenced in later calculations. It also means that, once you change a field value in an earlier calculation, the later calculations will use the new value. There is no fixed limit to the number of calculations in a Calculate tool. However, if you perform lots of complex calculations, you may find that the project runs faster if the calculations are divided into two Calculate tools connected in series, because they can run in parallel.
Calculate tool configuration parameters
The Calculate tool has two sets of configuration parameters in addition to the standard execution options: Field assignments and Variables.
Field assignments
The Field assignments section of the Configuration tab lists fields or variables to be changed, and the expressions to assign to each one. Each item in this list consists of:
|
Item |
Description |
|---|---|
|
Field |
The name of an existing field, new field, or local variable. Local variable names must be preceded by a local. prefix. Note that field names containing spaces must be surrounded by square brackets, as in |
|
Type |
For new fields, this specifies the type of the field. It does not apply to existing fields or local variables. |
|
Expression |
The expression to calculate and assign to the field or variable. The type of the expression must be convertible to the type of the field. See Expression types and validity for details. |
|
Enabled |
This is normally used in macro processing to dynamically enable and disable field assignments. Select to enable the assignment, or clear to skip. |
Variables
The Variables tab has a single section called Local record.
Local record lists local variables that can be referenced by expressions in the Calculate tool. These variables are not written to the output, and are not available to any other tools. However, they do maintain their value between records, so they can be used for special aggregations and anywhere you need to track "state" in a multi-record stream. When local variables are referenced in expressions, the name of each local variable must be preceded by the local. prefix. Each item in the list of local variables consists of:
|
Item |
Description |
|---|---|
|
Field |
The name of the local variable. |
|
Type |
The type of the local variable. |
|
Initial value |
The value of the local variable before any records are processed. This is treated as text and will be converted to non-text types as needed. Do not enter quotes around the text value. |
Advanced
The Advanced tab has a single option: Override default Evaluate() cache size. If you use the Evaluate() function repeatedly on the same input text, overriding the default Evaluate() cache size setting and increasing the cache size may improve performance.
Configure the Calculate tool
-
Select the Calculate tool, and then go to the Configuration tab on the Properties pane.
-
Select a row in the field assignments grid, and then select a field name from the list or type the name of a new field. You can use the buttons above the grid to add and remove rows, and to move rows up and down.
-
If you are creating a new field, select the Data type box

-
Enter the expression to calculate in the EXPRESSION box.
-
Use any combination of mathematical operations and functions that is appropriate for your field data.
-
Any expression errors will be listed in the Errors box.
-
Select an error message to highlight the incorrect part of the expression.
-
The expression editor's autocomplete feature will show a pop-up list of fields, variables, and functions as you type.
-
You can also select Insert and use the Functions, System Variables, and Fields lists to help you construct your expression more quickly.
-
Field names containing spaces or punctuation will not appear on the Fields list, and must must be surrounded by brackets [ ].
-
-
Repeat steps 2 through 4 for each additional field assignment and calculation.
-
Optionally, select the Variables tab, and then define local variables.

-
Optionally, select Edit project properties to open the Project Parameters pane and edit global variables.
-
Optionally, select the Advanced tab and Override default Evaluate() cache size. If you use the Evaluate() function repeatedly on the same input text, overriding the default Evaluate() cache size setting and increasing the cache size may improve the performance of the Calculate tool.
-
Optionally, go to the Execution tab, and then set Web service options.
Each individual calculation can be disabled by clearing its Enabled check box. This is useful when you want to disable some processing but don't want to delete the calculation permanently. It is also useful in macros, to enable or disable individual calculations based on the macro settings.
See the Expression Reference and Function Reference for details about the expression syntax and the available functions.
Field assignments are performed in the order in which they are listed in the grid. This order can be important if a calculation uses the results of a previous assignment. To change the order, select a field then select ![]()
![]()
If you want to perform the same calculation across multiple fields, use the MultiCalc macro.
Calculate expression examples
Example 1: Some simple calculations
Suppose that you attach a Calculate tool to an upstream connection that has the following schema:
X: float[4]
NAME: textvar[64]
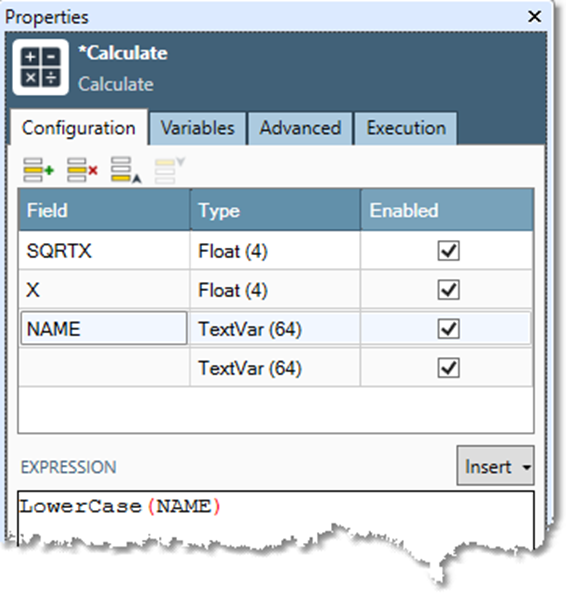
You want to add the square root of X to X, and make NAME lowercase. To do so, you could define the following calculations in this order:
-
New
float[4]fieldSQRTXis assigned the expressionSqrt(X). -
Existing field
Xis assigned the expressionX+SQRTX. -
Existing field
NAMEis assigned the expressionLowerCase(NAME).
These input records...
|
X |
NAME |
|---|---|
|
16.000 |
Fred Smith |
|
49.000 |
Joyce Jones |
...will result in these output records:
|
X |
NAME |
SQRTX |
|---|---|---|
|
20.000 |
fred smith |
4.000 |
|
56.000 |
joyce jones |
7.000 |
Example 2: Using a local variable
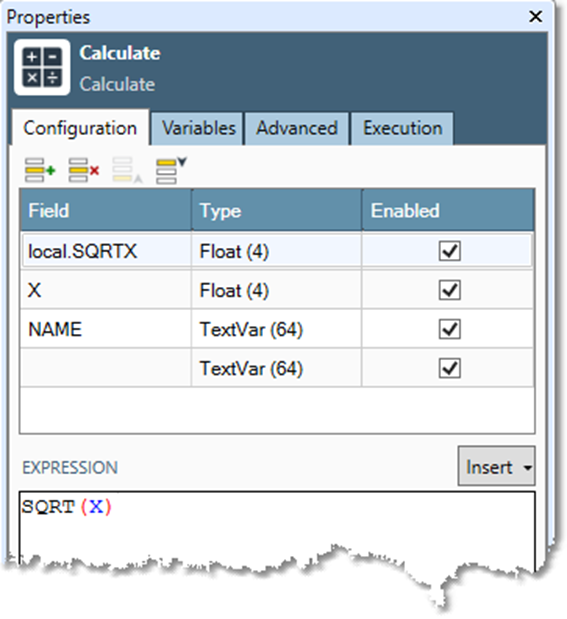
If you don't want the sqrt(X) attached to every record, you can use a local variable. A local variable is like a field in a record, except it is local to the Calculate tool and is not written to the output. Local variables let you store intermediate results separately to make your expressions easier to read and to avoid repeatedly typing a common sub-expression. Local variables are defined on the Variables tab. By defining SQRTX as a float[4] local variable, we can change the calculations to:
-
Local variable
local.SQRTXis assigned the expressionSqrt(X). -
Existing field
Xis assigned the expressionX+SQRTX. -
Existing field
NAMEis assigned the expressionLowerCase(NAME).
These calculations on the original input records will result in the following output records:
|
X |
NAME |
|---|---|
|
20.000 |
fred smith |
|
56.000 |
joyce jones |
Example 3: Substrings
Suppose that you need to process some legacy data where the keys have been composed from other useful information. This was common before normalized database practices became well-established. For example, you might have input data like:
|
KEY |
NAME |
|---|---|
|
|
Fred Smith |
|
|
Joyce Jones |
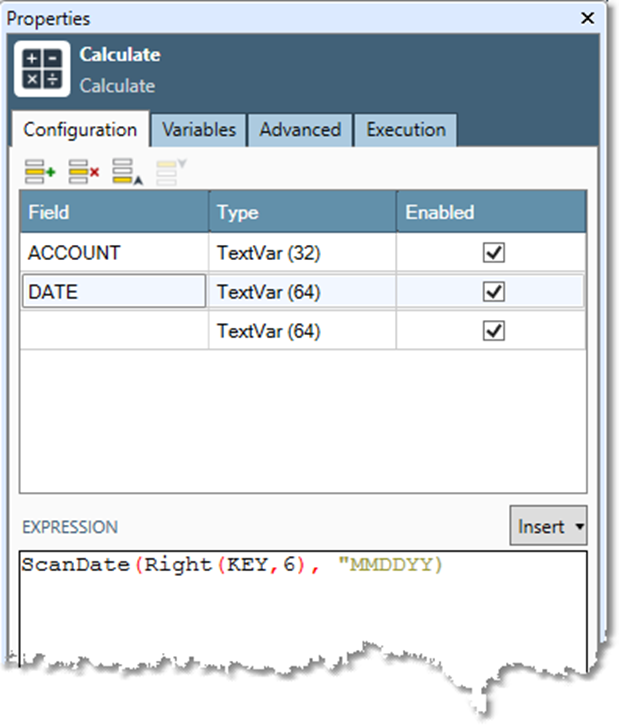
The KEY field consists of an account number followed by date in the form MMDDYY. There a simple way to extract the account and date from the input KEY:
-
New
textvar[32]fieldACCOUNTis assigned the expressionLeft(KEY,6). -
New date field
DATEis assigned the expressionScanDate(Right(KEY,6), "MMDDYY").
The resulting output is:
|
KEY |
NAME |
ACCOUNT |
DATE |
|---|---|---|---|
|
|
Fred Smith |
AXQY99 |
12 Oct 1964 |
|
|
Joyce Jones |
FHSK88 |
17 Jan 1954 |
Example 4: dates and times
You may want to perform date and time processing where the components of the date or time are needed, for example the day-of-month or the hour of the time. Data Management provides numerous date and time functions to accomplish this task. For example, if you input data is:
-
TIMESTAMP:
-
10 Jan 1998 14:32:01
-
24 Oct 2009 01:55:34
-
you can perform these assignments:
-
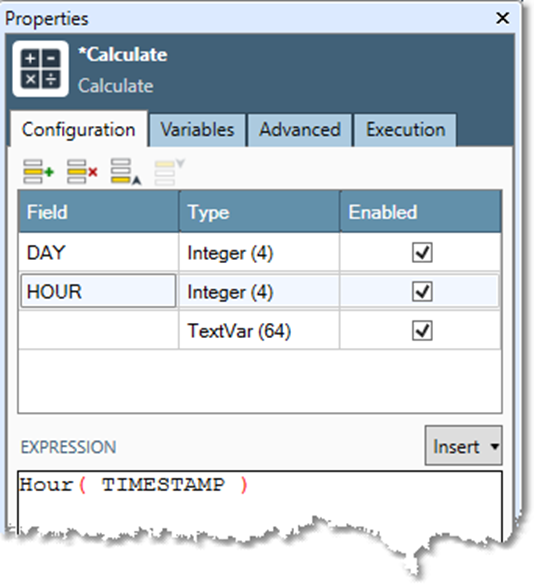
A new
integer[2]fieldDAYis assigned the expressionDay(TIMESTAMP). -
New
integer[2]fieldHOURis assigned the expressionHour(TIMESTAMP).
This results in the output records:
|
TIMESTAMP |
DAY |
HOUR |
|---|---|---|
|
10 Jan 1998 14:32:01 |
10 |
14 |
|
24 Oct 2009 01:55:34 |
24 |
1 |
Example 5: Identifying value ranges
Demographic databases often contain information like yearly income estimates, but these estimates are not expressed as numbers. Instead, they are expressed as codes like:
A: < 10000
B: 10000 -- 19999
C: 20000 -- 49999
D: >= 50000
X: unknown or error
Data Management offers a conditional expression to handle cases like this. Suppose that you have this input data:
-
INCOME:
-
42590
-
94378
-
2500
-
14000
-
<null>
-
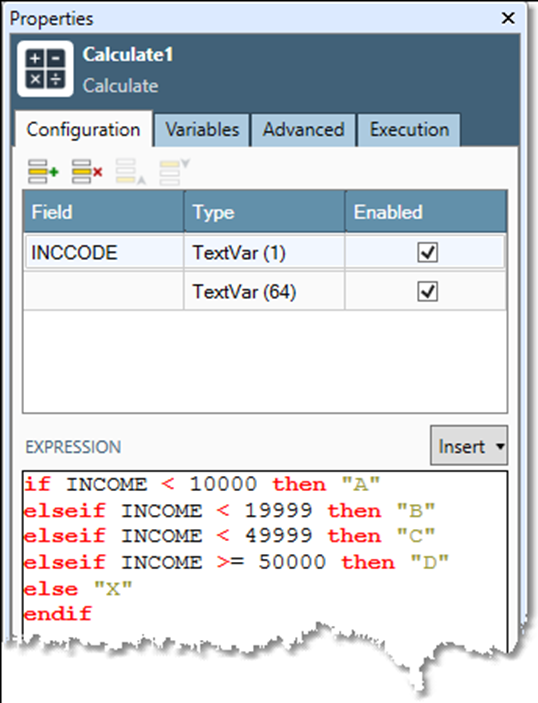
If you assign the following expression to a new textvar[1] field named INCCODE...
if INCOME < 10000 then "A"
elseif INCOME < 19999 then "B"
elseif INCOME < 49999 then "C"
elseif INCOME >= 50000 then "D"
else "X"
endif
...it will produce these records:
|
INCOME |
INCCODE |
|---|---|
|
42590 |
C |
|
94378 |
D |
|
2500 |
A |
|
14000 |
B |
|
<null> |
X |