

Overview
You must install the core before adding additional cluster nodes. Refer to Installing the Core for instructions on deploying the initial cluster node. For each additional node in the cluster, you will add the local node (while logged into the node) and install roles (refer to Installing Roles).
Connecting to a Cluster
The Connect to Cluster tab, displayed within the Server Workbench Welcome overlay, allows you to connect to an existing RPI cluster on the current, or another, machine.
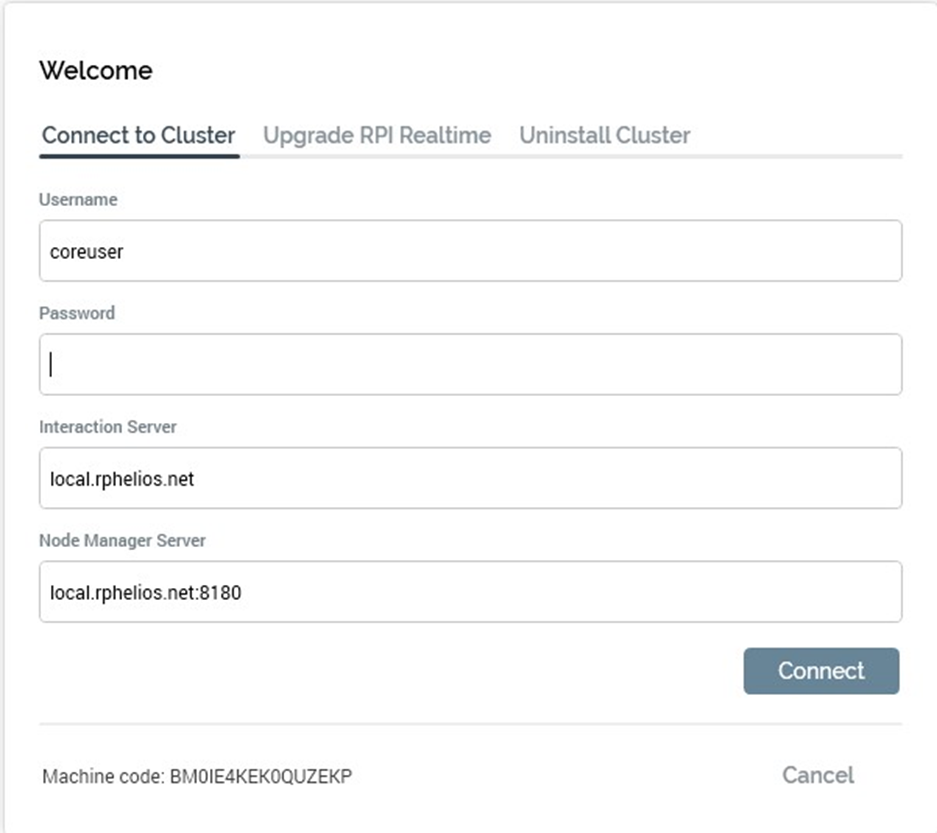
Note that, if connecting to a remote machine, the specified port must have opened there.
The following are shown:
-
Username: this field is only shown when the Full access radio button is selected. It is mandatory when displayed. You must enter the username of an RPI cluster administrator to connect to Server Workbench. For more information on cluster administrators, please see the Users section.
-
Password: this field is only shown when the Full access radio button is selected. It is mandatory when displayed. You must enter the password for the supplied Username.
-
Interaction Server: this field is only shown when the Full access radio button is selected. It is mandatory when displayed. You must enter the Interaction service URI of the RPI server to which you wish to connect.
-
Node Manager Server: this field is always displayed and is mandatory. You must enter the Node Manager service URI of the RPI server to which you wish to connect.
-
Connect: having completed the required fields, click this button to connect to your required RPI cluster.
Upon connecting successfully in Full access mode, the Cluster tab, within the main Server Workbench interface, is displayed. All tabs are available.
If connecting in Upgrade only mode, only the Cluster and Log tabs are shown. Please upgrade to the latest RPI version to access all available Server Workbench functionality.
If the details you entered are not recognized, or the Node manager service is not running on the machine to which you were trying to connect, an error dialog is shown.
A Failed to connect message is then shown at the Connect dialog.
Cluster Tab
The Cluster tab provides information relating to the current RPI cluster to which Server Workbench is connected. Details of its core and nodes are displayed:
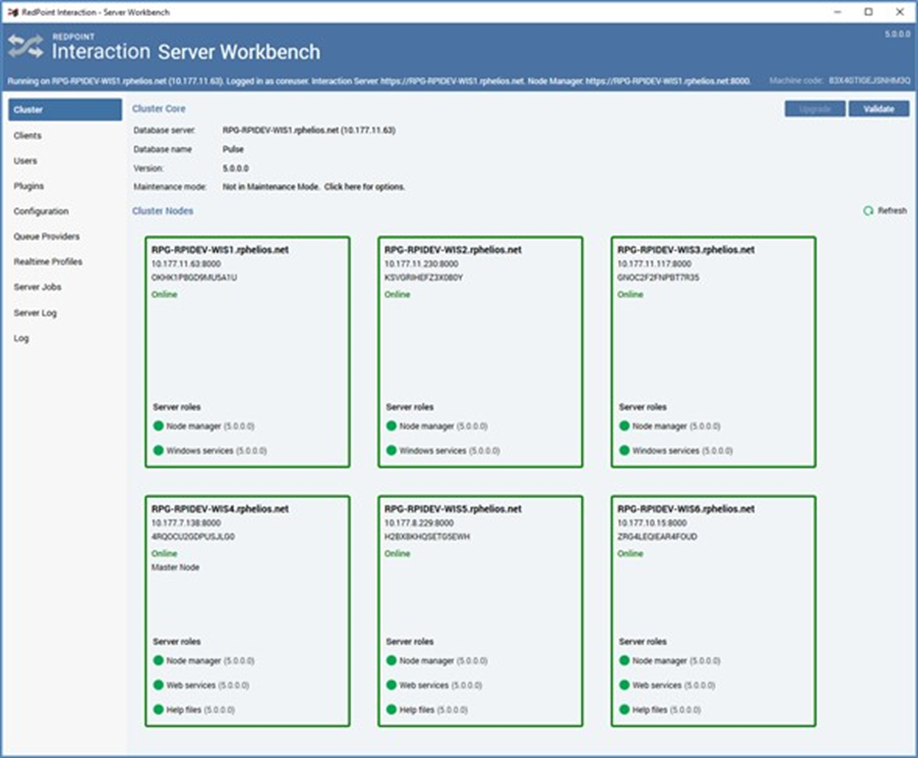
The Cluster page of the Server Workbench. In this example it is shown connected to a cluster containing six nodes. After an initial Cluster installation, only one node will be visible.
Cluster Core
The section contains a toolbar and core properties.
Toolbar
Two buttons are exposed within the Cluster Core toolbar:
-
Upgrade Core: this button is enabled when the version of the current Server Workbench instance is greater than the core to which it is connected. Clicking it displays the Upgrade Core overlay over the Cluster tab.
-
Validate Core: clicking this button displays the Validate Core overlay over the Cluster tab.
Core Properties
The following read-only properties are shown:
-
Database server: name and IP address
-
Database name: set to “Pulse”
-
Version
If the version of the currently-executing Server Workbench instances is higher than that of the core to which it is connected, an information label advises that “This Cluster Core can be upgraded”.
Cluster Nodes
This section contains a toolbar and cluster nodes list.
Toolbar
Two buttons are available at the Cluster Nodes toolbar:
-
Refresh: clicking this button refreshes the cluster nodes list with the nodes’ most recent status information.
-
Install & Add Local Node: this button is only displayed if:
-
Server Workbench is currently running on the same machine as the cluster core to which it is connected.
-
A node belonging to the cluster to which Server Workbench is connected is not currently installed on the machine upon which Server Workbench is running.
-
Clicking this button allows you to add the local machine as a node within the cluster to which Server Workbench is connected. This is carried out in the Install Local Node overlay, which is displayed over the Cluster tab.
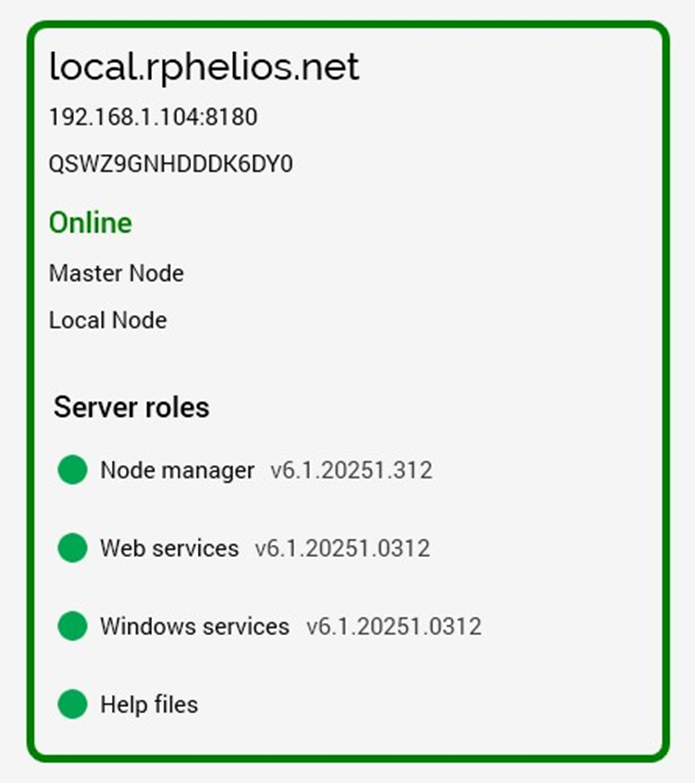
Nodes List
All nodes in the current cluster are listed. For each node, the following properties are displayed:
-
Upgrade node message: if the versions of the role(s) installed at the node are lower than that of the core to which it belongs, a warning message (“Please upgrade this node”) is displayed at the top of the node.
-
Server name: the name of the physical or virtual machine on which the node is installed
-
Server IP address:port
-
Machine code: the unique code of the physical or virtual machine on which the node is installed. Machine code is used when generating RPI server licenses. You can right-click the node’s machine code to copy its value to the clipboard.
-
Online status: advice as to whether the node is online or offline (or in error) is presented via a halo and colored icon as well as being shown verbally.
-
Master Node: displayed at the node within the cluster that is the master node. It is the master node’s responsibility to assign server jobs requested via the RPI client application to an online node on which the Windows services role is installed. If the current master node is taken offline, another node in the cluster immediately assumes this responsibility.
-
Master Node Role Disabled: displayed at the node when the master node role is disabled. Please see Disallow as Master Node, below, for further information.
-
Local Node: displayed at the node representing the current machine on which Server Workbench is running.
-
Server roles: nodes can support up to four roles, each of which defines the type of work that will be carried out by the node:
-
Node manager: all nodes support this role.
-
Web services: support for this role is optional.
-
Windows services: support for this role is optional.
-
Help files: support for this role is optional.
-
For information on the tasks undertaken by each role, see Roles.
The following are displayed at each server role:
-
Status icon. The role may be “Online”, “Offline” or “In error”. If “In error”, hovering over the role displays a tooltip containing the error details.
-
Role name
-
Version
The following buttons are shown when hovering over a role:
-
Put this role offline: this button is available when the role is online. Clicking it puts the role offline.
-
Put this role online: this button is available when the role is offline. Clicking it puts the role online.
When hovering over a node, a context menu is displayed. The following buttons can appear in the menu:
-
Go offline: this button is available when the node is online. Clicking it takes the node and all associated roles offline.
-
Go online: this button is available when the node is offline. Clicking it puts the node and all associated roles online.
-
Install Roles: this button is available when one or more roles are not yet installed at the node. Clicking it displays the Install Roles overlay over the Cluster tab.
-
Upgrade Roles: this button is available when the node is offline and the node role(s) versions are lower than the core version. Clicking it displays the Upgrade Roles overlay over the Cluster tab.
-
Validate Roles: this button is always available. Clicking it displays the Validate Node overlay.
-
Remove: this button is available when the node is offline. Clicking it removes the node from the cluster. Its invocation is protected by an “Are You Sure?” dialog. Note that you cannot remove a node if it is the only node in the cluster. Note also that, if you remove a node, you must manually uninstall its Node Manager service. You can do this using the following command:
sc delete [ServiceName]
Having done so, manually remove the ‘Program Files\RedPoint Global\RedPoint Interaction\Node Manager’ folder. -
Disable node: this option is available in a multi-node cluster. It allows you to disable a node within the cluster (other than the node to which you are currently connected). When a node is disabled, it assumes a Disabled state, and is displayed with a black border. You can invoke Enable at a Disabled node to re-enable it.
When a node is disabled, no new jobs will be sent to it and existing work will be stopped so it can be picked up by another node. There may be short delay for the node to reactivate if the Node Manager service was started before the node was enabled as it polls the database looking for a status change.
-
Disallow as Master Node: this option is available when the node is able to assume master node status. Invocation displays the text 'Master Role Node Disabled' at the node (note that it is necessary to manually refresh Server Workbench to remove the 'Master Node' indicator at the node, if displayed.
-
Allow as Master Node: this option is available when the node's ability to assume master node status is disabled. Invocation enables the node to assume master node status ('Master Node' is displayed after a few seconds if the node assumes master node responsibility).