

Overview
The Configure sub-interface allows you define a series of properties required by Server Workbench in advance of installing the core. It consists of the following sections.
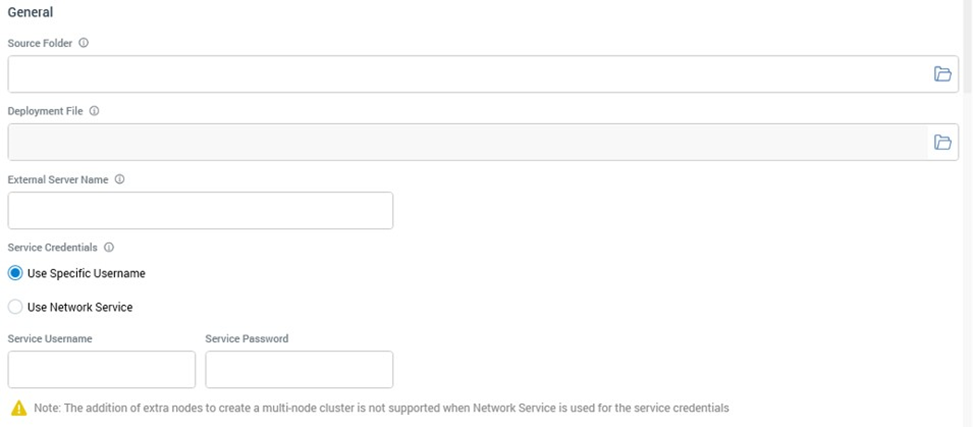
General Section
This section allows you to define a basic set of properties relating to the installation:
-
Source Folder: the Windows file system folder in which the files used to perform the installation are to be found. You can specify this value manually or by browsing for a folder.
-
Deployment File: an XML file that defines the tasks to be undertaken during installation. This property defaults to “RPDeployment.xml” if that file can be found within the Source folder.
-
External Server Name: the fully-qualified name, including any certificate extension, of the initial node’s machine (i.e., the machine upon which Server Workbench is currently running).
-
Service Credentials: two radio buttons are available:
-
Use Specific Username: selected by default. When chosen, you can provide a domain Service Username (with sufficient privileges) that will be used to run the initial node’s Node manager service. An optional Service Password can also be supplied.
Note that you cannot use the ‘.\username’ syntax in this context. All user names must be fully declared. Active Directory-style names (e.g. ‘username@Redpoint’ are supported). -
Use Network Service: when selected, the initial node’s Node manager service will run under the current machine’s Network Service account. The account must be a member of the local Administrators group.
A warning message is displayed if you select this option.
-
If you intend to create a multi-node cluster, you should not use Network Service as the service credentials.
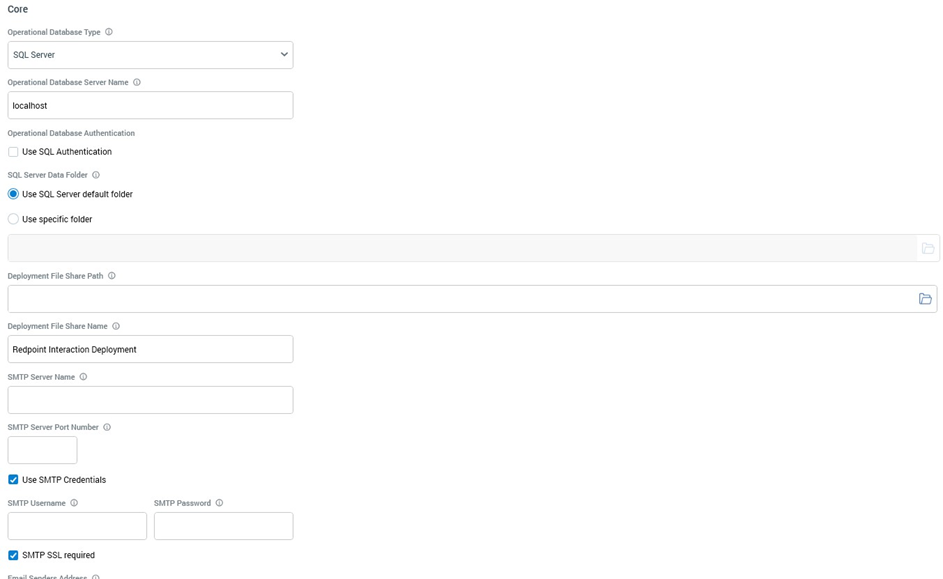
Core Section
This section allows you to capture fundamental properties of the core.
-
Operational Database Type: this dropdown field defaults to SQL Server. You can optionally elect to specify that the operational databases be installed using the Azure SQL Database, Amazon RDS SQL, Google Cloud SQL or PostgreSQL provider.
-
Operational Database server name: the name of the server on which the core operational databases are to be installed.
-
Database Port Number: only if hosting the operational databases in PostgreSQL.
-
Operational Database Authentication: contains a Use SQL Authentication checkbox, which is unchecked by default. When unchecked, connection will be made to the operational databases using Windows authentication. When checked, an SQL Server login username and optional password can be provided instead (the <,>,'," and & characters are not supported at passwords).
If using an Azure SQL operational database, leave this property unchecked to use Azure Managed Identity.
-
SQL Server Data Folder: allows you to define a folder where the operational databases’ data will be persisted, if using SQL Server. Two radio buttons are provided o Use SQL Server default folder: selected by default.
-
Use specific folder: selection of this option allows you to specify a folder in which operational data will be stored. When selected, a label is shown to confirm that the folder exists on the operational database server.
-
-
Deployment File Share Path: this field is used to capture the physical path of a shared folder that, if it does not exist already, is created during installation of the core. The share is used when adding further elements—other nodes and node roles—to the cluster.
-
Deployment File Share Name: accompanying Deployment file share path, this field is set by default to “RPI Deployment”. It allows you to define the name by which the share will be known.
-
SMTP Server Name: the name or IP address of a server that will be used to manage operational email communications within the cluster.
-
SMTP Port Number
-
Use SMTP Credentials: this checkbox allows you specify whether to use credentials when connecting to the SMTP server. If checked, SMTP Username (mandatory) and SMTP Password (optional) fields are also shown. An SMTP SSL required checkbox, unchecked by default, is also displayed; you can check this if secure sockets are to be used in when connecting to the SMTP server.
-
Email Sender's Address: allows you to specify the email address from which operational communications from the RPI server will be received.
-
License File: you can browse for a valid RPI server license with which to populate this field. Alternatively, you can provide the license’s path manually. Details of the usage of RPI server licenses are provided elsewhere.
-
License Machine Code: another read-only representation of the current machine’s unique license machine code value.
-
Certificate Hash: you can click Choose certificate hash to display the Choose Server Certificate dialog:
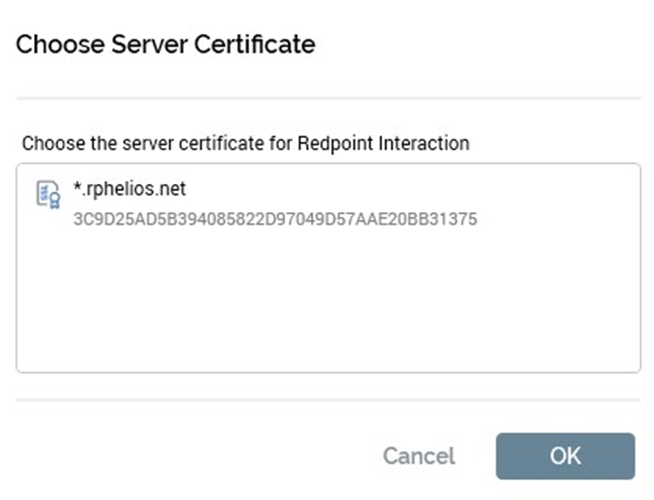
On selection of a certificate, its unique hash value is displayed in the field. Alternatively, you can specify a certificate hash value manually.
-
Key Vault Type: this dropdown field allows you to specify that the new RPI Installation will make use of Microsoft Azure KeyVault to securely persist credentials used by the application. A dropdown, it exposes the following values:
-
None: the default (don't use KeyVault) o Azure: use KeyVault. If selected, the Key vault URI property is displayed.
-
-
Key Vault URI: this property is shown when Key vault type is set to 'Azure’. It allows you to specify the URI of the Azure KeyVault to use to protect RPI application credentials. It is mandatory if shown.
-
'coreuser' Cluster Administrator Password: a read-only password for the default 'coreuser' Cluster Administrator user is generated automatically. You must take note of this value, as you will need it to log into the new RPI installation as coreuser. Having logged in, the value can be changed to something more memorable.
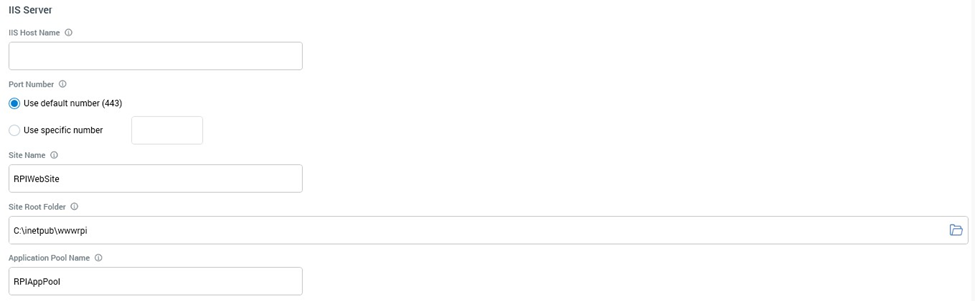
IIS Server Section
This section is used to specify the Internet Information Server (IIS) to be used by the RPI cluster.
-
IIS Host Name: this field should be set to the fully-qualified (including certificate extension) name of the public-facing machine that will host the cluster’s web services. This field is used when connecting to the RPI server using the RPI client application. IIS host name is of particular significance when an IIS load balancer is being used within the cluster; in this case the public name of the load balancer server, rather than the name of any specific web service machine, needs to be specified here.
-
Port Number: you can specify the port through which communication will be made with the cluster’s web services here. Two radio buttons are provided: o Use default number (443): selected by default.
-
Use specific number: selecting this option enables a field in which you can specify a specific port number.
-
-
Site Name: the name of the IIS site.
-
Site Root Folder: the IIS site's root folder.
-
Application Pool Name: the app pool to be used by the RPI IIS application.
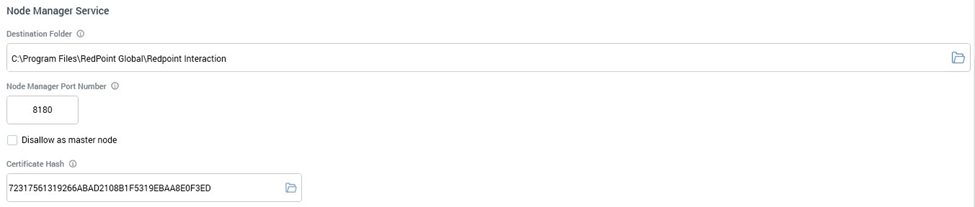
Node Manager Service Section
This section covers properties relating to the cluster’s Node Manager service.
-
Destination Folder: this field defaults to “C:\Program Files\Redpoint Global\RPI”. It defines the folder in which the initial node’s Node manager service will be installed.
-
Node Manager Port Number: by default, port 8000 is used to access the Node manager service; however, you can change this value if required.
-
Disallow as master node: this checkbox is unchecked by default. When unchecked, the current node can assume master node status. When checked, the current node cannot assume master node status, unless explicitly allowed through use of the context menu option shown when right clicking the node.
-
Certificate Hash: as documented above. Set automatically to the value selected in the previous instance of the property.
End User License Agreement Section
The final section covers the RPI End User License Agreement (EULA).

-
Check this box to accept the Redpoint Interaction End User License Agreement: this checkbox is unchecked by default. You must accept the EULA before proceeding with the installation.
-
View Redpoint Interaction End User License Agreement: clicking this button displays the End User License Agreement in a separate Window.
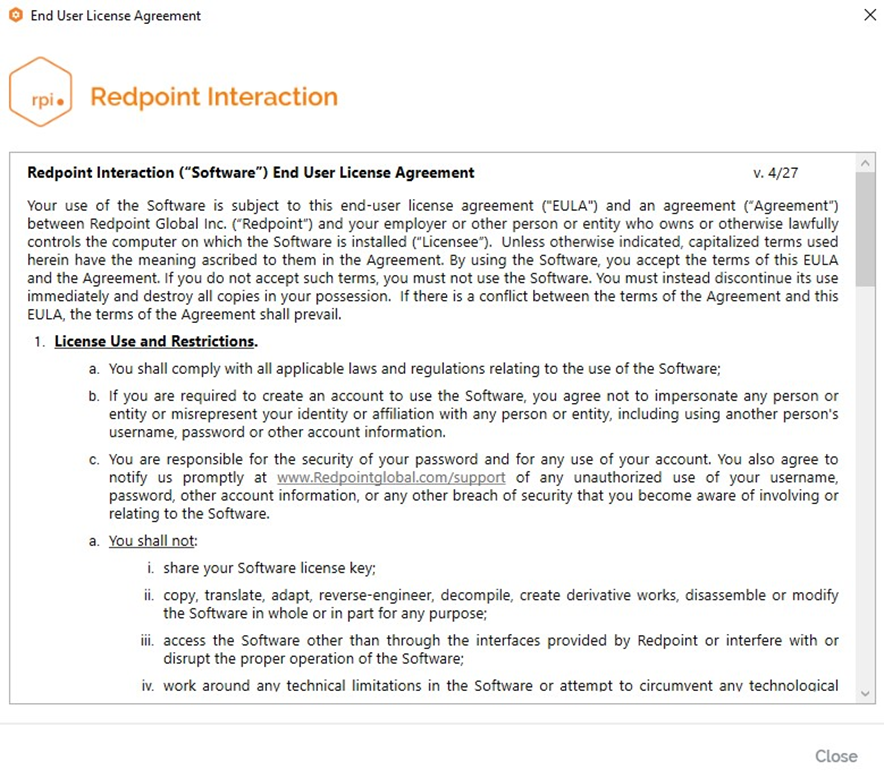
You can close the Window using the button at the bottom right.
Validation
If you have not correctly completed the mandatory fields within the Configure sub-interface, a validation errors indicator is displayed to the bottom right:
Clicking the indicator displays details of the errors in a dialog.
You cannot progress to the Pre-Install checklist so long as outstanding validation errors remain.
If the configuration is valid, an indicator advises accordingly:
You may now move to the next wizard step.
Navigation
You can move forwards through the Install Core wizard by clicking on the Next button at the bottom right. Doing so displays the Pre-Install Checklist sub-interface.
A message (‘You must accept the End User License Agreement before installing the core services’) if shown if you click Next without accepting the RPI EULA.