

Please follow these steps to set up RPI’s Data Intake functionality, which allows you to load files into your data warehouse using the Data Project Designer.
Before commencing setup of Data Intake, please ensure that the following pre-requisites are in place:
-
RPI is installed.
-
Redpoint Data Management v6 or later is installed.
Follow these steps to install Data Intake:
Data Intake Share Folder
-
Create a folder named DataIntake where files will be loaded and processed. ‘C:\Program Files\Redpoint Global\RPI\’ is a reasonable place to create this, but it may be created anywhere.
-
Create four sub-folders inside the newly created folder.
-
Processing
-
Archive
-
Upload
-
Reference
-
-
Open the DataIntake folder’s Properties dialog, and navigate to the Sharing tab. Ensure that the RPI Execution service user has read and write access to this folder and all of its sub-folders.
-
If the above folder and share do not reside on the same physical or virtual as the RPI server, update the following configuration values in RPI:
-
DataIntakeArchiveDirectory
-
DataIntakeLandingDirectory
-
DataIntakeProcessingDirectory
-
DataIntakeProcessingDirectoryDataManagement
-
Data Management Configuration
-
Macros
-
Connect to Redpoint DataManagement via your RedpointDM.exe client.
-
On the left side are the Palette and Repository tabs, select the Repository tab. Right click on repository and select load from archive.
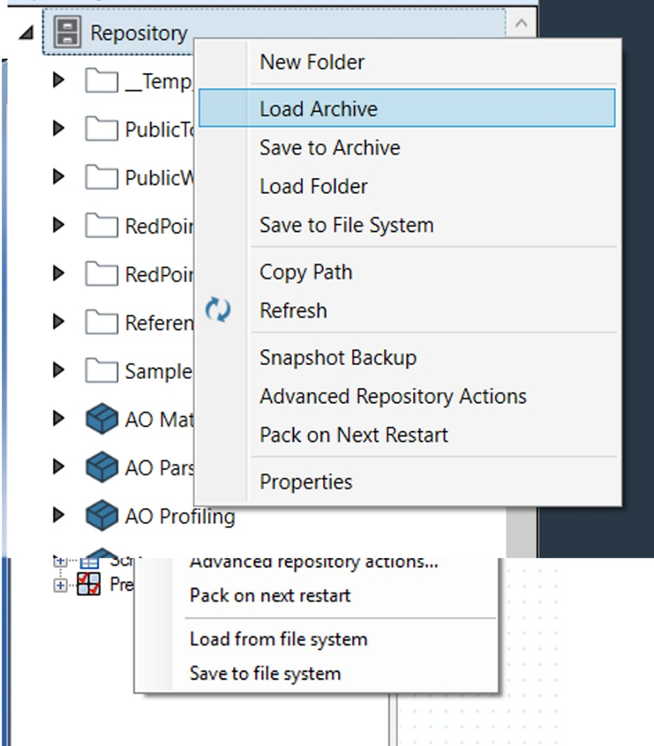
-
Import Redpoint_macros_object.dlb from the source folder (Example: C:\source\Resonance\Database Scripts\DataManagement Macros).
-
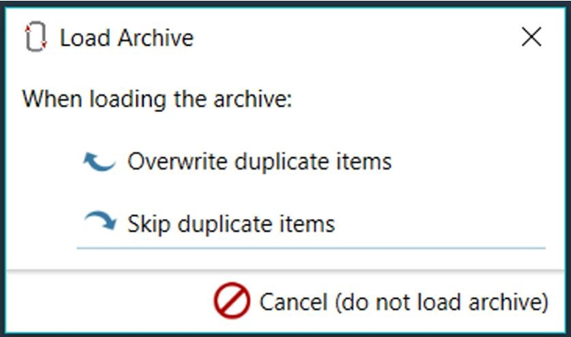
If the following dialog is displayed, please select Skip duplicate items.
-
Validate that a folder named “RedpointMacros” now exists in the repository.
-
-
Database Connections
-
Browse in the repository to data connections.
-
Right-click on data connections – select “New connection”.
-
Create 2 new data connections:
-
RPI_AuditDB – this connection will connect to the interaction audit database.
-
RPI_MainDB – this connection will connect to the main data warehouse.
Note that the data connections should be in sync with the respective connections in the Server Workbench Clients interface.
-
-
Configure the above data connections per the specifics of your environment, with users who have DB owner level permissions.
-
If you are configuring a multi-tenant environment on the same data management instance, an additional pair of connections will be required for each tenant. The names of the connections must start with “RPI_”. We recommend RPI_AuditDB_[Tenant Name] and RPI_MainDB_[Tenant Name]. In this case, the AuditDatabaseSourceName and MainDatabaseSourceName configuration values in RPI must also be configured.
-
-
Set the following system configuration settings:
-
AuditDatabaseSchema: the schema to use for the processing engine to write back logging information.
-
AuditDataSourceName: the connection string to use for the processing engine to write back logging information.
-
MainDatabaseSchema: the Data Intake data warehouse schema.
-
MainDatabaseSourceName: the Data Intake data warehouse connection string.
-
DataManagementCredentials: the credentials used to sign in to Data Management.
-
DataManagementExecutionServer: Optional setting to force RPI triggered data management jobs to run on a specific execution server.
-
DataManagementIntegrationType: the method to be used in communicating with Data Management. Set 0 to designate legacy method, set 1 to use the Operational API web service.
-
DataManagementOAPIWebServiceAddress: the configured URL to connect to the OAPI web service.
-
DataManagementServerName: the RPDM Site server hostname to be used.
-
DataManagementServerPort: the Port number used to connect in Data Management (normally 20400 for DM7, 20410 for DM8).
-