

Overview
In order for RPI Realtime decisions to be used, a caching mechanism must be made available, and configuration performed to ensure that the RPI Realtime application can make use of the same. The following caching technologies are supported:
-
Memcached
-
Amazon Elasticache
-
Redis
-
Windows Azure Redis Cache
-
SAP HANA
-
Couchbase
-
Cassandra
-
MongoDB
-
SQL Server
-
Database
-
Ncache
-
CosmosDB
-
MemoryDB Redis
The following sections describe how to configure RPI Realtime to use each of these. Note that setup of each cache technology is beyond the scope of this documentation.
Memcached Configuration
Support for this connector has been deprecated and will be removed in a future release. Refer to the Connector deprecation plan for details.
This section describes how to configure the RPI Realtime to utilize the Memcached caching mechanism.
-
At the RPI Realtime appsettings.json file, ensure that a Memcached entry is added to the CacheSettings section, as per the following example:
JSON{ "Name": "Memcached", "Assembly": "Redpoint.Resonance.Memcached", "Class": "Redpoint.Resonance.Memcached.MemcachedHandler", "Settings": [ { "Key": "SectionName", "Value": "memcached" } ] } -
In the web.config memcached element, configure the server addresses and ports.
-
If you wish to turn on Memcached logging, please uncomment the following (separate) sections in the same web.config file:
XML<!-- Turn on for memcache logging --> <!-- <sectionGroup name="http://enyim.com"> <section name="log" type="Enyim.Caching.Configuration.LoggerSection, Enyim.Caching" /> </sectionGroup> --> <!-- Turn on for memcache logging --> <!-- <appSettings> <add key="Enyim.Caching.Diagnostics.LogPath" value="C:\Redpoint\WebProcessing\Logs\MemcacheLog.txt" /> </appSettings> <http://enyim.com> <log factory="Enyim.Caching.DiagnosticsLogFactory, Enyim.Caching" /> </http://enyim.com> --> -
For further information on configuring Memcached, please see https://github.com/enyim/EnyimMemcached/wiki.
Amazon Elasticache Configuration
Configuration of Amazon Elasticache is carried out exactly as per Memcached configuration.
Redis Configuration
This section describes how to configure the RPI Realtime website to utilize the Redis caching mechanism.
-
In the RPI Realtime appsettings. json file’s CacheSettings section, add the following:
JSON{ "Name": "Redis", "Assembly": "Redpoint.Resonance.RedisCache", "Class": "Redpoint.Resonance.RedisCache.RedisCacheHandler", "Settings": [ { "Key": "IPAddress", "Value": "127.0.0.1" }, { "Key": "DisableMGET", "Value": true } ] }
Note the DisableMGET setting; this is used to toggle whether the cache provider will use multikey operations.
Windows Azure Redis Cache Configuration
This section describes how to configure the RPI Realtime Redis caching mechanism.
-
In the RPI Realtime appsettings. json file’s CacheSettings section, add the following:
JSON{ "Name": "AzureRedis", "Assembly": "Redpoint.Resonance.AzureRedisCache", "Class": "Redpoint.Resonance.AzureRedisCache.AzureRedisCacheHandler", "Settings": [ { "Key": "ConnectionString", "Value": "_azure connection string_" }, { "Key": "DisableMGET", "Value": true } ] }
Note the DisableMGET setting; this is used to toggle whether the cache provider will use multikey operations.
SAP HANA Cache Configuration
Support for this connector has been deprecated and will be removed in a future release. Refer to the Connector deprecation plan for details.
This section describes how to configure the Realtime Agent website to utilize the SAP HANA caching mechanism to support RPI Realtime decisions. Please follow the steps below.
-
Ensure the following assembly is present within the Realtime Agent bin directory: Redpoint.Resonance.SAPHANACache.dll
-
In the Realtime Agent’s web.config file, add the following entries:
XML<section name="sapHANACacheClient" type="Redpoint.Resonance.SAPHANACache.Configuration.SAPHANACacheClientSection, Redpoint.Resonance.SAPHANACache" />This entry must be added within the <configSections> section.
XML<setting name="WebCacheAssembly" serializeAs="String"> <value>Redpoint.Resonance.SAPHANACache</value> </setting> <setting name="WebCacheClass" serializeAs="String"> <value>Redpoint.Resonance.SAPHANACache.SAPHANACacheHandler</value> </setting>These entries must be added within the <Redpoint.Resonance.Web.Shared.Properties.Settings> section.
XML<sapHANACacheClient> <host server="[server]:[port]" schema="SYSTEM" username="SYSTEM" password="Redpoint2016" /> </sapHANACacheClient>This entry must be added within the <configuration> section.
Couchbase Cache Configuration
Support for this connector has been deprecated and will be removed in a future release. Refer to the Connector deprecation plan for details.
This section describes how to configure the RPI Realtime to utilize the Couchbase caching mechanism.
-
In the RPI Realtime appsettings. json file’s CacheSettings section, add the following:
JSON{ "Name": "Default", "Assembly": "Redpoint.Resonance.CouchbaseCache", "Class": "Redpoint.Resonance.CouchbaseCache.CouchbaseCacheHandler", "Settings": [ { "Key": "Server", "Value": "Server", "Values": null }, { "Key": "Username", "Value": "Username", "Values": null }, { "Key": "Password", "Value": "Password", "Values": null }, { "Key": "BucketName", "Value": "BucketName", "Values": null } ] }
Cassandra Cache Configuration
Support for this connector has been deprecated and will be removed in a future release. Refer to the Connector deprecation plan for details.
This section describes how to configure the RPI Realtime website to utilize the Cassandra caching mechanism.
-
In the RPI Realtime appsettings. json file’s CacheSettings section, add the following:
JSON{ "Name": "Default", "Assembly": "Redpoint.Resonance.CassandraCachehe", "Class": "Redpoint.CassandraCache.CassandraCacheHandler", "Settings": [ { "Key": "Keyspace", "Value": "rpi", "Values": null }, { "Key": "ContactPoints", "Value": "server1,server2", "Values": null }, { "Key": "Username", "Value": "CassandraUser", "Values": null }, { "Key": "Password", "Value": "Password", "Values": null } ] }
MongoDB Cache Configuration
This section describes how to configure the RPI Realtime website to utilize the MongoDB caching mechanism.
-
In the RPI Realtime appsettings. json file’s CacheSettings section, add the following:
JSON{ "Name": "Default", "Assembly": "Redpoint.Resonance.MongoDBCache", "Class": "Redpoint.Resonance.MongoDBCache.MongoDBCacheHandler", "Settings": [ { "Key": "Server", "Value": "Server" }, { "Key": "Port", "Value": "Port" }, { "Key": "Database", "Value": "Database" }, { "Key": "CollectionName", "Value": "CollectionName" }, { "Key": "IDasKeyEnabled", "Value": true } ] }Note the IDasKeyEnabled parameter, which, when enabled (the recommended setting), ensures records are written and retrieved from MongoDB using the native Mongo _id field instead of "Key" field.
-
The following Settings can be used to configure Partition Key functionality:
-
PartitionKeyEnabled (default value = false)
-
PartitionKeys (default values 'FieldName1' and 'FieldName2')
-
-
The following additional parameters are also supported at MongoDB cache:
-
Ssl
-
ReplicaSet
-
ConnectionString: e.g.:
JSON{ "Key": "ConnectionString", "Value": "mongodb://localhost:27017" }If a ConnectionString is provided, the Server, Port, Username, Password, ssl, and ReplicaSet parameters are ignored. Provision of the Database parameter is mandatory, CollectionName and MessageHistoryCollectionName optional.
-
SQL Server Cache Configuration
When using the RPI SQL Server native cache provider, scripts to set up SQL Server in-memory cache tables are available in the following deployment files folder:
\DeploymentFiles\SQL Server\Useful Scripts\Realtime In Memory Cache Setup.sql
Notes are provided therein, which should be read before executing the scripts.
An example SQL Server cache configuration section from appsettings.json is provided below:
{
  "Name": "InMemorySQL",
  "Assembly": "RedPoint.Resonance.Web.Shared",
  "Class": "RedPoint.Resonance.Web.Shared.Cache.SQLServerCache",
  "Settings": [
    {
      "Key": "ConnectionString",
      "Value": "Data Source=localhost;Initial Catalog=AdventureWorksDW;Integrated Security=True"
    }
  ]
}
NCache Cache Configuration
An example NCache cache configuration section from appsettings.json is provided below:
{
  "Name": "NCache",
  "Assembly": "RedPoint.Resonance.NCache",
  "Class": "RedPoint.Resonance.NCache.NCacheHandler",
  "Settings": [
    {
      "Key": "CacheID",
      "Value": "<cache-name>"
    },
    {
      "Key": "ServerList",
      "Value": "<server1-ip>,<server2-ip>,..."
    }
  ]
}
CosmosDB Cache Configuration
Support for this connector has been deprecated and will be removed in a future release. Refer to the Connector deprecation plan for details.
An example CosmosDB cache configuration section from appsettings.json is provided below:
{
  "Name": "AzureCosmosDB",
  "Assembly": "RedPoint.Resonance.DocumentDBCache",
  "Class": "RedPoint.Resonance.DocumentDBCache.DocumentDBCacheHandler",
  "Settings": [
    {
      "Key": "DatabaseId",
      "Value": "<DATABASE ID HERE>"
    },
    {
      "Key": "ConnectionString",
      "Value": "<CONNECTIONSTRING HERE>"
    },
    {
      "Key": "ContainerName",
      "Value": "<NAME>"
    }
  ]
}
The ContainerName setting will be used as the table name to be created in CosmosDB. Its ‘id’ column will be used as the PartitionKey (indicated by a prefix '/' in the Azure portal).
MemoryDB Redis Cache Configuration
Support for this connector has been deprecated and will be removed in a future release. Refer to the Connector deprecation plan for details.
An example MemoryDB Redis cache configuration section from appsettings.json is provided below:
{
  "Name": "MemoryDB",
  "Assembly": "RedPoint.Resonance.MemoryDBRedisCache",
  "Class": "RedPoint.Resonance.MemoryDBRedisCache.MemoryDBRedisCacheHandler",
  "Settings": [
    {
      "Key": "Host",
      "Value": ""
    },
    {
      "Key": "Port",
      "Value": ""
    },
    {
      "Key": "ssl",
      "Value": ""
    },
    {
      "Key": "UserName",
      "Value": ""
    },
    {
      "Key": "Password",
      "Value": ""
    }
  ]
}
Using a Database as the Cache
Rather than using an in-memory caching technology, you can also use a database to serve as the RPI Realtime cache. An obvious advantage of this approach is the inherent resilience provided by a database technology; a disadvantage is that performance will likely be compromised when compared to an in-memory cache. When data resiliency is not an absolute requirement, an in-memory cache is the recommended option.
To use a database as a cache, it must be defined in RPI’s appSettings.json configuration file. The following snippet defines two database caches – ‘DataWarehouse’ and ‘Cassandra’:
{
  "Caches": [
    {
      "Name": "DataWarehouse",
      "Assembly": "Redpoint.Resonance.Web.Shared",
      "Class": "Redpoint.Resonance.Web.Shared.Cache.DatabaseCache",
      "Settings": [
        {
          "Key": "ClientID",
          "Value": "D2A8B022-E87E-45E4-B9CD-3FC5809FD9C8"
        }
      ]
    },
    {
      "Name": "Cassandra",
      "Assembly": "Redpoint.Resonance.Web.Shared",
      "Class": "Redpoint.Resonance.Web.Shared.Cache.DatabaseCache",
      "Settings": [
        {
          "Key": "ClientID",
          "Value": "D2A8B022-E87E-45E4-B9CD-3FC5809FD9C8"
        },
        {
          "Key": "DatabaseID",
          "Value": "45E3C456-B8D4-4EA0-9496-BD24AA4FD842"
        }
      ]
    }
  ]
}
The database caches thus configured can subsequently be leveraged at the same file’s DataMaps section:
{
  "DataMaps": [
    {
      "Type": "Visitor Profile",
      "Cache": "Cassandra",
      "DaysToPersist": 28,
      "CompressData": "True"
    },
    {
      "Type": "Visitor History",
      "Cache": "Cassandra",
      "DaysToPersist": 28,
      "CompressData": "True"
    },
    {
      "Type": "Non Visitor Data",
      "Cache": "DataWarehouse",
      "DaysToPersist": 365,
      "CompressData": "True"
    },
    {
      "Type": "Product Recommendations",
      "Cache": "DataWarehouse",
      "DaysToPersist": 365,
      "CompressData": "True"
    }
  ]
}
In this example, the Cassandra cache is being used to persist visitor profile and history data; the Data Warehouse cache holds non-visitor data (such as published realtime decisions) and product recommendation data.
The following tables are required at a database that is intended to be used as a cache:
-
rpi_cacheobjects: this table stores details of all non-visitor data (e.g. landing pages, realtime decisions). It contains the following columns: o cachekey o cachevalue o expirydate
-
rpi_cachevisitors: this table stores details of realtime visitors. It contains the following columns: o cachekey: key column o profile o parametervalues o databasevalues o history o expirydate
-
rpi_cacheincrements: stores counters; used at content display ramp-up, inbound message lists (capping the maximum number of messages served). Note that, when using database providers there is a risk of contention when using the database to manage cache increments. It is therefore not recommended to use database providers for non-visitor data.
Table creation scripts are available at the following URL:
[RPI Realtime website]/status/{CacheName}
where {CacheName} corresponds to the Name property for the relevant entry defined in the “CacheSettings” section of the appsettings.json.config file.
Note that scripts vary by database provider.
Realtime Helper Utility
The following command line application is provided in the RPI deployment files:
DeploymentFiles\Utilities\RedpointRealtime\Redpoint.RealtimeHelper.exe
It can be used to perform a number of useful tasks to assist in the ongoing management of an RPI Realtime installation:
-
Decompress a visitor profile:
redpoint.realtimehelper profile <profile to decompress>
redpoint.realtimehelper profile -db <e.g. mongodb,cosmosdb> <profile to decompress>
-
Encrypt an appsettings password setting:
redpoint.realtimehelper appsetting <setting to hash>
-
Encrypt a visitor ID:
redpoint.realtimehelper visitorid encrypt <visitor id to encrypt> -
Decrypt a visitor ID:
redpoint.realtimehelper visitorid decrypt <visitor id to encrypt>
Realtime Decisions Setup
RPI’s Realtime decisions allow you vary web page content in real time, in accordance with, e.g.:
-
Site visitor characteristics such as region or browser type.
-
A visitor’s prior receipt of an RPI outbound offer.
-
An identified visitor’s cached attribute values, as sourced from the RPI data warehouse.
Realtime decisions utilize a (typically in-memory) Realtime cache (supported caching technologies are Memcached, Redis, Windows Azure Redis Cache, SAP HANA, Amazon Elasticache, Database, Cassandra, Couchbase, MongoDB, Ncache, CosmosDB and MemoryDB Redis).
The following setup steps need to be undertaken to configure an RPI server to use Realtime decisions:
-
Ensure that the caching service is running. Please refer to the appropriate section below.
-
Set Boolean client system configuration setting EnableRPIRealtimeServices to True.
Note that it is strongly recommended that a failover mechanism be implemented to support the Realtime cache. In its absence, should the caching service stop, all cached visitor profile data will be lost. On the service’s restart, any cached decision logic will be reloaded automatically, but any profile data will need to be built up again. Setup of a failover mechanism is beyond the scope of this documentation.
Realtime Agent Setup
The RPI Realtime Agent service allows RPI Realtime to communicate with the Data Warehouse and Operational databases.
Please follow these steps to set up the Realtime Agent.
-
Copy the InteractionRealtimeAgent folder, which can be found in the RPI DeploymentFiles folder.
-
Paste it into the RPI web application folder (typically C:\inetpub\wwwrpi).
-
Launch Internet Information Services (IIS).
-
In IIS, select the RPIWebSite website, and Add Application.
-
Configure the properties as follows:
-
Alias: InteractionRealtimeAgent
-
Application pool: RPIAppPool
-
Select the Physical path of the newly-pasted folder
-
-
Having configured the application’s properties, browse to the newly-added application’s Realtime Agent service, and ensure that a page describing the service is shown.
-
Copy the service’s URL to the clipboard.
-
Open web.config at the RPI Realtime website.
-
Locate the RealtimeAgentAddress setting and set its value to the URL copied previously.
-
Save the web.config changes.
-
Open web.config for the InteractionRealtimeAgent folder.
-
Ensure that the following database connection strings are configured correctly:
XML<connectionStrings> <add name="OperationalDatabase" connectionString="Server=localhost;Database=Pulse;Integrated Security=true" providerName="Microsoft.Data.SqlClient" /> <add name="LoggingDatabase" connectionString="Data Source=localhost;Initial Catalog=Pulse_Logging;Integrated Security=True" providerName="Microsoft.Data.SqlClient" /> </connectionStrings>If you wish to take advantage of .NET’s automatic connection retries feature, refer to the following article: https://msdn.microsoft.com/enus/library/system.data.sqlclient.sqlconnectionstringbuilder.connectretrycount(v=vs.11 0).aspx
-
Save the web.config changes.
The Realtime Agent will now be ready for use.
The Realtime Agent can be used in-process. To configure it for use in this way, follow these steps:
-
Set the RealtimeAgentInProcessEnabled setting in appsettings.json to True.
-
Copy the Realtime Agent deployment files' bin folder into the RPI Realtime bin folder.
-
Set the following RPI Realtime web.config setting as follows:
<probing privatePath="bin\[RT Agent bin folder name]" /> -
Add the following connection strings to the existing RPI Realtime web config <connectionStrings> node:
XML<add name="OperationalDatabase" connectionString="Server=localhost;Database=Pulse;Integrated Security=true" providerName="Microsoft.Data.SqlClient" /> <add name="LoggingDatabase" connectionString="Data Source=localhost;Initial Catalog=Pulse_Logging;Integrated Security=True" providerName="Microsoft.Data.SqlClient" />Note that Realtime Agent web.config settings are also available in the RPI Realtime web.config file under RedPoint.Interaction.RealtimeAgent.Properties.Settings.
Geolocation Setup
Three Geolocation providers are supported by RPI:
-
Bing
-
Azure
-
Google Maps Services
To use Geolocation functionality in RPI Realtime decisions with Bing or Azure, you will need a Map API key. This will need to be obtained from the respective provider, and will need to be referenced at the RPI Realtime appsettings file’s MapAPIKey setting.
In addition, the Geolocation plugins section in the AppSettings file will need to reference the provider of choice, as per this example:
{
  "GeolocationSettings": {
    "Provider": "Google Maps",
    "APIKey": "<API KEY>",
    "PluginAssembly": "RedPoint.Resonance.RealtimePlugins",
    "PluginType": "RedPoint.Resonance.RealtimePlugins.GoogleMapsPlugin.GoogleMapsPlugin",
    "WeatherUnits": null,
    "CoordsCacheTimespanMinutes": 1,
    "PluginSettings": []
  }
}
Load Web Cache Data Task Setup
The Load web cache system task (disabled by default) is responsible for loading cached visitor data into a series of dedicated data warehouse tables, and/or to a log file. To set the task up, please follow these steps:
-
Create a new ‘RPIWebCacheData’ queue, using your queue provider of choice.
-
Ensure that the RPI Windows services user and web events website’s application pool’s identity are configured to have read/write access to the queue.
-
At the RPI Realtime appsettings.json file, ensure the CacheOutputQueuePath setting references the aforementioned queue.
-
Ensure that at least one of the following system configuration settings is set to True:
-
WebCacheOutputToDatabase
-
WebCacheOutputToFile
-
-
In the RPI System Configuration configuration interface, ensure RPIWebCacheData is set to the path of the queue.
-
Ensure that appsettings.json setting CacheOutputQueueEnabled is set to True.
Web Publish Sites in a Load Balanced Environment
When publishing landing pages to IIS in a load balanced environment, it is recommended that Centralized Web Farm Management is used. This allows content that is published to a given share to be mirrored across a number of web servers. For more information, please see http://www.iis.net/overview/control/centralizedwebfarmmanagement .
It is recommended that the share used in this context not be hosted at one of the public-facing web servers.
Security Concerns Using Sequential Keys
If the Interaction Realtime API is publicly accessible and landing pages or dynamic content make use of personalization based on attributes, care should be taken when choosing a Master Key or alternative key that is sequential or easy to guess. In this case, it would be possible for an attacker to pull the same attribute value data value back for other visitors whose profile data is stored in the cache by iterating through possible keys.
Deploying the RPI Realtime API to Azure App Service
This section details a recommended approach to deploying the Redpoint Realtime API to Azure App Service.
The procedure assumes that the App Service base resources have already been provisioned and that networking requirements for Realtime running on App Service to access the Realtime message bus, Realtime cache, and Realtime Agent are in place. As of the current Release of RPI at the time of writing this article the App Service resource must be the Windows Server option targeted to .NET Framework.
Please follow the steps below to deploy the RPI Realtime API to Azure App Service.
-
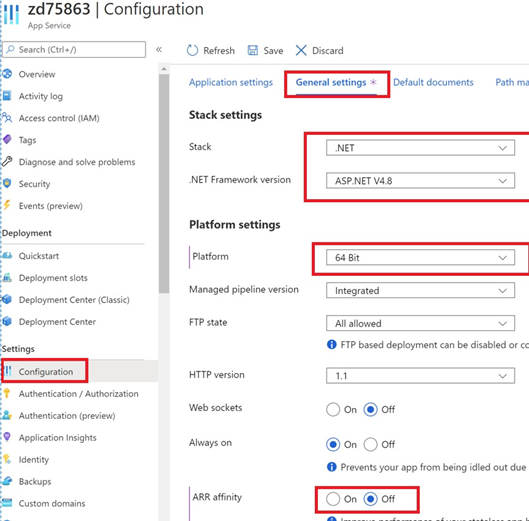
Validate stack and settings. At Configuration > General settings, ensure the App Service instance:
-
Is targeted to .NET Framework v4.8
-
Is set to 64bit
-
Has AAR affinity turned on
-
-
Set up virtual directory. If the Realtime service is to be deployed in a virtual directory, then from Configuration > Path mappings, create a virtual to physical path mapping and make sure it is an application (i.e. the Directory option should be un-checked). It’s strongly recommended to use interactionRealtimeAPI as the virtual directory name to match the folder in Deployment Files.
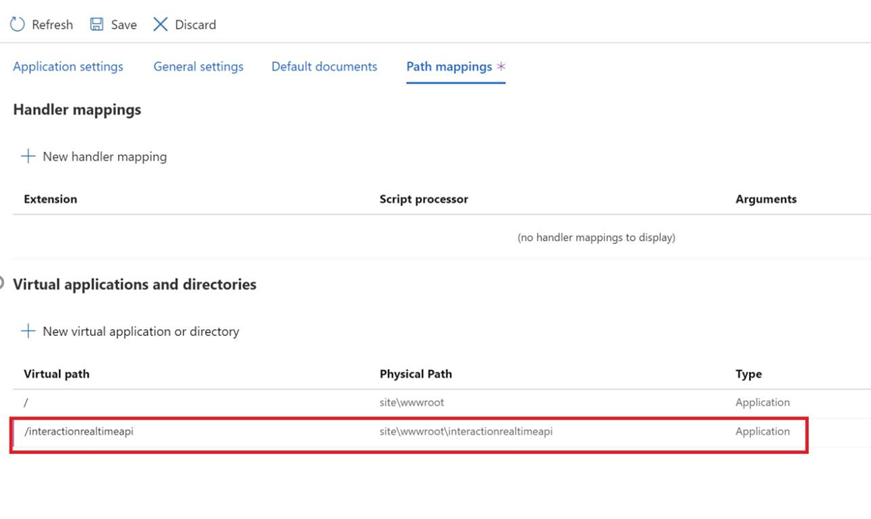
-
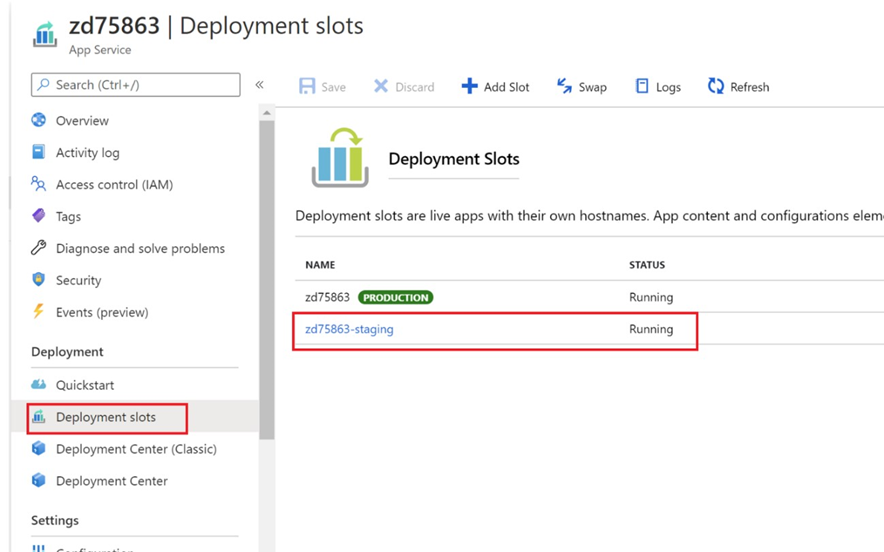
Create a staging deployment slot. It is recommended to create a staging deployment slot where changes can be applied and tested prior to production deployment. This can be added from Deployment > Deployment Slots.
-
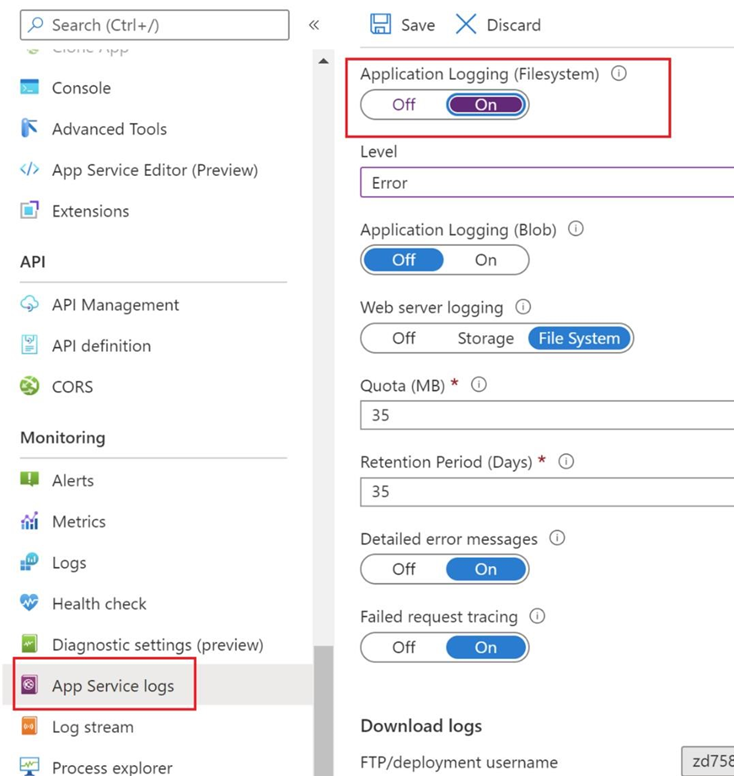
Turn on application logging. At Monitoring > App Service Logs set Application Logging (Filesystem) on and the level to Error.
-
Set deployment source. At Deployment Center > Settings, set the source of your staging deployment slot to Local Git or Azure Repo:

-
Clone the repository, copy in Realtime API files, set logging directory. Using the Git client of your choice, clone the repository you just created to a local repository and copy in the Realtime API deployment files. Assuming the virtual directory created above was named InteractionRealtimeAPI, simply copy in the InteractionRealtimeAPI folder from deployment. If you named the virtual directory and path mapping differently, then rename the folder accordingly. Make any necessary configurations in appsettings.json.config. Configuration settings of queue providers, Realtime caches and the Realtime agent within the appsettings.json.config file is out of scope of this document. Please refer to the RPI System Administration Guide for instructions on how to update this file. The one setting that we’ll cover here specific to App Service is the logging directory. This should be modified and set to path “D:\\Home\\LogFiles\\Application”. As of RPI v6.2, you can specify a [MachineName] variable in the file name to capture the hostname of the machine RPI is running on.

Links to Git Resources:
Git for windows: https://git-scm.com/download/winSource tree - git UI for Win & Mac: https://www.sourcetreeapp.com/
-
Perform initial commit and validate app loads. Ensure your Git client is not set to ignore DLLs and then make the initial commit. Once the commit is complete, you can confirm the operation from Azure portal Deployment Center logs:
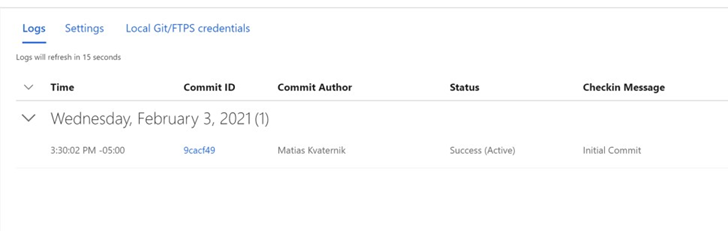
-
Validate staging deployment. Load the staging URL into your browser and confirm the RPI Realtime splash page loads as expected and perform any additional validation as needed.
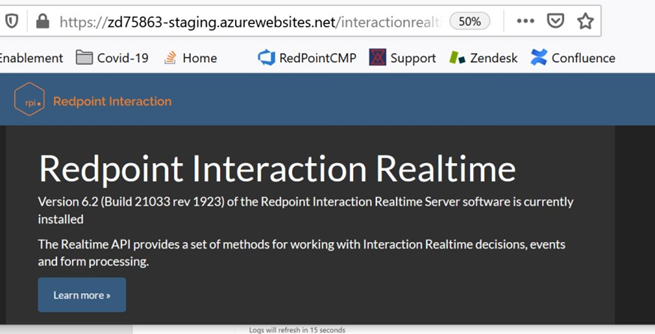
-
Swap staging into production. Once validations are complete, initiate a swap from the staging to the production slot.
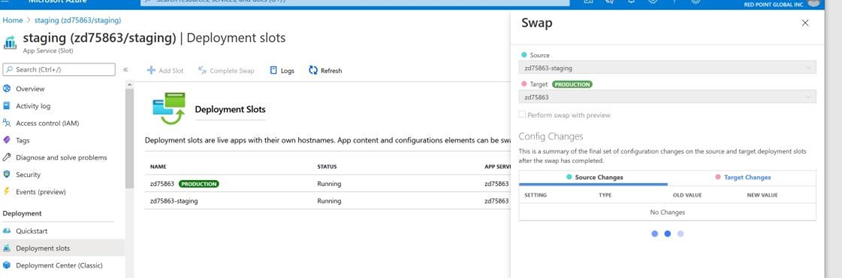
-
Validate new production deployment. Load the production URL into a browser and confirm the RPI Realtime splash page loads as expected and perform any additional validation as needed.