

Overview
This topic outlines a campaign prioritization strategy. You can put the overall strategy into action or can use various pieces of the strategy individually to enable various levels of engagement prioritization.
Prioritization strategy: life cycle
The life cycle strategy for prioritization uses a predefined set of segments related to a customer's life cycle stage (e.g., prospect, active, lapsing, etc.) along with channel, content, and frequency requirements to configure the overall strategy.
Strategy prerequisites
Before you get started, make sure you have an understanding of how to use Redpoint Interaction (RPI). This approach uses a variety of RPI features, including: selection rules, audiences, audience snapshots, metadata, interactions, and placeholders. Refer to the RPI Reference Guide for detailed information about these features.
Strategy requirements
This strategy requires that you have a desire to communicate to various customer life cycle segments. Each of the life cycle segments will have an associated journey and multiple touch points within that journey. There is a notion of an active customer segment, and that may have a different communication strategy than the other life cycle segments, given they are active.
Diagram of approach
Below is a diagram related to the overall campaign strategy. This is an example use case.

Define life cycle segments
First, start off with the target universe; in this example, this is the set of Golden Records.
Second, take the target universe and define a set of primary segments associated with the customer life cycle. You can add and remove segments and define them as the business sees fit, but in this example there is a set of six life cycle segments defined in total, and four of the six are specific to outbound communications. For example:
-
Prospect
-
Active customer
-
Lapsing
-
Win-back
Because these segments will be reused in the various life cycle journeys, we recommend that you create an audience snapshot for this step to reduce the amount of times the same queries are run against the database. An Audience Snapshot allows you to run an audience at a defined cadence, and the results of the segmentation will be stored in a table for other audiences to reference. We will show the configuration of the audience and audience snapshot next.
Below is an example of creating an audience for life cycle segments and creating an audience snapshot to support refreshing the segmentation on a regularly scheduled cadence.
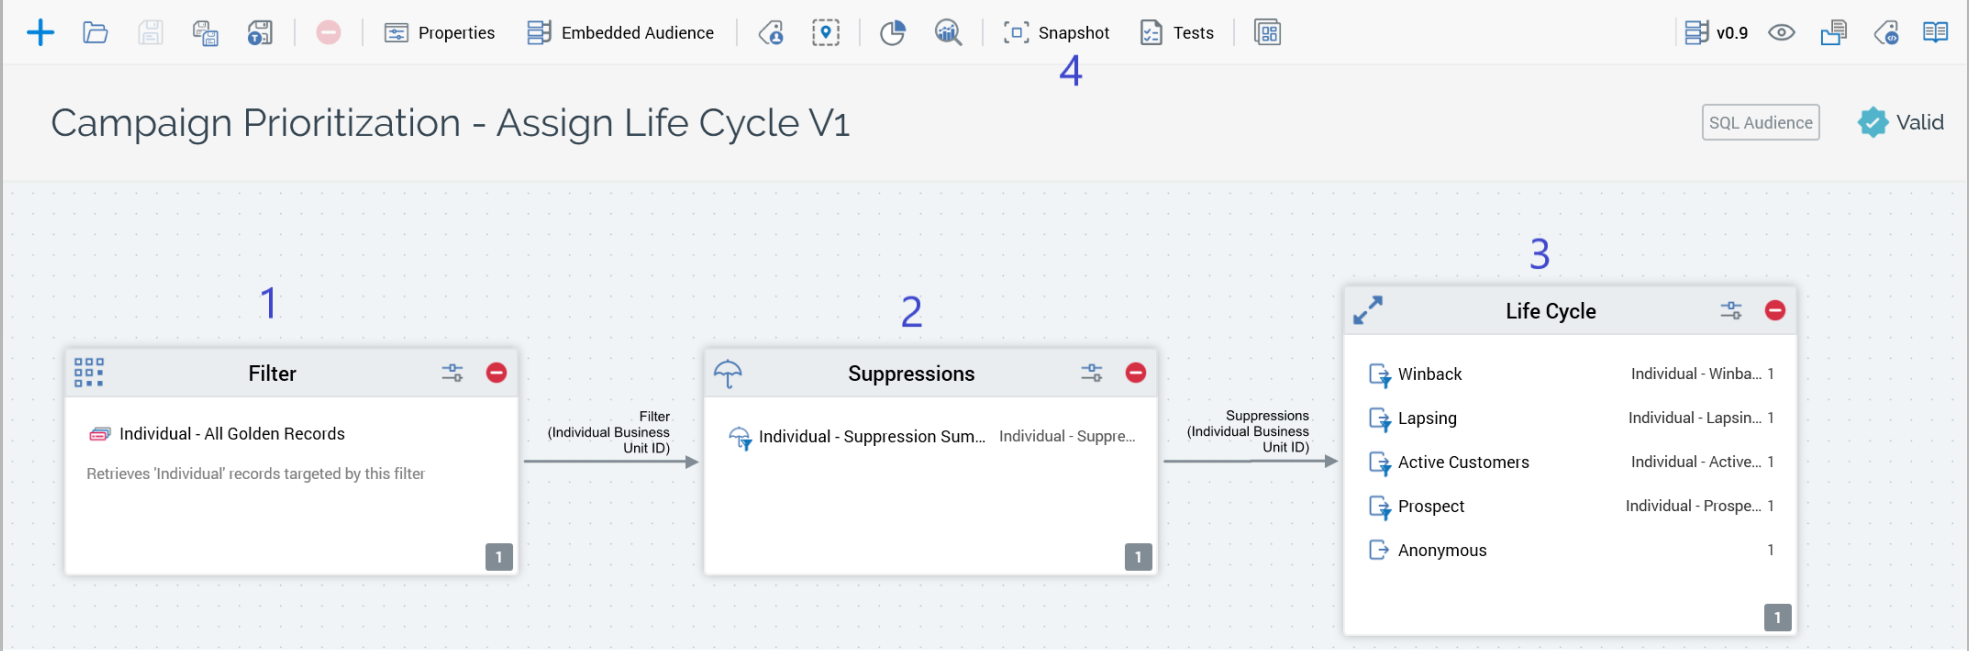
Campaign Prioritization - Assign Life Cycle
The following steps, which correlate to the screenshot above, outline the basic approach to the supporting segmentation for life cycle assignment and initiating a snapshot.
-
Start with a filter that selects all records in the universe. In this example, All Golden Records.
-
Apply any suppressions. In this example, there are global suppressions being applied. An example is golden records that are marked as deceased or associated with fraud.
-
Define a split to identify each of the life cycle segments. In this example, the different customer life cycles are defined by whether a purchase was made, and when; if no purchase has been made, then it is considered a prospect. For the customer segments of Active Customer, Lapsing Customer, and Win-back, they are each defined based on their last purchase date.
-
Next, click the Snapshot button in the audience (number 4 in the screenshot above) to create an audience snapshot based on the audience. The Create New Audience Snapshot dialog opens.
Create a new audience snapshot
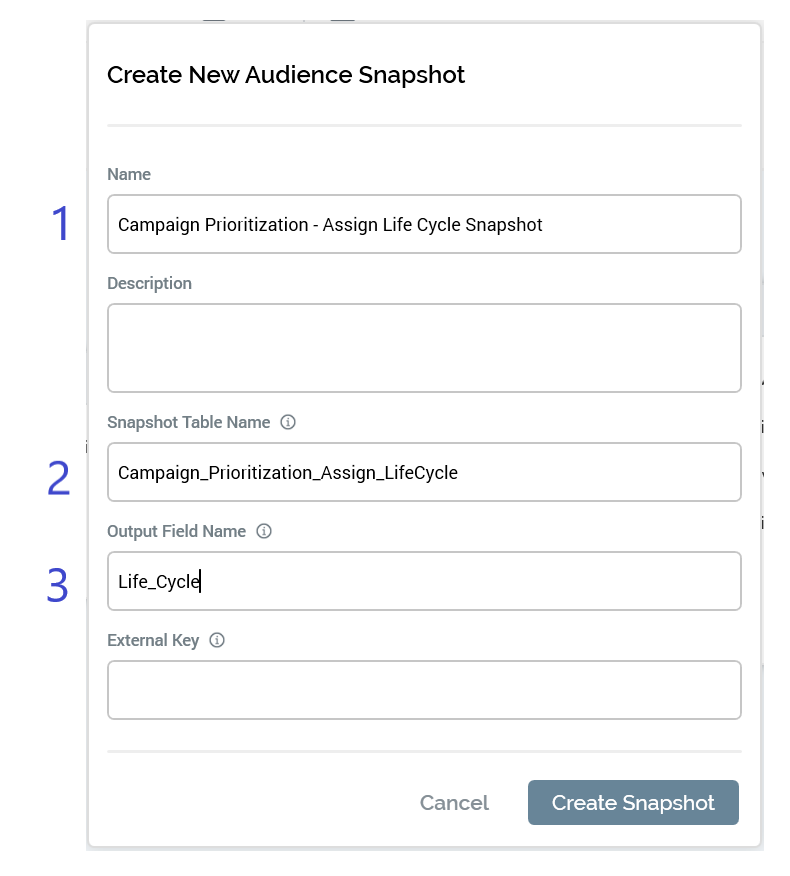
-
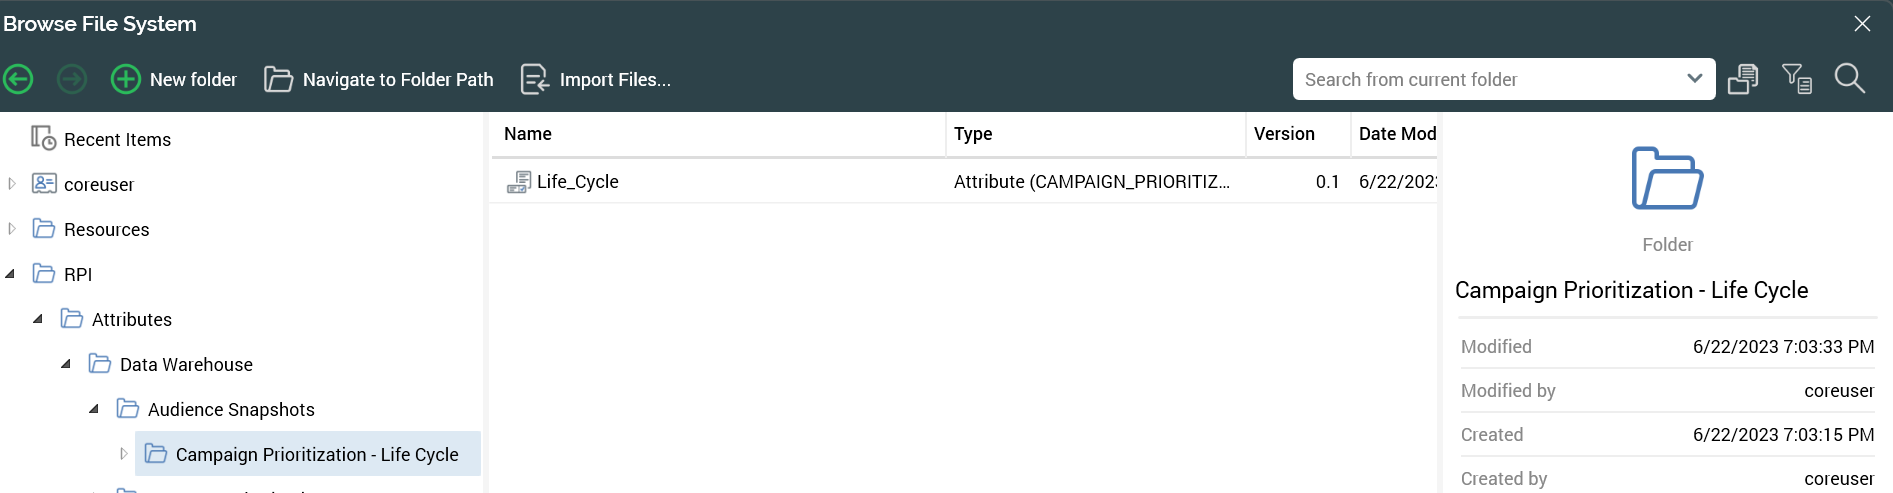
Choose a Name to identify the snapshot, which will be found in the configuration and the operations screens. We will show examples of these screens later in this section.
-
The Snapshot Table Name is the name of the table that will get created in the database, which will contain two fields. The first is the resolution key, which is defined in the audience definition; the second is the output field name that will store the value of the output name (segment name) generated by the audience for each resolution key.
-
The Output Field Name is the name of the field that the output name will get stored in. It is recommended that you name it something that is relevant to the value that will be stored in it. In this case, it is named
Life_Cycle. -
Select the Create Snapshot button to create the snapshot. At that point there will be an entry created in the Configuration and Operations panels in the section Audience Snapshots, described next.
-
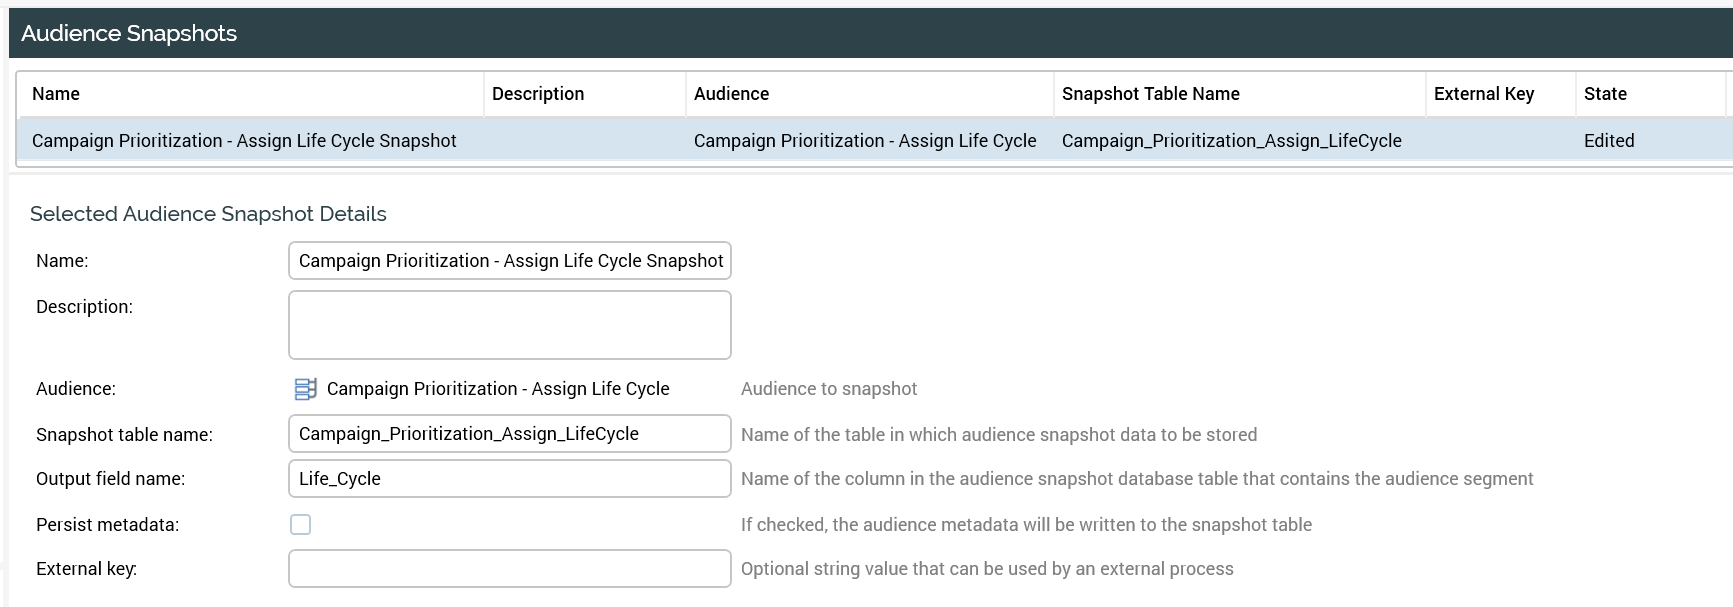
In Configuration > Audience Snapshots, you will see each of the Audience Snapshots that are created. You will see similar settings to when the snapshot was created in the Audience itself. You can make adjustments to the configuration of the snapshot within this section.
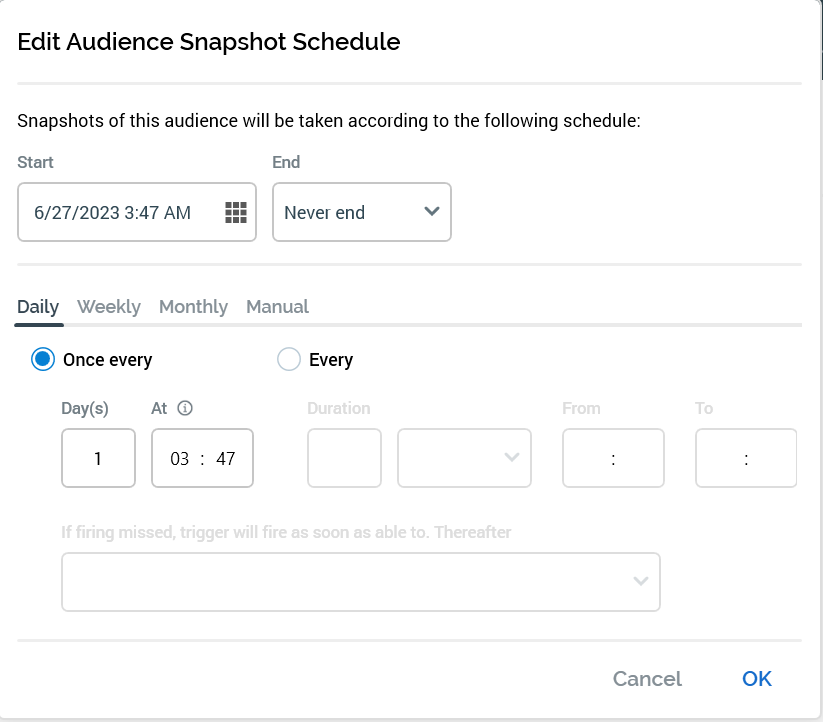
Configure when to run audience snapshots
Within Operations > Audience Snapshots, schedule when to run your snapshot:
-
On Demand: you need to manually kick it off each time you want to refresh it.
-
Recurring: schedule when and how often to refresh the snapshot. The Edit Audience Snapshot Schedule allows you to configure this recurrence.
Click On Demand/Recurring to toggle between the two modes.


Create attributes and joins for the audience snapshot
After creating the audience snapshot and running it manually or on a recurring basis, you can create the attributes and joins related to the table so that it can be used in later steps for additional selection and segmentation.
-
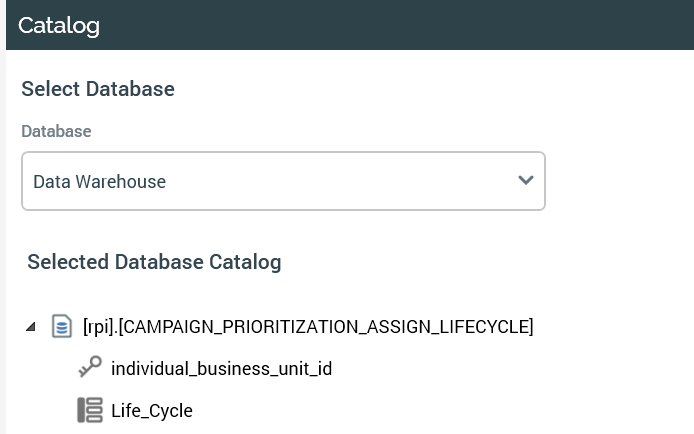
Synchronize the catalog so that the new snapshot table will be available in the catalog, which then allows you to create attributes and joins with it. The audience snapshot table should be unique on the resolution key, so it should be set as the primary key.
-
Select the snapshot table and create the attributes from the table. The only attribute that needs to be created is the one that was defined as the Output Field Name when you created the snapshot. In this example, it is
Life_Cycle.
-
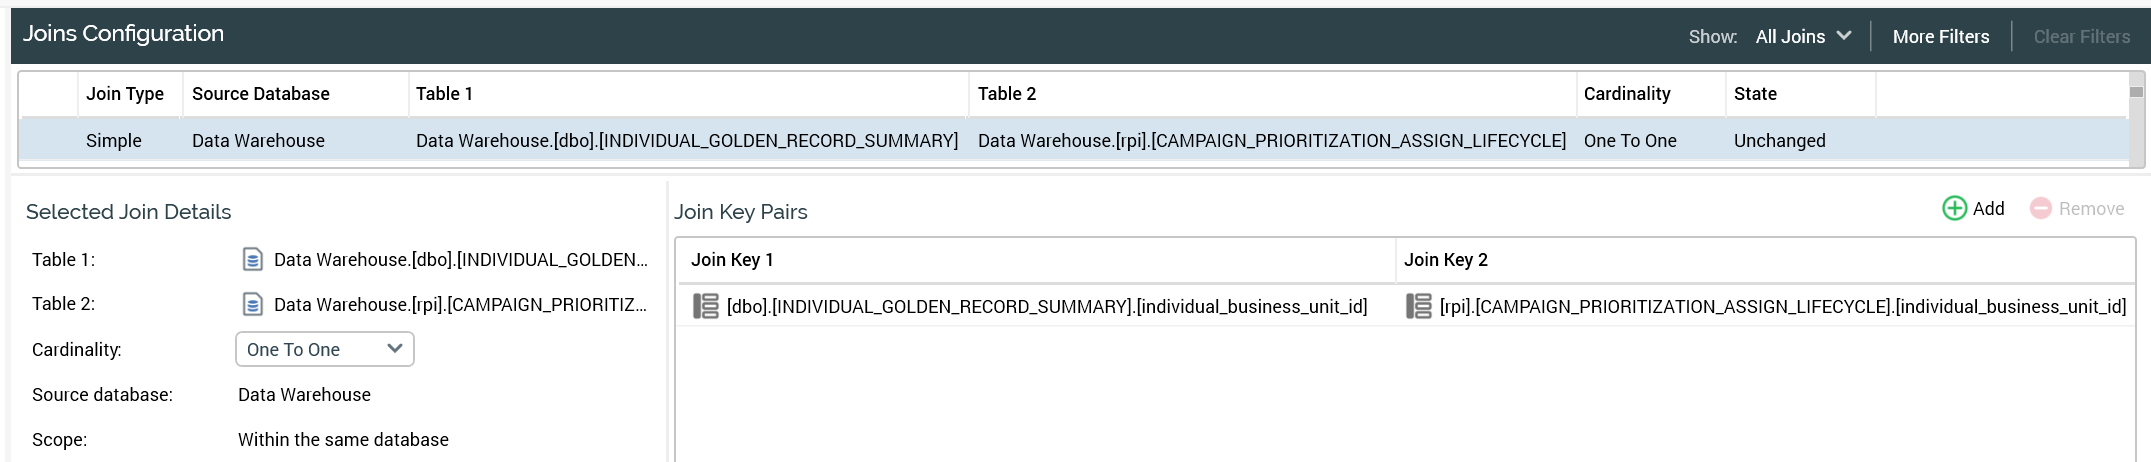
After the audience snapshot table is created, you can create the join from the resolution table of the audience definition from which the snapshot was created. In this example, the resolution table is
INDIVIDUAL_GOLDEN_RECORD_SUMMARYto the audience snapshot tableCampaign_Prioritization_Assign_LifeCycle. Given that the tables are both unique onindividual_business_unit_id, the Cardinality should be set to One To One.
Create a journey for each life cycle segment
Now that you have defined a set of life cycle segments, the next step is to define a journey, or communication strategy, for each of the segments representing the stages of a customer's life cycle.
The idea of a journey is to define a communication strategy that includes multiple touch points over a period of time. The goal is either to keep a customer within a life cycle segment (for example, maintain an active customer) or to move a customer from one life cycle segment into a different segment (for example, move a lapsing customer into the active customer segment).
The following example uses the lapsing customer segment to demonstrate what a customer journey could look like for a life cycle.
Example life cycle journey: lapsing customer
Now that you created the life cycle audience snapshot in the previous step, you can continue to build off of that.
-
One approach is to use the audience snapshot directly to select each of the life cycle segments independently for each of the associated journeys.
-
Another approach, which we will use in this example, is to create and use a cell list to standardize that portion of the segmentation as well. A cell list defines a series of cells and is used to configure a cell list block in an audience.
From there, we’ll illustrate an example of a life cycle segment journey, showing a few different touch points to demonstrate the possibilities. Generally speaking, the number of touch points will be up to the business, but the expectation is that at least one or more touch points will be a part of the journey.
Create a cell list
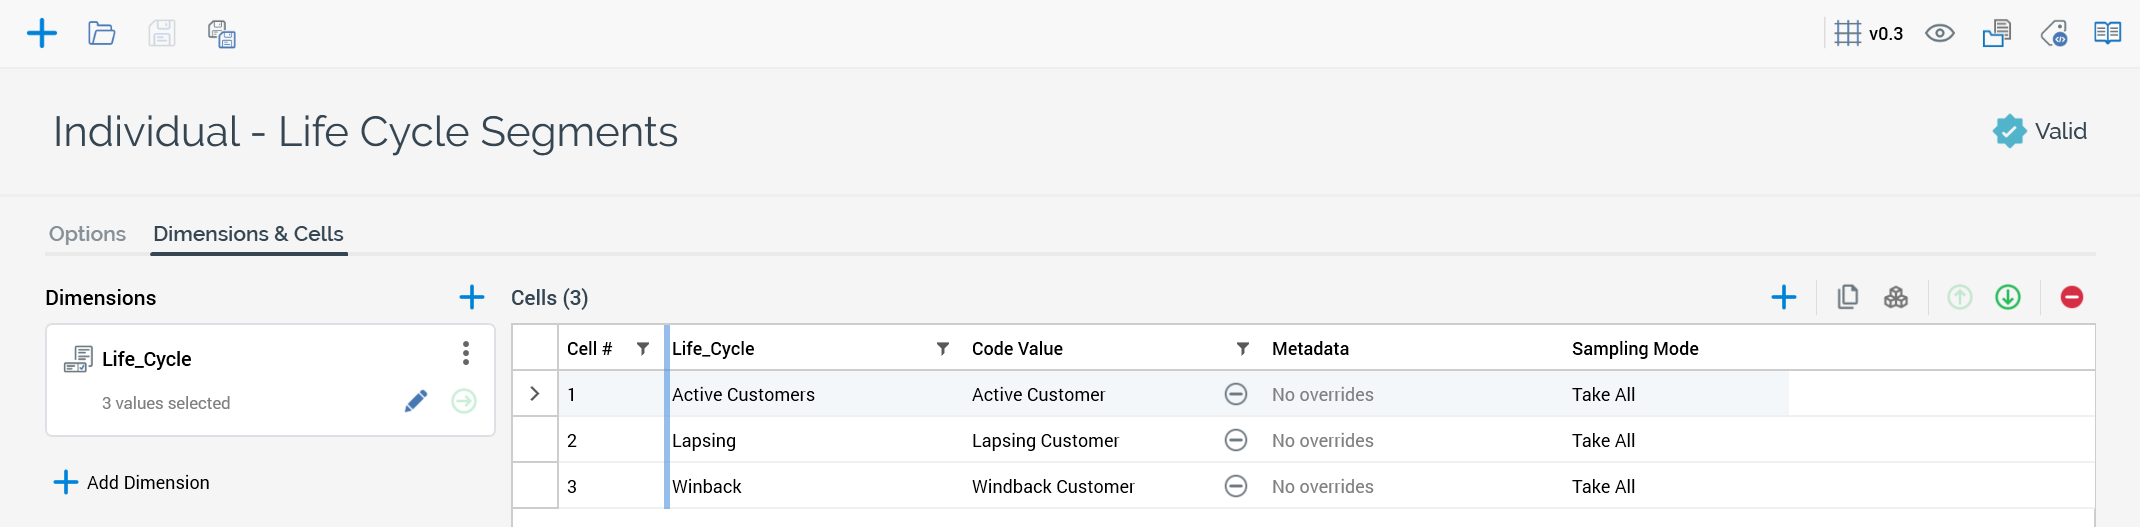
Creating a cell list provides a consistent starting point for each of the life cycle journeys. In addition, it allows for simple creation of control groups, if desired. To start, the cell list will just contain the primary life cycle segments and can be expanded upon from there. Below are screenshots of the primary configuration of the cell lists as well as the Dimensions & Cells tab.
Primary configuration of cell list
-
Add the attribute
Life_Cyclefrom the audience snapshot table as a Dimension to the cell list. -
Select all of the values that are populated in the table. In this example, there are only three of the four outbound segments that are represented in the audience snapshot and in the cell.
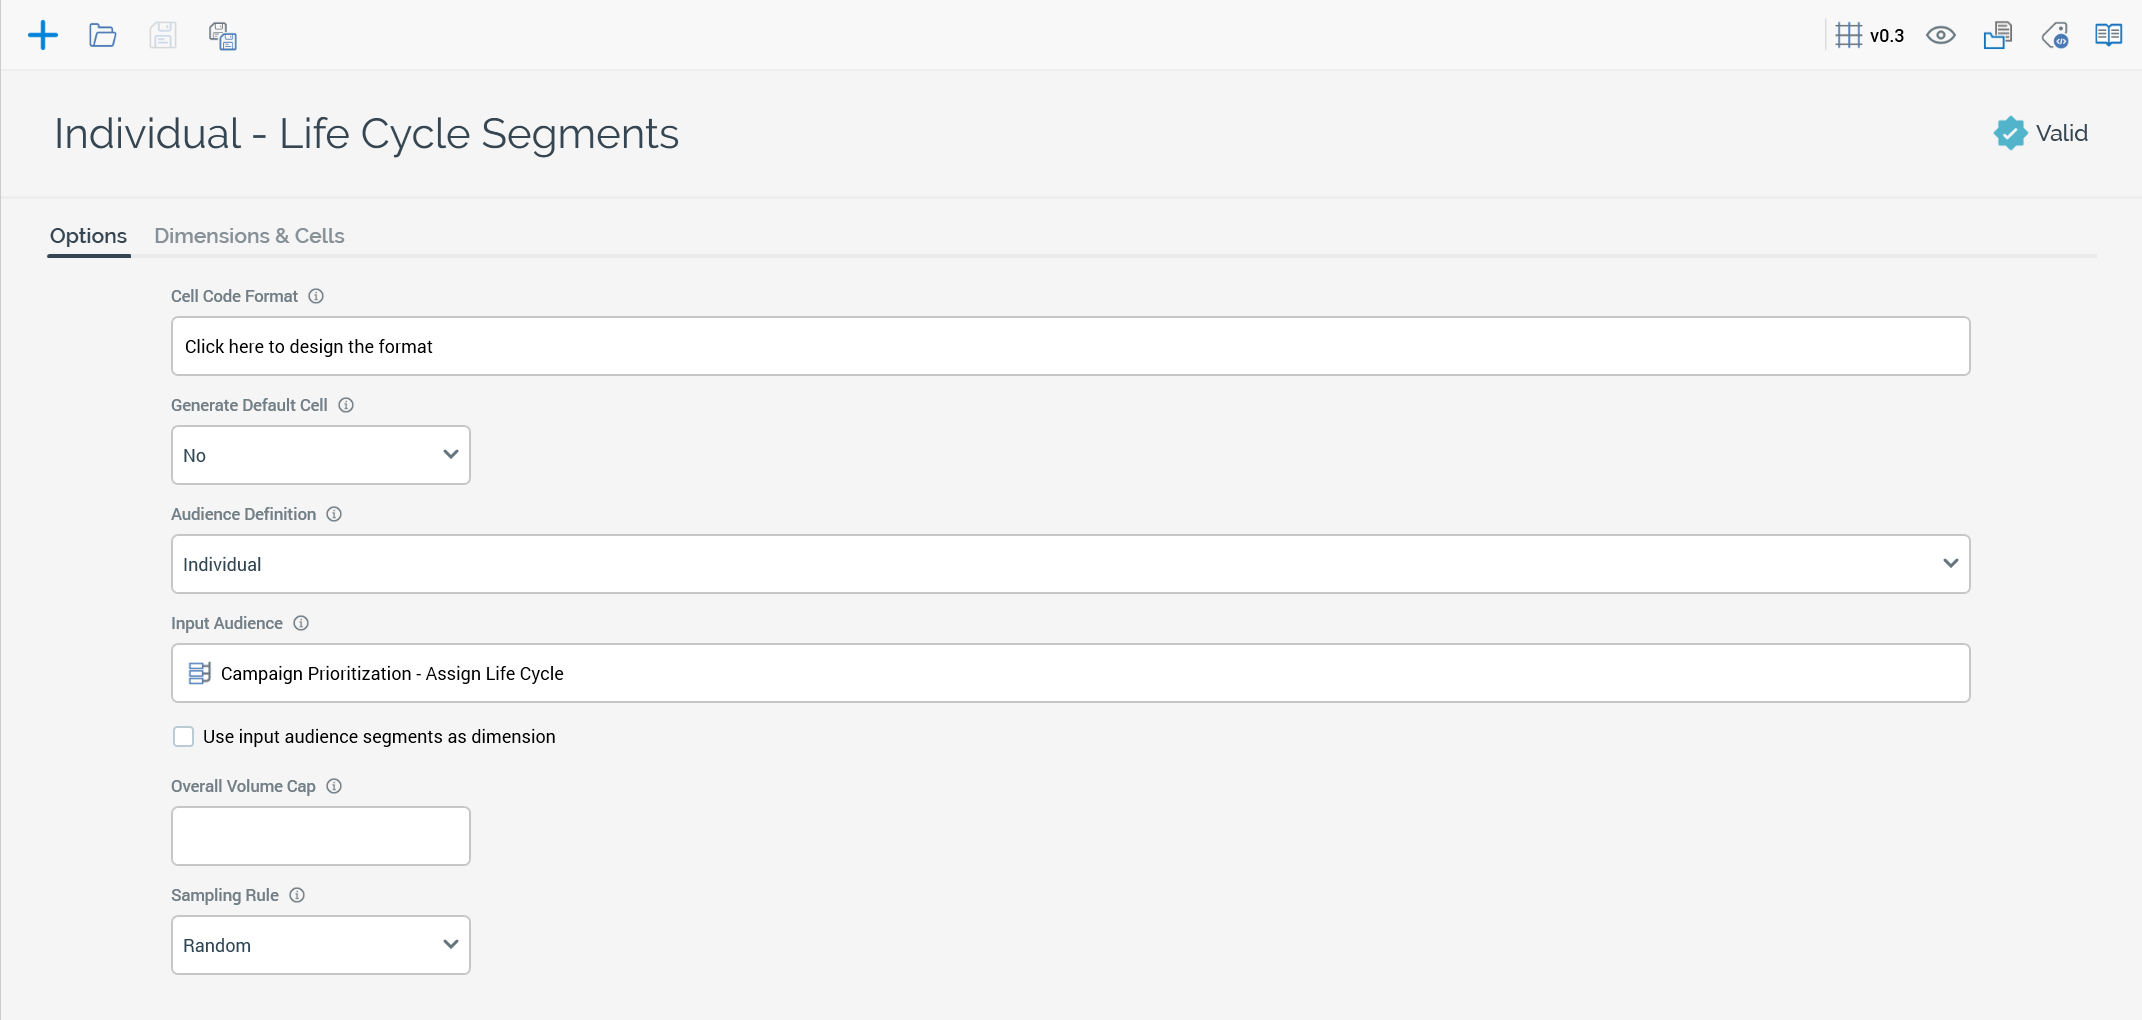
Create an audience for the life cycle segments
Now that the audience snapshot along with the cell list have been defined, the campaign journey can be created.
Start by creating an audience based on the cell list and the cell list only. This will be the basis of all of the campaign journeys for each of the life cycle segments.
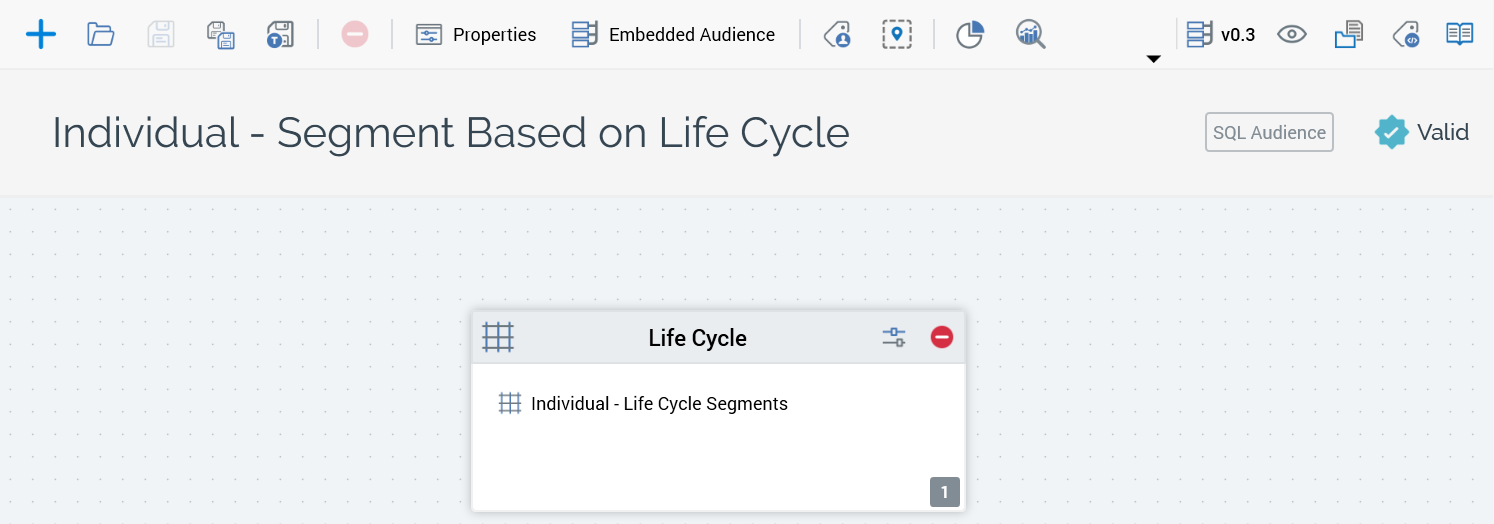
The output of the cell list is each of the life cycles.

Create an audience based on channel eligibility
Now that we have identified our target audience based on life cycle segments, we now want to layer in channels that the targets of the segments are eligible to be contacted on. So, create an audience based on the cell list for channel eligibility.
We are illustrating eligible channels as a separate audience for a more reusable approach of an audience that can be used to identify what channels a target is eligible for.
As shown in the original diagram above, channel eligibility can be defined as a separate audience (as we will show in this example) or it can be combined into the audience related to a specific life cycle segment, where additional logic could be applied to channel eligibility as well as other factors to determine eligibility for a given touch point.
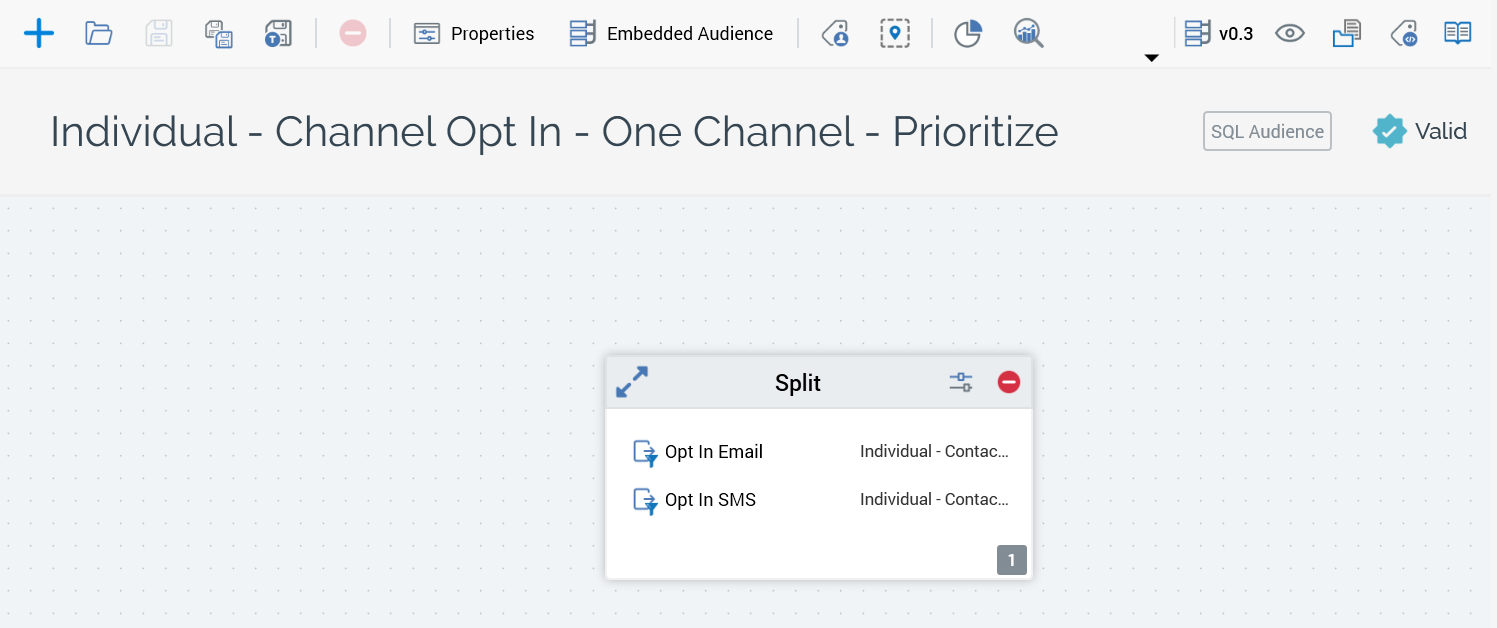
Below is the audience that identifies eligibility of two channels: Email and SMS. The details on the selection rules to determine eligibility are not explained here, as that may differ depending on how your data model is organized.
In this example, a target is associated to a single channel in a prioritized order. The first selection rule that a target qualifies for is the channel that the target will be communicated on. In this case, Email has precedence over SMS. An alternate option is to associate a target to all of the channels they are opted into.
In short, this is an audience that uses the same audience definition as the life cycle segment and assigns a single channel to a target based on the prioritization of the rules in the split.
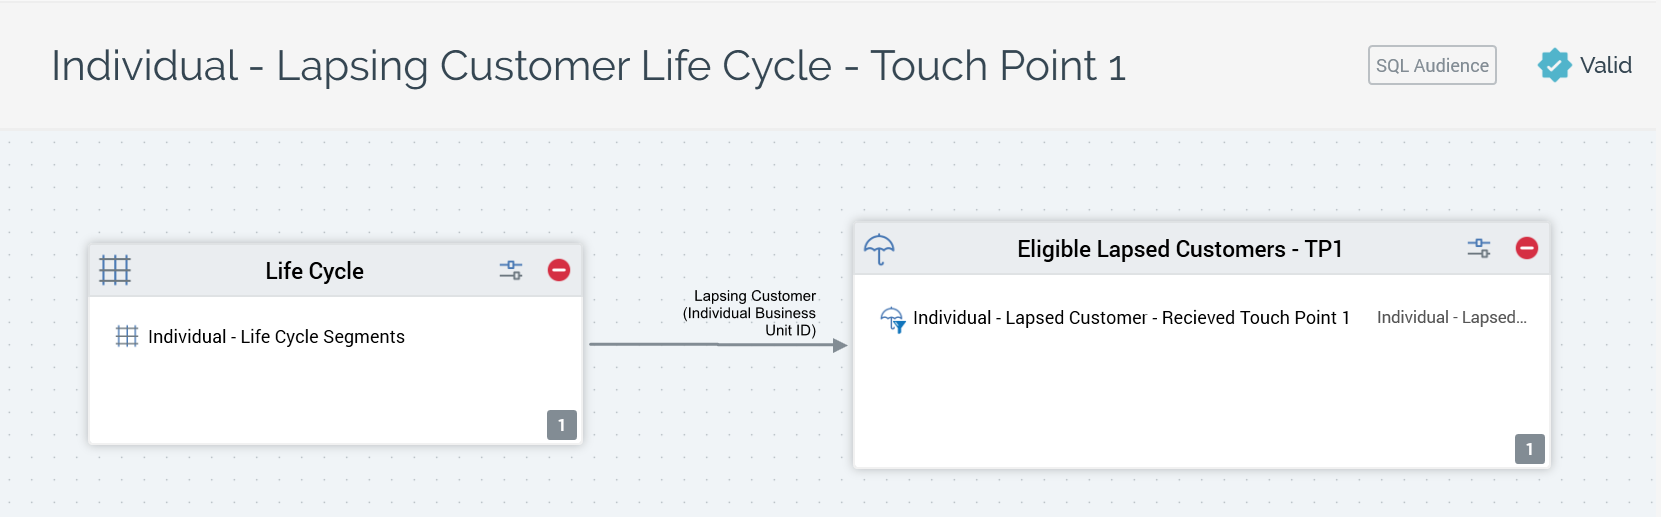
Define touch point 1
Now that we have the audience snapshot and associated audiences for life cycle segmentation and channel eligibility, we can combine those in an interaction to define a set of touch points for the life cycle journey. We’re continuing to use the lapsing customer segment in this example to illustrate a set of touch points for a life cycle segment.
Touchpoint 1 will identify that a customer is in the lapsing customer life cycle segment, and they have not already received a communication for touch point 1 in the last 90 days.
-
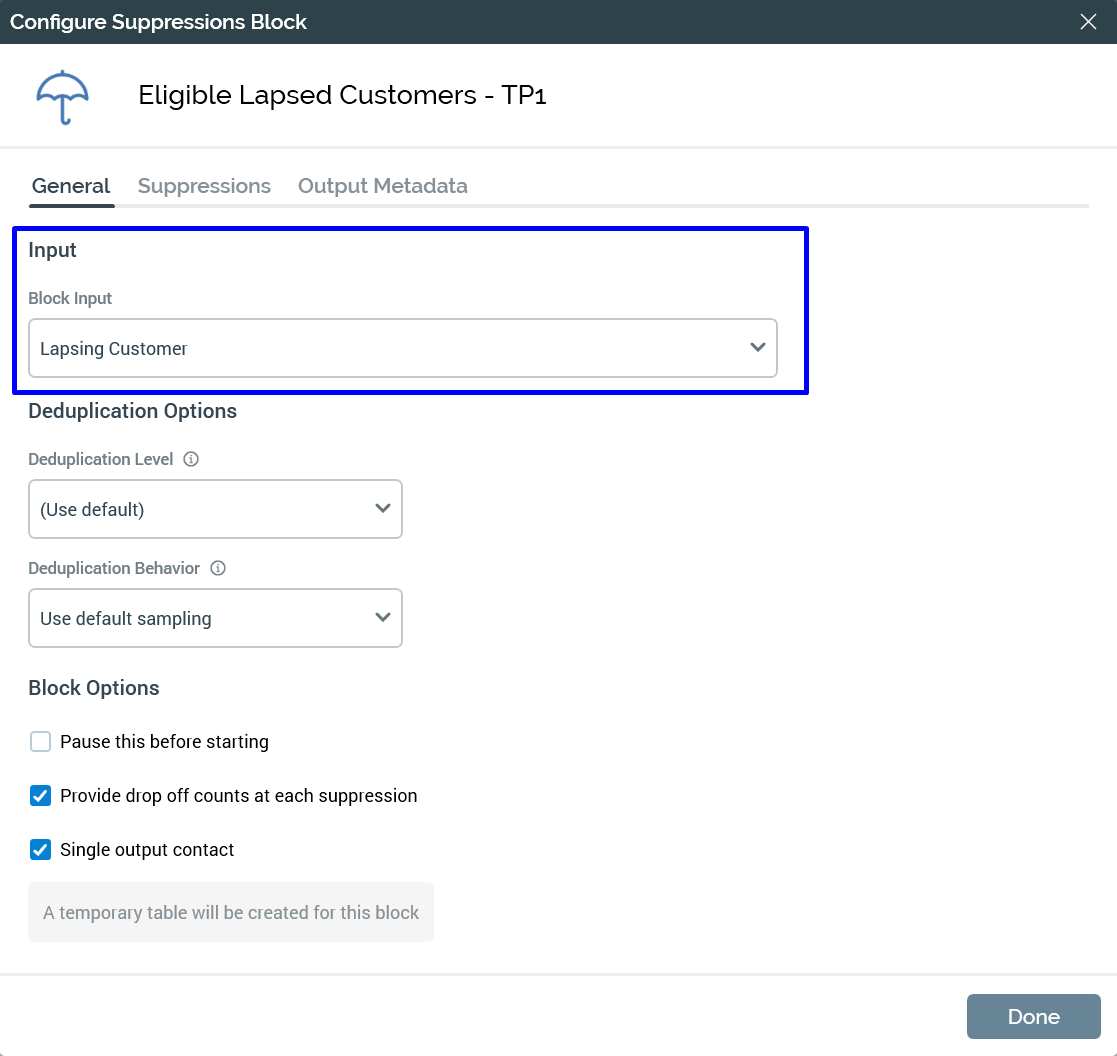
Start by making a copy of the audience “Individual - Segment Based on Life Cycle” as a starting point for the audience. From there, you’ll configure a suppression that will ensure that a target has not received the lapsing customer touch point 1 in the last 90 days.
In this example, we are using 90 days, but it could be any range. The idea of having a window like 90 days is so that a target could be eligible again for the same journey if 90 days later they are still in the same segment or if they have moved out of and back into this particular segment.
-
Because the life cycle cell list includes all segments, you must select the appropriate Input segment to apply the suppression to. In this case, it is Lapsing Customer. You should also name the suppression activity appropriately so that it is easy to identify in the interaction, as there will be more than one segment that is generated from this audience. You will see more on this later in the example when we are configuring the interaction workflow.
-
In order to make selection of the records for suppression, or any other reason, you should create a set of metadata fields that can make identifying the records that have been targeted previously easier. Here is an example of three metadata fields that can be used to make selection easier.

-
Using the metadata and the timeframe of 90 days, the following selection rule was configured to support the suppression.
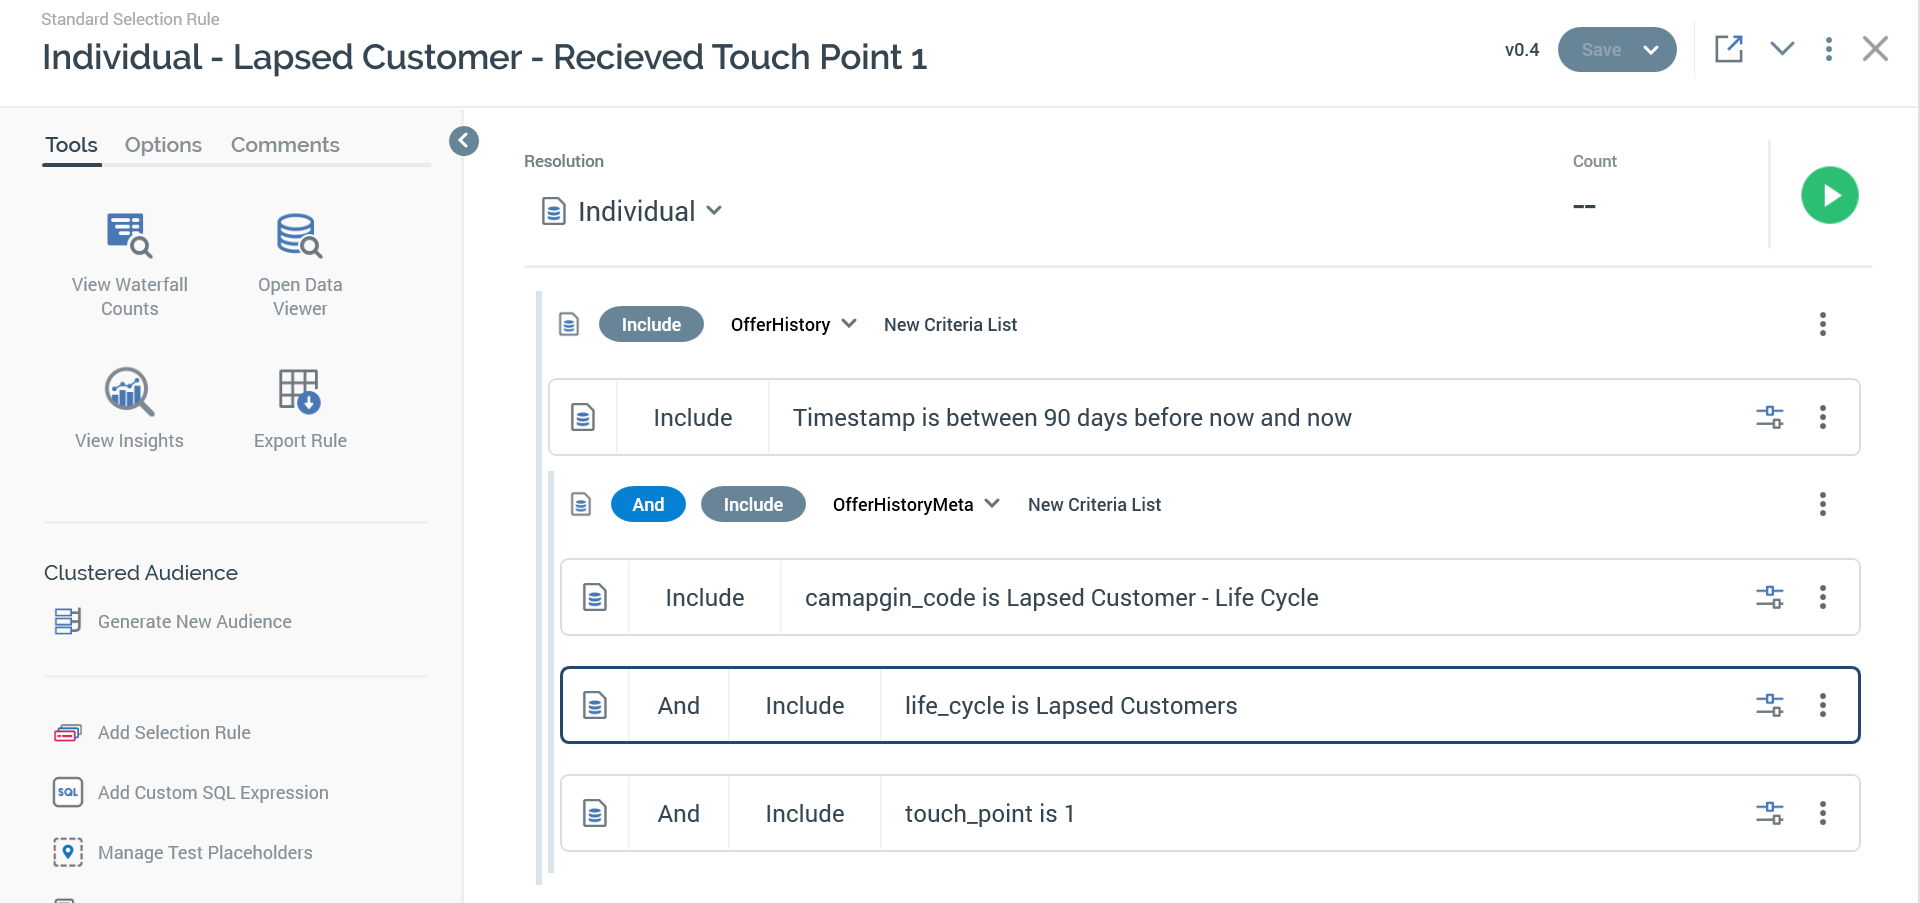
Lapsing customer - received touch point 1 selection rule
Create touch point 1 interaction
Now that the audience for lapsed customer touch point 1 is defined as well as the channel opt in audience, we can combine those in an interaction along with a recurring workflow control for scheduling associated Email and SMS offers.
Lapsing customer touch point 1 interaction workflow
-
This is the recuring schedule that you can set to your desired execution cadence. Daily is a reasonable starting point.
-
This is the life cycle audience defined for touch point 1.
-
This is the channel prioritization audience; in this example the two audiences are separated, but they could be combined if desired.
-
Email content for targets opted in to email.
-
SMS content for targets opted in to SMS.
Touch point 1: additional details
Here are some notes relating to creating an audience based on channel eligibility:
-
When configuring the channel audience, you need to select the appropriate input segment from the life cycle audience and you need to set the metadata appropriately.
Select the appropriate input to the channel audience Set the metadata for the channel audience -
Select the appropriate input from the channel audience to the email offer.
Input to email offer
-
Select the appropriate input from the channel audience to the SMS offer.
Input to SMS offer
Define touch point 2
Touch point 2 and on have a similar pattern of selecting the previously targeted touch point and suppressing anyone who has already received the communication for the current touch point. The idea is that touch point 2 and on will happen at some duration after the previous touch point.
In this section, we will describe the various pieces that make up the audience for touch point 2.
-
This audience starts with the same cell list as the first touch point audience. This is to ensure that the target is still in the same Lapsing Customer life cycle segment and has not moved out of that life cycle segment.
-
Following this cell list, a filter is applied that determines if it has been 7-14 days since the first touch point. The screenshot below illustrates the selection rule that is used for this filter block. The point of using a window like 7-14 days is so that if there is a failure or a target is not eligible for contact today because there is a rule to prevent more than one email per day, then the workflow will automatically reevaluate eligibility for touch point 2 for 7 days between 7-14 after touch point 1 was sent.
Received touch point 1 7-14 days ago -
The final step is to suppress any records that have already received touch point 2. This is the same as the suppression in touch point 1, but specific to touch point 2.
Received touch point 2
Create touch point 2 interaction
This is what the workflow for touch point 2 looks like. (It’s very similar to touch point 1.)
The configuration is similar to touch point 1, but in this case the new audience is used in Life Cycle 2, and the metadata for touch point 2 is updated in the Channel 2 activity, as seen in the screenshot below. The only difference is that the value of the Touch Point has been changed to a 2 instead of 1.
Metadata for channel 2 - touch point 2
Touch points 1 & 2 in a single interaction
In this example, we are putting all of the touch points in a single interaction so that you can see the results of each touchpoint in a single interaction (this is optional).
Below is a screenshot of touchpoint 1 & 2 workflows in the same interaction.
Interaction - lapsing customer journey - touch point 1 & 2
Define touch point 3
Touch point three is the same pattern as touch point two, and the pattern would continue for additional touch points.
In this section we will describe the various pieces that make up the audience for touch point 3.
-
This audience starts with the same cell list as the first and second touch point audience. This is to ensure that the target is still in the same Lapsing Customer life cycle segment and has not moved out of that life cycle segment.
-
Following this cell list, a filter is applied that determines if it has been 10-17 days since the second touch point; there is a screenshot below to illustrate the selection rule that is used for this filter block. Again, the point of using a window like 10-17 days is so that if there is a failure or a target is not eligible for contact today because there is a rule to prevent more than one email per day, then the workflow will automatically reevaluate eligibility for touch point for 7 days between 10-17 after touch point 2 was sent.
Received touch point 2 10-17 days ago -
The final step is to suppress any records that have already received touch point 3. This is the same as the suppression in touch point 1 & 2, but specific to touch point 3.
Received touch point 3
Create touch point 3 interaction
This is what the workflow for touch point 3 looks like. (It’s very similar to touch points 1 and 2.)
The configuration is similar to touch point 1 and 2, but in this case the new audience is used in Life Cycle 3, and the metadata for touch point 3 is updated in the Channel 3 activity seen in the screenshot below. The only difference is that the value of the Touch Point has been changed to a 3 instead of 1 or 2.
Touch points 1, 2, & 3 in a single interaction
In this example, we are putting all the touch points into a single interaction so that you can see the results of each touchpoint in a single interaction (this is optional).
Below is a screenshot of touchpoint 1, 2, and 3 workflows in the same interaction.
Define touch points 4+
The same pattern that was used for touch point 2 & 3 can be followed for any number of additional touchpoints that you want to include for a life cycle journey.
Life cycle journeys: additional considerations
In the following sections we discuss a few other considerations or options available to enhance or streamline the campaign prioritization strategy.
Content prioritization
When considering prioritization of content, we are more specifically talking about determining what content to show to a person for each of the touchpoints within a journey and potentially across journeys. Let’s consider the lapsing customer lifecycle segment first. In this journey, with retail as the vertical for this example, you may want to offer a series of discounts for each of the touch points to see if that helps to get a conversion. So you may consider that the first email offers free shipping, followed by a series of percentage off of total purchase amount. Touch point 2 could offer 5% off, and then touch point 3 could offer 10%, and touch point 4 could offer a free gift or additional discount. This would be the strategy associated to the journey.
In order to implement the strategy for the content, using email as the example, you could create a single HTML asset for the email content, where there is a smart asset that drives the call to action (CTA) and determines what touch point you are in within the journey and then provides the appropriate content for that touch point. This provides a single HTML asset to manage an associated smart asset and one place to make changes to either the HTML content or the CTA for the given touch point.
One final consideration relative to content prioritization is across life cycle segments. For instance you may not want to give any more than 10% off for a lapsing customer, whereas you may want to go as high as 20% for a win-back segment.
Contact frequency
In some cases, there are concerns that if you communicate to a customer or patient (or whomever your target audience is) too often that there may be a level of fatigue that causes them to unsubscribe and opt out of communications. This is an undesirable result for any marketer. In addition to generally defining a contact frequency strategy to limit the number of communications in a duration of time, there is also a notion of a preference for limited circulation. You can use either or both to limit the contact frequency.
The simplest approach to defining a contact frequency strategy is to create a custom aggregate that determines how frequently that an individual or email has been communicated to in a period of time. Then that rule is applied as a filter to the channel. Filters are inclusive, meaning that you need to qualify for the rule to be sent the communication.
When applying these rules, the simplest approach is just to allow the communications to go out as expected and apply these rules to perform the limited communication strategy as it is defined. This is the simplest approach, as this type of communication limiting can get very complicated very quickly if you want to apply all sort of criteria or to bypass the prioritization. One approach to bypassing the prioritization is to have a separate channel which does not have the filter associated to it. Yet this clearly devalues the point of define a contact frequency strategy.
Placeholders
Placeholders allow you to create selection rules with a placeholder that can be set to different values and overridden in audiences and in interactions without having to create and save a new selection rule.
A set of placeholders can be defined to streamline the creation of the customer journey campaigns by allowing you to just modify the placeholder values to configure the various touch points of a journey. This allows for one or two audiences to support a set of various touch points for a given life cycle journey as well as allowing you to use those same audiences in multiple life cycle journeys. This approach significantly reduces the number of objects used in RPI and allows for consistency across all touch points and journeys.
The following link is to an example of a multi-touch campaign that uses placeholders. This can be used as a template to build out your multi-touch journey strategy: Multi-touch campaign templates.
Active customer life cycle segment considerations
There are a few things you should consider in relation to the active customer life cycle segment. A predefined journey alone for this segment may not be applicable. This segment may just get the regularly scheduled marketing emails and not have a journey defined for them or they could have a combination of both a journey as well as regular communications. You would still use the audience with the cell list to determine someone who is in this segment, but you would just build out a single audience to use for regular marketing campaigns and reuse that unless you wanted to perform some additional segmentation within that audience for additional micro segments or for testing purposes.