

Overview
This topic provides information about how to maintain multiple Redpoint Interaction (RPI) clusters and tenant deployments, keeping configurations and objects consistent across environments. This approach will minimize the amount of effort involved in configuring target or upstream systems.
Not following the guidance provided in this documentation may cause issues that are difficult to troubleshoot and that may not be able to be resolved. Make sure to read this entire section to understand all of the information about migrating objects consistently.
If your production and lower environments get out of sync, refer to the Replicate prod environment in a lower environment topic for guidance.
Important notes about migrating objects
This section calls out some high-level items related to migrating configuration and file system objects between RPI tenants.
-
All underlying database schemas related to the primary data warehouse (main database), offer history, and auxiliary databases must always be the same between the source and target tenants, or you will be sure to encounter issues.
-
The very first step of setting up a new tenant is to start with the system configuration settings. The database schemas are the very first system configuration settings to set when you are configuring a new tenant, especially when the new tenant is going to be configured based on migrating objects from a source system.
-
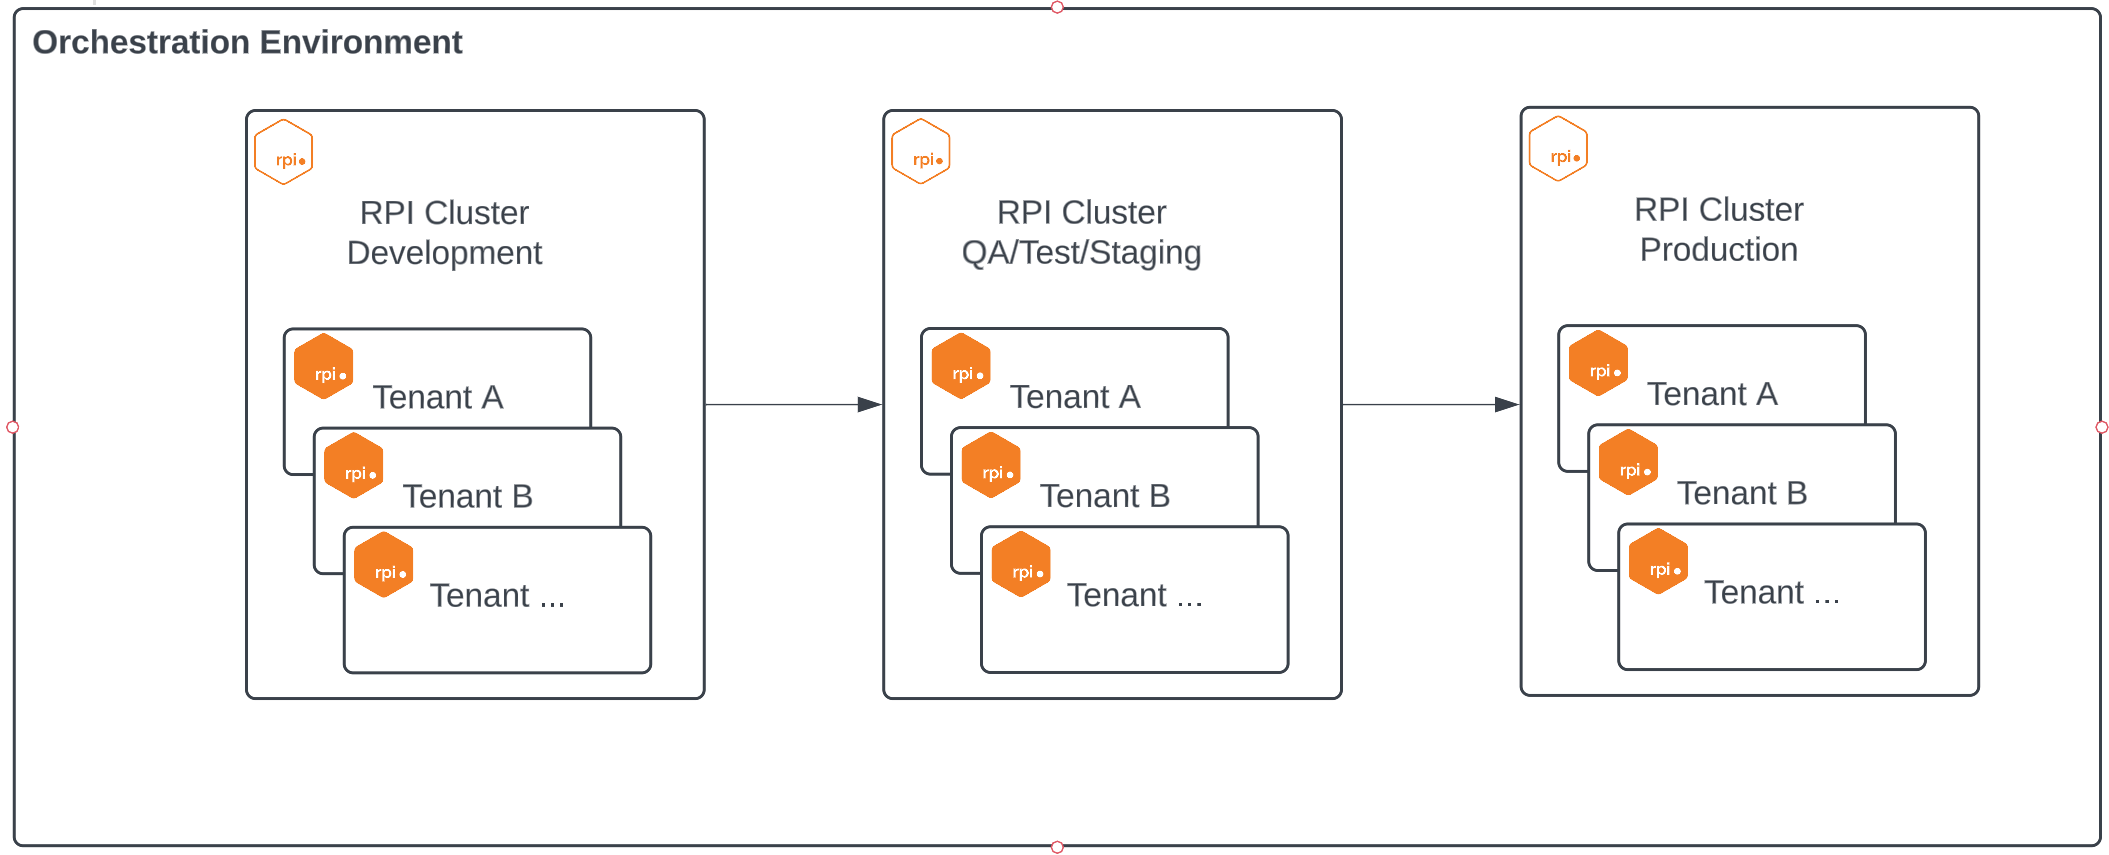
Always migrate objects from the lower environment up to the other environments in order (for example, “dev” to “prod” or “dev” to “test” to “prod”) and never create configuration or baseline objects (discussed later in this document) in an upper environment and move them down. Not following this policy strictly for configuration or baseline objects carries the risk of environments being out of sync or the potential for duplicate objects to be created.
-
When migrating audience definitions, you should always validate the audiences to ensure that offer history and joins are created appropriately. Also make sure the offer history schema is defined in the system configuration before you migrate audience definitions and validate them.
-
If a channel or audience definition is exported, the attributes that are used within those objects will also be migrated. This is OK but should be considered when moving objects.
-
Make sure that when you migrate an attribute list that is configured as a placeholder that you also migrate the attributes that the placeholder references. Currently this is not done by default and needs to be done as a two-step process of migrating the attribute list collection and the attributes.
-
Exporting file system objects also exports dependent file system objects but not configuration objects. For example, exporting an interaction will export the selection rules, audience, and offer, but it will not export the channel configuration used in the offer.
-
Configuration objects will export dependent file system objects. Exporting an audience definition will export the attributes used to configure the offer history portion of the audience definition.
-
Configuration objects are collections of objects, and you cannot select a single object to export from the collection. For example, if you have three audience definitions, you cannot export just one of the audience definitions; all three will be exported and imported to the other tenant.
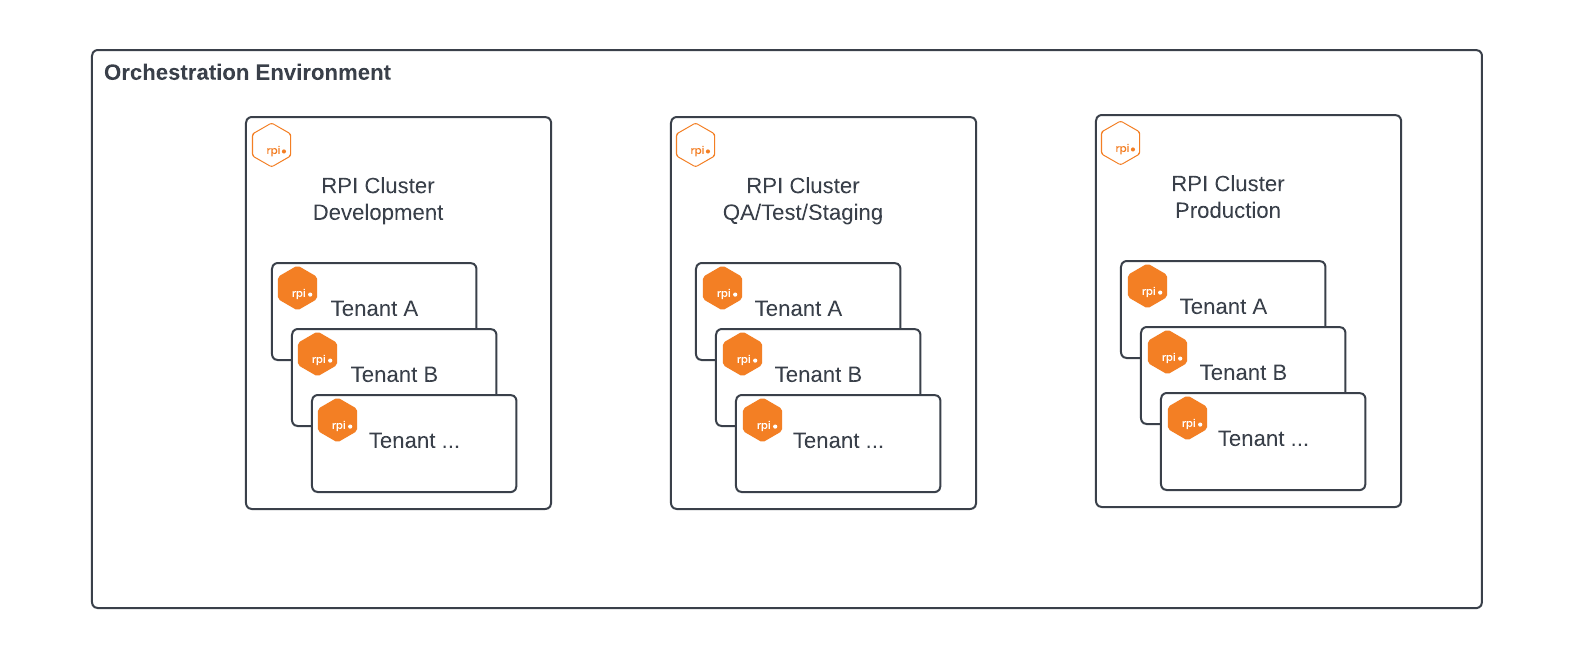
Multiple RPI clusters and tenants architecture
RPI has various deployment options that include at least one RPI cluster and one tenant. This can be scaled to multiple clusters and multiple tenants. This topic focuses on how to maintain consistent configuration across tenants within a cluster and across clusters; it will not cover deployment architecture approaches. There are some features that are supported for maintaining configurations and objects within a cluster vs. across clusters.
Summary of RPI object migration process
This section provides high-level information about how to migrate RPI objects across tenants within a cluster and across clusters.
-
The ability to export and import objects is a user group permission that is required by the user to perform these tasks. Regardless of whether you’re migrating across tenants within a single cluster or across multiple clusters, you need the appropriate permissions in both tenants to perform these tasks independently. A single user will require these permissions in both tenants to perform a copy to a tenant on the same cluster.
-
Across different clusters: When migrating objects across tenants that are on different clusters, you must export the files to the file system before importing them to the other tenant. Objects are exported from a source tenant to a location on the client file system, including file shares, and importing them from the same location to the target tenant.
-
Within the same cluster: When migrating objects between two tenants located on the same RPI cluster, you can copy directly from one tenant to another, skipping the interim steps of putting the objects on the file system and importing them in the other tenant.
-
-
When exporting objects, RPI also exports the dependent objects. For example, if you export a selection rule that has two attributes as part of its configuration, it will export the selection rule as well as the two attributes that are used within the rule. The caveat with this is that exporting system configuration objects will create dependent file system objects, like attributes, but file system objects will not create system configuration objects. So, exporting an interaction will generate all dependent file system objects, but it will not create the resolutions, audience definitions, or channels.
-
This is a powerful feature as it helps to ensure that all supporting objects of an object being migrated will be available when the migration is completed on the other system.
-
On the other hand, this feature can cause unintended objects to be migrated and potentially overwrite objects in the target tenant and introduce duplicate objects. This risk can be mitigated by taking advantage of some of the settings available when importing objects.
-
How RPI stores objects
It is helpful to understand how RPI stores objects within the system to better grasp the logic behind managing the migration of objects between instances. There are various objects in RPI, including, but not limited to:
-
Configurations
-
Attributes
-
Selection rules
-
Audiences
-
Interactions
-
Offers
Each of the objects within RPI is stored in the system using a unique identifier to keep track of the object. This identifier is not exposed in the UI, as it is managed by the system behind the scenes. This feature allows you to rename and move objects around in the file system without breaking any of the objects that refer to the object. For instance, if you have a selection rule that uses an attribute named address and you change the name of the attribute to mailing address, the selection rule will not break and will reflect the new name of the attribute in the configuration or the rule. These identifiers are used to determine if an object already exists in a system or not when migrating data from one environment to another.
Always move objects from lower environments up
We recommend that you always create and migrate objects from the lowest environments through to the upper environments. So, you should always configure things in development, and promote those changes to QA/test/staging, and then from there to production. This is applicable to the system objects, configuration, and attributes where they will be consistent between environments and are considered a part of the base configuration. Once the base objects like resolutions, audience definitions, and attributes have been promoted, it is a reasonable expectation that a marketing team will create new interactions that exist only in production to support a given initiative (for example, a monthly newsletter). It would be unreasonable overhead to build those objects in development and migrate them up to production.
Again, base objects should never be created in a production environment and moved downward; this is likely to cause inconsistencies.
Primary types of system objects
Now that you have a basic understanding of how objects are stored within RPI, let’s consider the primary types of objects within the system. For all intents and purposes, there are two primary types of objects within the system:
-
Configuration objects
-
File system objects
In general, when migrating objects from an existing environment that consists of both configuration settings and file system objects (which is common):
-
Start by migrating the configuration objects first.
-
Then migrate the file system objects.
Migrate configuration objects
Configuration is where you define the configuration of the tenant itself (including resolutions, audience definitions, joins, users, user groups, channels, and so on). Most of the configuration objects are exportable except for a few, which include system configuration, user groups, and users. Users are unique as they can be managed across tenants in the server workbench but are not exportable from the RPI client.
Configuration objects can be exported and imported into other environments, but they are managed at the collection level of the object, and you cannot export at a more granular level. That means if you have five different resolutions in the resolutions collection, you must export all five resolutions and cannot export only one of the five resolutions. Appendix A lists the configuration collections and whether or not they are exportable.
Migrate the system configuration collection
The system configuration collection is the first collection that should be migrated, but this is one of the objects that is not exportable and will need to be managed manually. There are various settings in this collection that are environment-specific, and you would not want to copy this collection from one tenant to another. An example would be the Realtime server configuration settings, because the expectation is that each RPI instance will have a unique set of Realtime servers that correspond to each logical RPI environment. We expect that if you have RPI development and production servers, that you also have corresponding development and production Realtime servers. This is just one example of settings that you would not want to copy from one tenant to another, but there are others.
The very first step of setting up a new tenant is to start with the system configuration settings, and the various database schemas are the very first system configuration settings to set when you are configuring a new tenant, especially when the new tenant is going to be configured based on migrating objects from a source system.
-
Primary data warehouse (main database) schema
-
Offer history schema
-
Auxiliary database schemas
All underlying database schemas should always be the same between the source and target tenants, or you will be sure to encounter issues.
Database schemas
The system configuration collection in the target system should be consistent with the source tenant where it is applicable. One important setting that needs to be consistent is the main database schema if it is not dbo, (the default setting). This is a fundamental configuration setting when it comes to migrating objects between tenants and needs to be kept at the top of your mind when setting up multiple databases (before RPI is configured) to support multi-environment dev/test/prod deployments. All the underlying databases should adhere to the same schema naming conventions, otherwise you will encounter challenges and issues when trying to deploy and maintain multiple RPI tenants on each of those databases.
It is very important to configure this setting before migrating other objects, and the main database schema must be named the same in the source and target systems, otherwise you will encounter issues when you try to execute things after migration. This is particularly important when migrating attributes.
Another setting to make note of is setting the offer history schema if that is different from the main database schema. Using a separate offer history schema is recommended but must be configured as a part of initial setup as this is not something that can be easily changed later in the configuration process. All the schemas should be consistent between source and target systems at the database level, and these settings should be configured before any other configuration of the initial tenant or when migrating objects to a new tenant.
All other settings should be documented and manually set in the target system, but the other settings are more flexible than the schemas and can be changed later without any adverse effects.
In addition to the schemas in the system configuration settings, any of the auxiliary databases should have the same schemas defined as well.
Migrate other configuration collections
Of the various configuration objects that can be migrated, you have the option to export one configuration collection or multiple configuration objects at one time.
-
When you are performing an initial configuration of a target tenant based on a source tenant, it is reasonable to copy all the exportable collections that have been configured in the source system all at once as opposed to migrating one collection at a time.
-
After initial configuration you will most likely be moving one, but not all, at a time based on changes being made to the collections in the source system. For example, adding a new database key, resolution level, and audience definition to support new data structures would be a reasonable set of collections to migrate based on enhancements to the source system.
Also, there are some cases where even though you can migrate a collection you still may want to configure a particular configuration in the target system manually vs. migrating it. For instance, you may have a channel (such as email) that uses the same credentials to connect to the sandbox environment of a provider in both dev and test and you can migrate the channel from dev to test. Yet in prod you have a different set of credentials to connect to the production environment of the provider and in that case, it may make more sense to just create the channel manually in production to avoid carrying over the sandbox configuration and forgetting to make the appropriate updates. So, although you can migrate configurations, you still may need to consider the impact that migrating a setting may have on the target tenant, and it may make sense to move/create things manually in the target system.
These settings are typically related to ones that have credentials associated with them and may have different resources for development vs. production, where you would not want to accidentally have production pointing at a development resource. The following is a reference of some of the configuration collections you may want to review to determine if migration is appropriate or if it is better to just configure them manually in the other tenant. Although we are calling out making considerations when migrating between development and production environments, the same may be true for development to test environments. For instance, you will probably have a unique set of queue providers for each environment, so it will make more sense to configure those in each tenant as opposed to migrating them.
-
Channels
-
External content providers
-
Web adapters
-
FTP sites
-
Web-published sites
-
Queue providers
After the initial configuration of an environment has been migrated from one tenant to another, it is likely that you will need to only migrate changes that are made in the lower environment for new functionality or features that you have enabled and tested in that environment. For example, if you add a new database key, resolution, and audience definition, you would migrate only those three collections.
To ensure that things stay consistent between environments, you must ensure that you always update the lower environment and then migrate things up to the other tenants from there.
If you start to make changes to the fields in the offer history section of an audience definition in an upper environment/tenant you run the risk of getting that out of sync with the lower environment/tenant and then if you promote/migrate the lower environment changes for something different at a later date you may overwrite changes you made in the upper environment and potentially break things and regress functionality you have enabled in the upper environment. This is where discipline comes in, and you need to ensure that you follow the process and procedure of making larger system changes in the lowest environment and promoting those up from there. It is tempting at times to just make a change in an upper environment for convenience, but that can end up causing longer-term issues. So please be sure to consistently make updates in the lowest environment and promote those changes up appropriately. Keep in mind that there are still things like interactions and objects that are not base objects that do not require that you build them in the lower environment and migrate them up. What is important is the general configuration items that we are discussing in this section, and there will be similar direction given in the following section regarding file system objects.
Below are some additional steps required after moving certain configuration collections.
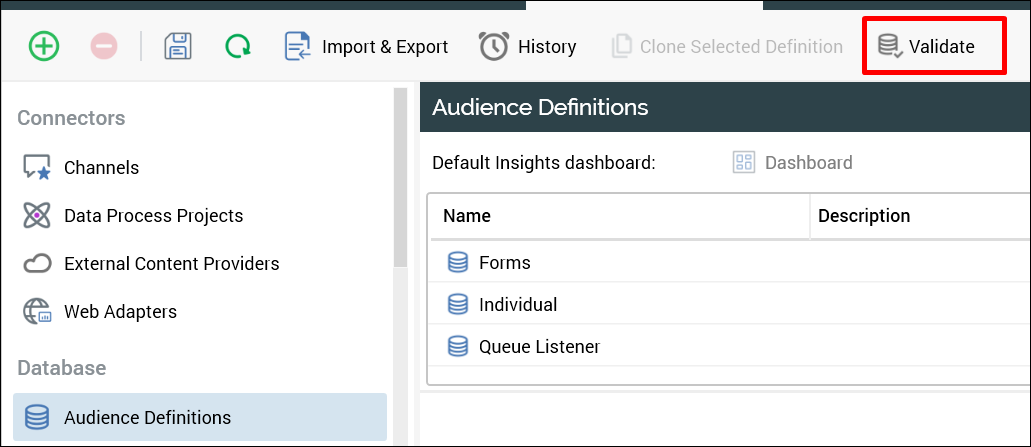
Migrating audience definition collection
When audience definitions are moved from one tenant to another, the offer history tables that are associated with those audiences will not automatically be created in the database of the tenant that the definitions are migrated to. To ensure that the offer history tables are created, you should always click Validate in the Audience Definitions section (see the following screenshot) after migrating audience definitions from one tenant to the next. This ensures that the tables are available in that tenant (and the process will create them if they are not). It also validates that the joins are configured if for some reason the joins were also not migrated as a part of moving configurations from one tenant to another. If you fail to perform this step and attempt to run an audience or interaction, you will get errors related to the tables and joins not being available.
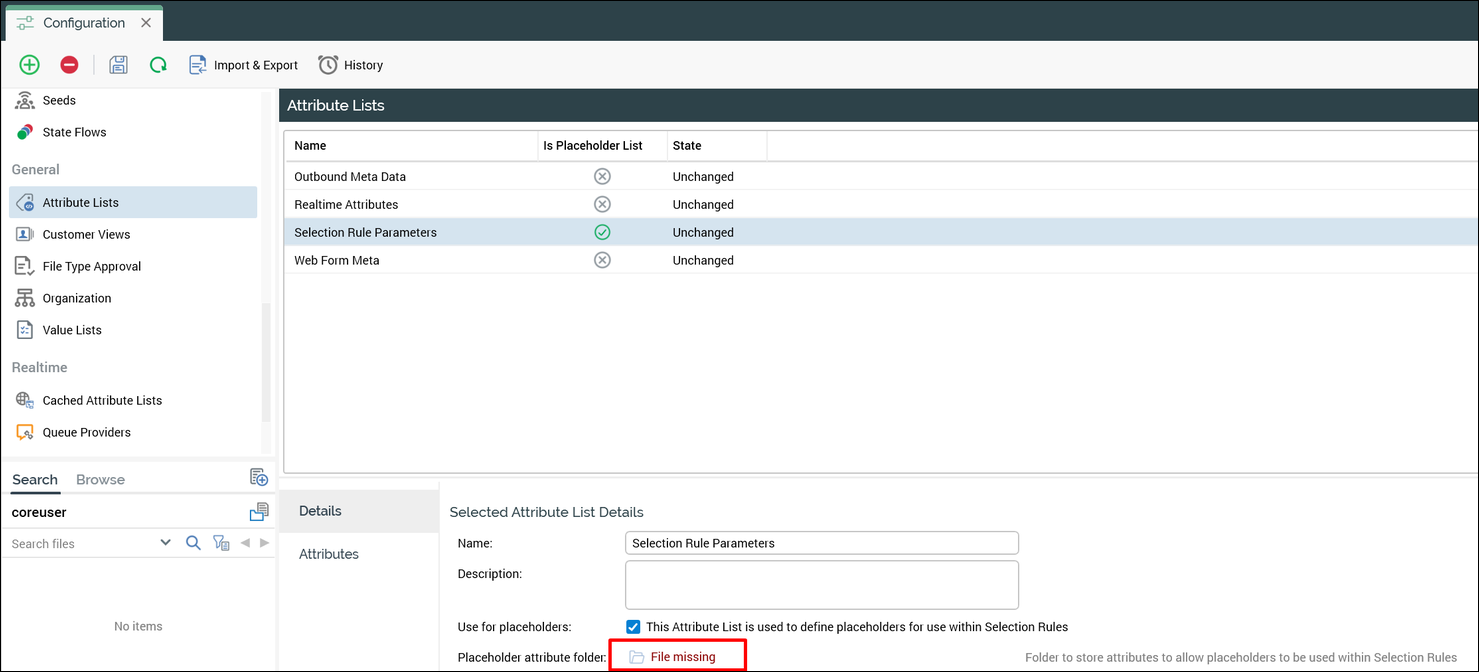
Attribute lists used as placeholders
An attribute list is a collection that supports various features within the platform, including placeholders. If you select the Use for placeholders check box for the attribute list, you need to define a file system location where you want to create the placeholder attribute. If you move an attribute list's collection but not the actual attributes, an error is displayed in the target system related to that attribute list (see the following screenshot).
To resolve this issue, move the folder and the attributes in the source file system over to the target system with the error noted (as shown in the previous screenshot). Moving file system objects is covered in the next section of this document. Do not create the folder in the target tenant and save the collection, because:
-
This generates new attributes where the underlying identifiers of the attributes will be different than the source tenant.
-
This will cause duplicate attributes to be created if you move the attributes from the source tenant to the target tenant at a later time.
At a minimum this will cause confusion, and may generate errors when executing selection rules that reference the placeholders. In addition, if you copy over a selection rule that references the placeholders from the source system, placeholder attributes will be duplicated. Always ensure that the attributes are moved from the source tenant to the target tenant so that attributes are not duplicated.
Export/import or copy configuration objects
Now that you understand the recommended move approach (including when and why to move), we will detail how to perform object export and import. This process differs depending on whether you’re migrating to…
-
A tenant that is on a different RPI cluster (you’ll export and then import the objects)
-
A tenant on the same cluster (you’ll copy the objects)
In addition to the information below, there is an Appendix C related to the questions and answers about importing objects. Please review this section if you have any questions related to exporting or importing objects after going through this section to see if the questions are addressed. If not, please follow up with your Redpoint contact or support@redpointglobal.com with any additional questions.
-
Open the Configuration Section in the RPI client.
-
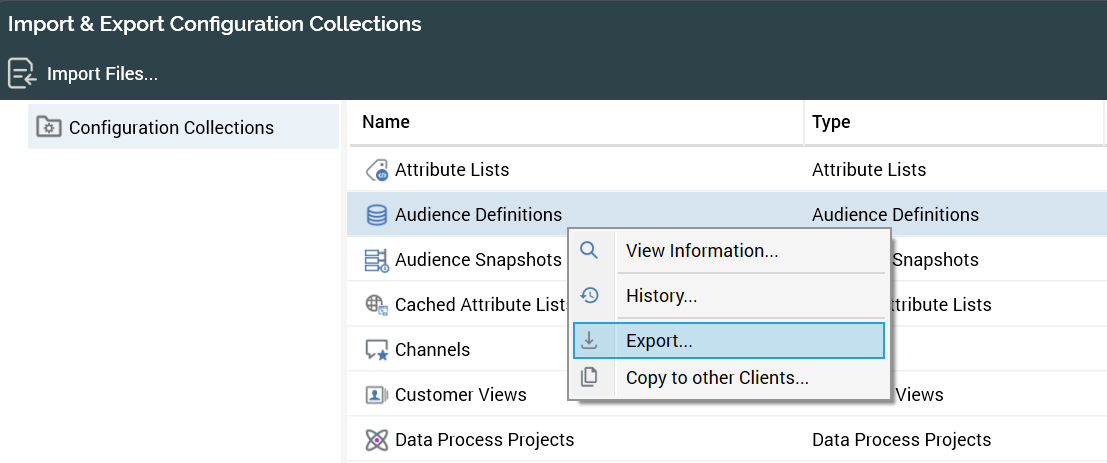
Click Import & Export (highlighted in the following screenshot) to export objects from the base tenant.

-
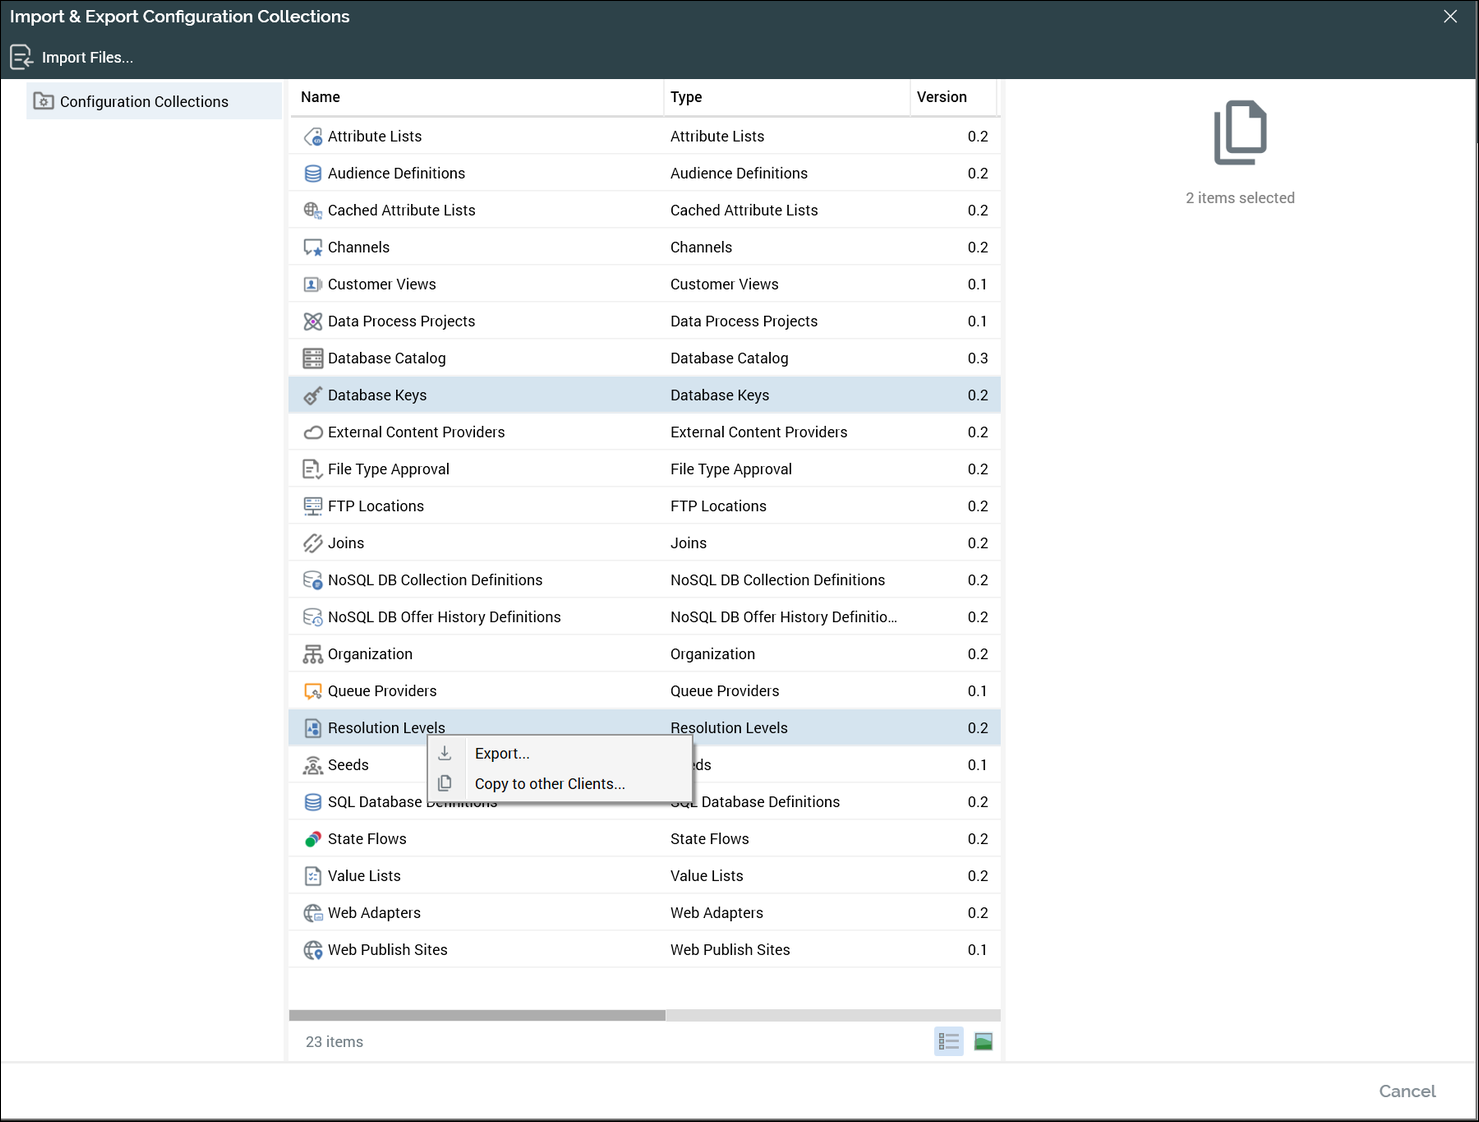
A popup is displayed, showing a list of the various configuration collections that can be exported and objects you can choose to import (which will be discussed in the next section).
-
In the right-hand panel, you can select one or more of the collections. In this example (shown in the next screenshot), Database Keys and Resolution Levels collections are selected.
-
Select all the collections you want to export and right-click one of the highlighted collections. Two options will be displayed:
-
Export: Select this option to migrate the objects to a tenant that is on a different RPI cluster.
-
Copy to other clients…: Select this option to copy the objects to a tenant on the same cluster.
-
The next few subsections detail how to use each of these options, depending on whether you’re exporting to a tenant on a different RPI cluster or copying to the same cluster.
Export configuration objects: different cluster
Follow these steps if you’re exporting configuration objects to a tenant on a different RPI cluster:
-
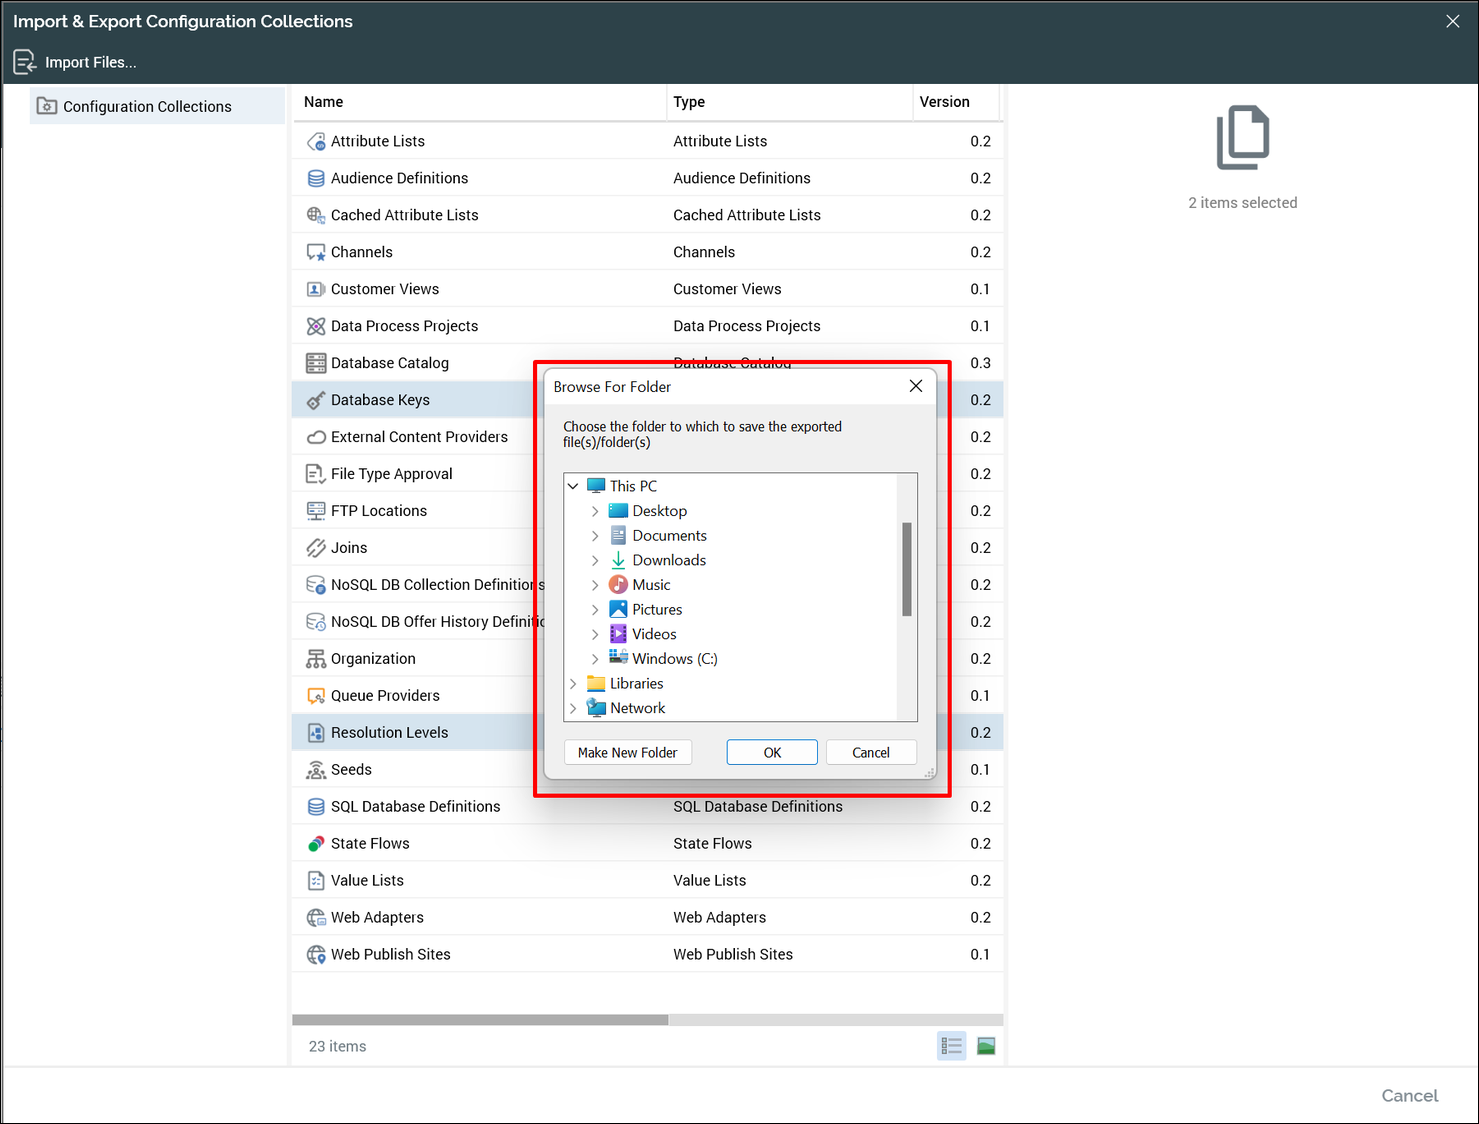
Select Export from the context menu. A file browser popup is displayed.
-
Browse for a location to store the objects that you have selected to export and click OK. The export process will begin.
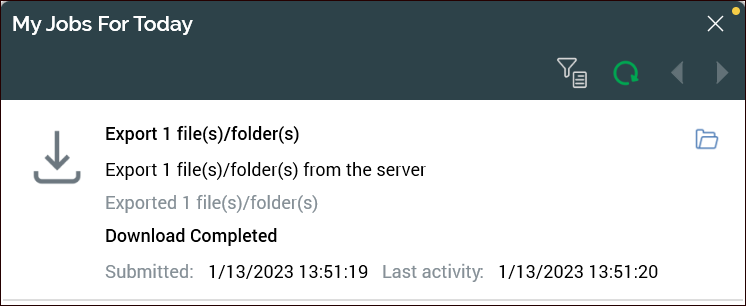
The My Jobs For Today popup is displayed. When the export job ends, the popup displays the text Download Completed (assuming there were no errors).
-
Click the folder icon to display the object export folder. A single file is listed (this will be a
ZIPfile if multiple files were generated).
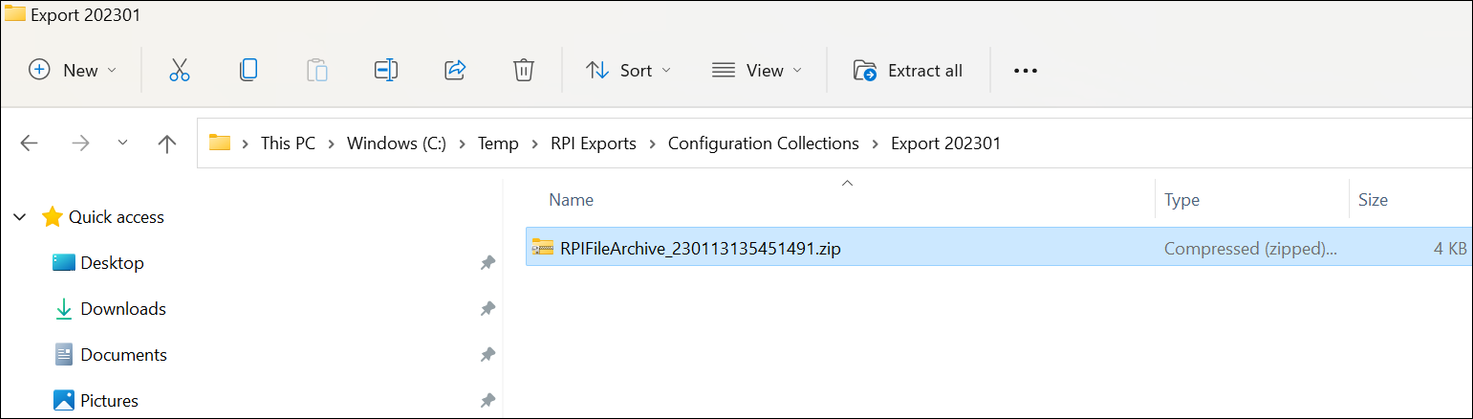
If one file was generated (or if a ZIP file was created and you extract the file) you will see one or more files with the .rpf extension.
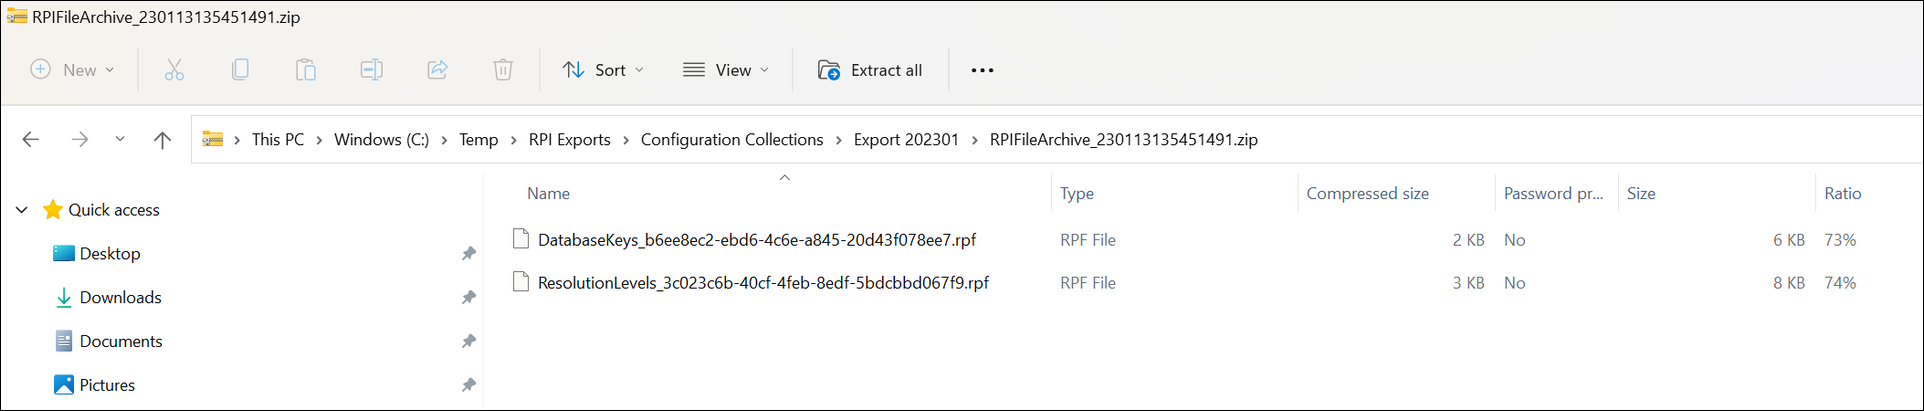
Use these RPF files to import to the other tenant in the next section.
Import configuration objects: different cluster
-
Log in to the other (target) tenant.
-
Navigate to the Configuration section of the RPI client and click Import & Export.
-
At the top left of the displayed window click Import Files… The Import Files dialog box is displayed.
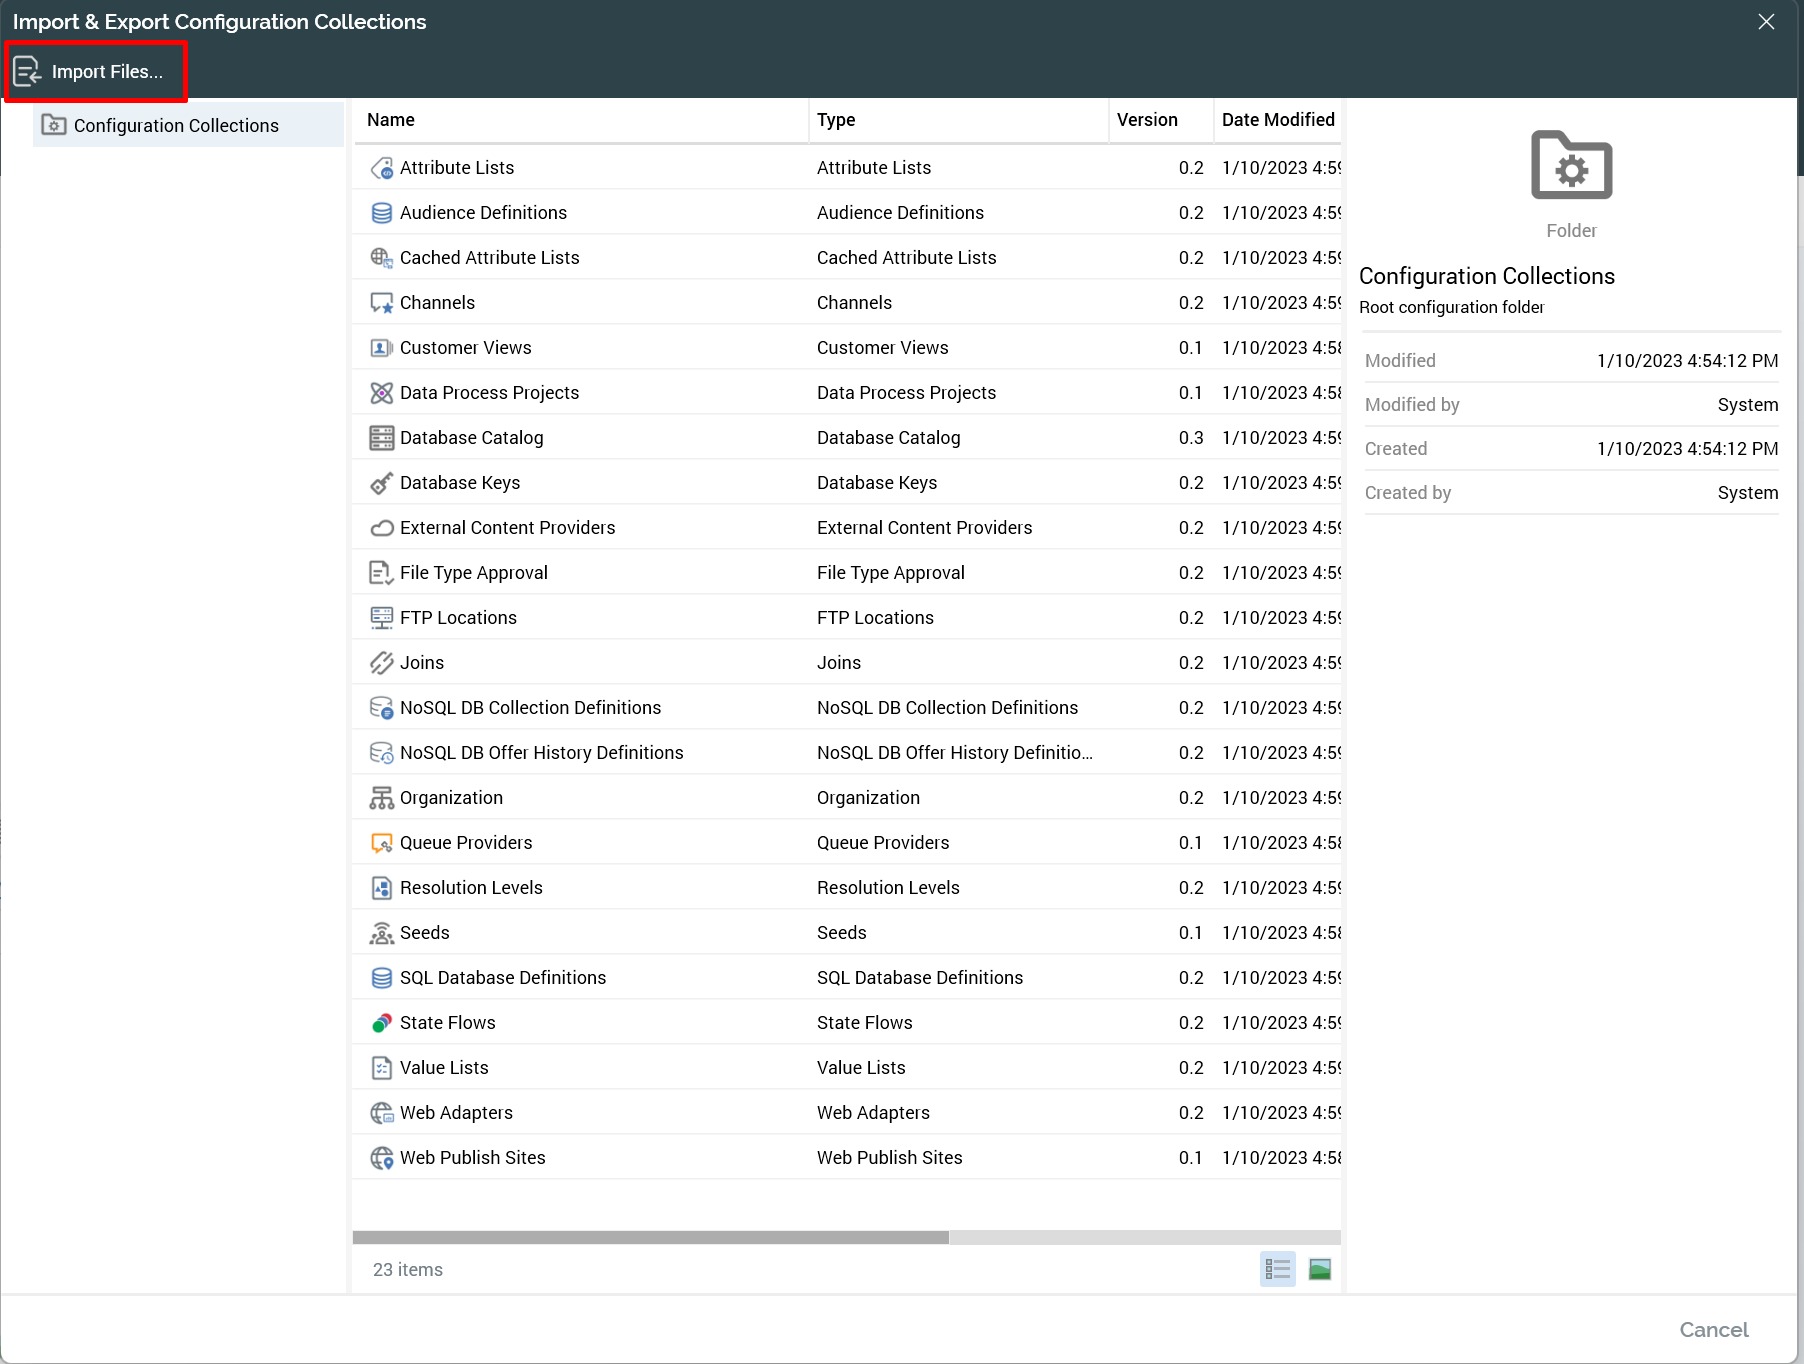
-
In the top section of the Import Files dialog, choose the files to import using one of the following methods.
-
Drag and drop the files on to the import space.
-
Click the add icon
to browse for the files.
-
-
Select the
RPFfile or theZIPfile containing multiple files.
-
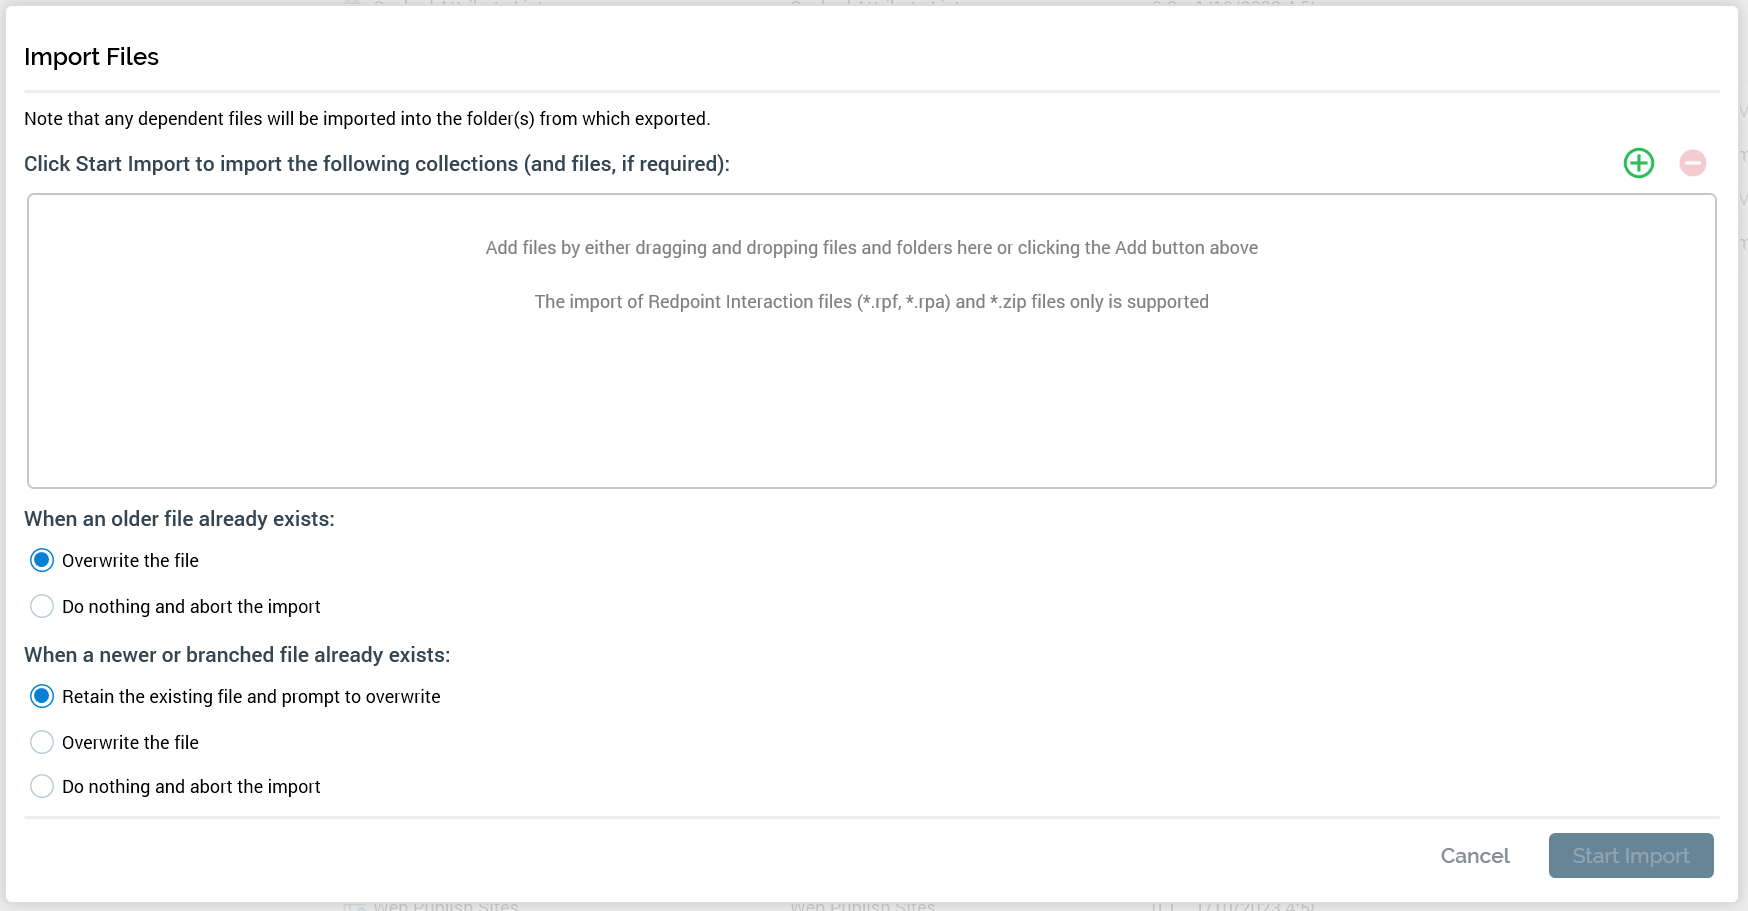
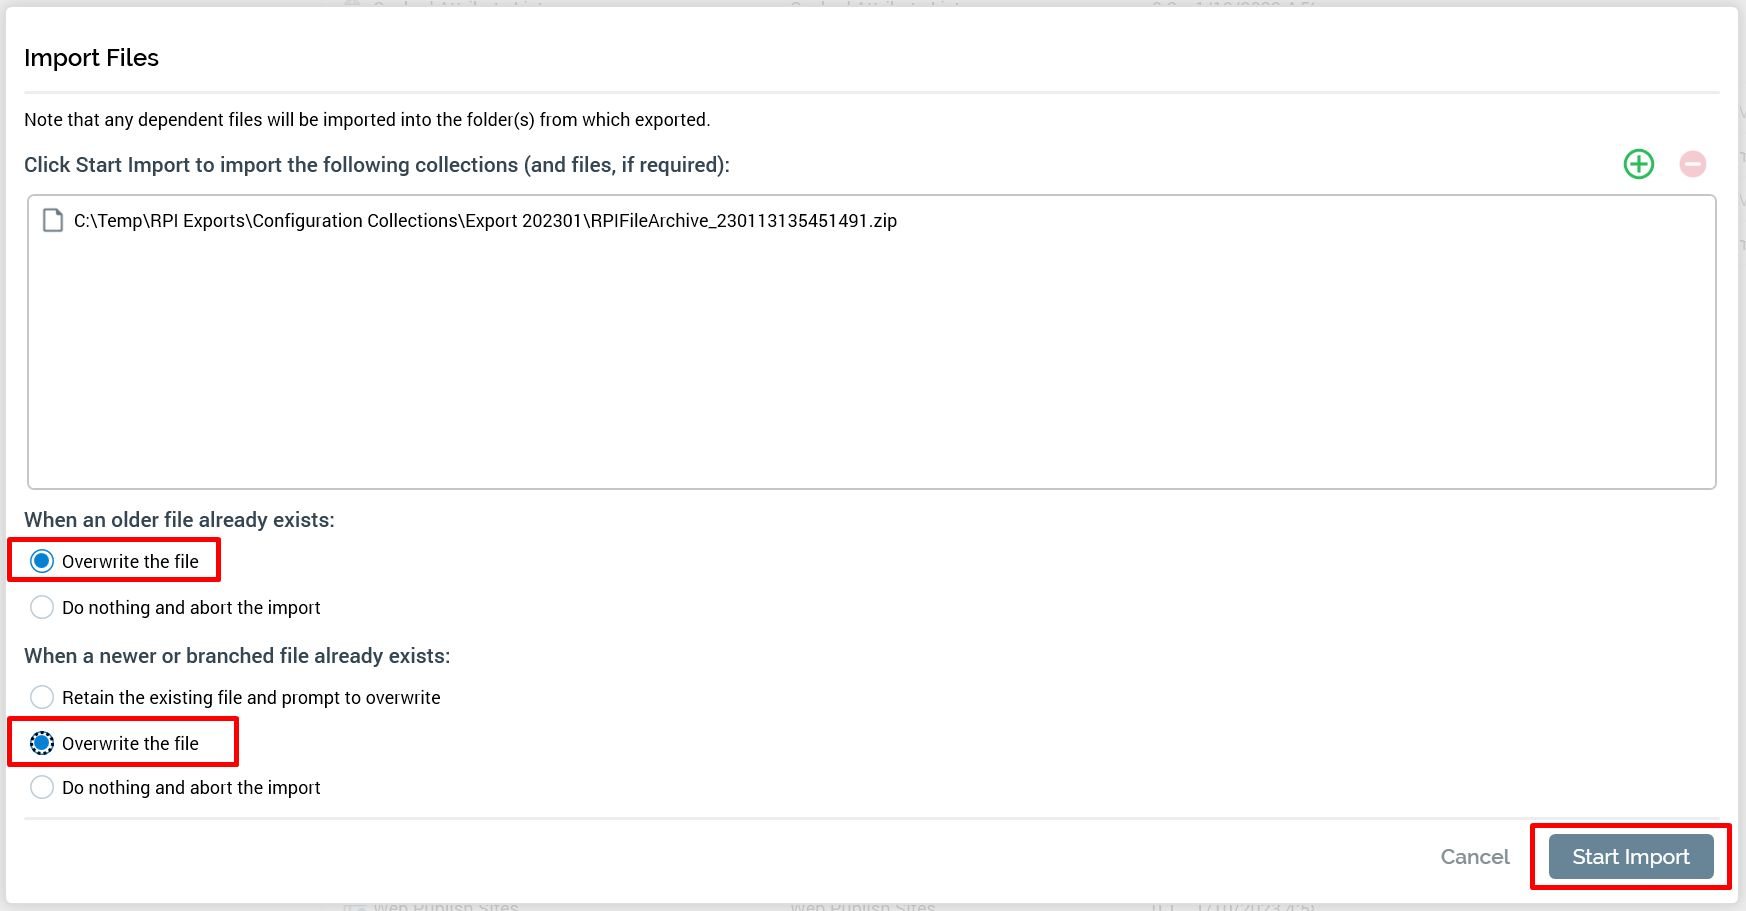
Choose how you want to handle the import process if the objects (files) you’re importing already exist in the location where the objects are being imported.
-
When an older file already exists:
There are two options you can select for this scenario:-
Overwrite the file
-
Do nothing and abort the import: If you are concerned about potentially breaking things in the tenant to which you are importing the objects, this is the option to select.
-
-
When a newer or branched file already exists
There are three options you can select for this scenario:-
Retain the existing file and prompt to overwrite: prompts you to decide (for each of the objects that encounters this scenario) whether to overwrite the object.
-
Overwrite the file
-
Do nothing and abort the import: If you are concerned about potentially breaking things in the tenant to which you are importing the objects, this is the option to select.
-
-
The Overwrite… and Do nothing… options are a cautious way to approach the import, whereas in the Retain… option you are making an explicit decision to overwrite the files in the tenant. Let your confidence in the impact of importing the objects help you determine what setting is best to select. In the following screenshot we have chosen to overwrite the files in both cases.
-
Click Start Import.
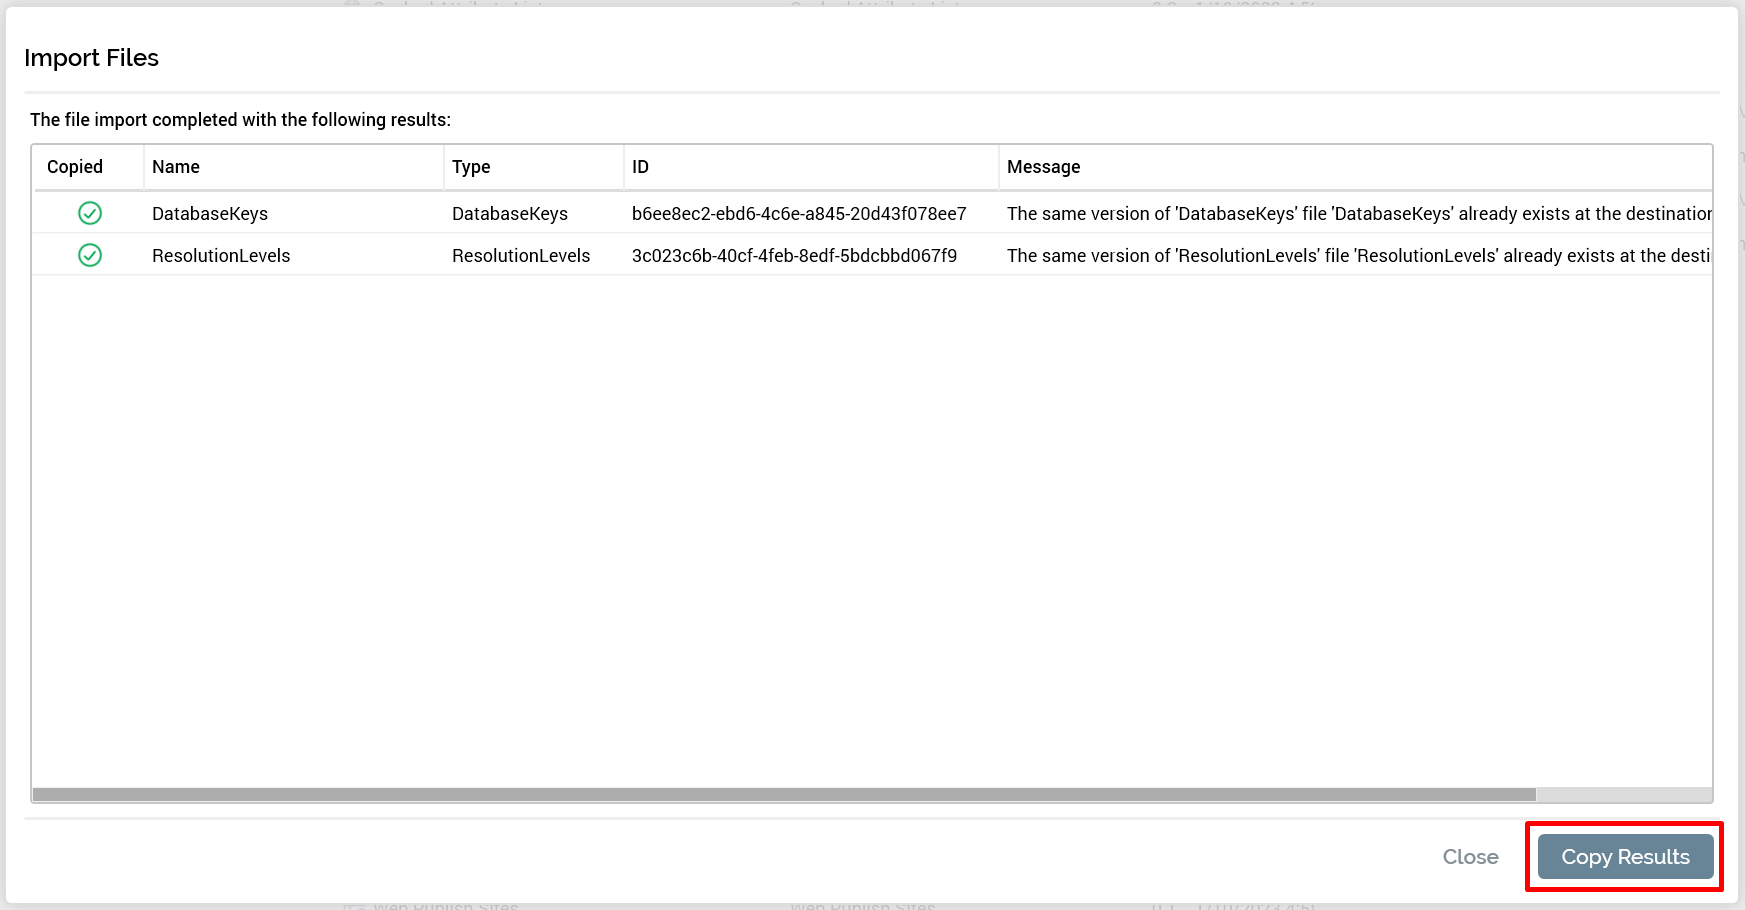
After the import is completed, an Import Files popup is displayed that shows the status of each file that was attempted to be imported.
You can click Copy Results to the clipboard for further review or for logging the status of the input for documentation purposes.
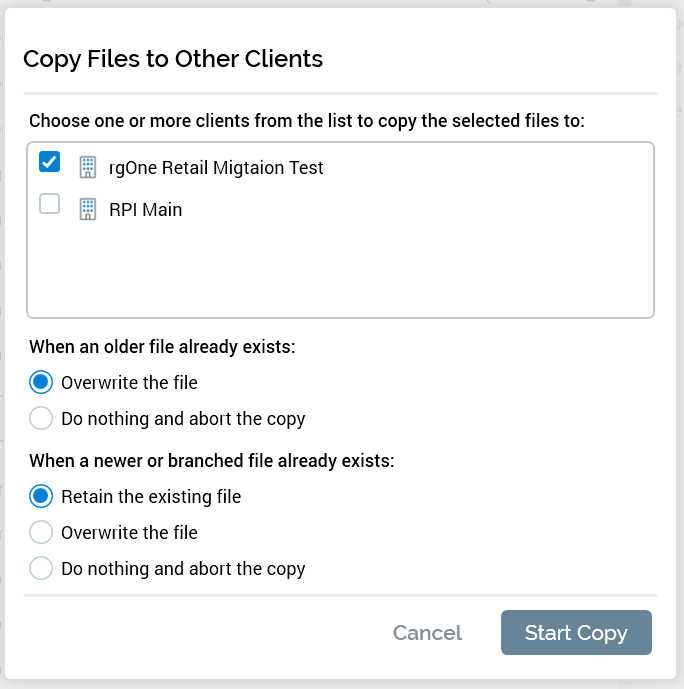
Copy configuration objects: same cluster
Alternately, if the target tenant is on the same cluster as the source tenant, you can copy the configuration collections directly to the target tenant.
-
Click Import & Export (noted in previous section).
-
Select the collections to migrate.
-
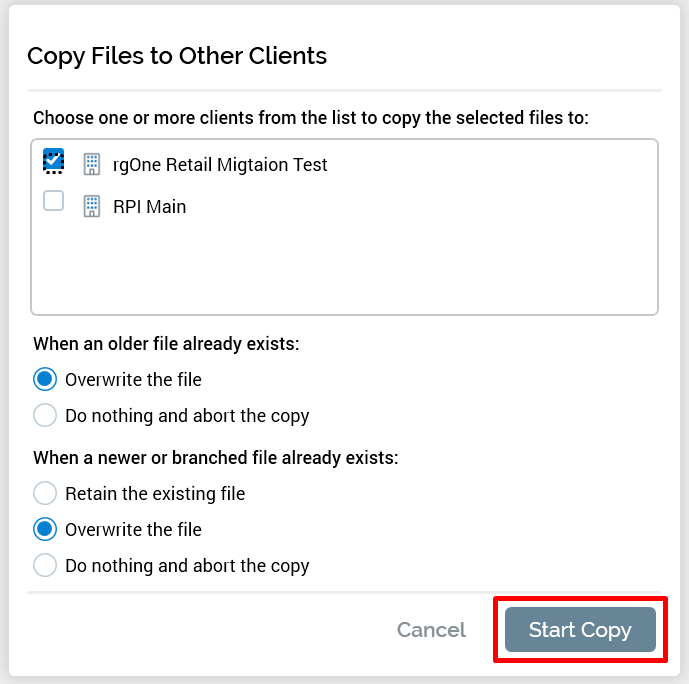
Right-click one of the highlighted collections and choose Copy to other clients… A dialog box is displayed (shown in the next screenshot) that lists the other tenants on the cluster to which you can copy the configuration.
-
Select one or more tenants to copy the configuration to.
-
Choose how you want to handle the copy process if the objects (files) you’re copying already exist in the location you’re copying to.
-
When an older file already exists:
There are two options you can select for this scenario:-
Overwrite the file
-
Do nothing and abort the copy: If you are concerned about potentially breaking things in the tenant to which you are copying the objects, this is the option to select.
-
-
When a newer or branched file already exists
There are three options you can select for this scenario:-
Retain the existing file and prompt to overwrite: prompts you to decide (for each of the objects that encounters this scenario) whether to overwrite the object.
-
Overwrite the file
-
Do nothing and abort the copy: If you are concerned about potentially breaking things in the tenant to which you are copying the objects, this is the option to select.
-
-
The Overwrite… and Do nothing… options are a cautious way to approach the copy, whereas in the Retain… option you are making an explicit decision to overwrite the files in the tenant. Let your confidence in the impact of copying the objects help you determine what setting is best to select. In the following screenshot we have chosen to overwrite the files in both cases.
-
After selecting the appropriate settings, click Start Copy.
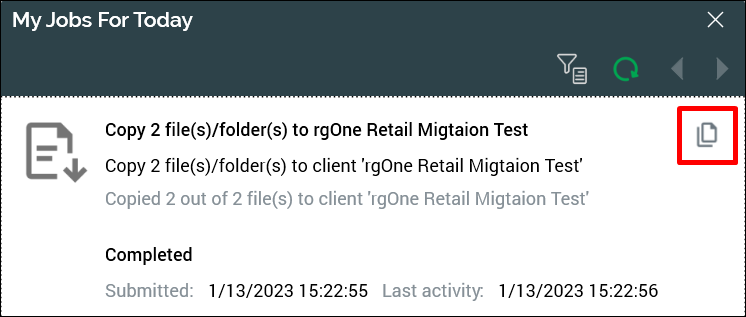
A job is generated and displayed on the My Jobs For Today popup dialog. To display a list of the copy result details, click the copy icon.
Migrate file system objects
After setting and migrating the configuration settings, the next step is to migrate objects from the file system. This consists of various objects, including but not limited to:
-
Attributes
-
Placeholders
-
Selection rules
-
Audiences
-
Interactions
-
Offers
These file system objects (like the configuration objects) can be moved in groups and do not need to be moved one at a time. The primary difference is that you can move a single object (if you want to) as the file system is not stored as a collection of objects. So, if you add a single new attribute, you can choose to move just that attribute and not the whole folder that contains the attributes. However, keep in mind that RPI will export any dependent objects as well, so if you export a selection rule, it will also move the attributes that are used by the selection rule. This should not cause any issues if you always move objects from the lower tenant to the upper tenant, but it can cause duplicate objects to be created if you do not adhere to this process and create some attributes in an upper tenant and then move a selection rule from a lower tenant. In this case you may end up with duplicate attributes that have the same name but different underlying unique identifiers. This will then lead to confusion on what attributes to keep vs. delete. This is an example of why it is imperative to move the primary objects like attributes from a lower environment to an upper environment and not to create any directly in an upper environment.
If you attempt to move a folder from one tenant to another, it will be created only if there are file system objects within that folder. So, if you define a folder structure that you want to migrate, but it doesn’t have objects in it, then they will not be created in the target system as you may expect.
We recommend that you build two primary root folders within your RPI deployments:
-
System level folder: This folder will contain objects that are maintained at a system level to support the use of RPI. That includes things like attributes and placeholders and other objects that support system usage. Naming the folder something like
RPIis a suggestion but anything that makes sense for the system administrator will work. -
Client root folder: The second root folder will be the client root folder. We suggest giving the folder the name of the client using the tenant. This folder will include all the objects that are unique to the client and their use of the system, which will include things like selection rules, audiences, interactions, and offers. The idea behind this configuration is that the clients should only be creating objects within the client root folder, whereas the system administrators should be managing the objects within the folder used for supporting the system usage, which we have referred to as the
RPIfolder in this document. Within this folder you may also have templates and examples that are defined by the system administrators.
The expectation for this is that you can import and export items for either folder, but if a client or user wants to export things, they will be doing so from the client folder, and the system administrator will be maintaining the other (RPI) folder. Ideally, any of the objects that are managed by the system administrator will be moved over before the user moves objects that reference objects maintained by the system administrator. For example, a system administrator will maintain the attributes, but a user will create a selection rule that uses the attributes, and the user will move the selection rule. Given that RPI will export the dependent objects, the attributes will also be exported, and an attempt will be made to import them, but they will be ignored on import because they already exist. This behavior depends on how you configure the import process (which is discussed in the following sections).
Export/import or copy file system objects
This section provides information about exporting and importing objects from the file system. This process will vary slightly, depending on whether you’re migrating to…
-
A tenant on a different RPI cluster (export/import)
-
A tenant on the same cluster (copy)
-
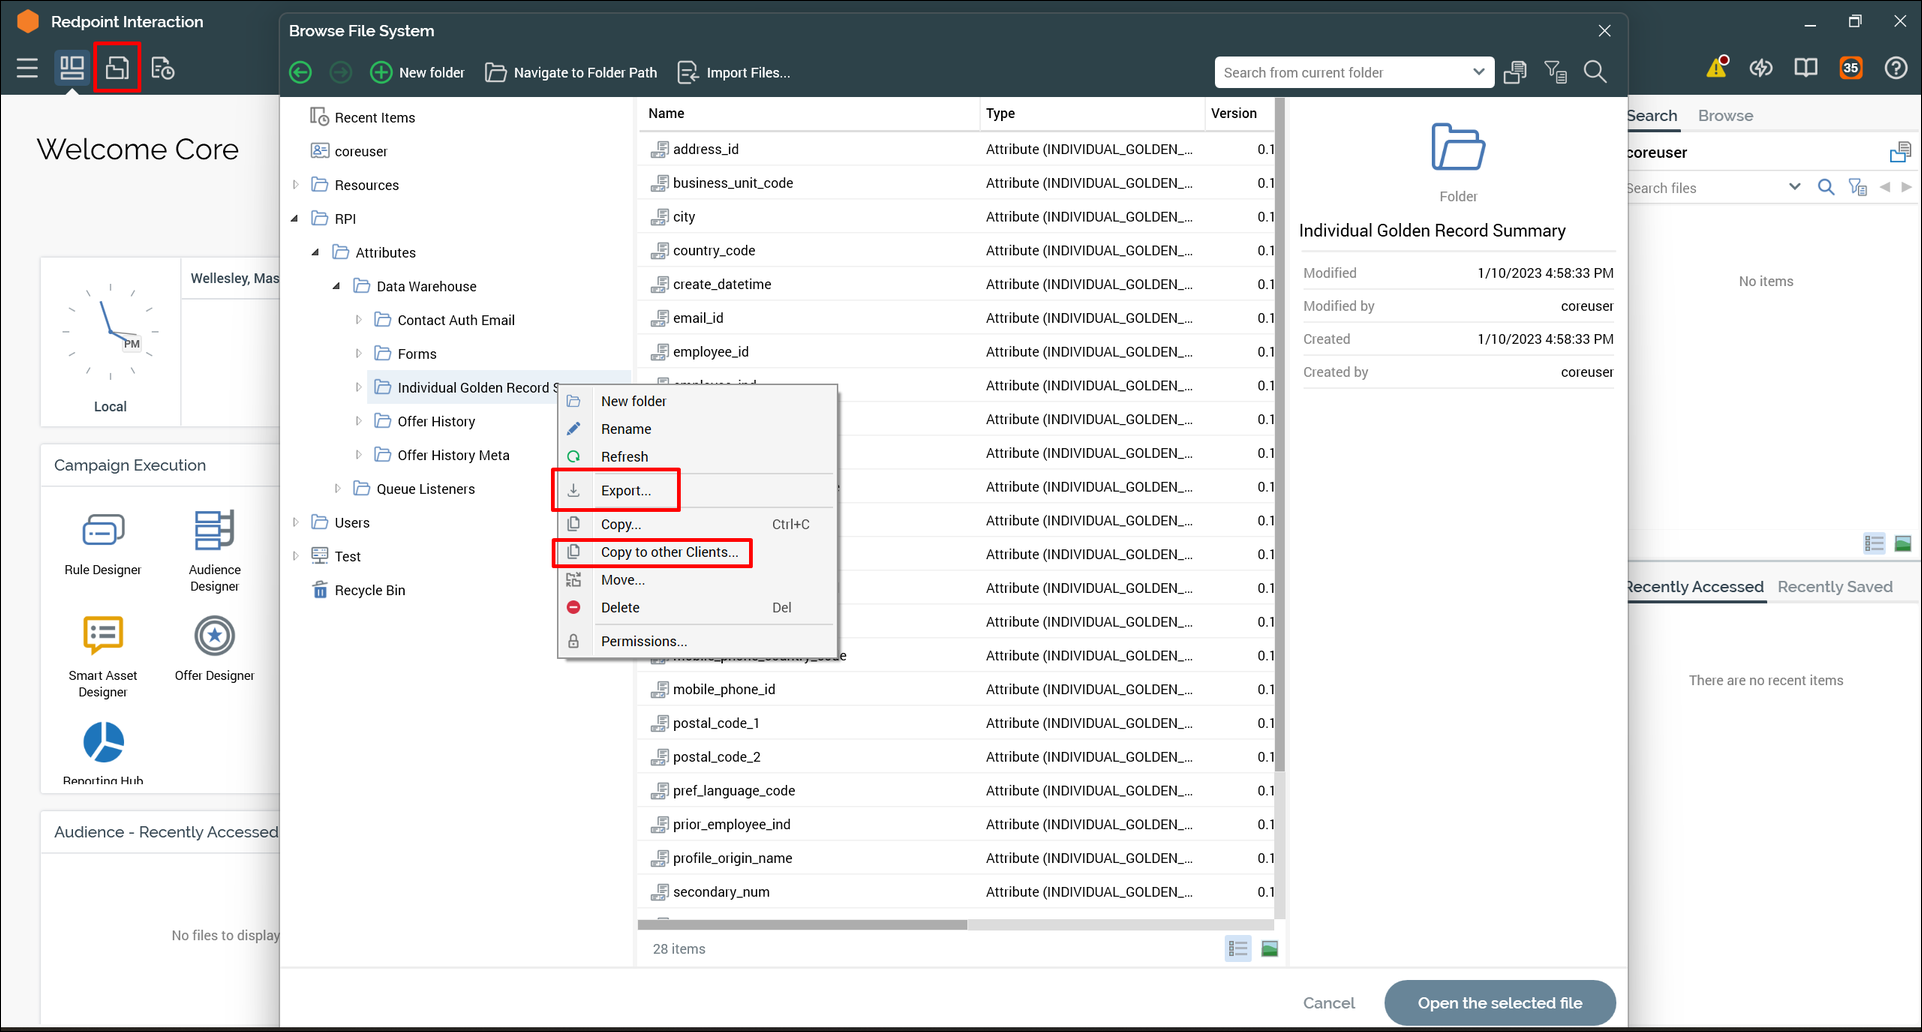
Click the File Browser icon at the top left of the RPI client.
-
Navigate to and select the folder or individual object(s) that you want to export. In this example we are exporting the folder Individual Golden Record Summary.
-
Right-click one of the selected objects and choose one of the following options:
-
Export... Select this option to export to a tenant that is on a different RPI cluster.
-
Copy to other Clients... Select this option to copy the objects to a tenant on the same cluster.
-
Export file system objects: different cluster
-
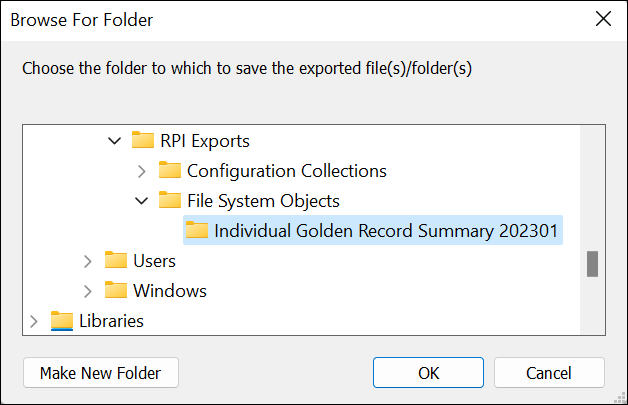
Select Export from the context menu. A folder browser is displayed.
-
Browse to the folder where you want to save the exported files and click OK.
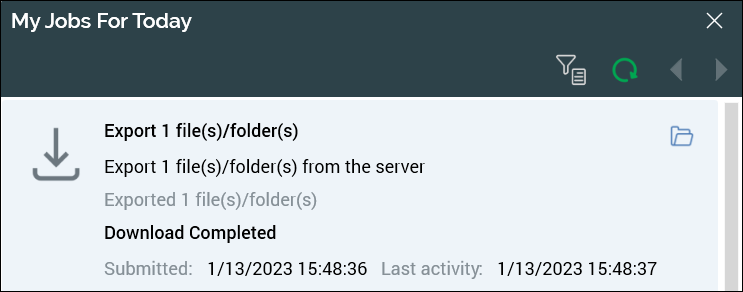
A My Jobs for Today dialog is displayed, which describes the actions of the job created to export the folder and the objects it contains.
Import file system objects: different cluster
-
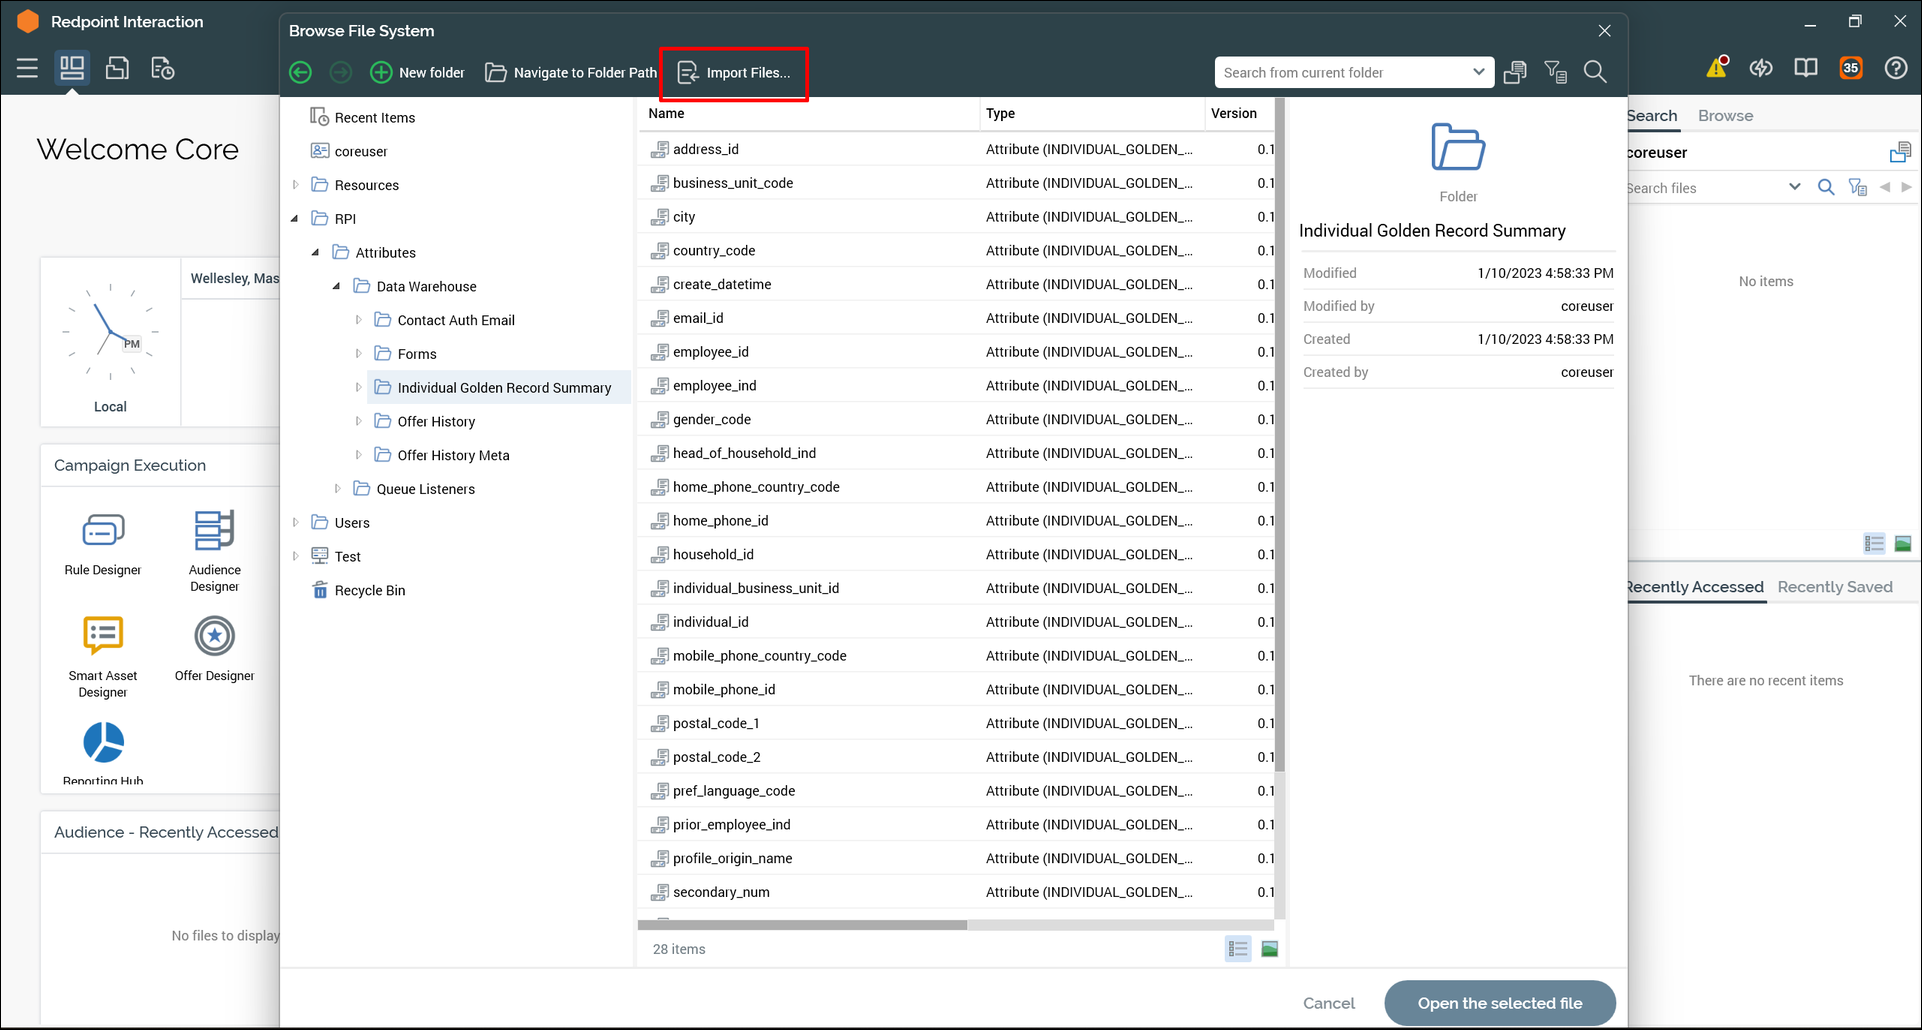
Navigate to the other (target) tenant, click the File Browser icon.
-
Click Import Files… at the top of the browser to import the files that were exported.
-
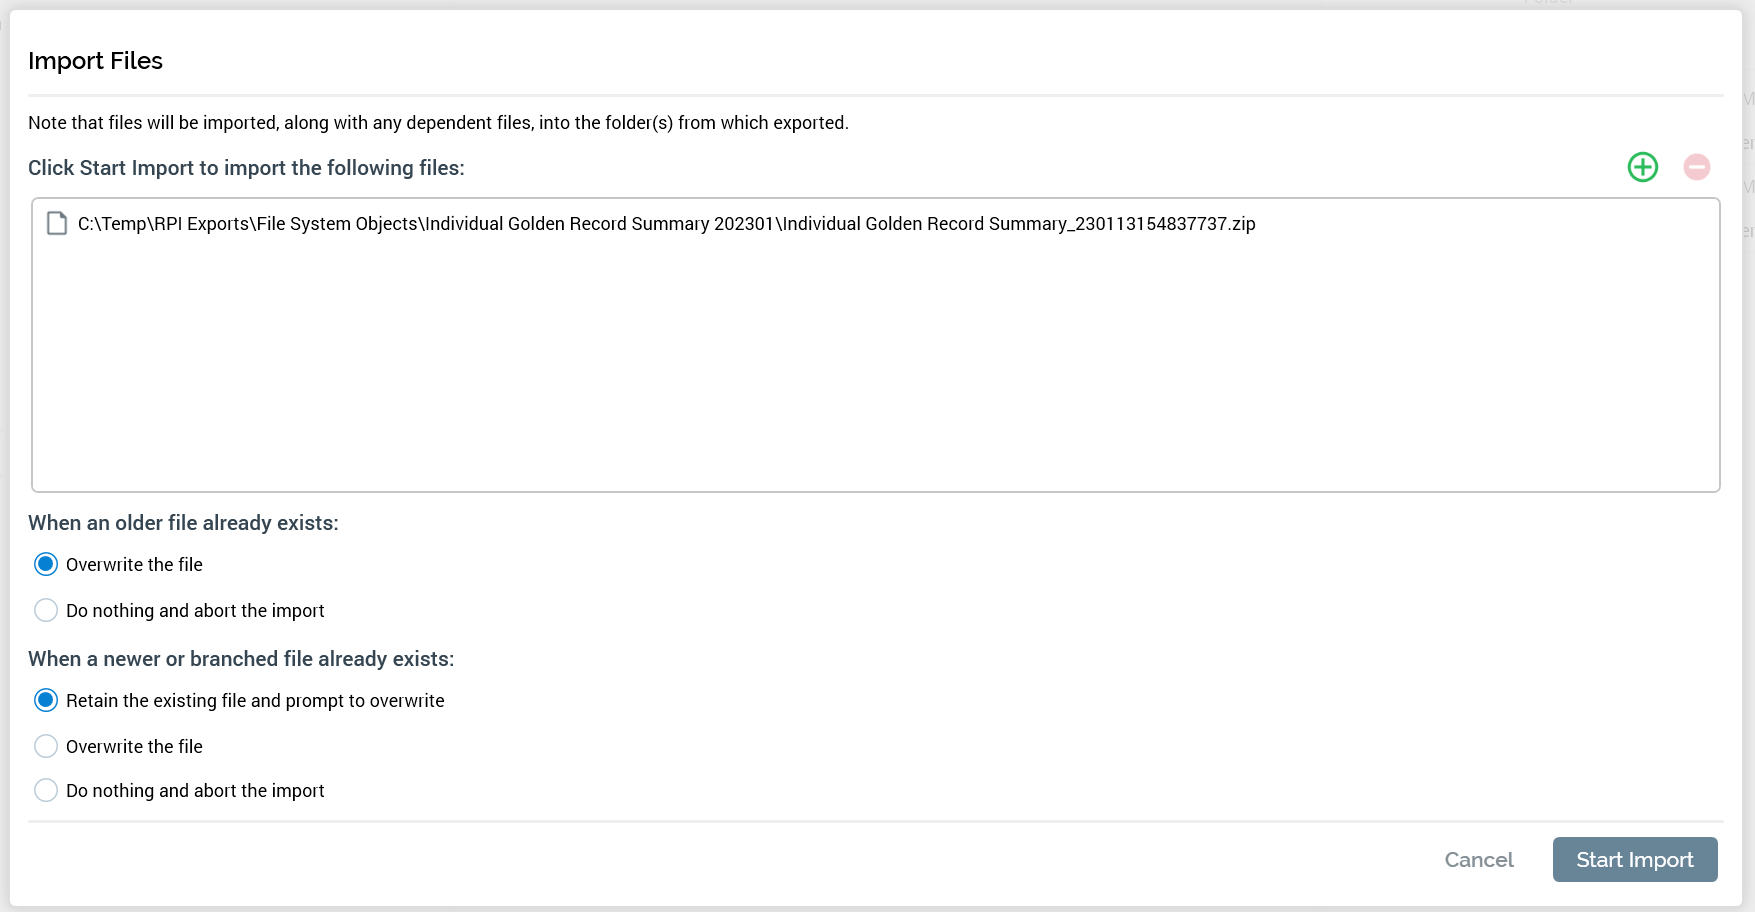
An Import Files dialog is displayed (similar to the dialog displayed when importing configuration collections). Confirm that the dialog has the appropriate options selected and click Start Import.
-
When the file import is complete, a summary of the import is displayed. You can click Copy Results to copy this summary to the buffer for validation and logging purposes.

Import Files results
Copy file system objects: same cluster
-
After selecting a folder or object(s) and right-clicking on one of the selected objects, choose Copy to other Clients…
-
In the Copy Files to Other Clients dialog, choose the clients to copy the files to as well as how to handle import.
-
Click Start Copy.
Appendix A: Configuration objects and file system objects
Configuration objects
|
Configuration object |
Grouping |
Exportable? |
|---|---|---|
|
Channels |
Connectors |
Yes |
|
Data Process Projects |
Connectors |
Yes |
|
External Content Providers |
Connectors |
Yes |
|
Web Adapters |
Connectors |
Yes |
|
Audience Definitions |
Database |
Yes |
|
Audience Snapshots |
Database |
Yes |
|
Catalog |
Database |
Yes |
|
Database Keys |
Database |
Yes |
|
Joins |
Database |
Yes |
|
NoSQL DB Collection Definitions |
Database |
Yes |
|
Resolution Levels |
Database |
Yes |
|
SQL Database Definitions |
Database |
Yes |
|
FTP Locations |
Environment |
Yes |
|
System Configuration |
Environment |
No |
|
Web Publish Sites |
Environment |
Yes |
|
Seeds |
Fulfillment |
Yes |
|
State Flows |
General |
Yes |
|
Attribute Lists |
General |
Yes |
|
Customer Views |
General |
Yes |
|
File Type Approval |
General |
Yes |
|
Organization |
General |
Yes |
|
Value List |
General |
Yes |
|
Cached Attribute Lists |
Realtime |
Yes |
|
Queue Providers |
Realtime |
Yes |
|
User Groups |
User Management |
No |
|
Users |
User Management |
No |
File system objects
|
File system object |
Grouping |
|---|---|
|
Attributes |
System Configuration Generated |
|
Placeholders |
System Configuration Generated |
|
Selection Rules |
Audience |
|
Cell Lists |
Audience |
|
Audiences |
Audience |
|
HTML Assets |
Content |
|
Text Assets |
Content |
|
Form Assets |
Content |
|
Smart Assets |
Content |
|
Image Assets |
Content |
|
Export Templates |
Content |
|
Offers |
Content |
|
Landing Pages |
Content |
|
Interactions |
Orchestration |
|
Dashboards |
Reporting |
Appendix B: Configuration objects are collections of objects
Configuration objects are collections of objects. In the screenshot below are three different Audience Definitions: Forms, Individual, and Queue Listener.
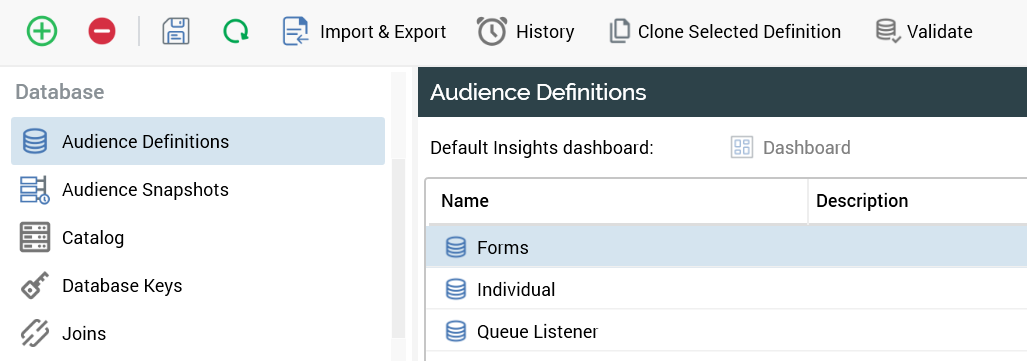
When you go to export the Audience Definitions, you can only select the Audience Definitions collection and not just one of the Audience Definitions within the collection. As you see in the left-hand panel of the screenshot below, the reference is Configuration Collections which you can import or export.
This means that you need to keep all Configuration Collections consistent across tenants and any new items added to a collection or changes to an item in a collection will all be moved at the same time. Always make changes to collections in lower environments and move them up to upper environments to keep them consistent, otherwise you will encounter consistency issues and run the risk of overwriting changes to the collections in upper environments if they are not made in lower environments first.
Appendix C: Questions and answers about importing objects
Below is a list of questions that you may have after reviewing this document, along with answers.
-
Question: We have the option to abort or overwrite based on an object being newer. What timestamp determines that, the modified date in the source system or when you export it?
-
Answer: It is based on the modified date in the source and target systems.
-
Question: Since the only options are to abort or overwrite objects, what situation creates duplicates?
-
Answer: You would not get duplicate objects with either of these options. Abort will keep the existing object in the target system, and overwrite would overwrite the target system with the object from the source system. If you are prompted with this question, it is comparing the same object based on its underlying ID, which means that no duplicate would be created. Duplicates are created when the same object doesn't have the same underlying ID, and in that case the duplicate would get generated, but you wouldn't get any indication of it until you went to look for it in the files system and see two of the same objects, as the underlying IDs would be different.
-
Question: When importing attributes and the underlying database table isn’t there, what happens?
-
Answer: Nothing will happen; the object will get created, but if you use an object that references it, like a selection rule, that is when you will get the error that the database table and field are not found.
-
Question: When importing attributes, what happens if the underlying database table is there, but the catalog isn't synced? In other words, should you sync the data catalog before bringing in attributes?
-
Answer: Same as above, the attribute will get created, but will error when the selection rule is run. If you go and sync the catalog and the table and field is now seen by RPI and rerun the selection rule, it will complete successfully. The order doesn’t matter, but it is preferable to sync the catalog first, although not required.
If we didn’t answer your question, please follow up with your Redpoint contact or support@redpointglobal.com with any additional questions.