

Use case description
This guide shows you how to create and use an Attribute List in a Realtime Decision (RTD). When a customer visits your website, a Visitor Profile is created, which saves information about their behavior. We will use that information and the Attribute List to create a personalized experience on a landing page for the customer. An Attribute List is a way to standardize the possible values for a Visitor Profile Parameter. We will use Swagger to populate the Visitor Profile in lieu of building a robust website.
Prerequisites
The testing in this document assumes the ability to publish a landing page with your RTD to use for testing, and that will also require the web client.
The testing can be done directly through Swagger, without needing to publish a landing page and using the web client, but that is not how the testing is done in this example.
To execute the testing as defined in this document, you will need the following features enabled:
-
Web Published Sites
-
Used to publish landing pages for testing.
-
-
Realtime Web Client
-
The web client is used to test the RTD in this document, via the landing page.
-
Testing could be performed using server-to-server or the Swagger page as well.
-
High-level steps
-
Create an Attribute List
-
Create a Realtime Decision Rule
-
Create a Realtime Rule Smart Asset
-
Create a Landing Page
-
Test Realtime Smart Asset in Landing Page
Tools and configuration required in RPI
-
Attribute Lists
-
Realtime Decision Rules (Attribute Based Decisions)
-
Rule Smart Assets
-
Landing Pages
-
Realtime Swagger
Instructions
1. Create an Attribute List
You can create Attribute Lists under Quick Access > Management > Configuration.
-
Find and Select Attribute Lists in the scrolling section on the left-hand side (1).
-
Add a New Attribute List by clicking the green plus

-
The List can be renamed in the Details section, but must be configured by switching to Attributes (3).
-
Click the green plus

-
Build out an attribute for the product categories you want to track. When creating a custom attribute, define a Default value (1).
-
Define a Key Name for every attribute included (3).
-
You can enter a list in List Values (2) to standardize the values available for the attribute.
2. Create a Realtime Decision rule
Once you have the Attribute List configured, it is time to build the rule.
-
Go to Quick Access > Audiences > Rules.
-
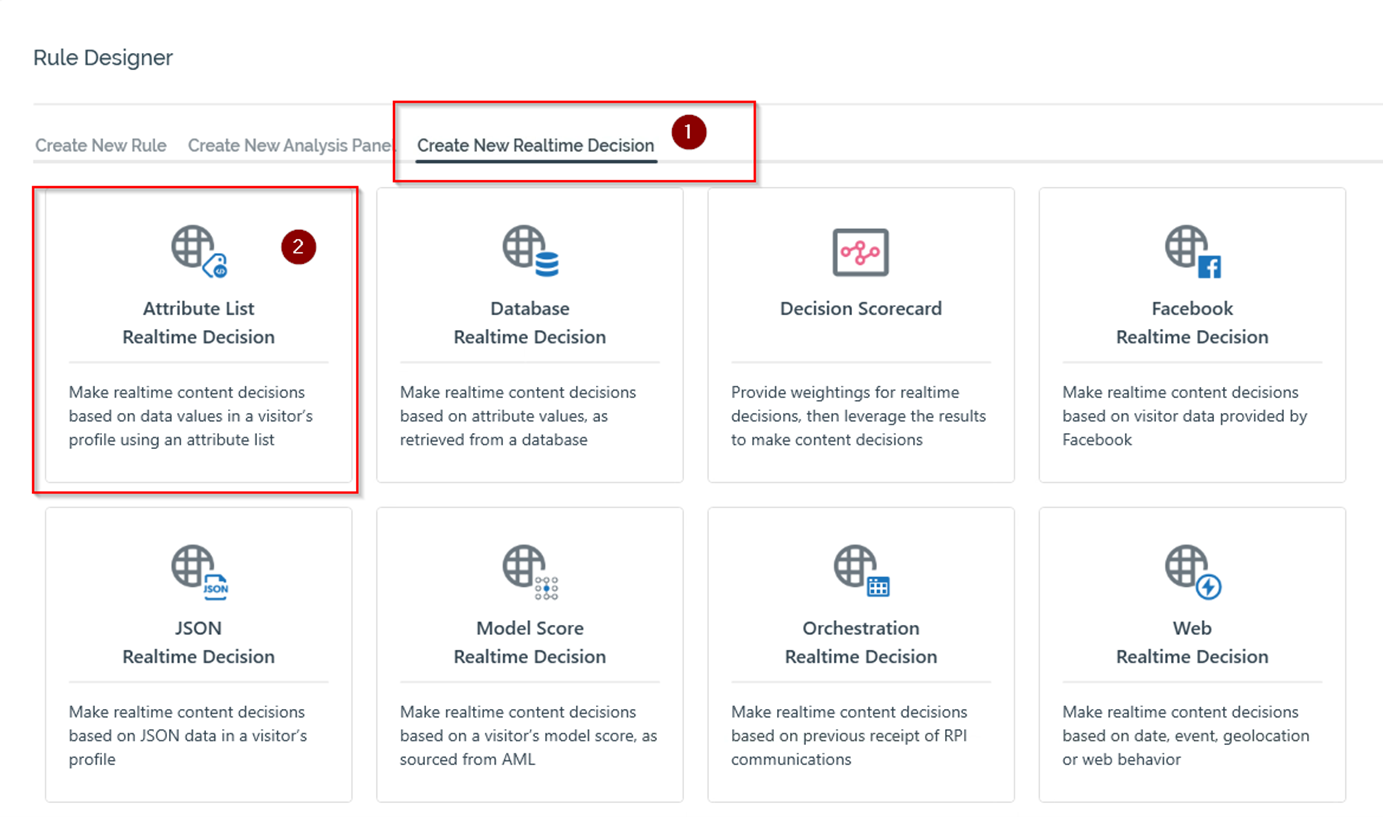
Select Create New Realtime Decision (1) and Attribute List Realtime Decision (2).
-
Once the rule is initialized, you should rename it (1).
-
Choose the Attribute List created above (2), then add (3) and configure a new criterion (4).
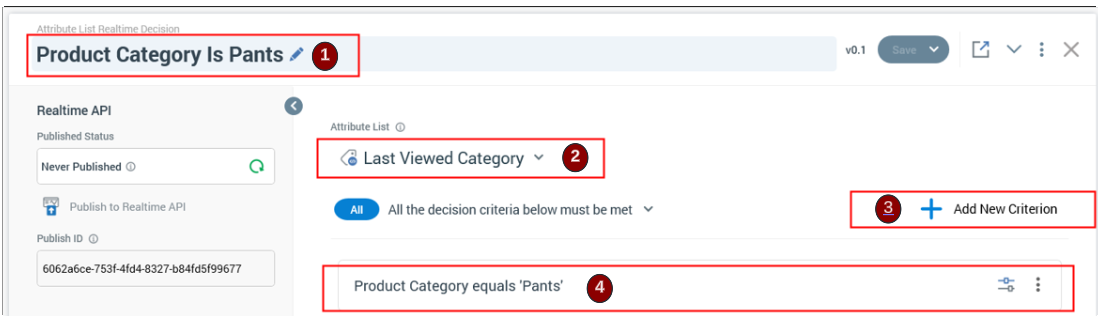
For information on building more complicated Attribute List rules, see Appendix B.
3. Create a Smart Asset
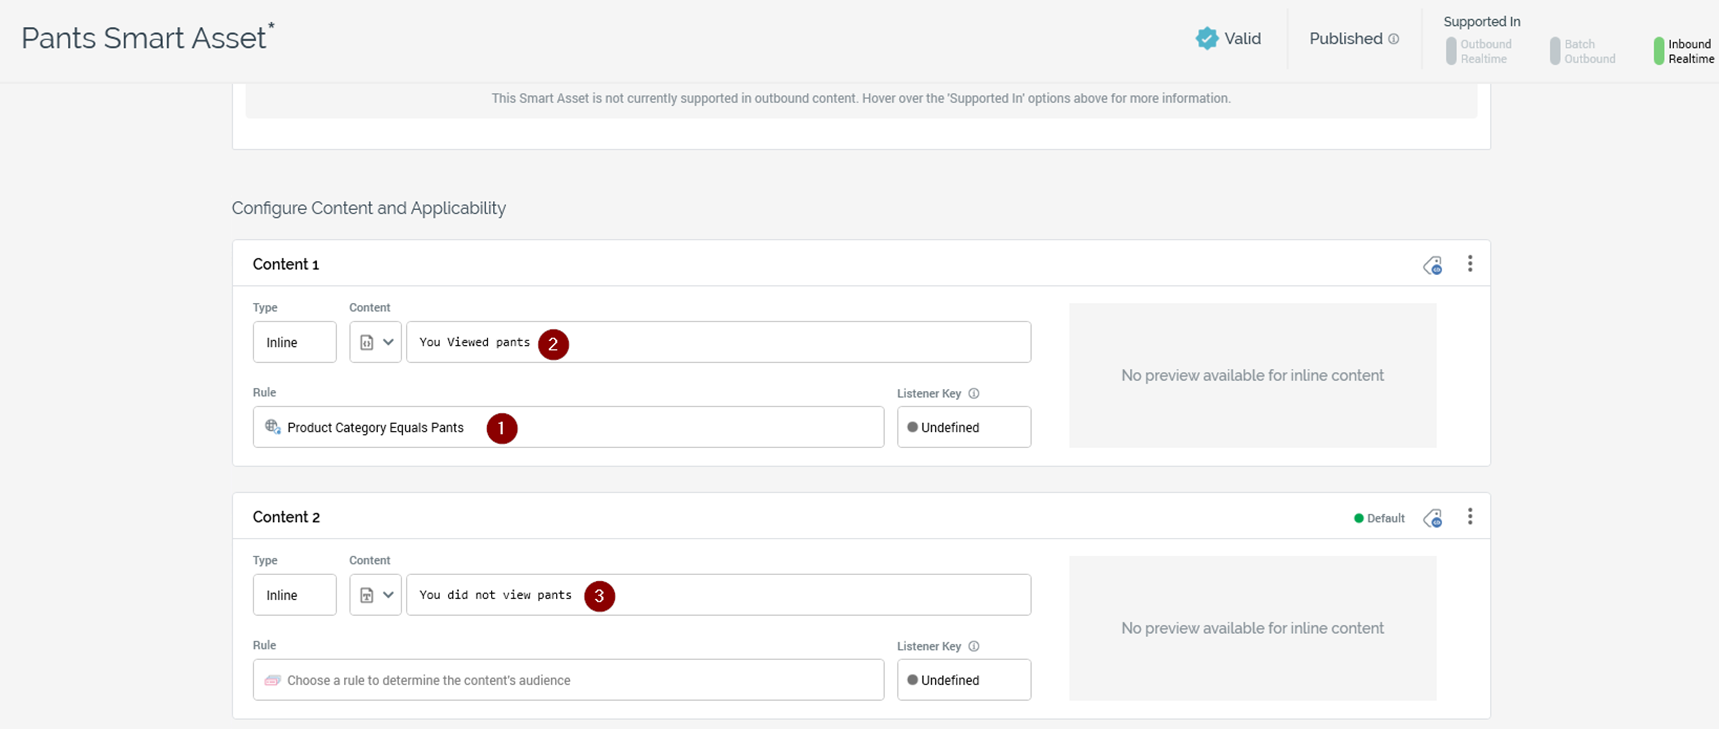
This rule must now be referenced in a Smart Asset; create a blank one at Quick Access > Content > Smart Assets.
-
Add the rule created above to the Smart Asset (1) and define some text that should appear when it is true (2).
-
Use the Add Content button at the bottom to create a default tier and add default text (3).
4. Create a landing page
This Smart Asset should now be referenced by a Landing Page.
-
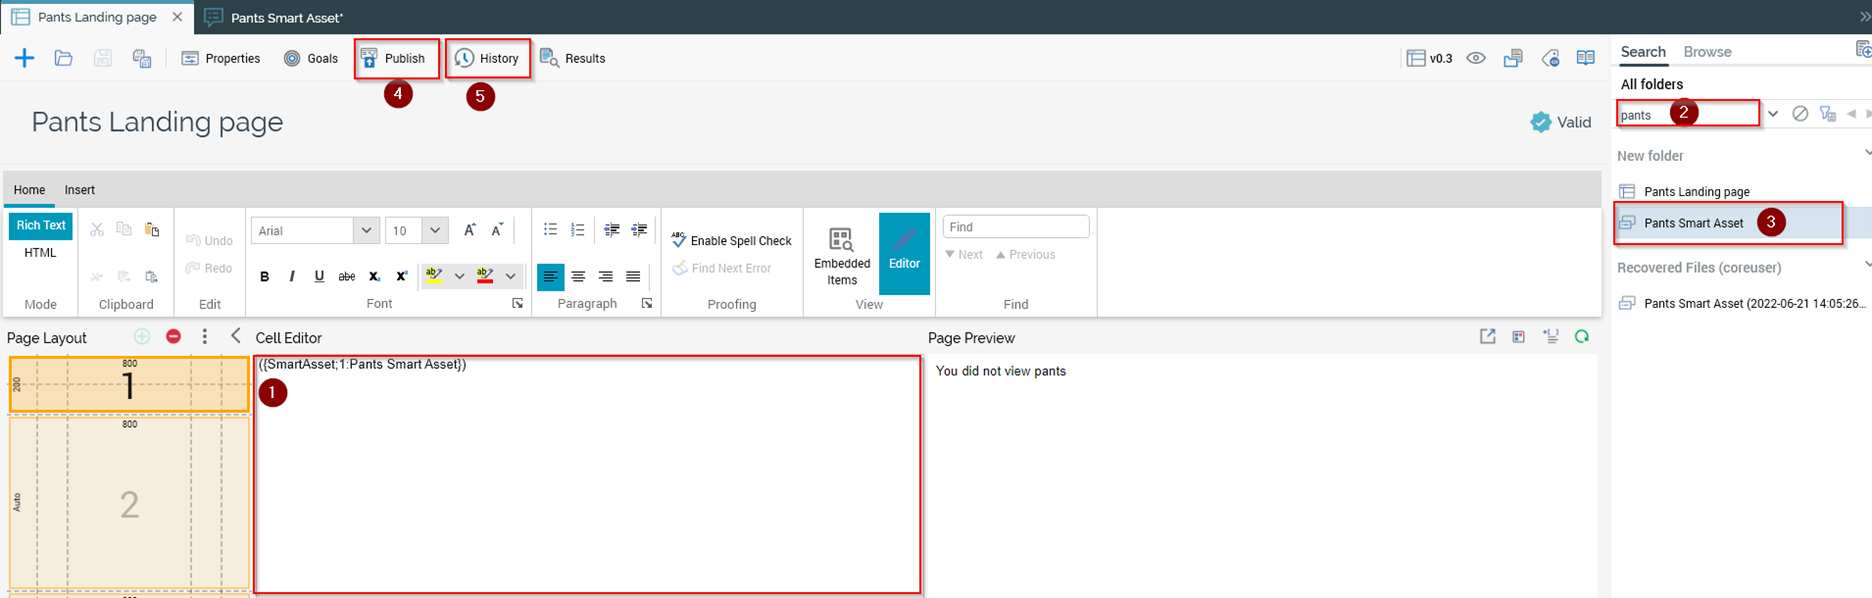
Open Quick Access > Content > Landing Pages. You can enter some surrounding text in (1) or just add your Smart Asset using this format:
({SmartAsset;1:**Smart Asset Name**}) -
You can also search for the one you created in (2) then click and drag it over to (1) from (3).
-
Once you are happy with your landing page, click Publish (4).
-
Click History (5) to find the URL where the Landing Page has been published.
-
Copy the Landing Page Published URL by clicking the button at (1).

-
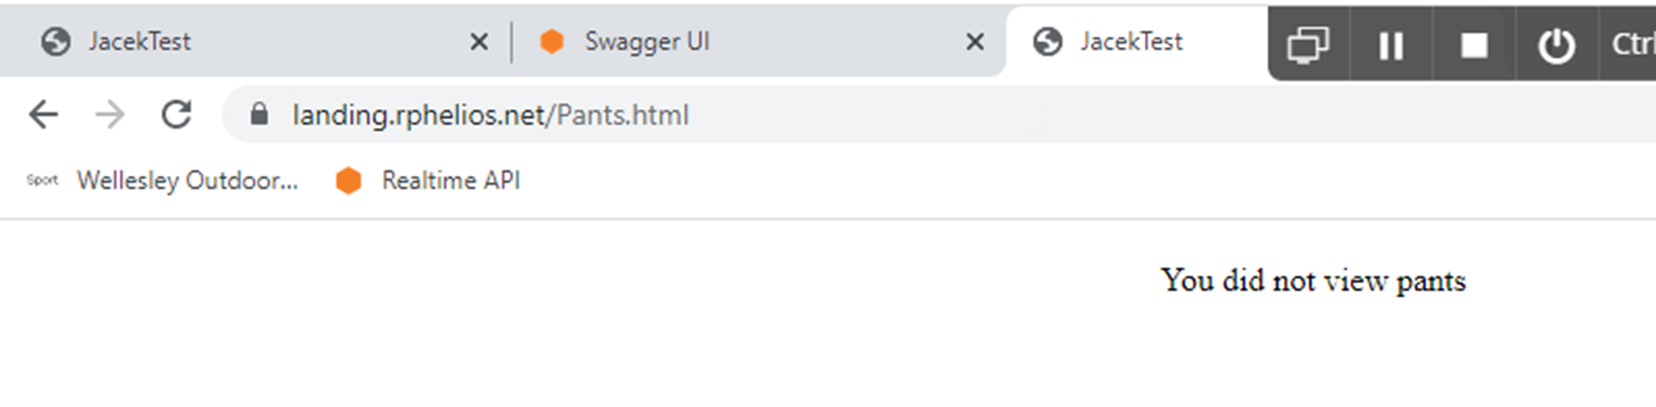
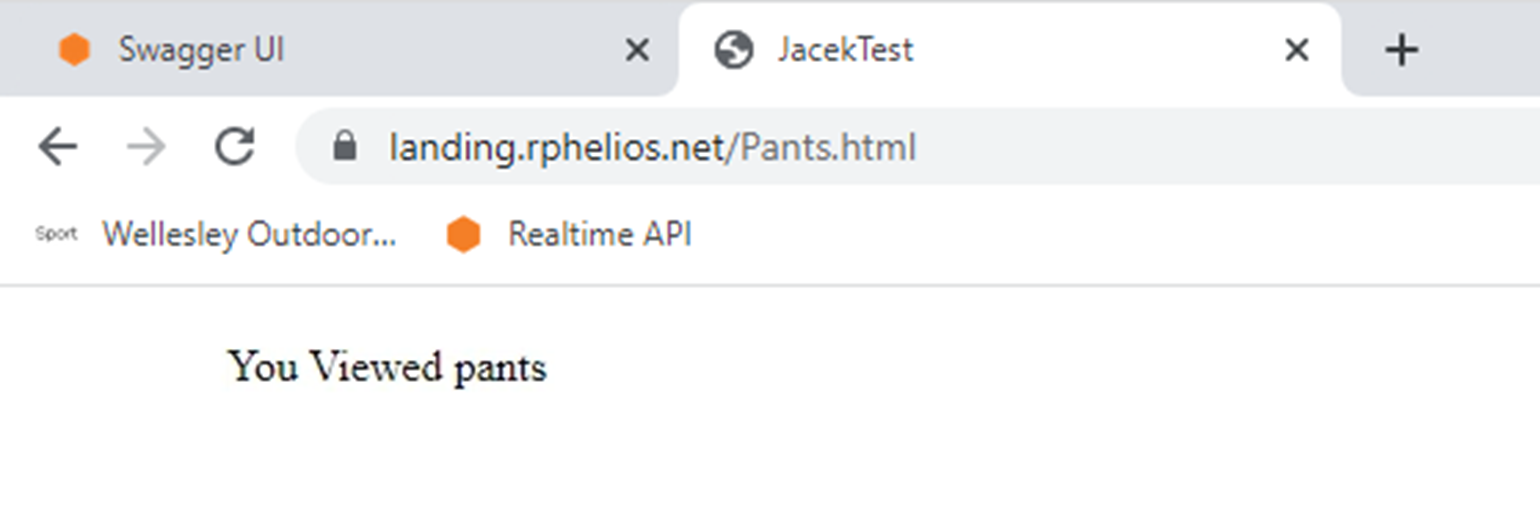
Paste the URL into an internet browser, and you should see your default text. We will need to populate values in your visitor profile using Swagger.
-
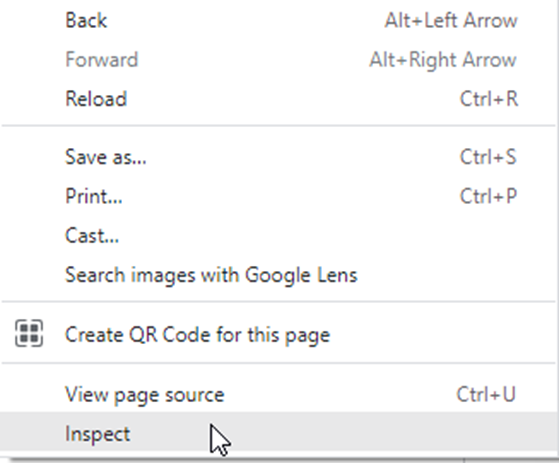
Right-click inside of your browser and select “Inspect”.
-
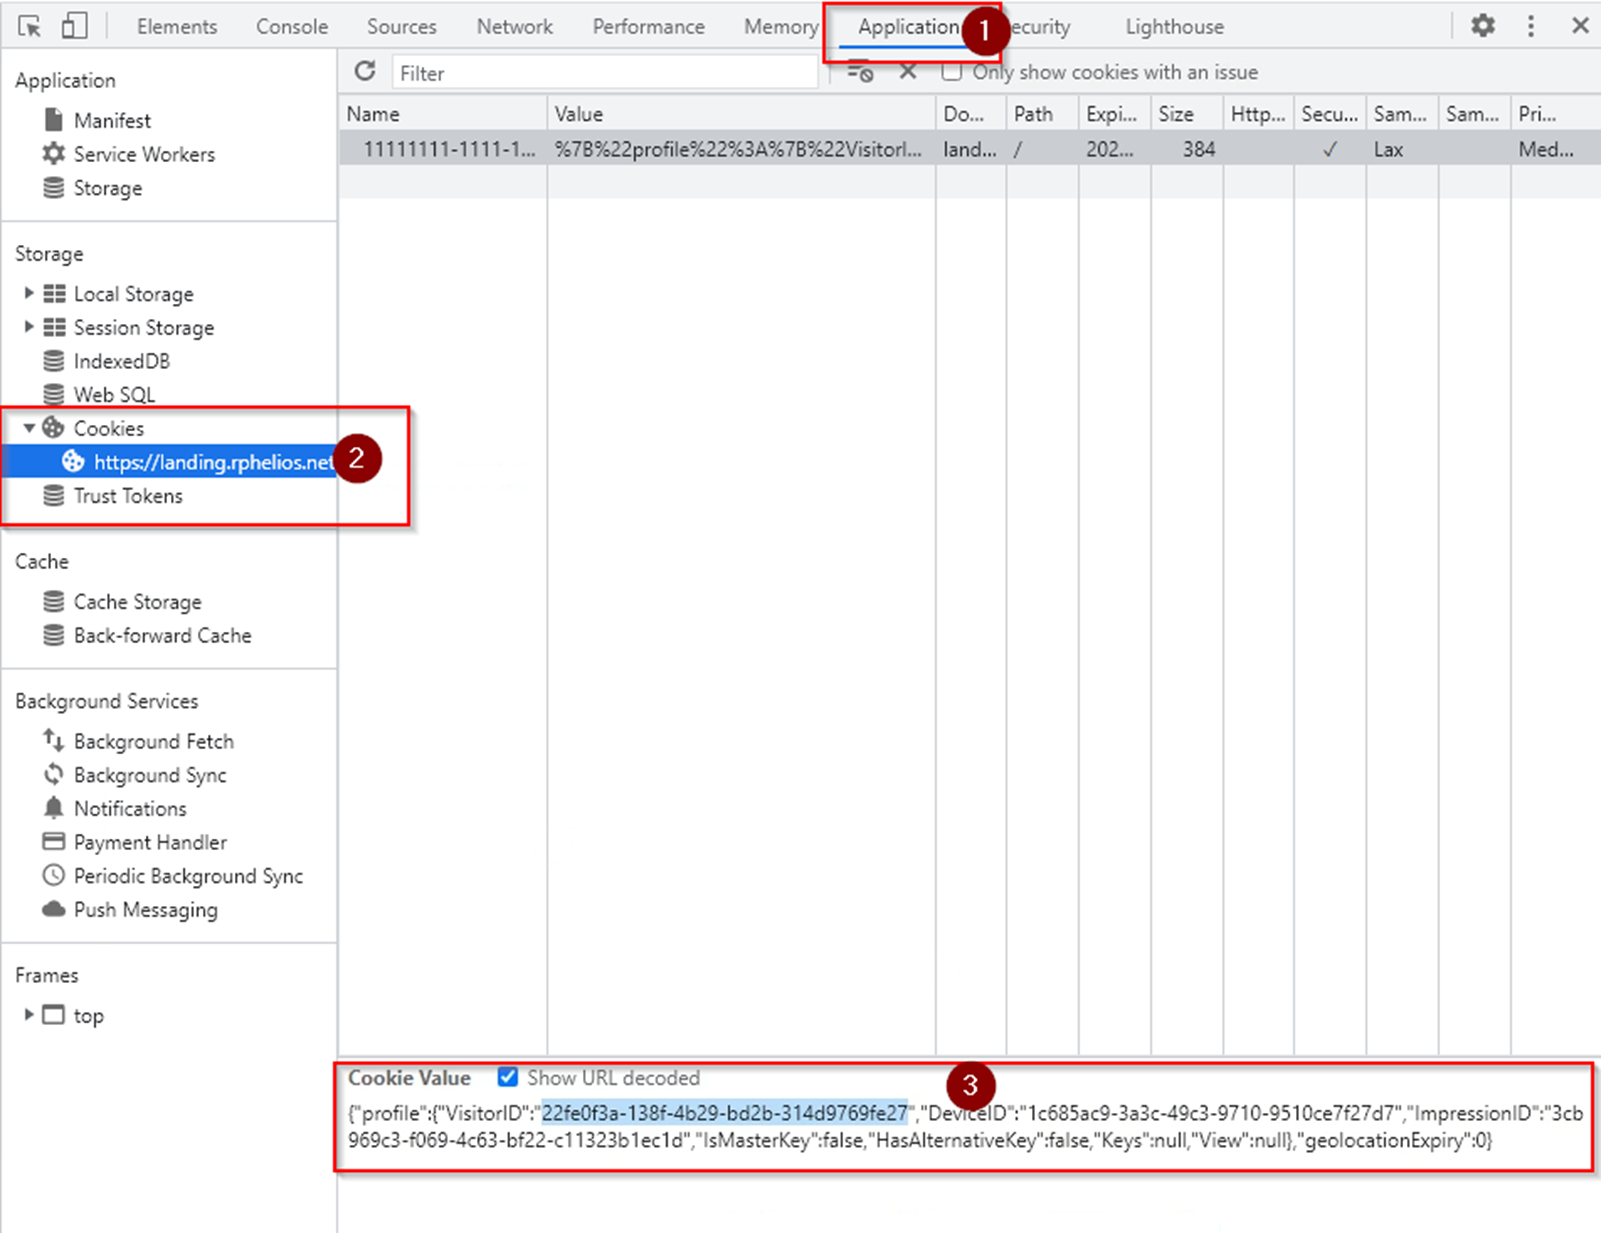
In the sidebar that opens, select Application (1) then navigate to the cookies for your landing page (2). At the bottom of your screen, there will be a Cookie Value with an entry for
VisitorID(3). Copy this value.
-
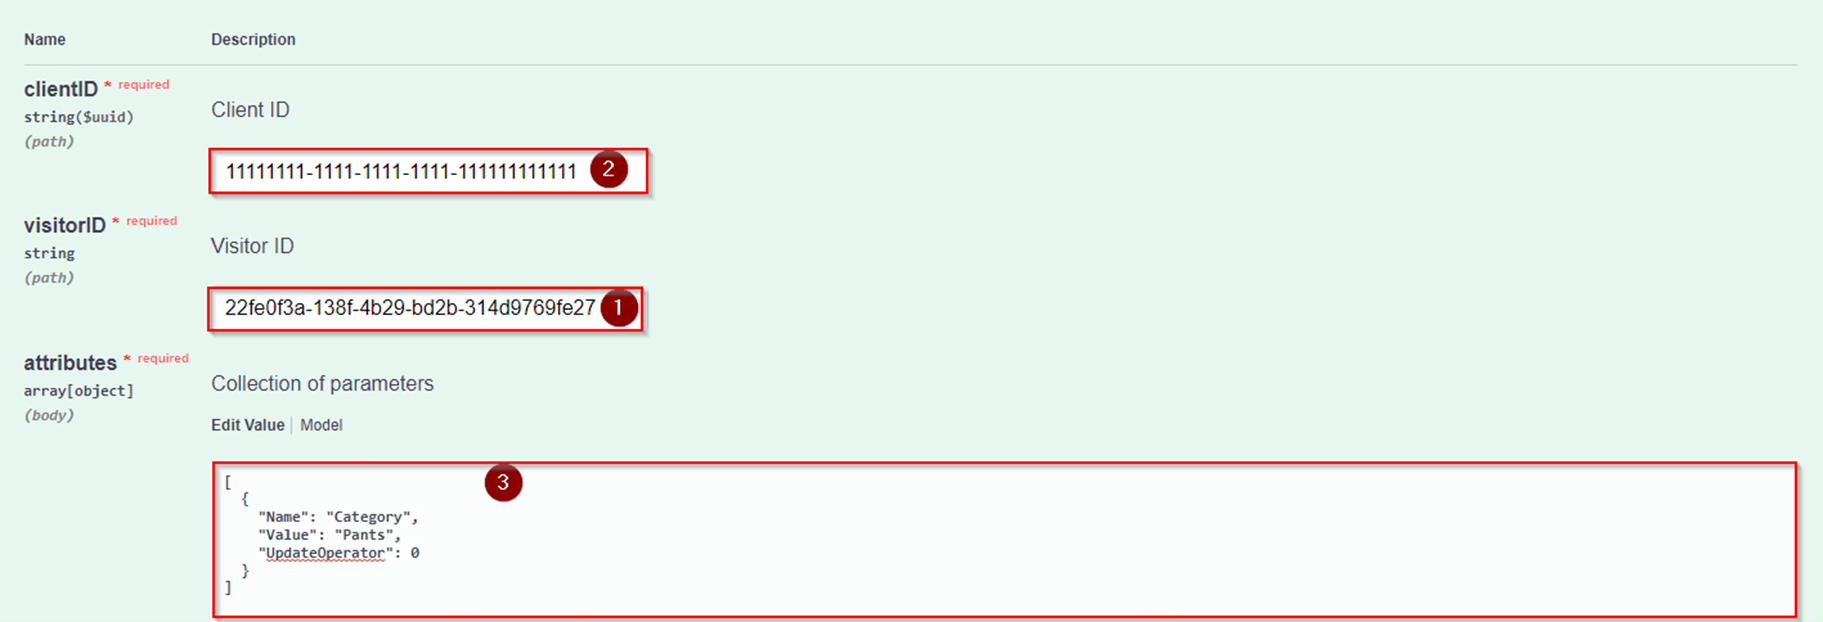
Navigate to Swagger in your browser and scroll to the Cache/Parameters endpoint (https://realtime.rphelios.net/swagger/#/Cache/Cache_AddVisitorParametersByVisitorID). Click the “try it out” button on the right. Enter the visitor ID you copied previously in the
VisitorIDfield (1).
-
Add your Client ID to the
ClientIDfield to (2, above) on the screen above. This can be found by opening your Smart Asset and clicking the Realtime API Scripts button (1, below) then taking the string of numbers and characters from the API call (2):
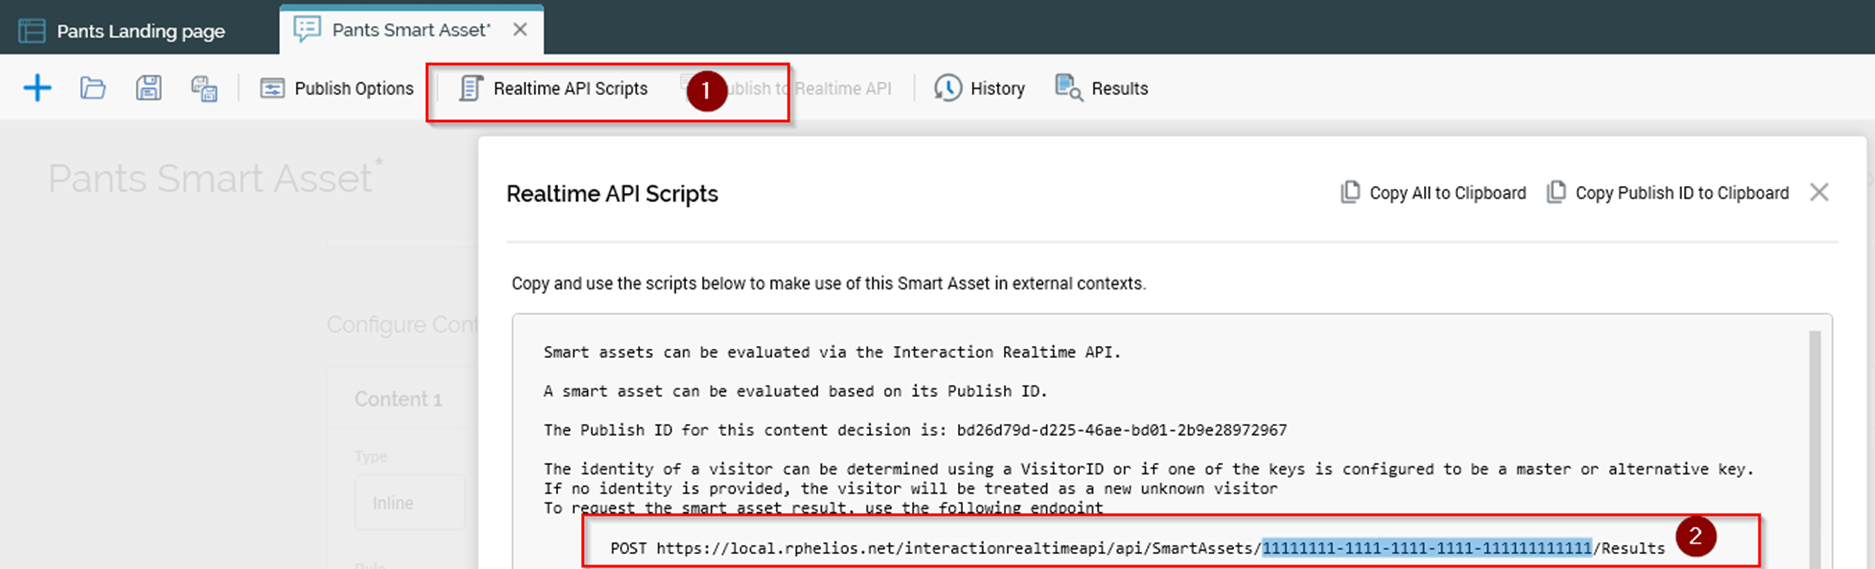
-
In (3, above) from Swagger, copy and paste from the opening bracket to the closing bracket, including the brackets:
[
  {
    "Name": "Category",
    "Value": "Pants",
    "UpdateOperator": 0
  }
]
See Appendix A for an explanation of what the available fields mean.
You can replace Category with the key name you chose for your attribute List if it is different. Similarly, Pants can be replaced if the value you reference in the rule is different. Click the execute button below to fire the API call.
Refresh your landing page, and it will now show the text that matches your rule in the Smart Asset.
Appendix A: Setting Visitor Profile Parameter with Swagger
The Visitor Profile Parameter call in Swagger has a few different fields we did not use in our example above.
{
    "Name": "string",
    "Value": "string",
    "ValueList": [
      "string"
    ],
    "ValueJSON": {},
    "UpdateOperator": 0
 }
-
"Name"is the key with which the data you are storing should be located. -
Only one of the
"Value","ValueList", and"ValueJSON"fields can be used at a time.-
"Value"takes a single data element and is the simplest of the three. -
"ValueList"can hold multiple elements concurrently. -
"ValueJSON"is used in more complex situations where the data structure of the parameter requires more information.
-
-
The entire list can be replaced, or new values can be appended based on the
"UpdateOperator"field.-
Set(0) will work when"Value"or"ValueJSON"is populated. -
Delete(1) will remove the parameter from the Visitor Profile. -
PushToArray(2) andPullFromArray(3) are intended to be used with"ValueList".-
PushToArray(2) will append the"ValueList"entered to the existing one, or will create one if one does not exist. -
PullFromArray(3) requires a"ValueList"and will remove the first occurrence in the existing list for each element in the provided list.
-
-
For example if the Visitor Profile has this list:
"ValueList": [
      "Pants","Pants","Shirt","Pants","Shirt","Hat"
    ]
Then after an API call with this information provided:
{
    "Name": "Category",
    "ValueList": [
      "Pants","Pants","Hat"
    ],
    "UpdateOperator": 3
  }
The resulting Profile will have this "ValueList":
"ValueList": [
      "Shirt","Pants","Shirt"
    ]
For more on how to make use of "ValueJSON" or "ValueList" see Appendix B.
Appendix B: Using Custom Criteria in Attribute List Realtime Decisions
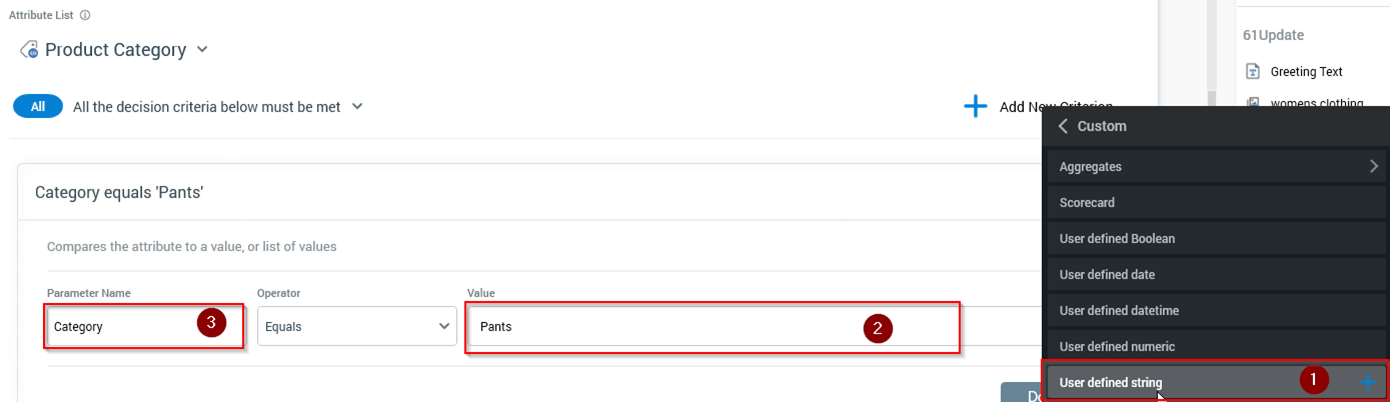
When choosing the criterion for a Realtime Decision, one of the options is “Custom”. This requires more configuration, but allows for some additional control.
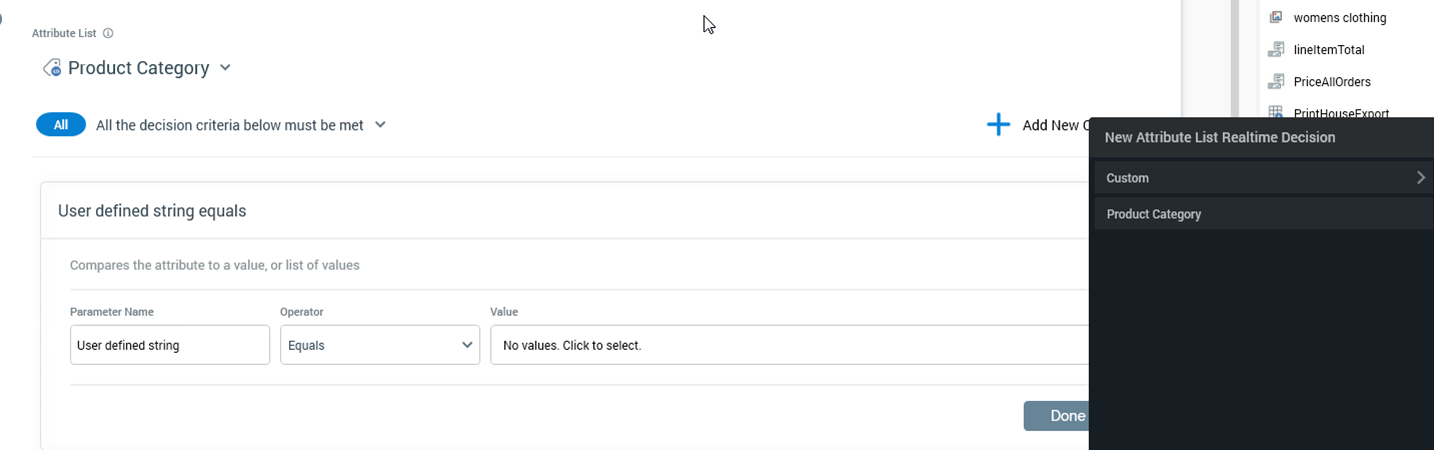
The rule created in this guide can be re-created by using the ”User defined string” option (1) in the Custom menu. Enter the Attribute List key value in (3) then the Values you want to select in field (2).
While this is functionally equivalent, you should select your Attribute List if doing something like this, as it will protect you from errors like typos.
The Aggregates option can help you take advantage of the "ValueList" field referenced in Appendix A. For example, take an API call with the following values:
[{
    "Name": "Category",
    "ValueList": [
      "Pants",”Pants”,”Shirt”,”Pants”,”Shirt”,”Hat”
    ] ,
    "UpdateOperator": 2
}]
If you want to compare the relative frequencies of Pants and Shirt, you would do so with a rule like this:
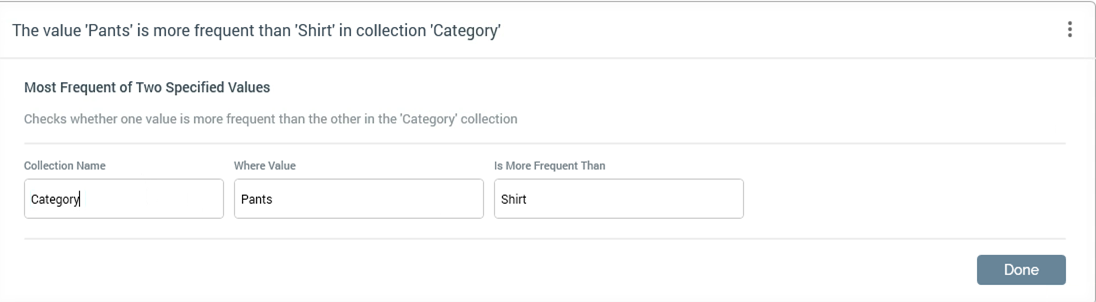
For the example Visitor Profile created above, this rule would return true. The other rules are similarly based on how often a value appears in the list. Frequency Count would return 3 for "Pants" or 1 for "Hat". Most frequent value will return the string "Pants".