

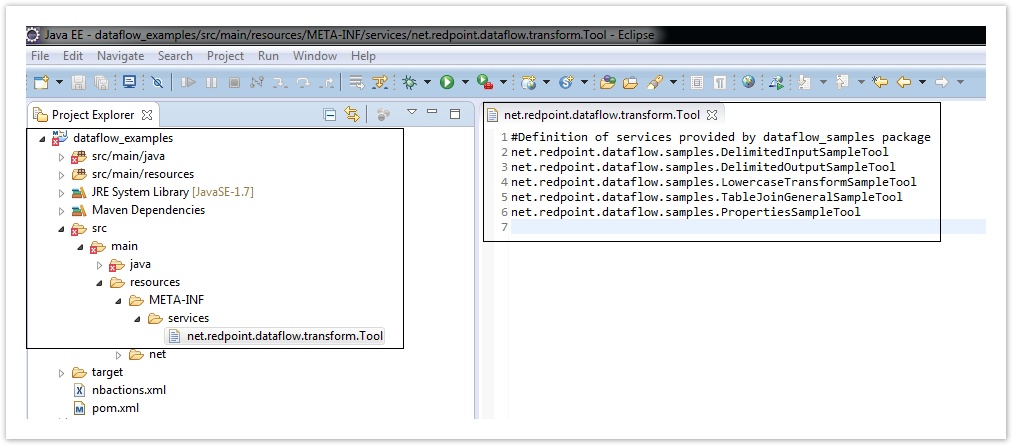
The Data Management SDK relies on java.util.ServiceLoader to find, load, and use service providers that implement the tool interfaces. You must make ServiceLoader aware of your tools by adding their fully-qualified class name to a service definition file located at META-INF/services/net.redpoint.dataflow.transform.Tool.
For example, given tools named DelimitedInputSampleTool, DelimitedOutputSampleTool, and LowercaseTransformSampleTool in the package net.redpoint.dataflow.samples, you must edit your service definition file to look like this.
|
Each fully-qualified classname must appear on its own line in the service definition file.
Once you've added your tool to the service definition file, you'll need to add your tool (and any classes on which it depends) to Data Management's classpath, as described below in Installing your tool JAR. But first, you must package your tool and its dependencies in a JAR file.
Building your tool JAR on the command-line
Build a deployable JAR by running the following command from your project directory.
|
This will generate a deployable JAR file in the target directory.
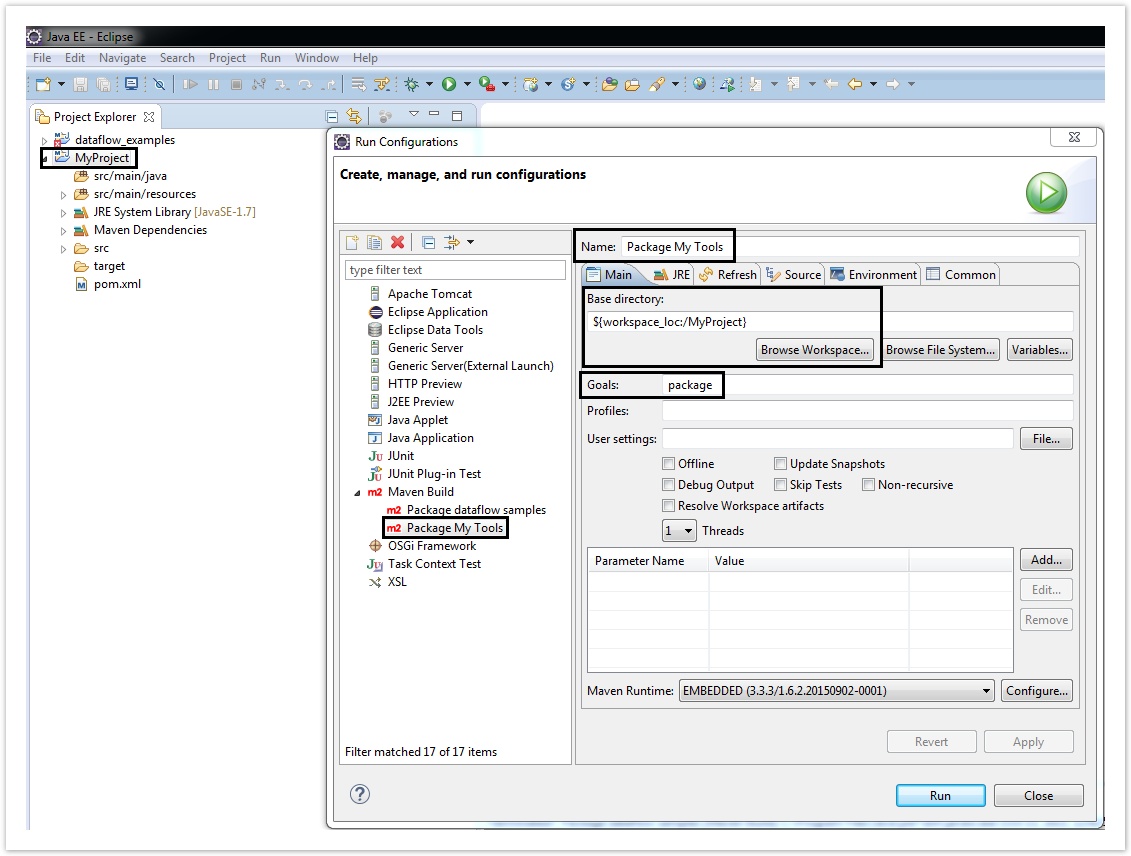
Building your tool JAR in Eclipse
These instructions assume that you are using maven. To use the Maven bundled with Eclipse:
-
From the menu bar, select Run As>Run Configurations.
-
Right-click on Maven Build and select New.
-
Name your run configuration something like Package My Tools.
-
For Base Directory, select Browse Workspace and choose your SDK project.
-
For Goals, enter
package. -
Select Apply, and then choose Close.
-
Make sure that your project is selected in the Project Explorer, and then select Package My Tools (or whatever name you chose in step 3 above) from the Run As button on the toolbar.
Building your tool JAR in NetBeans
In standard project, the NetBeans IDE builds a JAR file from your project sources every time you run the Build command or the Clean and Build command. The JAR file is generated to the target directory of your project folder.
Installing your tool JAR
To use your tools in a project, your tool JAR must be added to Data Management. RPDM will auto-discover and load any tool JAR it finds in the %RPDM_HOME\java_plugins directory.
On Windows, you cannot replace existing JAR files while any projects or automations are open. The safest approach is to stop the RPDM services while replacing JARs.
You can also plan ahead and create symbolic links (using mklink command) from the java_plugins folder to the actual JARs. You can update the link at any time to point to a newer JAR.
Adding your SDK tool JAR to the Java classpath under Settings>Site>Java is no longer supported as of RPDM version 8.2!
Once you have installed your JARs, restart the RPDM client, or if it is already running, click the Palette menu, and then select Reset Palette. Your tool should now appear on the Palette.
Managing dependencies for your tools
As of version 8.2, Data Management provides your SDK tool JAR with its own ClassLoader to prevent classpath collisions with other classes loaded by Data Management. If your tool requires additional libraries, you must include those dependencies in your SDK tool JAR by using Maven's shade plug-in. The pom.xml distributed with the SDK samples project includes a stanza that can be used as a starting point for working with maven-shade-plugin.
Sometimes you'll need to exercise finer-grained control over which dependencies are shaded into your tool JAR, beyond relying on the scope attribute in your dependency declarations.
With version 8.2, class relocation is no longer required to avoid classpath collisions when shading your SDK tool JARs.
Do not add dependent JARs to the classpath under Settings>Site>Java, as this is no longer supported as of RPDM version 8.2.
Run your tool
After you've built and installed your tool, you're ready to run it in the Data Management client:
-
Select File>New Project from the menu bar.
-
Locate your tool in the Palette by scrolling through the palette or searching for it by name.
-
Drag your tool onto the canvas.
-
Connect your tool as necessary, and configure any required properties.
-
Select the Run button.
If your tool doesn't behave as expected, you can debug it.
Run Data Management from the command line
By default, Data Management installs its Site Server and Execution Server as Windows services. When developing SDK tools, you may prefer to run Data Management from the command line so you can more easily see diagnostic messages printed to standard output.
First, stop the Data Management services:
-
Type Windows+R to bring up the Run dialog.
-
Type services.msc in the Open field and select OK.
-
Find RedPointDM Version 8 Execution Service and select Stop.
-
Optionally, you can set its Startup type to Disabled if you want explicit control over when these services start.
-
Repeat steps 3-4 for RedPointDM Version 8 Site Service and RedPointDM Version 8 Web Service.
Now start Data Management from the command line:
-
Open a DOS command prompt (type Windows+R, in the Run dialog, type in cmd then select OK).
-
From the DOS command prompt, run the command:
%RPDM_HOME%\program\Release\x64\rpdm_SiteServer.exe. -
Open another command prompt and run the command:
%RPDM_HOME%\program\Release\x64\rpdm_ExecutionServer.exe. -
Open another command prompt and run the command:
%RPDM_HOME%\program\Release\x64\rpdm_WSPServer.exe.
To stop the Site, Execution, or Web servers, give the desired command window focus and enter Control+C (or just close the command window).