

Overview
Data Management ships with pre-built optimized macros that enable users to to quickly solve some common data problems. The macros, which encapsulate powerful processes, can be quickly and easily linked together, along with other Data Management processes such as address correction and geospatial analysis. You can find these macros in the repository under Macros.
Business Match macro
The Business Match macro is designed to match businesses using their name, address, ZIP Code, and phone number. This macro can form the basis of merge-purge or deduplication processes. The Business Match macro accepts a single table as input and produces three outputs:
-
Deduplicated ("D"): The deduplicated table of records.
-
Groups ("G"): The groups of matched records sorted by group ID.
-
Rejected ("R"): The rejected duplicate records.
The Business Match macro allows the specification of a "Priority" field that controls which records are discarded from duplicate groups. Records with priority values that sort earlier are retained in preference to records with priority values that sort later. The priority field can be of any type. In merge-purge processes, the priority is typically a code indicating the relative priority of each table input in the merge. In other situations it may indicate priority based on some aspect of the record (for example more recent records may be given priority).
To use the Business Match macro in a project:
-
Drag the Business Match macro icon from the Palette.
-
Connect the macro icon to inputs and outputs.
-
Select the macro icon and view the Properties pane.
-
Go the Configuration tab and choose the fields containing the required matching information (Company, Address, ZIP, and Phone).
-
Optionally, choose a Priority field.
-
Select or clear the Compare Company + Phone, Compare Company + Address, and Compare Company + Parsed Address boxes to specify the kind of match that you want to perform. You must choose at least one. Generally, choosing more than one match type will produce better results (more complete matching) but at the expense of performance. Matching with Parsed Addresses is especially useful if the address data is questionable.
-
Optionally, select or clear the Compare records with same Priority box. If this is selected, only records with different priority values are compared. Select this for merge-purge and deduplication processes, and clear it for data append or cross-table matching applications.
Classifier macro
The Classifier macro accepts a single input table, allows the user to choose a single text field from the table, and uses statistical pattern-matching methods to recognize the kind of entity contained within the specified text field. The macro classifies text into the following categories:
-
Names
-
Street addresses
-
Postal address
-
Suites
-
Careof/Attn
-
Unclassified
To use the Classifier macro in a project:
-
Drag the Classifier macro icon from the Palette.
-
Connect the macro icon to inputs and outputs.
-
Select the macro icon and view the Properties pane.
-
Go to the Configuration tab and choose the Input field containing the text that you want to recognize, and then specify an Output field to receive the classification.
When the macro is run, the Output field will contain a string containing one of STREET_ADDRESS, POSTAL_ADDRESS, SUITE, NAME, CAREOF, UNCLASSIFIED, or OTHER.
Consumer Match macro
The Consumer Match macro is designed to match individuals using their name, address, and ZIP Code, plus optionally a phone number and/or email address. This macro can form the basis of merge-purge or deduplication processes.
The Consumer Match macro accepts a single table as input and produces two outputs:
-
Duplicate Groups ("D"): groups of duplicate records sorted by group ID.
-
Uniques ("U"): records that did not match any other record.
To use the Consumer Match macro in a project:
-
Drag the Consumer Match macro icon from the Palette.
-
Connect the macro icon to inputs and outputs.
-
Select the macro icon and view the Properties pane.
-
Go to the Input tab, choose the fields containing the required matching information:
-
Full name or First name, optional Middle name, and Last name.
-
Address (and optionally Address2 ) or address components (Street number, Street predir, Street name, Street suffix, Street postdir and Apt/Suite #).
-
City
-
State
-
ZIP Code
-
Optionally, you can specify Gender, Phone, and Email fields.
-
-
Optionally, go to the Options tab and specify additional matching information or adjust match settings:
-
If you want records to match only if the gender matches, select Match gender.
-
If you do not want the first name to match initials, clear the Match first name & initials box.
-
If you do not want the middle name to be matched, clear the Match middle name box.
-
You can adjust the match threshold for each of the matching fields by setting individual field Scores. Increase the threshold number for tighter matches and decrease the threshold number for looser matches.
-
If your data has segments larger than 50 or if your data is very poor, you may wish to increase the Segment size. The default setting is a Window size of 6 and Max Window size of 50.
-
If your segments so large that processing ZIP alone will increase the processing time significantly, you can change Segment type to ZIP/Street or ZIP/Street/Nbr.
-
If your segments are very large you can specify an Additional segment to reduce processing time and generate a wider comparison set. Specify either ZIP/Street or ZIP/Street/Nbr.
-
If you want to prevent "fuzzy" records from matching outside their own segment, select the Require Segment match box.
-
If you have very dirty data that has not been CASS certified or that contains addresses that could not be standardized, you can select the Additional match on full address box. This will compare the full addresses and sort by City instead of ZIP, finding additional matches.
-
To exclude matches where both records have the same value in a source file field, specify the Source field.
-
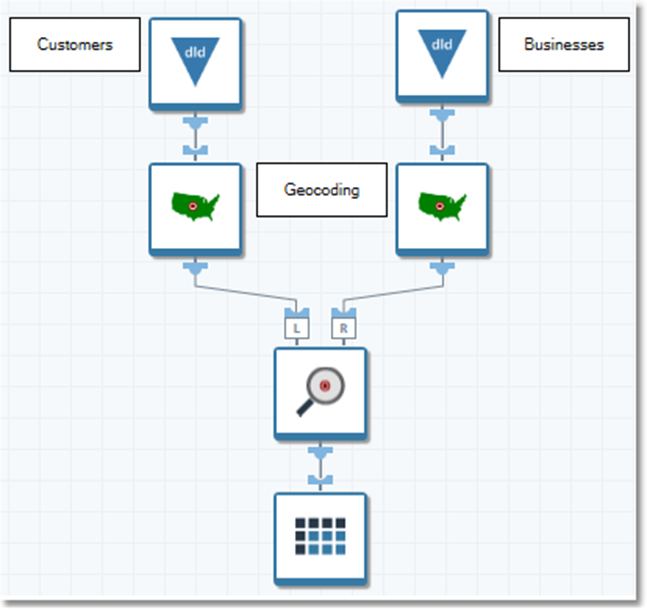
Find Closest macro
The Find Closest macro accepts two tables containing location information (latitude and longitude expressed in degrees). For each record in the "left" table, the macro finds the closest record in the "right" table, and appends an identifier of the right table to the left record. The macro performs a first-order correction of longitudinal distortion, but does not calculate true spherical distance, nor does it account for the fact that the Earth is non-spherical.
The Find Closest macro is useful for finding things like the closest business to consumers or the closest cell tower to homes. It can also be used to get a rough approximation of drive times.
To use the Find Closest macro in a project:
-
Drag the Find Closest macro icon from the Palette.
-
Connect the macro icon to inputs and outputs.
-
Select the macro icon and view the Properties pane.
-
Go to the Configuration tab and choose the fields containing the latitude and longitude on both left and right inputs, and then select the field from the right input containing an identifier of the right record.
Table Profiler macro
The Table Profiler macro accepts a single data stream as input and produces a quick analysis of the input fields:
-
The F (Frequency) output displays statistics on each field, including: null count, percent null, unique count, percent unique, minimum and maximum length, minimum and maximum lexical value, and a pattern template of field contents and the percentage confirming to the template.
-
The C (Counts) output lists the most and least frequent field values and their count, rank, and metric (top ten, bottom ten). Also included are the most frequent patterns and their count, rank, and metric.
This macro has no configurable properties.
Parallel Sort macro
If you have an Execution Server with multiple cores (2-8) and multiple temp spaces, the Parallel Sort macro offers excellent performance sorting large volumes of data. Some guidelines:
-
Only use when you have at least 2 CPU cores and 2 independent temp spaces.
-
Measure your results. Not all processes will show improved performance.
To use the Parallel Sort macro in a project:
-
Drag the Parallel Sort macro icon from the Palette.
-
Connect the macro icon to inputs and outputs.
-
Select the macro icon and view the Properties pane.
-
Go to the Configuration tab and choose one or more Fields to be sorted, and a Sort type for each field (either Ascending or Descending).
-
Specify the number of CPU cores to use. Do not specify more CPU cores than you have available on the Execution Server.