

Interaction API
Authentication can be configured at the Interaction API container, using either an appsettings override JSON file or environment variables.
The default interaction API image is configured to use native RPI user authentication.
Native RPI authentication
This is available when the application setting Authentication__EnableRPIAuthentication is set to true. RPI authentication persists user details and encrypted credentials in the Pulse operational database.
The following settings are available to configure native authentication:
-
To turn on/off native authentication
-
Authentication__EnableRPIAuthentication==true/false
-
-
The URL used by the client application to connect to the Interaction API service must be provided
-
Authentication__RPIAuthentication__AuthorizationHost= https://interactionapi.com
-
-
In a typical deployment, the internal address used by the containers to reach the InteractionAPI will differ from the public address used by the client application. In this case, this should be configured using the following setting:
-
Authentication__RPIAuthentication__AuthMetaHttpHost=http://internaladdress.net
-
Password policy
There are a number of settings available to configure password policy, such as minimum password length and required character types. The list of settings is as follows:
-
Authentication__RPIAuthentication__PasswordPolicy__RequiredLength -
Authentication__RPIAuthentication__PasswordPolicy__RequiredUniqueChars -
Authentication__RPIAuthentication__PasswordPolicy__RequireDigit -
Authentication__RPIAuthentication__PasswordPolicy__RequireNonAlphanumeric -
Authentication__RPIAuthentication__PasswordPolicy__RequireLowercase -
Authentication__RPIAuthentication__PasswordPolicy__RequireUppercase
Account lockout
The following application settings control locking of a user’s account following a series of failed sign in attempts:
-
Authentication__RPIAuthentication__MaxFailedAccessAttempts -
Authentication__RPIAuthentication__LockoutTimeSpan
OpenID connect authentication
RPI supports the use of the KeyCloak and Okta OpenID connection (OIDC) providers to be used to authenticate users accessing RPI. To integrate an OIDC provider with your environment, update the settings in the values.yaml file.
Refer to OpenID connection (OIDC) configuration for details about configuring these settings.
Microsoft Entra ID
RPI supports Microsoft Entra ID to be used to authenticate users accessing RPI.
Refer to Microsoft Entra ID configuration for details about configuring these settings.
Realtime API authentication
Token authentication
The default authentication method for the Realtime API is an authentication token in the header of the call to the API endpoint.
The token is configured with the setting
-
RealtimeAPIConfiguration__AppSettings__RPIAuthToken
The token is then passed to the endpoint in the RPIAuthKey header.
By default, the decision and form endpoints do not require authentication. Authentication can be turned on for these endpoints using:
-
RealtimeAPIConfiguration__BasicAuthenticationRequireToken__Standard==true -
RealtimeAPIConfiguration__BasicAuthenticationRequireToken__Forms==true
OAuth authentication
The Realtime API can be configured to use OAuth instead of the header token authentication.
To configure RPI Realtime to use OAuth, first create the SQL Server or PostgreSQL database required by the OAuth implementation. The scripts to create the database can be downloaded from the Configuration Service.
Set up the connection string in application settings. For example:
"ConnectionStrings": {
    "DefaultConnection": "<ConnString>"
}
The application service settings required to enable OAuth are as follows:
-
To turn on/off OAuth authentication
-
Authentication__ EnableOAuth==true/false
-
-
The URL used by the client application to connect to the Realtime API service must be provided
-
Authentication__ RootServiceURL=https://realtimeapi.com
-
-
In a typical deployment, the internal address used by the containers to reach the RealtimeAPI will differ from the public address used by the client application. In this case, this should be configured using the following settings:
-
Authentication__HttpMetaRootServiceURL=http://internaladdress.net -
Authentication__DisableHttpRedirect=true
-
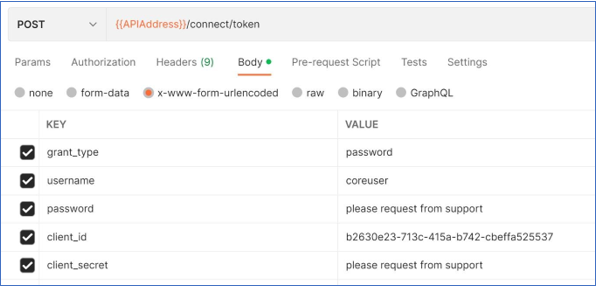
To get an access token, use Realtime endpoint {{APIAddress}}/connect/token.
By default, the script will create an OAuth client with an ID of b2630e23-713c-415a-b742-cbeffa525537, which requires a grant type of password and which requires a client secret. It will also create a user called coreuser. The request to the endpoint would look as follows:
It is strongly recommended you create your own OAuth client by inserting a new row into the OpenIddictApplications table and deleting the existing client.
First generate a Client Secret Hash based on a new Client Secret using the Realtime Utility available from the Configuration Service’s Downloads page. Using a command prompt, run the Realtime utility with following arguments.
clientsecret <Client Secret>
Then insert the new client using the SQL below, replacing the <Client Secret Hash> with the hash from the Realtime utility.
INSERT INTO [dbo].[OpenIddictApplications]
          ([Id]
          ,[ClientId]
          ,[ClientSecret]
          ,[Type]
          ,[DisplayName]
          ,[Permissions]
)
    VALUES
          (Cast(NEWID() as varchar(50))
          ,'MyClientId'
          ,'<Client Secret Hash>'
          ,'confidential'
          ,'My Client'
          ,'["gt:password","gt:refresh_token"]')
GO
If access tokens or refresh tokens need to be immediately revoked, the authorizations(s) and token(s) can be purged from the database tables OpenIddictAuthorizations and OpenIddictTokens.
Once OAuth has been configured, users can be created or removed, and permissions granted, using the Account API endpoints.
Deployment service API
The deployment service API can be secured using a third-party OpenID connect provider, and supports the Client Credentials authentication flow. To configure the service to use the OIDC provider, configure the following settings with the correct OIDC provider values:
-
Authentication__Enabled=true -
Authentication__Issuer=issuer -
Authentication__ HostAddress =OIDC Host URL -
Authentication__Audience=audience -
Authentication__ClientId =client id
Cloud identity authentication
Certain RPI functionality (e.g., secret managers, Azure and GCP plugins) is able to make use of cloud provider identity to authenticate with cloud services. This can be configured in the services’ Cloud Identity application settings.