

Rich text content can be entered and manipulated in the rich text content section, and provision thereof is mandatory. No practicable content length limit exists for rich text content.
You can drag and drop one or more attributes, assets, and smart assets into rich text content. Certain restrictions apply:
-
You cannot embed an exists in table attribute.
-
Anonymous auxiliary database attributes are not supported.
-
You cannot embed an asset within itself.
-
Only text assets can be embedded in text content.
A tag is created when you embed an attribute or asset in this way, e.g.:
-
“({HTML1:My HTML Asset})”
-
“({Attribute;2:FirstName})”
You can create a link to a landing page by dragging a landing page from the toolbox and dropping it into the content editor. When you do so, the link’s Display text property is set automatically to the name of the landing page.
You can add an advanced smart asset variant by dropping an advanced smart asset into the content. When you do so, the Add Advanced Smart Asset Variant dialog is displayed:
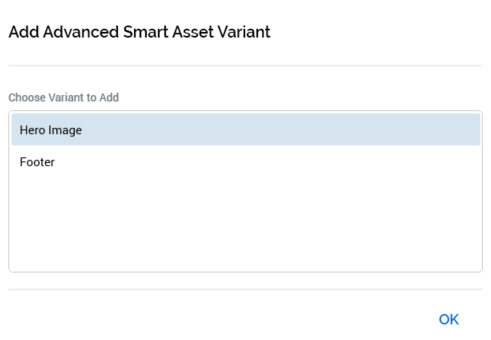
Select the variant you wish to add to the content.
You can also insert links and buttons using the toolbar buttons.
A series of context menu options are available when right-clicking rich text content:
-
Cut
-
Copy: note that the copying of table content is not supported.
-
Paste
-
Font: selecting this option displays the Font dialog box.
-
Paragraph: selecting this option displays the Paragraph dialog box.
-
Edit: this option is available when right-clicking the following within rich text content:
-
Image asset: invocation of Edit in this context displays the Edit [Image] dialog, which is documented separately.
-
Link: facilitates editing of the link in the Edit Link dialog (as per the Insert Link dialog; documented separately).
-
Social button: facilitates editing of the button’s settings in the Edit [Button Type] Button dialog (documented separately).
-
Share button: facilitates editing of the button’s settings (documented separately).
-
Date or date/time attribute: facilitates editing of settings specific to attributes of these data types in the Edit Date/Time Attribute dialog (documented separately).
-
Decimal attribute: facilitates editing of settings specific to attributes of this data type in the Edit Decimal Attribute dialog (documented separately).
-
-
View File Information...: this option is available when a tag representing an embedded file (e.g. an attribute or image asset) is right-clicked in rich text content. Invocation displays the file’s details in the File Information Dialog.
The following context menu options are available when right-clicking within a numbered list:
-
Restart at 1: invocation of this option resets the list’s initial number to 1.
-
Continue Numbering: maintains the numbering sequence.
-
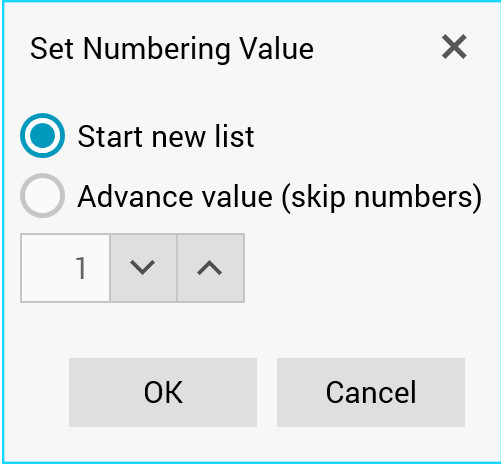
Set Numbering Value...: selecting this option displays the Set Numbering Value dialog box:
The following context menu options are available when right-clicking within a table:
-
Insert
-
Insert Column to the Left
-
Insert Column to the Right
-
Insert Row Above
-
Insert Row Below
-
-
Delete
-
Delete Row
-
Delete Column
-
Delete Table
-
-
Select
-
Select Cell
-
Select Column
-
Select Row
-
Select Table
-
-
Merge Cells
-
Table Borders…
-
Selecting this option displays the Table Borders dialog box, which is documented separately.
-
-
Cell Alignment
-
AutoFit
-
Table Properties
-
Invocation of this option displays the Table Properties dialog box, which is documented separately.
-
The following keyboard commands are supported when editing rich text content:
-
Select All
-
Copy
-
Cut
-
Paste
-
Undo
-
Redo