

Overview
The RPI file system operates very similarly to the Windows file system, using the metaphors of files and folders to allow you to save and retrieve the assets you create. Also like the Windows file system, the RPI file system supports the limiting of access to folders by users based upon their assigned permissions. Unlike the Windows file system, however, details of RPI folders and files are stored in the tenant’s Interaction operational database.
The RPI file system is accessed using the File System Dialog.
The dialog will be familiar to anyone who has saved a file in a Microsoft Office application. However, it is used to save, open or manage RPI’s “files”—its system assets, like selection rules and interactions, In the RPI system.
The File System Dialog is accessed in a number of ways—e.g. when opening an audience, when saving an interaction and specifying its name (i.e. Save As...) or when browsing for a selection rule to associate with a filter. In these circumstances, the contents of the Dialog are filtered to display only assets of the relevant type.
Whenever you open the File System Dialog, the folders you can access are limited in accordance with your folder permissions.
When invoked, the File System Dialog automatically displays the folder you most recently accessed. This applies also to special folders such as Recent Items.
When invoking Browse... to configure a property previously configured with a file, the original file's folder is displayed instead of the current most recently-accessed folder. The original file is selected within the folder, which in turn becomes the most-recently accessed folder.
Browsing the File System
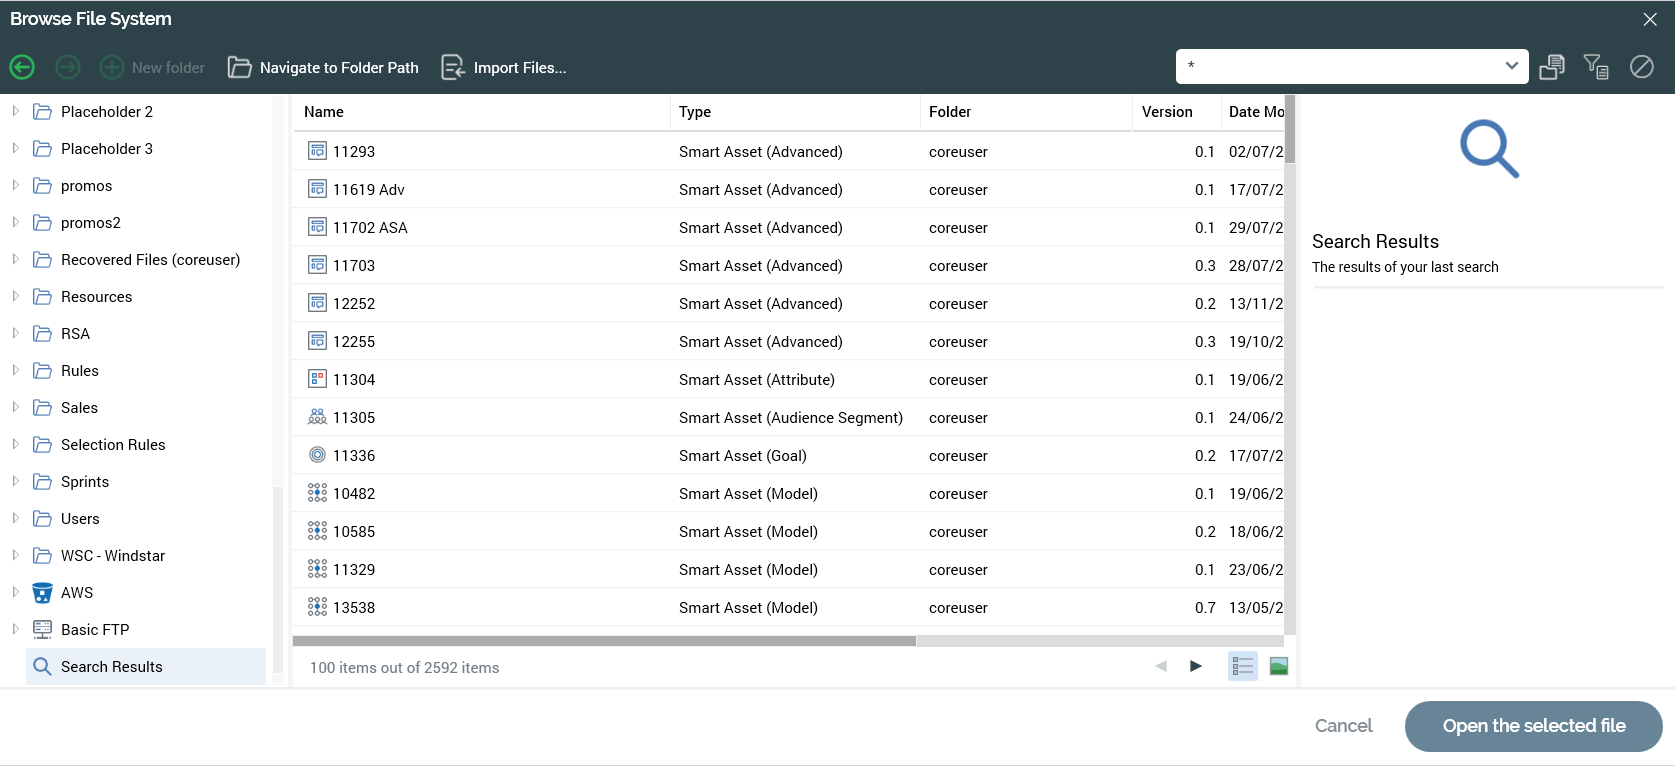
All users may browse the RPI file system using the File System Dialog. This option is invoked from the RPI toolbar using the paper and file icon.
When browsing the file system, all files to which you have access are shown, irrespective of their type—attributes, selection rules, audiences and interactions are displayed alongside one another.
You can undertake all File System Dialog functionality (folder and functional permissions notwithstanding), including opening a file, which you can do by double-clicking it, or by using the Open the selected file button. The file in question is displayed:
-
In new instance of the appropriate designer (if other than a selection rule or realtime decision).
-
If a selection rule or realtime decision, and the Rule Designer is open, within the open Designer tab.
-
If a selection rule or realtime decision, and the Rule Designer is not open, within a new Rule Designer instance.
An attempt to open an attribute file results in the display of a message advising that the file type may not be opened.
You can open multiple files at the same time. If an file is already open when you do so, it is not opened again. Any selection rules or realtime decisions opened in this way are displayed in separate Rule Designer instances.
Toolbar
A toolbar is displayed at the top of the File System Dialog.
It exposes the following options:
Back/Forward
These buttons allow you move backwards or forward through your history of recently-visited folders.
This history is reset each time you start the RPI client.
New folder
Selecting this button creates a new folder within the currently-selected folder.
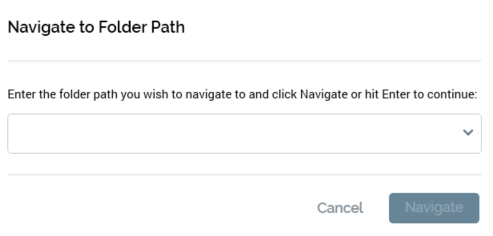
Navigate to Folder Path
This button allows you to navigate directly to a specific folder. Selecting it displays the Navigate to Folder Path dialog:
-
You can specify the full path of a folder to which you wish to navigate using the combobox provided or select a path to which you have navigated previously. Entering a folder path enables the Navigate button.
-
If you entered a valid folder path, on selecting Navigate or hitting Enter, the current folder context is changed to that which you supplied. If you enter an invalid folder path, or you attempt to navigate to Recent Items, your user shortcut, an external folder or the Recycle Bin, a warning message is displayed.
-
Selecting Cancel removes the dialog from display. Selecting off the dialog has the same effect.
Import Files
Availability of this button is controlled by functional permission File System – Import. Selecting it displays the Import Files overlay, which facilitates the import of previously-exported RPI files. The dialog contains the following:
Toolbar
Two options are exposed in the toolbar:
-
Add Files: selecting this button displays the Import Files... Windows file system dialog, within which the Default file type is set to RPI Files (*.rpf).
-
You can also select a zip file containing exported RPI files when importing files (zip files are also shown when RPI Files are displayed at the Windows file system dialog).
-
You can select one or more files and select Open to commence their import. If a file has dependent files (e.g. a selection rule containing criteria based on attributes), to import the file successfully all dependent files must also be selected.
-
When you select Open, the file(s) are shown in the Import Files overlay. You can also select Cancel to close the Windows file system dialog.
-
-
Remove selected Files: invocation of this option removes the selected file(s) from the list. An “Are You Sure?” dialog is not shown.
Files list
When empty, a message is shown: “Add files by either dragging and dropping files and folders here or selecting the Add button above. The import of Redpoint Interaction files (*.rpf, *rpa) and *zip files only is supported.” Otherwise, the list contains files, selected from the Windows file system, that are to be imported. You can drag file(s), folder(s) or combinations thereof from Windows Explorer directly into the list. If you drag in a folder containing a subfolder, all files within the child folder(s) are added to the list.
Two sets of radio buttons, displayed below the files list, allow you to specify how the file import should behave in the event that one or more files already exists.
-
When an older file already exists: the accompanying radio buttons allow specification of behavior should an older version of a given file already be present in the same folder at import:
-
Do nothing and abort the import: the default option.
-
Overwrite the file
-
-
When a newer or branched file already exists: the accompanying radio buttons allow specification of behavior should a newer or branched version of a given file already be present in the same folder at import:
-
Do nothing and abort the import: the default option.
-
Retain the existing file and prompt to overwrite: if a newer version of a file being imported already exists at import, a dialog is displayed, containing the message “[File type] ‘[File name]’ already exists. It was last modified by [User] on [Date/time]. Would you like to override this file?”
-
You can choose to overwrite or retain the file. You can also choose whether to apply the selected action for any other files being imported (if applicable). If you elect not to apply to all remaining files, and other files qualify for display of the dialog, it is displayed again as required.
-
-
Overwrite the file
-
Start Import
This button is enabled when one or more files are present in the files list. Selecting it imports the files and displays the results of the exercise in an overlay.
If successful, the following overlay will appear:

You can select Copy Results to copy the contents of the overlay to the clipboard. Selecting the Close button closes the Import Files overlay. If files were imported successfully, they are available in the current tenant’s file system.
If either or both “Do nothing and abort the import” radio button(s) are selected, RPI will check for matching files, and if it finds any matching files, the import will be cancelled and the following overlay will appear:
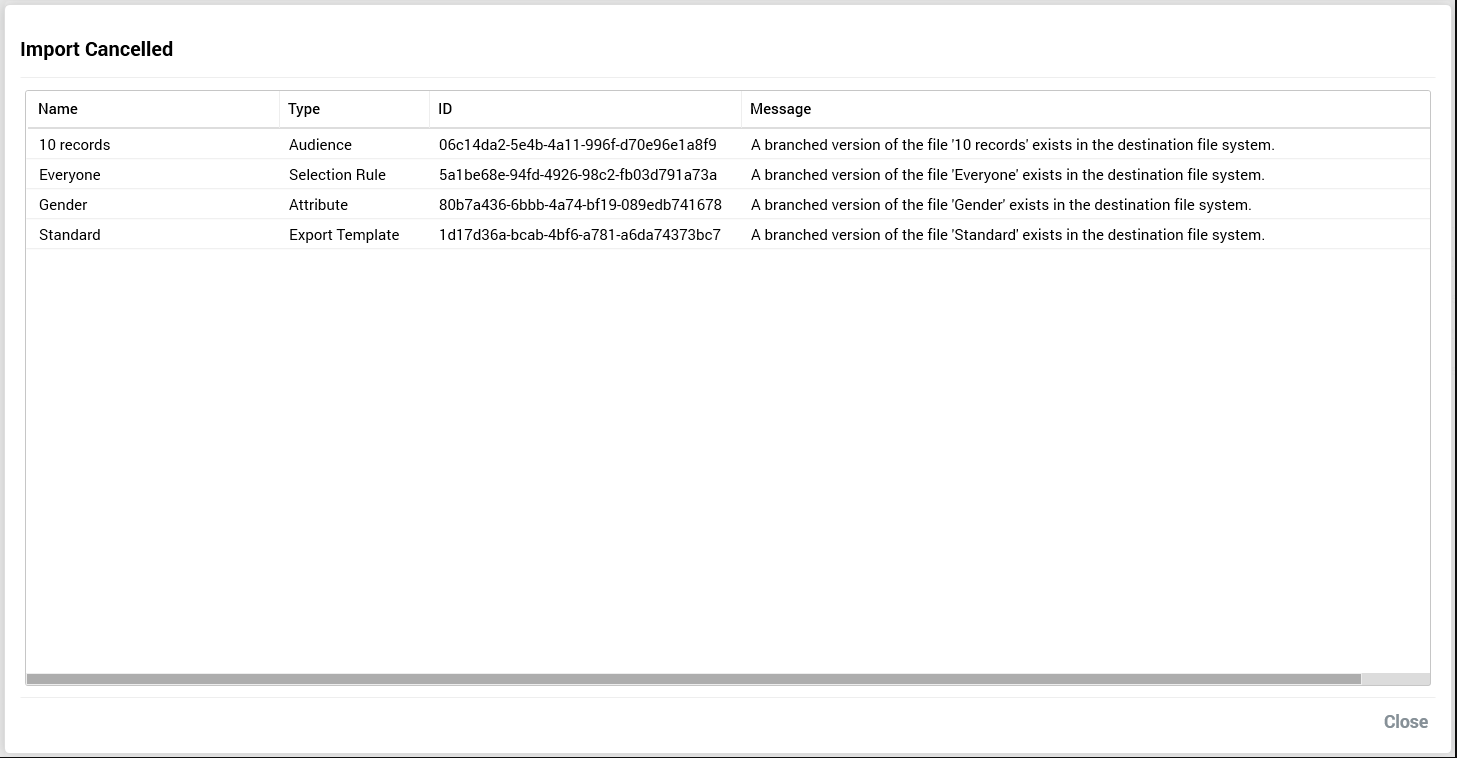
RPI checks for the existence of files before the import is processed.
-
Cancel: selecting this button removes the Import File overlay from display.
Search
You can search for files within the File System Dialog. A search field is provided at the dialog’s top right-hand corner. Selecting Ctrl-F in the File System Dialog places the cursor in the search field.
At initial invocation, the text “Search from current folder” is shown in the field.
You can define the context of the search as either within the current folder, or across all folders in the RPI file system. A button with a “folder” icon is shown to the right hand side of the search field:
On hovering over the button, the following tooltip is displayed: “Currently searching from the current folder. Click here to search across all folders”. Selecting the button highlights it and changes its tooltip to: “Currently searching across all folders. Click here to only search from the current folder”. The text shown in the search field is also changed to read “Search across all folders”.
Searching across all folders does not automatically search across external folders, which much be selected explicitly in order to perform a search therein.
Searching is initiated automatically one second after having entered one or more characters in the search field.
Having initiated or executed a search, a Cancel search button is shown:
Cancelling a search clears down the search results and continues to display the contents of the Search Results folder.
You can view a list of recent searches in a dropdown list.
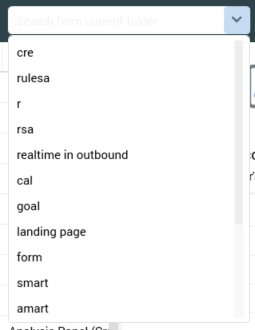
The list is displayed in reverse chronological order. You can select a search from the list in order to re-execute it. Up to 15 of your most recent searches are displayed. Only search strings in respect of which a search was actually executed are added to the recent searches list.
Show/hide search options
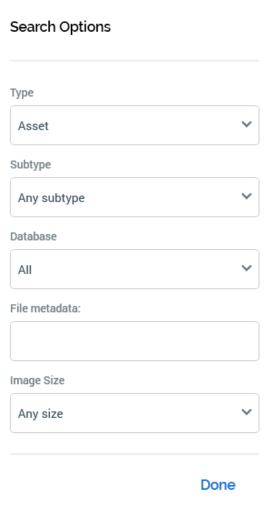
The button at the right of the search field is used to show or hide search options. The following search options are available:
-
Type: you can use the Type drop-down to select a file type to search for. The field lists all file types, along with default value “Any valid file type”. Selection of a value executes a search immediately, and the results are limited to the selected file type(s). Unless reset to “Any valid file type”, the file type restriction continues to be applied in addition to any further search criteria you specify.
-
Subtype: this options is displayed when a specific Type has been selected. A dropdown provides access to all of the selected type's subtypes, plus "Any subtype". If no explicit subtypes are supported at a type, only the "Any subtype" value is available. Application of a Type/Subtype filter limits the files displayed in accordance with the current selections. Note that, if an explicit Image size search option has been applied, Type is set to "Asset" and Subtype to "Image".
-
Database: this field is only available when one or more auxiliary databases have been configured at the current RPI tenant. A dropdown field, it exposes the values “All” (the default), “Data Warehouse”, and one row per configured auxiliary database. Search results are filtered in accordance with the selection made therein. If an auxiliary database is selected, the following file types may be retrieved:
-
Attribute
-
Selection rule
-
Analysis panel
-
Export template
-
-
File metadata: you can use this field to specify a file metadata attribute value to perform a search upon the same.
You can also search for files using file metadata, using the following syntax:
'{meta:keyname operator "value"}'
(Use of the double quotes at value is optional). The following operators are supported: =, ==, !=, <>, >, >=, <, <=, ~, String contains. Multiple concurrent expressions are supported; they should be separated by a space. Note that, if searching for Date metadata, the value provided must match exactly how data is persisted at the database (including any time component, if relevant).
-
Image size: This dropdown field exposes the following options:
-
Any size (default)
-
Small (Images with an area size smaller than 120,000px (e.g. 400x300))
-
Medium (Images with an area size between 120,000px and 480,000px (e.g. 400x300 to 800x600))
-
Large (Images with an area size greater than 480,000px (e.g. 800x600))
-
An exact size (Selection of this option displays width and height fields. Both default to 100, and the minimum permissible value is 1, the maximum 99999)
-
If you specify an explicit image size, non-image asset files that match other search criteria are not returned; when you set Image size to a value other than Any size, the Type field is set to a read-only “Image assets only”.
You cannot search by image size at an external content provider or Recent Items.
The supplied search string is compared to files’ names and descriptions. Files are retrieved if:
-
If searching the current folder, they are contained within the current folder, or within a child thereof.
-
If searching across all folders, they exist within an accessible folder.
-
The search criteria (as entered literally) are matched anywhere within the selected name or description - e.g. search for “first name” returns “Customer first name” but not “Customer name”.
-
Saved within a folder to which Full control, Read-Write or Read-Only access is granted.
-
If a file type has been specified, are files of that type are retrieved.
-
If searching by image size, are image files of the specified size.
Search results are displayed in the Search Results folder, which is displayed immediately before the Recycle Bin in the File System Dialog folders treeview.
A read-only Folder column is shown within the search results files list. It displays the name of the folder within which the file is persisted. The file’s full path is not shown as it is available at the File System Dialog information panel. Search results are ordered by file type, name and folder.
Search results may be spread across more than one page. The number of results per page is controlled by system configuration setting MaxFileSearchPageSize. Footer text advises of the current set of search results being displayed:
Next and Previous Page buttons are displayed to the right hand side of the Search field. The buttons are enabled only when additional results pages exist, and invocation displays the next or previous page's worth of results (as appropriate).
Search is always available in the File System Dialog, irrespective of how it was invoked; however, search results are limited to only files that are relevant to the context of its invocation—if invoked to open a selection rule, for example, only selection rules are displayed in search results.
If no search results match the entered criteria, the Search Results folder is still displayed, but a label advises that no search results were retrieved.
Searches are not case dependent.
You can execute a “wildcard” search by typing "*" into the search field. Upon execution, the system retrieves all files within the current folder and all descendent folders.