

Overview
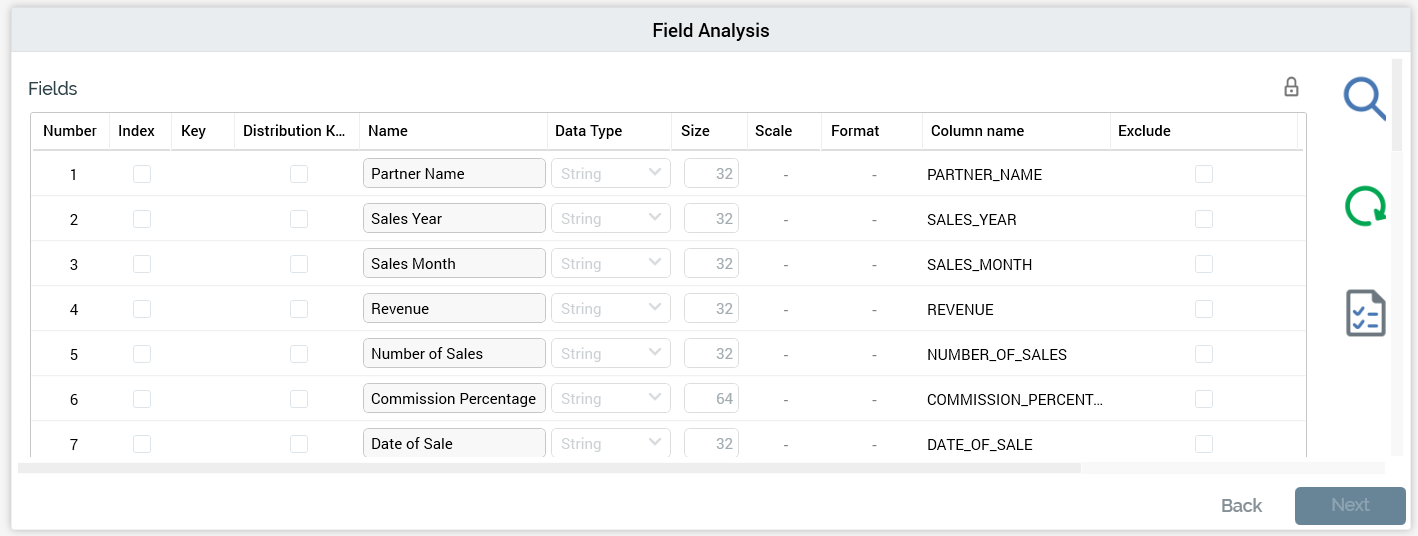
The Definition tab’s Field Analysis panel is used to provide visibility of the data project’s fields.
Within the panel, you can:
-
Make changes to the field structure determined by RPI’s initial analysis of the file.
-
If a delimited file, view a raw or parsed preview of the file’s contents.
-
If a fixed-width file, invoke a dialog within which you can specify field boundaries.
-
Invoke Re-analyze to observe the ramifications of any changes made to the data project’s high-level properties (and field boundaries, if a fixed-width file).
-
Initiate validation of the file against the data project’s definition, and load data into the data warehouse.
The Field Analysis panel consists of the following:
Fields Grid
A single button is displayed above the fields grid:
Lock or unlock fields properties: this toggle button is shown above and to the right of the Fields grid. It allows you to control as to whether it is possible to make changes to the properties of the fields listed in the Fields grid at second or subsequent data project execution.
At the second or subsequent execution of a data project, if the Lock or Unlock... property is set to Unlocked, a field's Data Type can be changed. However, only the following changes are supported:
-
If an Integer, can only be converted to Decimal
-
If Date, can only be converted to Date Time
Note that the Data Type of the table's primary key cannot be changed.
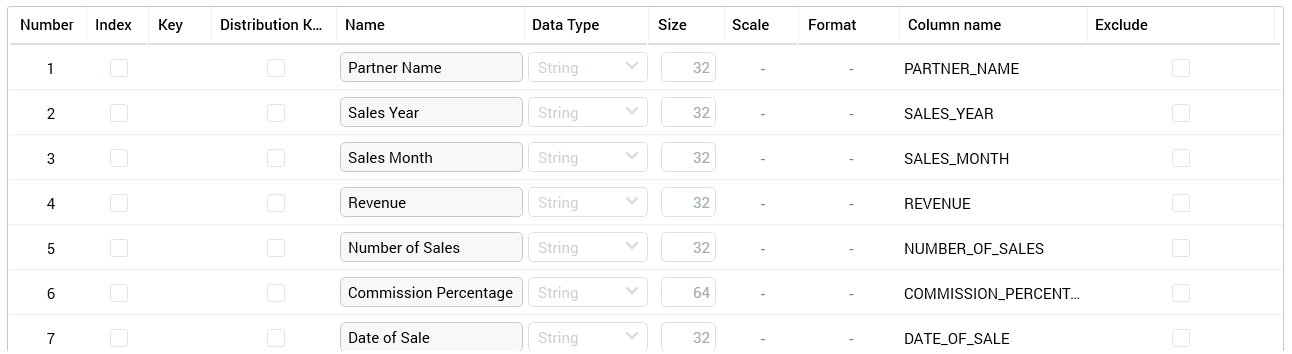
The fields grid itself contains a list of the fields in the uploaded file. It is populated during the file’s initial analysis. However, its initial contents vary depending upon whether the file is delimited or fixed-width.
If the file is delimited, a full set of columns is displayed in the grid.
You can make changes therein as required.
If the file is fixed-width, a limited set of read-only columns is displayed in the grid after initial analysis.
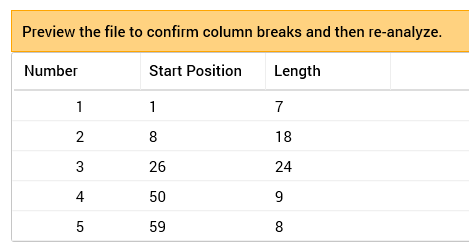
Note the message displayed above the grid. The message is removed from display after invocation of Re-analyze. It will subsequently be redisplayed should field boundaries change again.
The grid is populated as follows:
-
Number: an incrementing integer value that begins at 1. Number maps to the watermark number displayed in the fixed-width Preview dialog.
-
Start Position: the position within the file at which the field begins. In all fields except the first, Start Position equals the previous field’s Start Position plus its Length.
-
Length: the length of the field in characters.
The limited column set is replaced with the full set of columns following successful re-analysis of the file.
Typically, you will invoke Preview & Define to view a sample of the file in the Preview dialog, make manual adjustments to field boundaries, and then invoke Re-analyze to confirm your stipulations. Note that you can make subsequent changes to field boundaries using Preview & Define, but, if you do so, the limited column set will be redisplayed and any manual changes made within the full column set (e.g. to a field’s Data Type or Classification) will be lost. The ‘Preview the file…’ message will also be redisplayed.
When all columns are displayed, you can make amendments to the file’s schema directly within the grid. The following columns are presented:
-
Number: a read-only, incrementing integer indicating the field’s ordinal position within the file. Note that Number corresponds to the watermark displayed when Preview & Define is invoked for a fixed-width file.
-
Index: this checkbox allows you to specify that a field is to be used for table indexing. Post-validate and load, for each field checked as an Index, a database index will be created on the data project table.
-
Key: clicking a cell within the Key column allows you to define that the selected field is a key field. When clicked, a key icon is displayed in the column (clicking it again removes the icon from display). You can specify that a file has a compound key by clicking on more than one field. A SQL Server primary key constraint is created at load of the initial data project file in accordance with your specifications. If no fields are defined as key, a primary key is not created.
-
Name: a mandatory text field that can be a maximum of 50 characters in length. Name is used to specify column names within the table into which data will be loaded. Name is either set by default in accordance with a file’s header row or set to a default value if no header row exists (full details of how this is carried out are provided elsewhere). Note that a field’s name must be unique within the data project.
-
Data Type: set automatically during file analysis (full details of the logic employed by RPI in doing so are provided elsewhere). Data type can be set manually using a drop-down that exposes the following options:
-
Date
-
DateTime
-
Decimal
-
Integer
-
String
-
Time
-
-
Size: relevant for data types String, Integer and Decimal. Different validation criteria are enforced depending on the field’s data type:
-
String: must be an integer, with a minimum value of 1 and a maximum value of 4000.
-
Integer/Decimal: must be an integer, with a minimum value of 1 and a maximum value of 16. In the case of a decimal, size represents the field’s precision (the total number of digits before and after the decimal point in a number).
-
-
Scale: relevant only if Decimal; an integer, with a minimum value of 0, and a maximum value of 38. Scale represents the number of digits after the decimal point in a number.
-
Format: only enabled (and mandatory) when the field’s data type is one of Date, Time or DateTime. Format can be a maximum length of 30 characters. Format is used to define how data within the field is to be structured – e.g. “d/M/yyyy”. Full details on supported date formats are provided elsewhere.
-
Column Name: displays a read-only representation of the final column name. Based on Name, but with the following caveats:
-
Shown in upper case
-
Any database-incompatible characters are replaced with underscores
-
If a Name is set to a reserved word, a validation error is raised
-
If Name begins with a numeric character, a ‘X’ is added as its first character
-
-
Exclude: a checkbox, unchecked by default. If you exclude a field, it will not be exposed through the creation of an RPI attribute after data is loaded. Right-clicking this column provides access to Exclude all rows and Clear all excluded rows options.
-
Distribution Key: this checkbox is used when importing data into a Netezza data warehouse only It is unchecked by default. Up to four fields can be selected to serve as a data project's distribution key. When a data project at which distribution keys are defined is executed, distribution keys will be created for the data project's 'UD_XXXXX' table.
Attribute Columns Section
This section is shown below the Fields grid. It contains the following

-
Automatically create attribute columns: this checkbox is unchecked by default. It allows you to specify that database column attributes representing the data project's fields are to be created automatically. It is accompanied by a Create attributes in property, which is enabled and mandatory when Automatically... is checked, which allows you to select the (non-external) folder in which attributes are to be created.
-
Expiry date: this optional property allows you to specify a date at which the data project will expire.
-
Create attributes in: allows you to specify the folder in which attributes will be created.
Join Details Section
This section is shown below the Attribute Columns section. It contains the following:

It is used to define the simple join between the table into which data is to be loaded and an existing reference table. The section consists of Join Details and Join Key Pairs sub-sections.
The Join Details sub-section contains the following:
-
Create new join after load: this checkbox is unchecked by default. When checked, a join between an existing reference table and the uploaded data's table will be created when the data is loaded. Checking the property enables Reference table.
-
Reference table: this property is mandatory when enabled. It represents the existing database table to which the uploaded data's table will be joined. It is populated using the Choose Database Item dialog, which lists all tables in the data warehouse. On changing the selected table:
-
Any existing join key pairs are removed.
-
A new join key pair is added, following the rules documented at the Join Key Pairs table’s Add button (see below for details).
-
-
Cardinality: this dropdown list allows you to define the nature of the join between the reference and data tables. It exposes the following values:
-
Not known (the default)
-
One to one
-
One to many
-
Many to one
-
Many to many
-
The Join Key Pairs sub-section allows you to define the pairs of keys that will be used to create the join between reference and data tables. It consists of a toolbar and a table.
-
Toolbar: exposing the following:
-
Add: this button is enabled when a Reference table has been chosen. Clicking it adds a new join key pair to the table. Join Key 1 is set to the data table's primary key (or first alphabetical column if a primary key is not defined). Join Key 2 is set to a matching column at the reference table, else to its primary key, else to the first column alphabetically.
-
Remove: this button is enabled when a join key pair is selected. Invocation removes the currently-selected join key pair without display of an ‘Are You Sure?’ dialog.
-
-
Table: listing all existing join key pairs. The table contains two columns:
-
Join Key 1: this column represents a key from the data table. It is set using a dropdown, which exposes values representing each of the data table's columns.
-
Join Key 2: this column represents a key from the reference table. It is set using the Choose Database Item dialog, which is constrained to display only columns from the selected Reference table.
-
Provision of at least one join key pair is mandatory.
Actions Panel
The Actions panel is shown to the right.
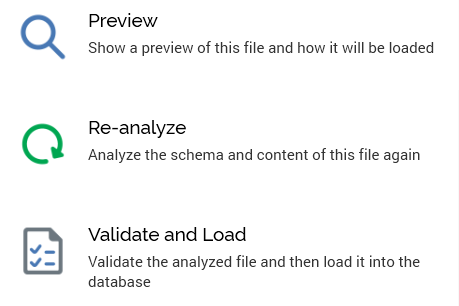
It is only displayed prior to starting the acquisition of the data project’s second or a subsequent file. The buttons that it contains are enabled, disabled or made visible in accordance with the current status of the data project. The buttons shown are as per the File Analysis panel.
Navigation Buttons
The navigation buttons provide an alternative way of navigating through the wizard-style sequence of data project definition process steps.

They are displayed at the bottom right of the panel.
In the Definition tab’s Field Analysis panel, the Back button is enabled, and displays the File Analysis panel. Next is disabled, as Field Analysis represents the final step in the definition process.