This section provides information about each of the configuration options.
-
Options related to all data process projects (DPPs)
-
Items related to using a DPP in an RPI audience to support enhanced segmentation functionality
For this example, we will start creating the DPP in RPI as that will automatically generate a stub RPDM project containing the appropriate RPDM project parameters. This is a good place to start the first time that you are creating an RPDM project that will be called from RPI to ensure all the parameters that will be passed to the RPDM project are named correctly.
There are several configuration options for DPPs. If the DPP will be used in an audience to support advanced segmentation, there will be additional configuration settings as well as implementation considerations.
DPPs are created in the Configuration section (Configuration > Data Process Project) of the RPI client. The first step is to create a new DPP.
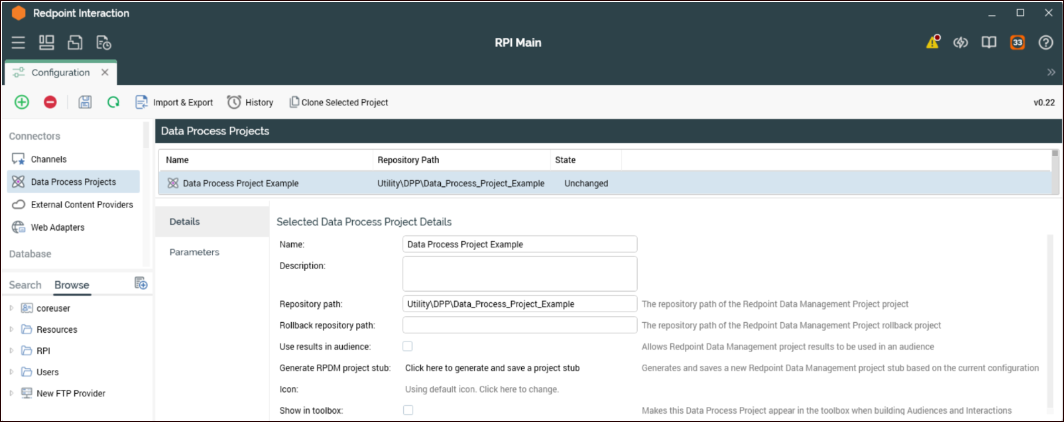
Details tab
The following table describes the settings in the Details tab:
|
Setting |
Description |
|---|---|
|
Name |
(Required) Project name that will appear in the pallet in the RPI designers. This name has no association with the RPDM project name and can have spaces for ease of readability for the RPI user. |
|
Description |
Description of the project for reference in RPI. |
|
Repository path |
(Required) This is the path to the project in RPDM. Note that the path defaults to the root of the RPDM repository. At a minimum, you must include the RPDM project name in this section if the project is in the root of the repository, else reference the folders in which the project is contained as well as the name of the project. In this example and the previous screenshot, the project is in two subdirectories of the repository RPDM does not support spaces in paths. |
|
Rollback repository path |
RPI gives you the ability to roll back interactions. If a DPP is rolled back, you may want to configure a project to undo or reset what has been done by the DPP. This may be useful to ensure all the data in RPI and other potential areas like the database are aligned. |
|
Use results in audience |
Selecting this check box will provide additional configuration options, both within the Details tab as well as a new tab called Bands. See the "Use results in audience" section next for details. |
|
Generate RPDM project stub |
Creates a simple RPDM project file that can be imported to RPDM and will have a sample project flow and some predefined parameters as well as any custom parameters that are defined in the Parameters section of the DPPs. Refer to Configure and use an RPDM stub project for more information. |
|
Icon |
The default icon can be overridden with an image of your choice. |
|
Show in toolbox |
Determines if projects should appear in the toolbox of the audience and interaction designers or not. |
Use results in audience
Selecting the check box Use results in audience on the Details tab exposes additional configuration options, both within the Details tab as well as a new tab called Bands.
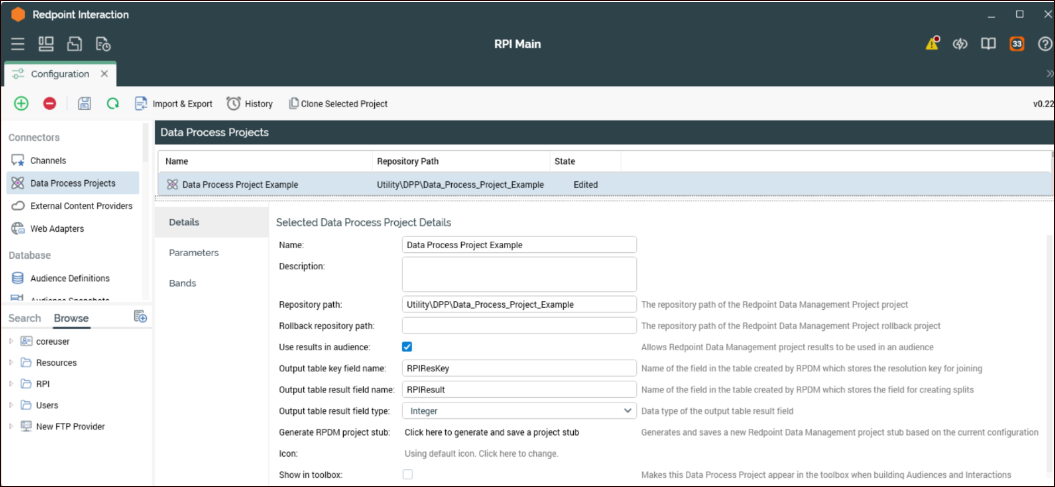
Additional Details tab options
It is important that you select the appropriate Output table result field type to ensure that the correct options are provided when configuring the bandings. This option will have the biggest effect on the configuration. The other options can be left as default unless there is a compelling reason to change them, as these are only fields used by a temporary table that is only persisted to support the handoff between RPI and RPDM execution.
The following table describes the additional settings that are exposed on the Details tab when you select the Use results in audience checkbox:
|
Setting |
Description |
|---|---|
|
Output table key field name |
This is the name of the field used to store the RPI resolution key in the temporary table that is generated by RPI and populated by RPDM to support identifying the segments (bands) that keys in an audience are associated to. RPDM must provide a distinct set of key values that will be stored in the output table to ensure expected and consistent results. |
|
Output table result field name |
This is the name of the field that will be used to store the resulting value of executing the RPDM project. Each unique resolution key should have one and only one resulting value. |
|
Output table result field type |
Determines the data type of the result field. This will determine the field type when the output temporary table is generated and the options you will have when configuring the bandings. The supported types are: |
|
Generate RPDM project stub |
This button will create a stub RPDM project based on the configuration information provided in the Detail and Parameter tabs of the data project. This will create an RPDM project file (DLP) which prompts the user to save in a location accessible from the RPDM server. Open RPDM and load the stub project, then save it to the location in the repository listed in the Repository Path section of the Details tab in the DPP. There are more details in the Appendix pertaining to generating, importing, and configuring the RPDM stub project. |
We strongly recommended that you configure as much as possible in the data project before creating the stub project to minimize the manual configuration of the RPDM job.
To give additional context to how additional audience configuration of a DPP works, the following detail level execution flow is explained below.
-
DPP executed in RPI (audience or interaction): Two temporary tables created by RPI are passed to RPDM via project parameters
-
The primary RPI temp table (
RPISQLSource) contains the RPI resolution key as primary key. This table contains the distinct list of resolution keys that are being input into the DPP within the audience or interaction. This would be a starting source table for the RPDM project to identify the appropriate records to perform the required processing on. All fields configured in the offer history section of the audience definition are also available in the temp table and available to be used in the RPDM project. -
Results temp table (
RPIOutputTable) only contains two fields. The field names are configurable in the DPP within RPI, but as mentioned above there is no reason to change the names. This table is expected to be populated by the RPDM project with two fields, which will be used by RPI in the audience to assign the bands when the processing in DM is complete and passed back to RPI.-
RPIResKey– This field needs to be populated with the resolution key that is provided from the source table noted above. It is expected that the RPDM process ensures the table is unique on this field, otherwise the results in RPI may not be accurate or consistent. -
RPIResult– This field needs to be populated with the result value for each of the associated resolution keys. The value will be used by the DPP in the audience to identify the bandings (segments) that each of the resolution keys belong to.
-
-
-
DM project execution: The RPDM project will be used to perform the appropriate data processing for the specific use case that the DPP is being used to solve. The expectation is when the DPP is being used in an audience then the results temp table noted above is populated to support the assignments of the bandings.
-
RPI continues to execute from DPP: After the RPDM project completes, it will return processing to RPI. RPI will continue to process the DPP in the audience. At this point the source table will be joined to the results temp table on the resolution key and the appropriate bandings defined in the DPP within the audience will be used to associate each of the resolution keys to the segment that the bandings are associated to. This will become clearer in the audience example.
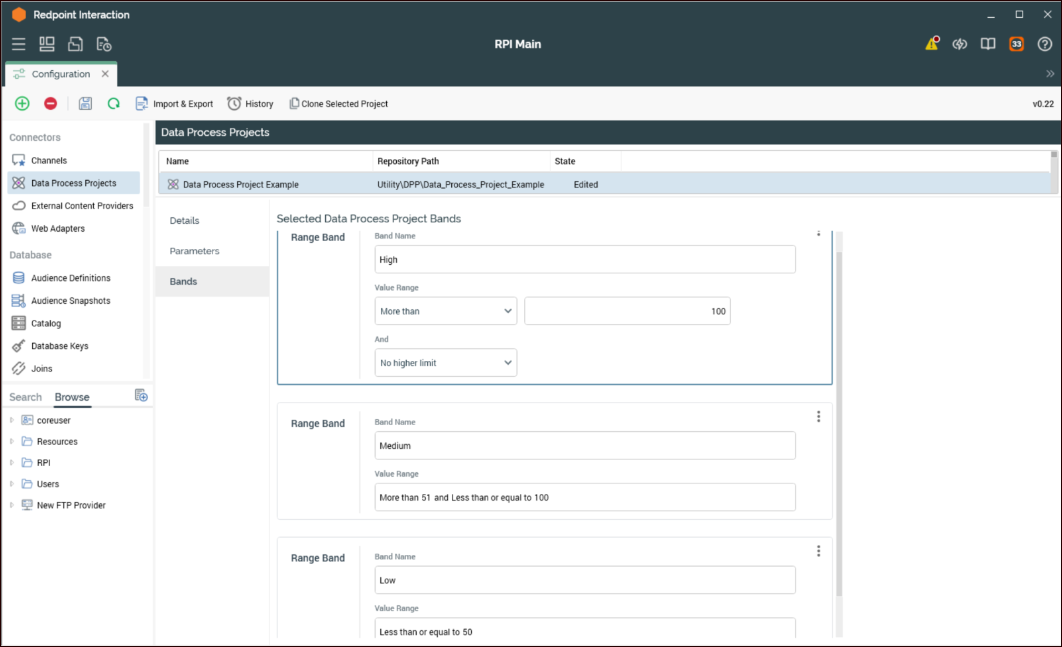
Bands tab
The Bands tab uses the RPIResult field to identify which band a ResolutionID in the temp table belongs to. These bands can then be used in the audience to define segments which are configured as outputs in the configuration section of the data project being used in an audience.
Below is an example of three bands using an integer based RPIResult field. These will be based on a hypothetical model score results which is generated within the RPDM project. This is for illustrative purposes only. The bands are defined as High, Medium, or Low propensity to buy. Usage examples are provided further in the document that show the bands used as outputs in an audience, and how they can be used to define segments. The values the bands are based on, for instance “High is more than 100”, are purely for illustrative purposes and don't reflect a true model score, which would likely be a decimal value from 0 to 1 (0.67).
The configuration options available when creating bandings are variable depending on the data type set when configuring the Output table result field type option. For example, in this use case we set it as an Integer, so the Bands tab options are related to numerical values. Yet if we had configured the data type as DateTime, the options for configuring the bands would be related to dates and not to numerical values.
Parameters tab
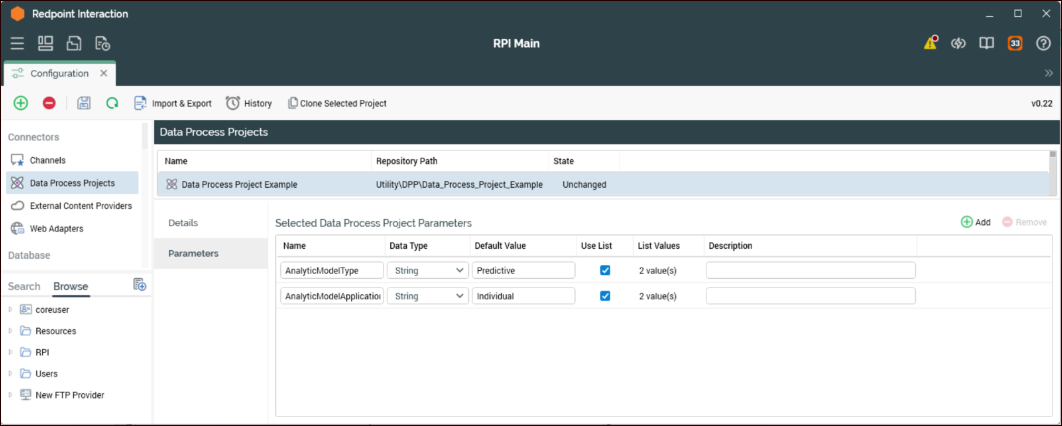
You can define parameters for data projects to provide additional information to the RPDM data project to help control the processing or set switches within the RPDM project. It is best practice to create all of the parameters that you can before creating the stub RPDM project, as this automatically creates the RPDM variables, eliminating spelling errors and saving time. You can always add variables manually to the RPDM project later, if needed. Below is a screenshot of the Parameters tab in which there are two sample parameters that are configured to determine what analytic model type should be applied and if the analytic model application level should be applied at an Individual or Household level.