Overview
Databricks is a cloud-based data engineering and data science platform that provides a unified analytics solution for processing, storing, and collaborating on large datasets. By integrating with Databricks, you can unlock the full potential of their customer data, enabling them to create highly personalized and effective customer interactions.
Prerequisites
-
UID and password of the Databricks instance that will be configured in RPI
-
Download the latest version of the Simba Spark ODBC driver
-
The name of the Unity Catalog that will be used for configuring the Auxiliary database connection in RPI
Step 1: Install Databricks ODBC driver for Linux
-
Go to Databricks Download Page (https://www.databricks.com/spark/odbc-drivers-download).
-
Download ODBC for Linux (RPM) installer.
-
Copy the downloaded file (
SimbaSparkODBC-<version>-LinuxRPM-64bit.zip) to a working directory (e.g., copy on windows machineD:\Redpoint\Docker-v7-Dev\RPI-Services\config\temp). -
Extract the zip file
SimbaSparkODBC-<version>-LinuxRPM-64bit.zip. -
Inside the extracted folder, extract the file
simbaspark-2.7.7.1016-1.x86_64.rpm(we recommend using 7zip). -
Inside the extracted folder, extract the file
simbaspark-2.7.7.1016-1.x86_64.cpio(we recommend using 7zip). -
Copy the folder
spark(inside extracted folder/opt/spark) to Docker container folder execution service folder/app/odbc-lib.
Step 2: Configure ODBC driver
Update the following 3 ini files:
simba.sparkodbc.ini
-
On
/app/odbc-lib/spark/lib/64/, opensimba.sparkodbc.ini. -
Update
ErrorMessagesPath=/app/odbc-lib/spark/ErrorMessages.[Driver] ErrorMessagesPath=/app/odbc-lib/spark/ErrorMessages LogLevel=0 LogPath= SwapFilePath=/tmp
odbcinst.ini file (Driver Registration)
On /app/odbc-config/odbcinst.ini, add the following entries to the odbcinst.ini file:
[ODBC Drivers]
Simba Apache Spark ODBC Connector=Installed

[Simba Apache Spark ODBC Connector]
Description=Simba Apache Spark ODBC Connector
Driver=/app/odbc-lib/spark/lib/64/libsparkodbc_sb64.so
odbc.ini file (DSN Entries)
On /app/odbc-config/odbc.ini, add connection details and configure parameter values:
[ODBC]
Trace=no
[ODBC Data Sources]
databricks=Simba Spark ODBC Driver 64-bit
[databricks]
# Description: DSN Description.

# This key is not necessary and is only to give a description of the data source.
Description=Simba Spark ODBC Driver (64-bit) DSN

# Driver: The location where the ODBC driver is installed to.
Driver=/app/odbc-lib/simba/spark/lib/libsparkodbc_sb64.so
# The host name or IP of the Thrift server.
HOST=<Databricks HOST URL>
#HTTP Path
HTTPPath=/sql/1.0/warehouses/c546e1e69e8d2ac9
# The TCP port Thrift server is listening.
PORT=443
# The name of the database schema to use when a schema is not explicitly specified in a query.
Schema=<schema>
# The Spark Server Type
# 1 - Shark Server 1 for Shark 0.8.1 and earlier
# 2 - Shark Server 2 for Shark 0.9.*
# 3 - Spark Thrift Server for Shark 1.1 and later
SparkServerType=3
# The authentication mechanism to use for the connection.
#   Set to 0 for No Authentication
#   Set to 1 for Kerberos
#   Set to 2 for User Name
#   Set to 3 for User Name and Password
# Note only No Authentication is supported when connecting to Shark Server 1.
AuthMech=3
# The Thrift transport to use for the connection.
#	Set to 0 for Binary
#	Set to 1 for SASL
#	Set to 2 for HTTP
# Note for Shark Server 1 only Binary can be used.
ThriftTransport=2
# When this option is enabled (1), the driver does not transform the queries emitted by an
# application, so the native query is used.
# When this option is disabled (0), the driver transforms the queries emitted by an application and
# converts them into an equivalent from in Spark SQL.
# UseNativeQuery=0
# Set the UID with the user name to use to access Spark when using AuthMech 2 or 3.
UID=<username>
PWD=<password>
# Set to 1 to enable SSL. Set to 0 to disable.
SSL=1
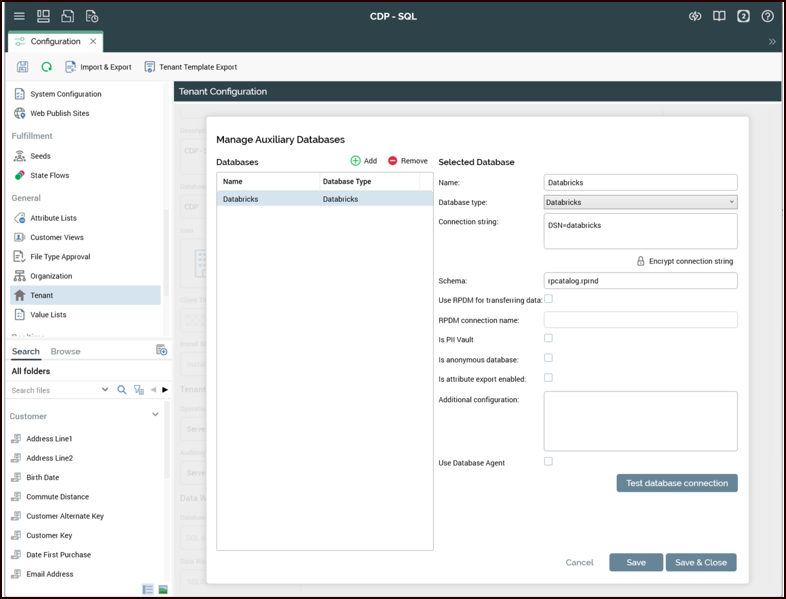
Step 3: Configure AuxDB in RPI Tenant
-
Log into RPI and go to Configuration>Tenant.
-
Scroll to the bottom and select Manage Auxiliary Databases.
-
Create a new Auxiliary Database:
-
Select Add.
-
Enter a name for the Auxiliary database, e.g., “Databricks”.
-
Choose Databricks as the database type.
-
Enter the connection string as
DSN=<name of ODBC data source configured in the odbc.ini file>. -
Enter schema name in the following format:
<unity catalog name>.<schema>. -
Select Save.
-
Select the Test database connection button to validate that RPI can connect to the Databricks instance.
-
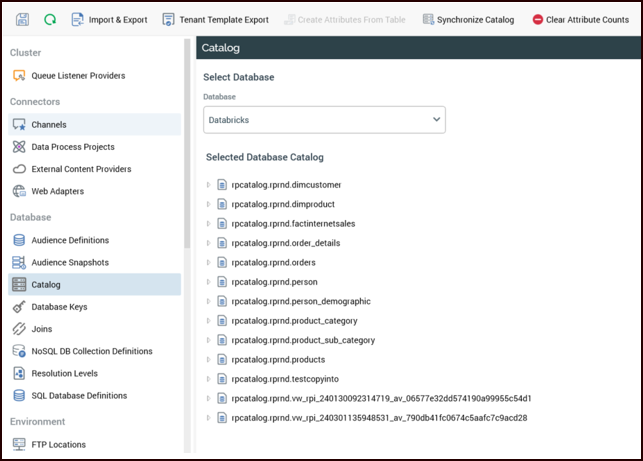
Step 4: Sync the Catalog
-
Log into RPI and go to Configuration>Catalog.
-
In the Database drop-down, choose the Databricks Auxiliary Database you configured in the previous step.
-
Select the Synchronize Catalog button.
-
Once the catalog sync is complete, select the refresh button on the far left. The list of tables in the unity catalog should display.