

Overview
This page walks you through the process of upgrading RPI from v6 to v7, and assumes you’ve reviewed the content on the previous pages of this section:
-
Upgrade to RPI v7.x: Provides benefits and other high-level information about the upgrade
-
Plan your RPI v7.x upgrade: Helps you to plan for the upgrade detailed on this page
Step 1: Back up your v6 environment
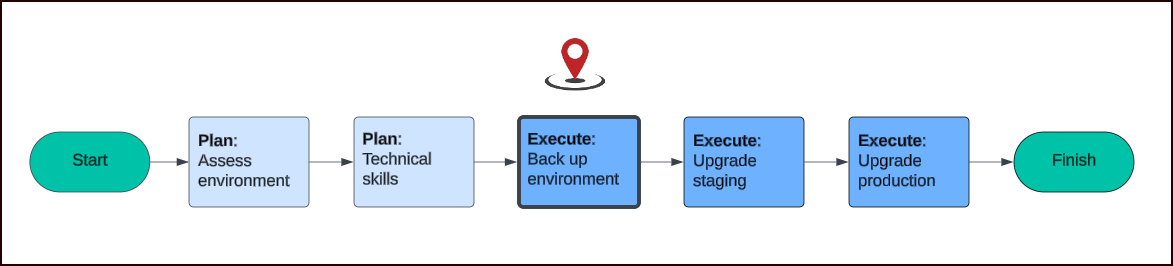
Take comprehensive backups of your current v6 environment, including databases, configuration files, and application data. While we are not familiar with your specific set up and cannot mandate how you back up your RPI v6.x environment, we strongly recommend creating backups of the following RPI components:
RPI Node(s):
-
Snapshots of the RPI VM(s)
Or
-
Back up the following folders, assuming you use the default locations:
-
C:\Program Files\RedPoint Global -
C:\inetpub\wwwrpi
-
Operational Databases:
-
Pulse
-
Pulse_Logging
-
Interaction_xxx
-
InteractionAudit_xxx
-
RPIRealtime (if used)
Once you’ve ensured that you meet the prerequisites and backed up your v6 environment, follow the steps outlined below, first for your non-production (staging) environment, and then for your production environment.
Step 2: Upgrade your non-production (staging) environment

This section applies to all non-production lower-level environments, for example, development, test, and staging. Start with the lowest-level environment first.
Step 2a: Deploy v7 in non-production environment
Follow the steps outlined in the GitHub readme to deploy v7 in your staging environment.
The key differences between the upgrade installation and a new (greenfield) installation are explained in the next sub-sections.
SQL server configuration
Ensure your SQL server configuration, caches, and queue provider settings all point to your current RPI v6 environment.
Helm chart customization
Modify the Helm Chart to incorporate the details provided in the Upgrade Assistant output. Update the values.yaml file with the relevant environment variables and configuration settings from the output to ensure compatibility with v7.
Operational database settings
RPI stores certain tenant-level settings in the operational databases. When cloning the v6 operational databases, these settings are carried over and must be updated to align with the v7 environment.
For example, the FileOutputDirectory used in your v6 cluster might differ from the one intended for your v7 cluster. After the upgrade completes successfully, the RPI administrator should review and update the following settings via the Configuration tab in the RPI client:
-
Environment > FileExportLocation: Export destinations.
-
0 = File Output Directory
-
1 = Default FTP Location
-
2 = External Content Provider
-
-
Environment > FileOutputDirectory: Specifies the path within the RPI v7 containers where the
FileOutputDirectoryvolume is mounted. The default path is/fileoutputdir, but consult your Kubernetes administrator if the volume was mounted to a different location. -
Environment > DataManagementUploadDirectory: Specifies the path within the RPI v7 containers where the
DataManagementUploadDirectoryvolume is mounted. The default path is/rpdmuploaddirectory, but consult your Kubernetes administrator if the volume was mounted to a different location. -
Channels > Channel name: Update relevant configuration to match your v7 requirements.
Step 2b: Perform initial testing in non-production environment
-
Validate: Perform thorough testing to validate the upgrade. Check all integrations, customizations, and functionalities.
-
Performance test: Conduct performance testing to ensure the new version meets your performance requirements.
Step 2c: Address Issues
-
Identify issues: Document and remediate any issues encountered during the staging upgrade for following production environment upgrade.
-
Solve issues: Develop solutions for any issues. This may involve tweaking configurations, updating integrations, or contacting Redpoint Service Desk for clarification. If you need further assistance, please reach out to our Client Services team, your Customer Success Director, or Technical Account Manager (if assigned).
Step 2d: Make final preparations for upgrading production
-
Update scripts and automations: Update your deployment scripts and automations to support v7 in a production environment.
-
Communicate to users: Inform users about the upgrade schedule and any expected downtime or changes in functionality.
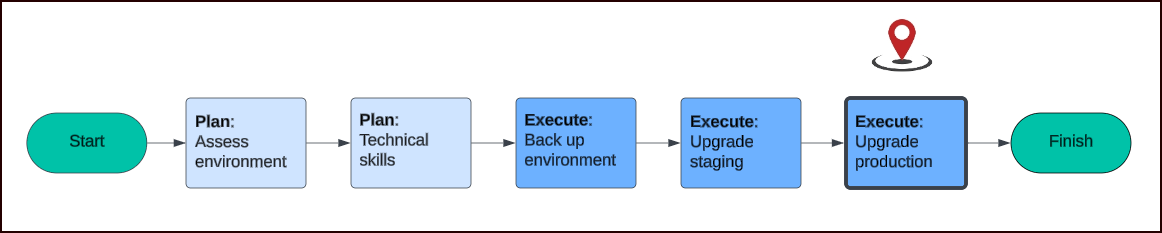
Step 3: Upgrade your production environment
Step 3a: Schedule downtime
-
Plan downtime: Determine how much downtime you’ll need and when to schedule the downtime so that it will have the least impact on your users.
-
As a default, you can plan for a four hour maintenance window. Although the upgrade can take less time, variance in your infrastructure, personnel, approach, etc. could impact the amount of time it takes.
-
Another approach could be to prescribe a project management scoping effort prior to undertaking the migration. The necessary maintenance window would be established as an output of that scoping effort.
-
Schedule the upgrade during a low-traffic period to minimize impact on users.
-
-
Notify users: Notify users in advance about the planned downtime.
Step 3b: Execute upgrade
Stop any Queue Listeners before you proceed with shutdown and upgrade.
-
Step-by-step upgrade: Proceed with the upgrade, following the upgrade steps precisely as done during the non-production upgrade. Deploy RPI v7, following the steps outlined in the GitHub readme to deploy v7 in your staging environment, and remediate documented issues which occurred during the staging upgrade.
Alternative: Mirror/duplicate staging environment and promote to production. -
Monitor: Monitor the upgrade process closely to catch any issues immediately.
The key differences between the upgrade installation and a new (greenfield) installation are explained in the next sub-sections.
SQL server configuration
Ensure your SQL server configuration, caches, and queue provider settings all point to your current RPI v6 environment.
Helm chart customization
Modify the Helm Chart to incorporate the details provided in the Upgrade Assistant output. Update the values.yaml file with the relevant environment variables and configuration settings from the output to ensure compatibility with v7.
Operational database settings
RPI stores certain tenant-level settings in the operational databases. When cloning the v6 operational databases, these settings are carried over and must be updated to align with the v7 environment.
For example, the FileOutputDirectory used in your v6 cluster might differ from the one intended for your v7 cluster. After the upgrade completes successfully, the RPI administrator should review and update the following settings via the Configuration tab in the RPI client:
-
Environment > FileExportLocation: Export destinations.
-
0 = File Output Directory
-
1 = Default FTP Location
-
2 = External Content Provider
-
-
Environment > FileOutputDirectory: Specifies the path within the RPI v7 containers where the
FileOutputDirectoryvolume is mounted. The default path is/fileoutputdir, but consult your Kubernetes administrator if the volume was mounted to a different location. -
Environment > DataManagementUploadDirectory: Specifies the path within the RPI v7 containers where the
DataManagementUploadDirectoryvolume is mounted. The default path is/rpdmuploaddirectory, but consult your Kubernetes administrator if the volume was mounted to a different location. -
Channels > Channel name: Update relevant configuration to match your v7 requirements.
Step 3c: Perform post-upgrade validation
-
Comprehensive testing: Perform comprehensive testing to ensure the upgrade was successful.
-
User acceptance testing (UAT): Allow a select group of users to perform UAT to identify any user-facing issue.
Have a contingency plan in place to roll back to the existing RPI v6 environment if you encounter issues. If required, restore from the backups taken before the upgrade.
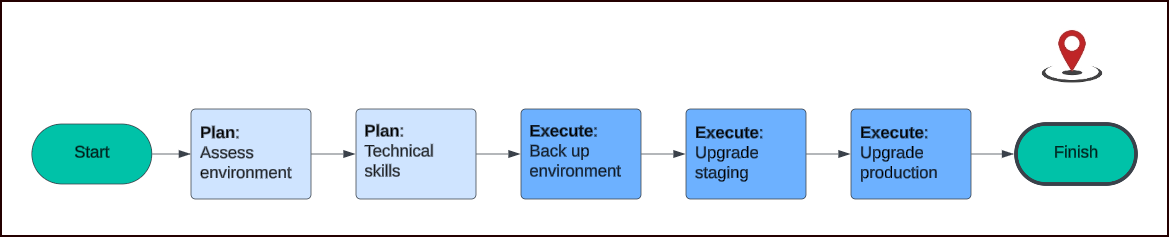
Wrapping up
-
Monitoring and support
-
Ongoing monitoring: Monitor the system closely for the first few days after the upgrade to catch any lingering issues.
-
User support: Provide support to users to help them adapt to the new version and address any issues they encounter.
-
-
Feedback and iteration: Gather feedback from users and stakeholders about the upgrade process and the new version, and resolve and/or communicate issues as appropriate.