Overview
This section describes the steps to be undertaken to ensure that databases are prepared for use by RPI as a data warehouse or auxiliary database.
Google BigQuery ODBC driver configuration
This section describes how to configure Google BigQuery using the Simba ODBC driver configured in Redpoint Interaction docker based image.
Please follow the steps below:
-
In your
docker-compose.ymlfile, ensure that following entries below are defined.
volumes:
          -./config/odbc:/app/odbc-config
          -./config/odbc/google-creds:/app/odbc-google-creds-config
-
Create a new or edit an existing odbc.ini located at the
./configlocal directory:-
Set the BigQuery odbc name and provide credentials.
-
Set the Driver parameter:
Driver=/app/odbc-lib/bigquery/SimbaODBCDriverforGoogleBigQuery64/lib/libgooglebigqueryodbc_sb64.so.
-
e.g.:
[ODBC]
Trace=no
[ODBC Data Sources]
gbq=Simba ODBC Driver for Google BigQuery 64-bit
[gbq]
Description=Simba ODBC Driver for Google BigQuery (64-bit) DSN
Driver=/app/odbc-lib/bigquery/SimbaODBCDriverforGoogleBigQuery64/lib/libgooglebigqueryodbc_sb64.so
Catalog=[ENVIRONMENTAL SETTING]
DefaultDataset=[ENVIRONMENTAL SETTING]
SQLDialect=1
OAuthMechanism=1
RefreshToken=[ENVIRONMENTAL SETTING]
KeyFilePath=[ENVIRONMENTAL SETTING]
TrustedCerts=/app/odbc-lib/bigquery/SimbaODBCDriverforGoogleBigQuery64/lib/cacerts.pem
AllowLargeResults=0
Min_TLS=1.2
DefaultStringColumnLength=16384
LargeResultsTempTableExpirationTime=3600000
RowsFetchedPerBlock=100000
Timeout=300000
SSL=0
To check if the ODBC driver is connected, execute isql [ODBC_NAME] -v in the execution service CLI.
-
Request a JSON Google service account key file, or create one using this guide.
-
Place the JSON key file inside
/config/odbc/google-creds. -
In the Pulse database, update the
ConnectionConfigurationfield in therpi_Clientstable for the BigQuery client:{"ProjectId":"[GOOGLE_PROJECT_ID]","ServiceAccountJsonPath":"/app/odbc-google-creds-config/[GOOGLE_SERVICE_ACCOUNT_KEYFILE].json"}.
Google Bigtable configuration
This section describes how to configure Google Bigtable. Please follow the steps below:
Obtaining a Bigtable instance ID
-
In a web browser, navigate to https://console.cloud.google.com to log into the Google Cloud console.
-
Once you have successfully logged on, you will be redirected to the portal’s main page.
-
In the dashboard navigation menu, select Bigtable.
-
Once the Bigtable interface is displayed, take note of the Bigtable Instance ID, as this will be used to configure Google BigQuery.
Obtaining a Google Cloud project ID
-
While in the Google Cloud console, select the project selector to the right side of the Google Cloud Platform interface.
-
Once the project selector is displayed, take note of the currently-selected project ID, as this will be used to configure Google BigQuery.
Creating a Google BigQuery dataset
-
Open the BigQuery page in the Google Cloud console.
-
In the Explorer panel, select the project where you want to create the dataset.
-
Expand the three dot action menu option and select Create dataset.
-
On the Create dataset page:
-
For Dataset ID, enter a unique dataset name.
-
For Data location, choose a geographic location for the dataset. After a dataset is created, the location can't be changed.
-
-
Select Create dataset.
Creating a Google Bigtable table
-
Open the list of Bigtable instances in the Google Cloud console.
-
Select the instance whose tables you want to view.
-
Select Tables in the left pane. The Tables page displays a list of tables in the instance.
-
Select Create a table.
-
Enter a table ID for the table.
-
Add column families (optional).
-
Select Create.
Creating a Google BigQuery table
-
In the Google Cloud console, go to the BigQuery page.
-
In the query editor, enter the following statement.
CREATE EXTERNAL TABLE DATASET.NEW_TABLE
OPTIONS (
  format = 'CLOUD_BIGTABLE',
  uris = ['URI'],
  bigtable_options = BIGTABLE_OPTIONS );
-
Replace the following:
-
DATASET: dataset name created at Google BiqQuery. -
NEW_TABLE: table Id from the Google Bigtable created. -
URI:https://googleapis.com/bigtable/projects/[YOUR-PROJECT-ID]/instances/[YOUR-BIGTABLE-INSTACEID]/tables/YOUR-BIGTABLE-TABLE-ID. -
BIGTABLE_OPTIONS: the schema for the Bigtable table in JSON format.
-
CREATE EXTERNAL TABLE DATASET.NEW_TABLE
OPTIONS (
  format = 'CLOUD_BIGTABLE',
  uris = ['https://googleapis.com/bigtable/projects/[PROJECT-ID]/instances/[INSTANCE-ID]/tables/[TABLE-ID]'],
  bigtable_options = """
    {
      bigtableColumnFamilies: [
        {
          "familyId": "[FamilyName]",
          "type": "INTEGER",
          "encoding": "BINARY"
        }
      ],
      readRowkeyAsString: true
    }
    """
);
-
Select RUN.
Installing Google BigQuery ODBC driver for Bigtable
Google Bigtable database connector required Google BigQuery ODBC driver, please refer to the Google BigQuery ODBC driver configuration section above. Once all set, you may want to test the connection by selecting Test. Otherwise, select OK to save your settings.
Azure MySQL ODBC configuration
This section describes how to create and configure a Azure MySQL Data Source Name (DSN) running in a container environment. Please follow the steps below.
-
In your container, launch a command line.
-
Type the commands to install the latest MySQL ODBC database driver.
> apt-get update
> apt-get upgrade
> apt-get install -y wget #install wget lib
> cd /
> mkdir download
> cd download
> wget https://dev.mysql.com/get/Downloads/Connector-ODBC/8.0/mysql-connector-odbc-8.0.32-linux-glibc2.28-x86-64bit.tar.gz
> tar -xvf mysql-connector-odbc-8.0.32-linux-glibc2.28-x86-64bit.tar.gz
> mkdir /usr/local/mysql
> cp -R mysql-connector-odbc-8.0.32-linux-glibc2.28-x86-64bit/lib/ /usr/local/mysql
> cp -R mysql-connector-odbc-8.0.32-linux-glibc2.28-x86-64bit/bin/ /usr/local/mysql
-
Under
\odbc\configdirectory, create the following files below:odbc.iniandodbcinst.ini.
You may use notepad editor or other preferred text editor to accomplish this.
-
Add the following entries below in
odbc.iniand save the file.
;
;  odbc.ini configuration for Connector/ODBC 8.0 driver
;
[ODBC Data Sources]
myodbc8w     = MyODBC 8.0 UNICODE Driver DSN
myodbc8a     = MyODBC 8.0 ANSI Driver DSN
[myodbc8w]
Driver       = /usr/local/mysql/lib/libmyodbc8w.so
Description  = Connector/ODBC 8.0 UNICODE Driver DSN
SERVER       =<REPLACE THIS WITH YOUR MYSQL SERVER NAME>
PORT         = <REPLACE THIS WITH YOUR MYSQL PORT NUMBER. Default value is 3306>
USER         =<REPLACE THIS WITH YOUR MYSQL USER NAME>
Password     = <REPLACE THIS WITH YOUR MYSQL PASSWORD>
Database     = <REPLACE THIS WITH YOUR MYSQL DATABASE NAME>
OPTION       = 3
SOCKET       =
SSLMODE      = REQUIRED
CHARSET      = utf8mb4
[myodbc8a]
Driver       = /usr/local/mysql/lib/libmyodbc8a.so
Description  = Connector/ODBC 8.0 ANSI Driver DSN
SERVER       =<REPLACE THIS WITH YOUR MYSQL SERVER NAME>
PORT         = <REPLACE THIS WITH YOUR MYSQL PORT NUMBER. Default value is 3306>
USER         =<REPLACE THIS WITH YOUR MYSQL USER NAME>
Password     = <REPLACE THIS WITH YOUR MYSQL PASSWORD>
Database     = <REPLACE THIS WITH YOUR MYSQL DATABASE NAME>
OPTION       = 3
SOCKET       =
SSLMODE      = REQUIRED
CHARSET      = utf8mb4
-
Add the following entries below in
odbcinst.iniand save the file.
[MyODBC 8.0 UNICODE Driver DSN]
Description=Connector/ODBC 8.0 UNICODE Driver DSN
Driver=libmyodbc8w.so
Setup=libmyodbc8w.so
Debug=0
CommLog=1
UsageCount=2
[MyODBC 8.0 ANSI Driver DSN]
Description=Connector/ODBC 8.0 ANSI Driver DSN
Driver=libmyodbc8a.so
Setup=libmyodbc8a.so
Debug=0
CommLog=1
UsageCount=2
-
In your
docker-compose.ymlfile, ensure that following entries below are defined.
volumes:
         -./config/odbc:/app/odbc-config
-
When provisioning new Redpoint Interaction client, use the myodbc8w as the data source name.
-
Restart the container.
Databricks ODBC driver configuration
This section describes how to configure Databricks using the Simba Apache Spark ODBC driver. Please follow the steps below:
-
In your
docker-compose.ymlfile, ensure that following entries below are defined.
volumes:
         -./config/odbc:/app/odbc-config
-
Create new or edit existing
odbc.inilocated at./configlocal directory:-
Set the Databricks ODBC name
-
Set
Driver=/app/odbc-lib/simba/spark/lib/libsparkodbc_sb64.so -
Provide credentials, e.g.
-
[ODBC]
Trace=no
[ODBC Data Sources]
databrick=Simba Apache Spark ODBC Connector
[databrick]
Driver=/app/odbc-lib/simba/spark/lib/libsparkodbc_sb64.so
SparkServerType=3
Host=[ENVIRONMENTAL SETTING]
Port=443
SSL=1
Min_TLS=1.2
ThriftTransport=2
UID=token
PWD=[ENVIRONMENTAL SETTING]
AuthMech=3
TrustedCerts=/app/odbc-lib/simba/spark/lib/cacerts.pem
UseSystemTrustStore=0
HTTPPath=/sql/1.0/warehouses/c546e1e69e8d2ac9
User credentials: Personal access token
-
Log in using the corp account.
-
Create your own personal access token from User Settings>User>Developer>Access Token.

-
Use “token” as the username and then for the password enter you personal access token.
Interaction configuration: Schema
Schema = <catalog>.<schema>
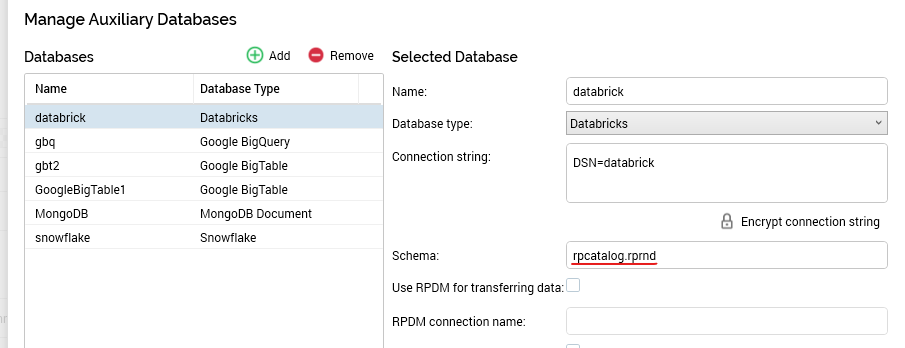
Additional resources
AWS Redshift configuration
This section describes how to create and configure an AWS Redshift Data Source Name (DSN). Please follow the steps below. Please note that you may skip steps from 1–4 if you have already installed the ODBC driver.
-
In a web browser, navigate to https://docs.aws.amazon.com/redshift/latest/mgmt/install-odbc-driver-windows.html to download the driver.
-
Locate https://s3.amazonaws.com/redshift-downloads/drivers/odbc/1.5.9.1011/AmazonRedshiftODBC64-1.5.9.1011.msi to download the 64bit Amazon Redshift ODBC installer.
-
In the download folder, double-click the
AmazonRedshiftODBC64-1.5.9.1011.msifile. -
In the Amazon Redshift ODBC Driver 64-bit Setup Window, select Next and follow the required steps to install the driver.
-
Once you have successfully installed the ODBC driver, go to Control Panel\All Control Panel Items\Administrative Tools and select Data Sources (ODBC).
-
In the ODBC Data Source Administrator Window, select the System DSN tab.
-
Choose the Add... button to create a new Data Source.
-
Find and select Amazon Redshift (x64) and select Finish.
-
In the Amazon Redshift ODBC Driver DSN Setup Window, configure the following details:
-
Data Source Name: the name of the data source.
-
Server: the Amazon Redshift cluster endpoint URL, i.e.,
"xxx.xxx.endpointregion.redshift.amazonaws.com". -
Port: the cluster port number. Only numerical values are supported. The default is
5439. -
Database: the database’s name.
-
Auth Type: must be set to
"Standard". -
User: the database username.
-
Password: the database password.
-
Encrypt Password For: must be set to
"All Users of This Machine". -
Additional Options: change the radio button selection to Use
"Multiple Statements".
-
-
Select the Test button. Once the connection has been made successfully, choose the OK button to create the DSN.
-
Once completed, launch Server Workbench and login.
-
In the Install Client at Data warehouse pane, select AWS Redshift as the database provider.
-
Enter the Server name. This can be either the DNS (Domain Name System) or an IP address of the server.
-
Enter the Database provider.
-
Enter the Data Source Name.
-
Enter the Database schema.
-
-
Check the End User License Agreement checkbox and then select Next.
SQL Server configuration
This section describes how to configure a SQL Server connection for a specific Redpoint Interaction tenant running within a container application. Please follow the steps below:
-
In the Configuration Editor’s Data Warehouse Settings section, select the SQLServer provider.
-
Enter the required parameters such as Server, Database Name, Username and Password.
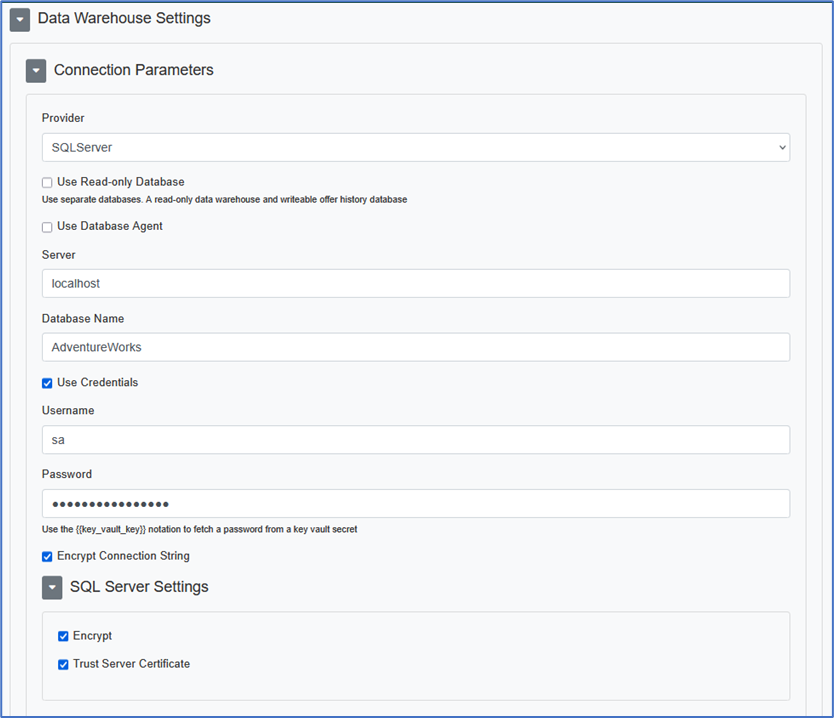
-
Specify optional parameters (e.g. per the SQL Server Settings section if required).
-
Copy the JSON text template to provision the new tenant.
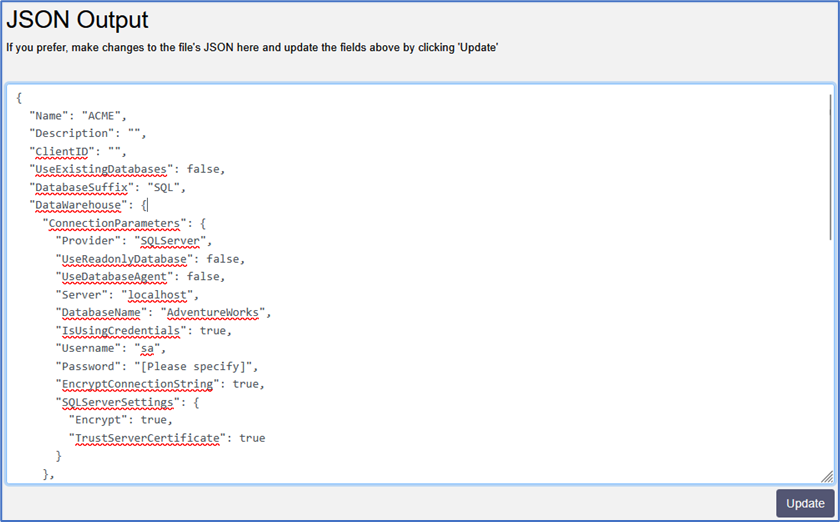
-
Once the tenant has been provisioned, a sample connection string is generated.
Server=localhost;Database=AdventureWorks;UID=sa;PWD=******;
Encrypt=True;TrustServerCertificate=True;ConnectRetryCount=3;ConnectRetryInterval=10
-
For more information about SQL Server connection string parameters, please see https://learn.microsoft.com/en-us/dotnet/api/microsoft.data.sqlclient.sqlconnection.connectionstring?view=sqlclient-dotnet-standard-5.2.
AzureSQL configuration
This section describes how to configure an AzureSQL connection for a specific Redpoint Interaction tenant running within a container application. Please follow the steps below:
-
In the Configuration Editor’s Data Warehouse Settings section, select the AzureSQLDatabase provider.
-
Enter the required parameters such as Server, Database Name, Username and Password.
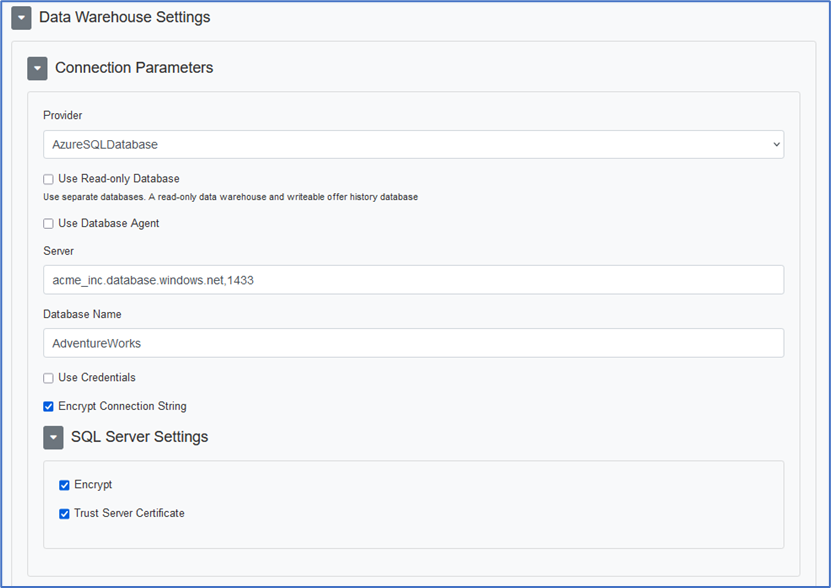
-
Specify optional parameters (e.g. per the SQL Server Settings section if required).
-
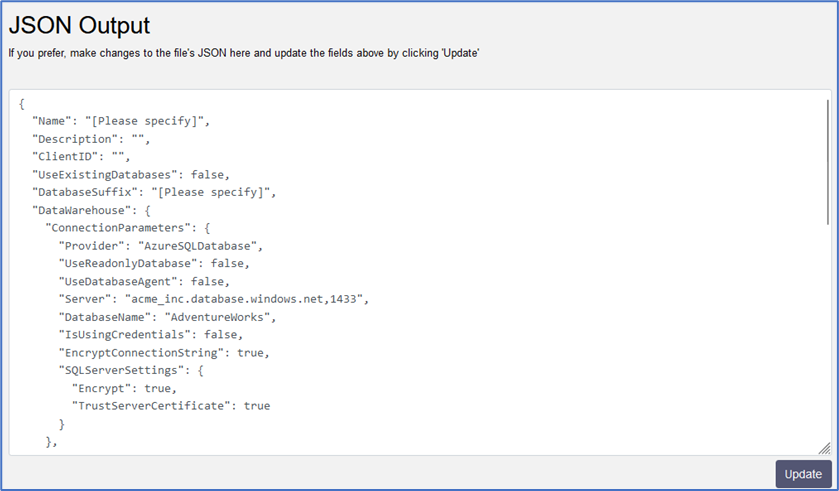
Copy the JSON text template to provision the new tenant.
-
Once the tenant has been provisioned, a sample connection string is generated.
Server=acme_inc.database.windows.net,1433;Database=AdventureWorks;User ID=sa;
Password=*****;Trusted_Connection=False;Encrypt=True;Connection Timeout=0;
ConnectRetryCount=3;ConnectRetryInterval=10;TrustServerCertificate=True
-
For more information about AzureSQL connection string parameters, please see https://learn.microsoft.com/en-us/azure/azure-sql/database/connect-query-content-reference-guide?view=azuresql.
PostgreSQL configuration
This section describes how to configure a PostgreSQL connection for a specific Redpoint Interaction tenant running within a container application. Please follow the steps below:
-
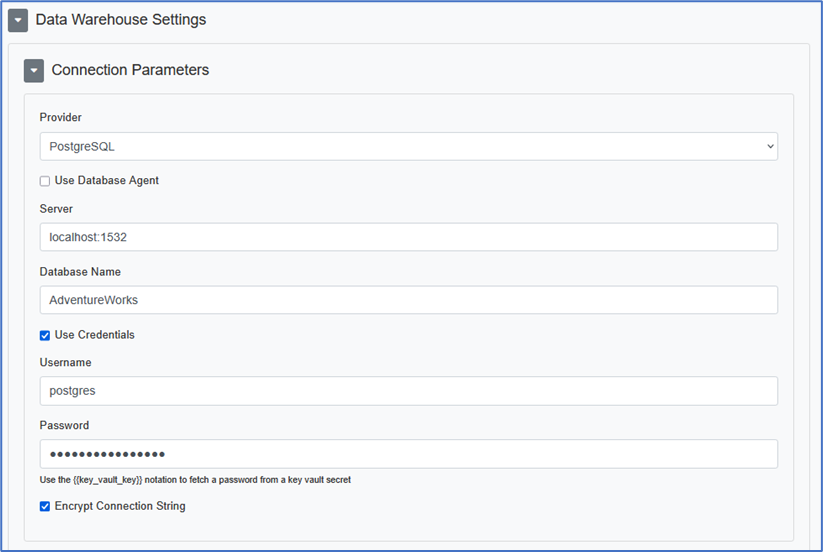
In the Configuration Editor’s Data Warehouse Settings section, select the PostgreSQL provider.
-
Enter the required parameters such as Server, Database Name, Username and Password.
-
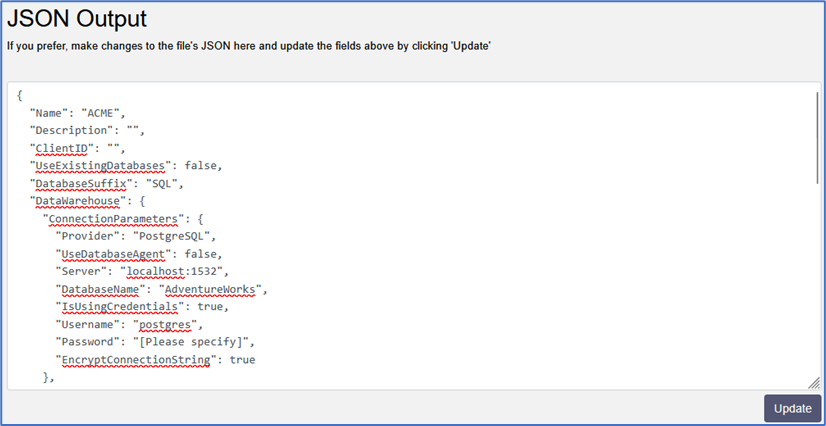
Copy the JSON text template to provision the new tenant.
-
Once the tenant has been provisioned, a sample connection string is generated.
Server=localhost;Database=AdventureWorks;Port=1532;User Id=postgres;
Password=*****;SslMode=Disable
-
For more information about PostgreSQL connection string parameters, please see https://www.npgsql.org/doc/connection-string-parameters.html.
Azure Database for PostgreSQL configuration
This section describes how to configure an Azure Database for PostgreSQL connection for a specific Redpoint Interaction tenant running within a container application. Please follow the steps below:
-
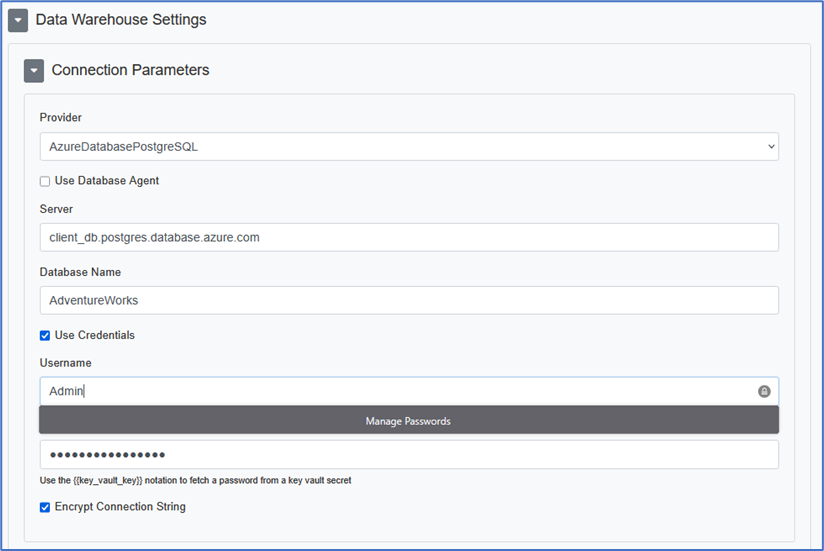
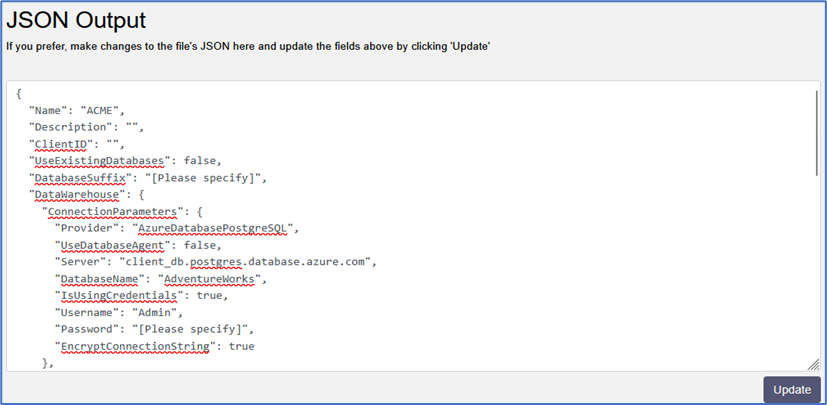
In the Configuration Editor’s Data Warehouse Settings section, select the AzureDatabasePostgreSQL provider.
-
Enter the required parameters such as Server, Database Name, Username and Password.
-
Copy the JSON text template to provision the new tenant.
-
Once the tenant has been provisioned, a sample connection string is generated.
Server=client_db.postgres.database.azure.com;Database=AdventureWorks;
Port=5432;User Id=postgres;Password=*****;SslMode=Disable
-
For more information about Azure Database for PostgreSQL connection string parameters, please see https://learn.microsoft.com/en-us/azure/postgresql/flexible-server/connect-csharp and https://www.npgsql.org/doc/connection-string-parameters.html.
Teradata configuration
This section describes how to configure a Teradata connection for a specific Redpoint Interaction tenant running within a container application. Please follow the steps below:
-
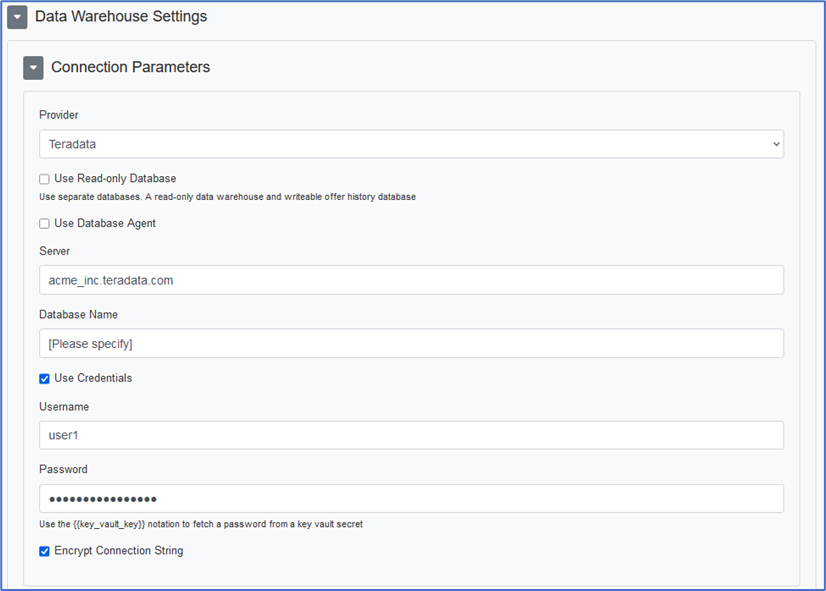
In the Configuration Editor’s Data Warehouse Settings section, select the Teradata provider.
-
Enter the required parameters such as Server, Database Name, Username and Password.
-
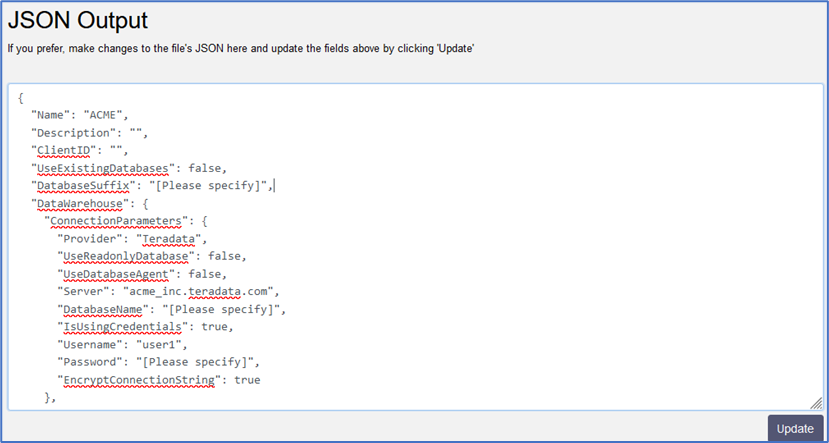
Copy the JSON text template to provision the new tenant.
-
Once the tenant has been provisioned, a sample connection string is generated.
Data Source=acme_inc.teradata.com;User ID=user1;Password=*****
-
For more information about Teradata connection string parameters, please see https://teradata-docs.s3.amazonaws.com/doc/connectivity/tdnetdp/20.00/help/webframe.html.
Snowflake configuration
This section describes how to configure Snowflake connection for a specific Redpoint Interaction tenant running within a container application. Please follow the steps below:
-
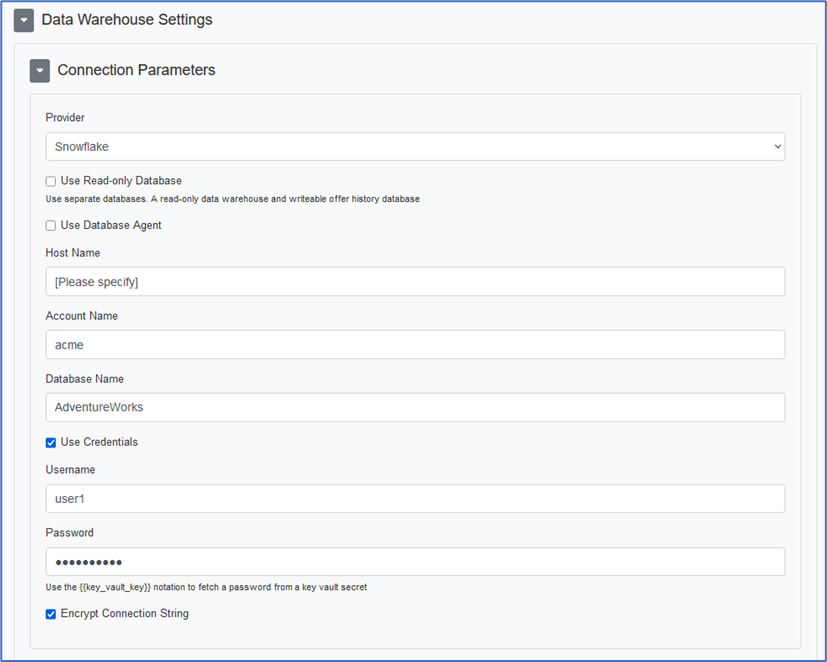
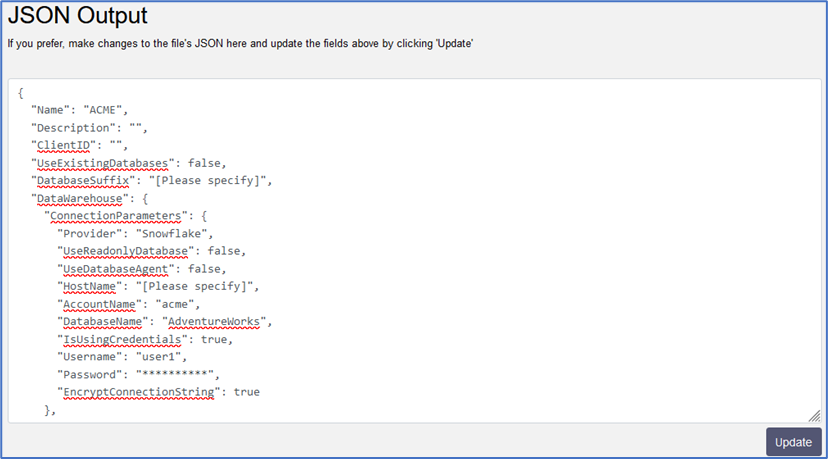
In the Configuration Editor’s Data Warehouse Settings section, select the Snowflake provider.
-
Enter the required parameters such as Server, Database Name, Username and Password. You will need to provide a value for the Host Name parameter if Snowflake is configured in a cluster other than the default.
-
Copy the JSON text template to provision the new tenant.
-
Once the tenant has been provisioned, a sample connection string is generated.
account=acme;user=user1;password=*****db=AdventureWorks
-
For more information about Snowflake connection string parameters, please see https://github.com/snowflakedb/snowflake-connector-net/blob/master/doc/Connecting.md.

