Creating a New Audience
You can initiate the creation of a new audience in a number of ways:
-
By selecting the Create New toolbar button at any time when the Audience Designer is displayed. selecting this button displays the Audience Designer Start Page. A Close button is shown to its top right; selecting it removes the Start Page from display. If an audience containing unsaved changes is displayed at invocation of Create New, an “Are You Sure?” dialog is shown, from which you can:
-
Save the changes
-
Abandon the changes
-
Abandon creation of the new audience
-
-
By selecting Create new Audience in a widget or the quick access menu, or by selecting Create New Item in a batch audience’s or interactive activity’s configuration panel in the Interaction Designer. This displays a new audience in the Audience Properties overlay (covered separately in this documentation).
A new audience’s name is “New Audience”. Its other properties are set to their default values.
Opening an Audience
You can open an existing audience in the following ways:
-
By selecting the Open audience toolbar button at any time when the Audience Designer is displayed.
-
By selecting Open Audience in a widget or the quick access menu.
-
By double-clicking an audience in the recent items component.
-
By double-clicking or selecting Open having selected an audience when browsing the RPI file system.
-
By selecting Open latest version in a batch audience’s or interactive activity’s configuration panel in the Interaction Designer.
Invoking Open causes the File System Dialog to be displayed. You can navigate the folders within the RPI file system to locate the audience you require and, having found it, you can open it. Doing so displays the audience within the Audience Designer. You can also abandon opening the audience, which removes the File System Dialog from display.
When opened, the audience is zoomed to the level displayed at the time of its last having been saved.
If you attempt to open an audience in the Audience Designer when an audience to which changes have been made is already displayed, the system displays a dialog. You may:
-
Save changes to the displayed audience and proceed with opening the audience.
-
Lose changes made to the displayed audience and proceed with opening the audience.
-
Cancel opening the audience.
Saving an Audience: Save
You can save an audience that has been saved already to the file system using Save. The audience is saved using its existing filename. No opportunity is given to specify a new filename or destination folder for the audience. If the audience’s name has changed since the last time it was saved, its filename is updated to match its new name. In this case, the file with the original name is not retained.
Note that an audience instance's validity does not affect its ability to be saved.
Following a successful save an advisory message is displayed. The asterisk is removed from the audience name in the current tab, indicating that unsaved changes no longer exist.
Saving an Audience: Save As...
You can save any audience, regardless of whether it has been saved before, at any time using Save As....When you do so, the File System Dialog is displayed.
The audience’s filename defaults to the value provided. You can navigate accessible folders within the RPI file system to locate a folder in which to save the audience. Having done so, you can select OK, which saves the audience’s details; the File System Dialog is then removed from display.
You can also cancel saving the audience.
If you updated the audience’s filename when saving it, upon returning to the audience, its name is updated to match the new filename.
Note that an audience instance's validity does not affect its ability to be saved.
Following a successful save an advisory message is displayed. The asterisk is removed from the audience name in the current tab, indicating that unsaved changes no longer exist.
Saving an Audience as a Template
You can save a non-template audience as a template using the Save the current Audience as a Template toolbar button, which is only shown when a non-template audience is displayed in the Audience Designer. Selecting it displays the Save Audience as Template File System Dialog. You can specify name for the new template file and select Save. When you do so, the file is saved with a modified icon that indicates that it is a template.

For more information on audience templates, please see Audience Templates.
Configuring an Audience’s Name
An audience’s name is configured in the large property shown at the top of the Audience Designer, below the toolbar.

Provision of a name is mandatory, and the value provided may be a maximum of 100 characters. The audience’s name is the same as the filename under which it is saved within the RPI file system. As such, it must be unique amongst the audiences in the folder within which saved.
You can edit an audience’s name by selecting the property. Complete the edit by selecting off the property, or by hitting return.
Configuring Audience Properties
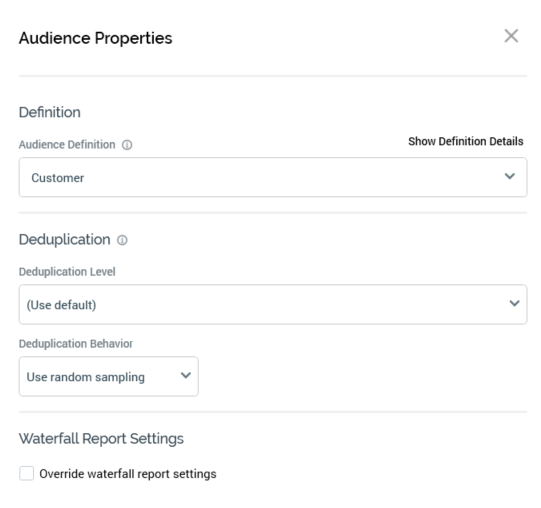
An audience’s properties are configured in the Audience Properties overlay:

The overlay is shown at the point of a new audience being displayed in the Audience Designer, or on selecting the Properties toolbar button. It exposes the following audience properties:
Definition section
-
Audience Definition: all audiences must be configured with an audience definition. You can select an audience definition using a dropdown. An audience’s audience definition defines:
-
Its resolution level, which in turn defines the table from which data will be retrieved when an instance of the audience is run. The resolution level associated with the selected audience definition is displayed as a tooltip when hovering over the audience definition.
-
Its available metadata attributes and their default values. These values can then be overridden at the audience itself or at its blocks.
-
The fields that will be stored in the offer history and offer history meta tables when a workflow instance executes.
-
The list of deduplication levels available to the audience - only database keys that are compatible with its resolution level are listed.
-
If system configuration setting EnableOrgNodeConfigUserControl is set to true, and there exist any audience definitions to which you do not have access, a View restricted items button is shown at the bottom of the dropdown.
Note that restricting access to specific audience definitions is carried out in the Audience Definitions configuration interface, in which you can link an audience definition to one or more organization nodes.
If your user account is linked to an organization node user group that matches an audience definition’s linked organization node, you will have access to that audience definition. If an audience definition is associated with more than one organization node, a user need be associated with only one of the nodes to access the audience definition. If an audience definition is associated with a descendent node from an organization hierarchy, a user associated with an ancestor node may access the audience definition.
For more information, please see the Configuration Workbench documentation.
When you select the button, it is selected, and its text set to Hide restricted items. A list of audience definition levels is displayed at the bottom of the chooser.
You can select a restricted audience definition; however, on its display at the audience, it is accompanied by a warning indicator. A tooltip is shown when you hover over the warning icon.
Restricted Items are hidden again on redisplay of the chooser. If no restricted audience definitions exist, the Restricted Items button is not shown.
If system configuration setting EnableOrgNodeConfigUserControl is set to false, Restricted Items are not shown, and access to all audience definitions is freely available, irrespective of any linked organization nodes.
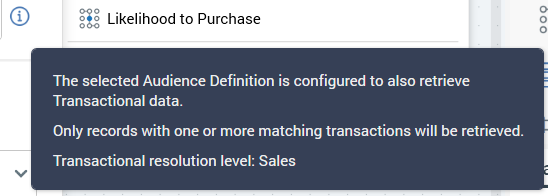
An information icon is displayed to the right of the Audience definition field if the selected definition is transactional.

Hovering over the icon displays a tooltip.

For full details on transactional audience definitions please see the Configuration Workbench documentation.
-
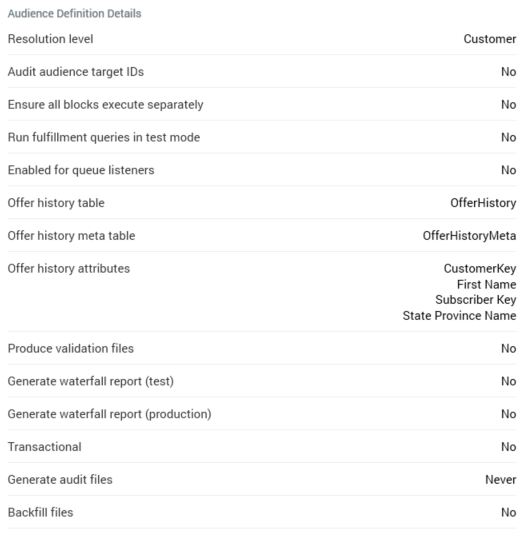
Show Definition Details: this toggle button is not selected by default. When selected, the Audience Definition Details section is shown, displaying read-only properties of the currently-selected audience definition:

Deduplication section
-
Deduplication Level: this value is selected from a drop-down list. Deduplication level represents the level at which, by default, the audience will be deduplicated—for example, select one record per individual, or one record per household. The list of available deduplication levels is restricted by the audience definition chosen for the audience. A list of database keys is filtered to include only those compatible with the selected audience definition's resolution level.
Deduplication level defaults to the value “[Use default]”. If this value is not amended, by default, an audience based upon the audience will be deduplicated at the default deduplication level defined by its resolution level.
A validation error is raised if the selected Deduplication level is not compatible with the template’s Audience definition.
-
Deduplication Behavior: specified by selecting a value from a drop-down list; deduplication behavior specifies the default manner in which deduplication will be performed when an audience instance based upon the template is run. For example, consider an audience that resolves to a Household level - one contact is to be made per household. Should more than one person within a household satisfy the audience’s rules, the system needs to understand the basis by which to choose a single individual from the household. The available values are:
-
Use random sampling
-
Sample ascending using
-
Sample descending using
-
If Use random sampling is selected, the person is chosen at random. If one of the other options is chosen, the decision is made on the basis of that person's value for a specified attribute (defined by the Order attribute property) - for example, if Deduplication behavior is set to Sample ascending using and Order attribute to Date of birth, the oldest person in the household will be selected for inclusion by the audience. Note that a validation error will be raised if an exists in table or parameter attribute is selected in this context.
Note that, having selected an Order attribute, you can view its details in the File Information Dialog.
The default value for Deduplication behavior is Use random sampling.
Note that this property can be overridden within the blocks contained within an audience.
-
Order Attribute: not relevant if Use random sampling Deduplication behavior selected, otherwise mandatory. Order attribute is populated using the recent items chooser or File System Dialog. A validation error is raised if you choose a parameter, model project, exists in table or Boolean attribute.
Waterfall Report Settings section
-
Override Waterfall Report Settings: this checkbox is unchecked by default. Checking it displays the Create in Test and Production mode checkboxes, both of which are unchecked by default.
When Override waterfall report settings is unchecked, audience waterfall reports are generated in accordance with the audience's audience definition settings.
When Override... is checked, audience waterfall reports are generated in accordance with the audience's Create... checkbox settings.
Embedded-Only Audiences
The Embedded Audience toolbar toggle button allows you to specify that an audience should only be able to be executed when it is embedded in another audience as an audience block. The button is not selected by default. When selected, the following audience properties are hidden:
-
Audience definition
-
Deduplication level
-
Deduplication behavior
-
Override waterfall report settings
The following property is shown:
-
Resolution level: this dropdown field is mandatory when displayed. No value is selected by default. You cannot use an anonymous auxiliary database resolution level at an embedded SQL audience's Resolution level property.
When an audience is defined as an Embedded Audience, it can only be used as an embedded audience block in another audience. It cannot be used directly in a batch audience or interactive activity within an interaction workflow. However, it can still be used in the following contexts:
-
Audience snapshot
-
Audience waterfall report
-
Cell list
-
Input audience
-
Audience segment smart asset
-
Workflow waterfall report
A label, shown at the Audience Designer workspace, reflects the toggle button's state:
If selected it says “Embedded SQL Audience”. If not selected, it says “SQL Audience”.
Audience Templates
An audience template is a special type of audience file that cannot be executed in a production interaction (however, it can be tested from the Audience Designer). Audience templates allow you to create a base audience, save it as a template file, and then create audiences based on the template.
When an audience template file is shown in the Audience Designer, the icon shown at the tab identifies it as a template.

The following differences are manifest at an audience template when it is displayed in the Audience Designer:
-
The Save Audience button is replaced by a Save Audience Template button, allowing you to save any changes you make to the current audience template file.
-
The Save Audience As button is replaced by a Save Audience Template As button, allowing you to save the audience template to a different filename.
-
The Save Audience as Template button is not shown.
-
The Snapshot button is not shown.
-
The Tests button is shown (execution of tests at an audience template is supported).
-
A “Template” watermark is shown at the workspace.
The following limitations are applied in respect of audience templates:
-
Audience template files are not shown at designer toolboxes.
-
You cannot configure an audience snapshot with an audience template.
-
You cannot configure an embedded audience block with an audience template.
-
You cannot configure a cell list's Input audience using an audience template.
-
You cannot configure an interaction's batch audience or interactive activity with an audience template.
-
Use of audience templates is not supported at the Workflow Builder's Choose your Audience interface.
Configuring Audience Metadata
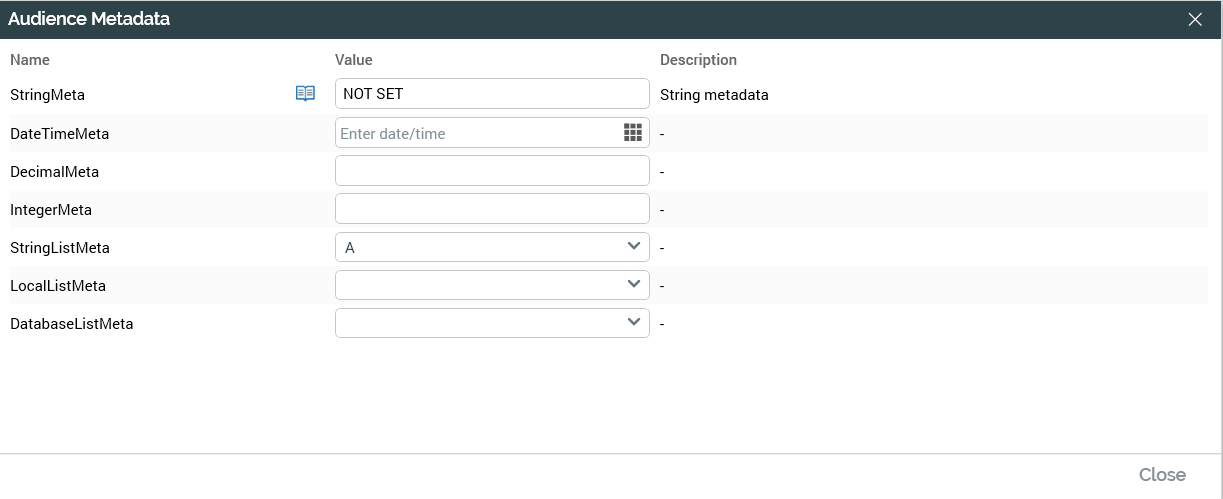
You can view and configure an audience’s metadata using the Audience Metadata dialog, which you can access from the toolbar.

The metadata attributes listed in the Audience Metadata dialog, both standard and managed list-based, are defined by the audience’s audience definition.
For each available metadata attribute, the following properties are displayed:
-
Name: read-only. The metadata attribute’s name, as defined within the audience definition.
-
Open linked Page: This inline button is only shown if the metadata attribute was associated with a Wiki or external web page when defined in the audience definition. Selecting it displays the page in question in the Linked Page Browser.
-
Value: updateable. When updating a metadata attribute's value, an appropriate control is provided in accordance with the value's data type. If the attribute is a string or numeric, you may update its value using a text box (string length restrictions must be observed). If a date, a calendar control is provided.
If Use List is checked, or the attribute is based on a managed list, a dropdown control is shown. If based on a database managed list, the maximum number of values shown in the list is controlled by system configuration setting MaxValuesDatabaseManagedList. You can constrain the values displayed in the list by entering characters into the field; when you do so, only values that contain the entered sequence of characters are displayed at the list.
When you enter a value, the system ensures that the value you supplied is compatible with the attribute's data type. Having updated a metadata attribute's value, you can, if you wish, revert to its default value (if one exists).
You can use metadata parameters when specifying a string metadata attribute's value. If the metadata attribute’s data type is DateTime, its value must be on or after 1 January 1800.
-
Description: read-only. The metadata attribute’s description, as defined within the audience definition.
Metadata values can be refined at the level of each audience block's outputs. You can override the metadata values set at the audience. You can also override any values set in an ancestor block. If you choose to revert the metadata attribute's value, it is reset to the next value set within the audience block hierarchy.
If the selected metadata attribute was associated with a Wiki page in the Audience Definition configuration interface, you can invoke Open linked Page to display the related page in the Linked Page Browser. If no linked page exists the button is not shown.
You can close the Audience Metadata dialog using the OK button displayed to its bottom right-hand corner. Any updates you have made are only saved when you save the audience as a whole.
Following an update of audience metadata, an asterisk is appended to the audience’s name displayed within the current tab, indicating that unsaved changes now exist.
Metadata Parameters
You can use parameters when configuring metadata attribute values at both the audience and block levels. Metadata parameters allow you to specify that all or part of a string metadata attribute's value will vary when assigned during audience execution.
The following metadata parameters are supported:
-
Day
-
DayOfWeek
-
DayOfYear
-
DayName
-
Month
-
MonthName
-
Year2
-
Year4
-
Hour Minute
As an example, suppose you specified a metadata value as “This audience ran on {Day}”. At audience execution, this might be expressed as “This audience ran on Tuesday”.

