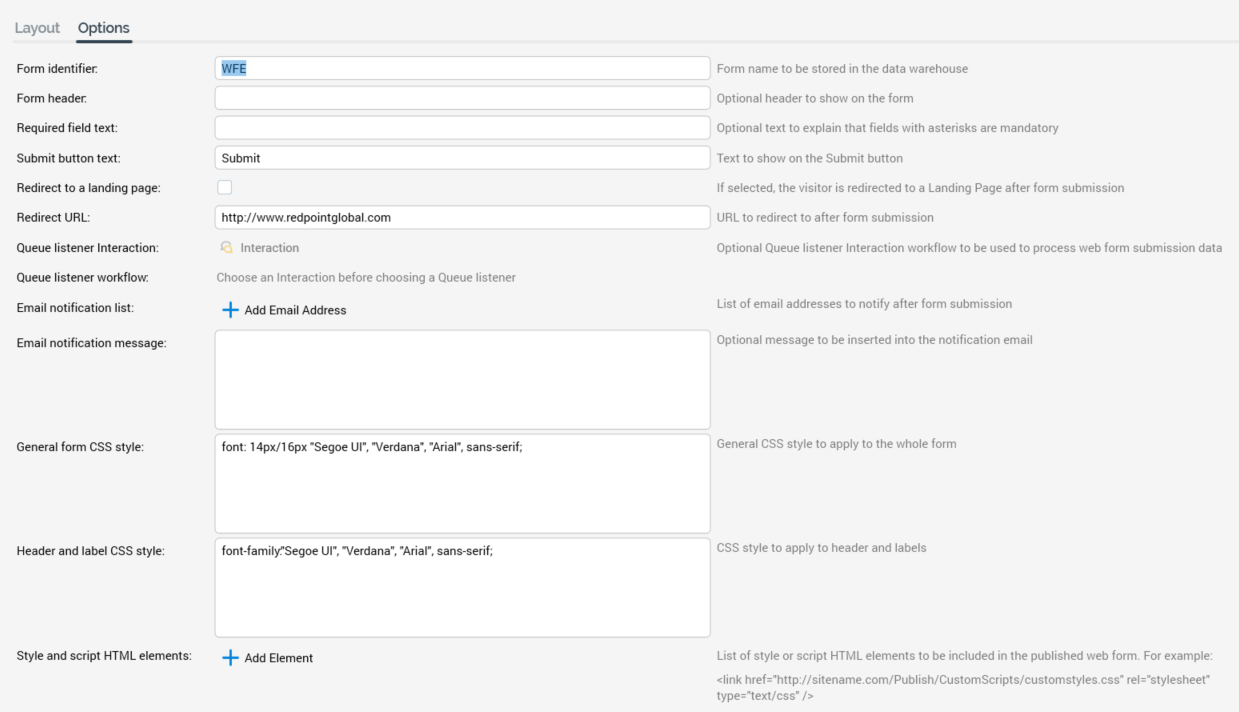
The Options tab allows you to define a series of properties for the web form.

-
Form identifier: this is the value that will be used to identify the form when data relating submitted from it are written to the data warehouse. It is mandatory and can be a maximum of 100 characters.
-
Form header: allows you to define an optional header to be shown on the form. It can be a maximum of 100 characters.
-
Required field text: this optional field allows you to define a string, shown at all times on the web form, that explains that fields accompanied by an asterisk are mandatory. It can be a maximum of 100 characters in length.
-
Submit button text: this property allows you to define the text to be displayed on the form's Submit button. It is optional and can be a maximum of 100 characters long.
-
Redirect to a landing page: this checkbox allows you to specify that a site visitor be redirected to a landing page after form submission. It is unchecked by default. When unchecked, the Redirect URL property is displayed. When checked, the Redirect landing page property is displayed.
-
Redirect URL: this property is shown when Redirect to a landing page is unchecked. It defines a URL to which the browser will be redirected following submission of the form. It is optional when shown, must be a well-formed URL, and can be a maximum of 1000 characters in length.
-
Redirect landing page: this property is displayed instead of Redirect URL when Redirect to a landing page is checked. It allows you to select a landing page to which to direct after form submission. It is mandatory when shown. You can choose a landing page using browse or drag and drop.
-
Queue listener interaction: you can optionally utilize the submission of a web form as the trigger for the placing of a message onto a queue listener queue. Full details of queue listeners can be found within the Interaction Designer documentation. To do so, you must first select the interaction in which the queue listener is to be found. You can browse for an interaction, or populate the property using drag and drop. Having selected an interaction, you can view its latest details in the Interaction Designer. You can also Clear the interaction you selected. If you choose an interaction that does not contain a queue listener, a validation error is raised.
Note that, if the web form is intended for use with a queue listener, by setting one of its elements’ Field name to “sendaddress”, it will be used as the send address in the queue listener’s JSON payload.
-
Queue listener workflow: prior to selection of a Queue listener interaction, a message is displayed at the property that says “Choose an Interaction before choosing a Queue listener”.
When an interaction containing one or more queue listeners has been selected, a dropdown is displayed, listing all of the queue listeners in the chosen interaction. If the selected interaction contains no queue listeners, a message is displayed.
-
Email notification list: this property allows you to specify a list of email addresses to which notification will be sent that the form has been submitted.
Selecting the Add Email Address button adds a new, unconfigured list entry. An inline Options button gives access to a single Remove option.
The list displays the email addresses to which a web form notification email will be sent. All entries must be unique. Note that the provision of email addresses in this context is optional.
-
Email notification message: this property allows you to specify an optional message that will be inserted into the web form's notification email. A multiline field, it can be a maximum of 5000 characters in length.
-
General form CSS style: this property allows you to define a general CSS style to apply to the whole form. By default, it is set to “font: 14px/16px "Segoe UI", "Verdana", "Arial", sans-serif;”.
-
Header and label CSS style: this property allows you to define a CSS style to apply to the form's header and labels. By default, it is set to “font-family:"Segoe UI", "Verdana", "Arial", sans-serif;”.
-
Style and script HTML elements: this optional property allows you define a list of style or script HTML elements to be included in the published web form. For example:
<link href="http://sitename.com/Publish/CustomScripts/customstyles.css/>" rel="stylesheet" type="text/css" />
Selecting the Add Element button adds a new, unconfigured list entry. An inline Options button gives access to a single Remove option.
Having added an element, provision of text at the same is mandatory.

