

Overview
A grid is displayed, listing all existing customer views:

Within the grid, the following read-only columns are displayed:
-
Name: the unique name that identifies a customer view.
-
Description: a description of the customer view.
-
Audience Definition: lists the audience definition.
-
Realtime Lookup: a tick or cross.
-
Realtime Master Key: a tick or cross.
-
Default: a tick or cross.
-
State: one of Added, Edited, Deleted or Unchanged.
When no customer views have been configured, an advisory message is displayed.
Tab set
Two tabs are shown below the list:
-
Details
-
Attribute Groups
Details
This tab displays the principal details of the currently-selected customer view.
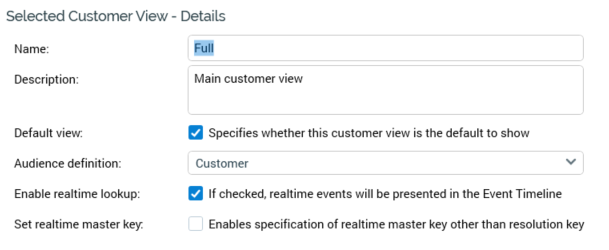
It contains the following:
-
Name: a mandatory property. Name must be unique and can be a maximum of 100 characters in length.
-
Description: an optional property, which can be a maximum of 1000 characters in length.
-
Default view: this checkbox specifies whether the current customer view is to be shown by default within the Single Customer View's Search overlay. It is unchecked by default.
-
Audience definition: a mandatory dropdown. Note that this property is replaced by a mandatory NoSQL offer history definition dropdown if configuring customer views in a NoSQL environment.
-
Enable Realtime lookup: a checkbox, which, when checked, ensures that Realtime events are presented in the Single Customer View's Event timeline. The property is unchecked by default. When checked, the Set Realtime master key property is shown.
-
Set Realtime master key: a checkbox, which is unchecked by default. Checking it facilitates specification of a Realtime master key other than the selected audience definition's resolution key and displays the Realtime master key property.
-
Realtime master key: this property facilitates retrieval of Realtime history (e.g. page visits, Realtime decision results) using a key other than the selected audience definition’s resolution key. It is mandatory if displayed and is shown when Set Realtime master key is checked. you can populate the property by browsing for an attribute, or by using drag and drop. You cannot select an Exists in table or Parameter attribute. Having selected an attribute, you can view its details in the File Information Dialog. You can also clear your selection.
Attribute Groups
This tab allows you to define the customer view’s attribute groups.
It contains the following:
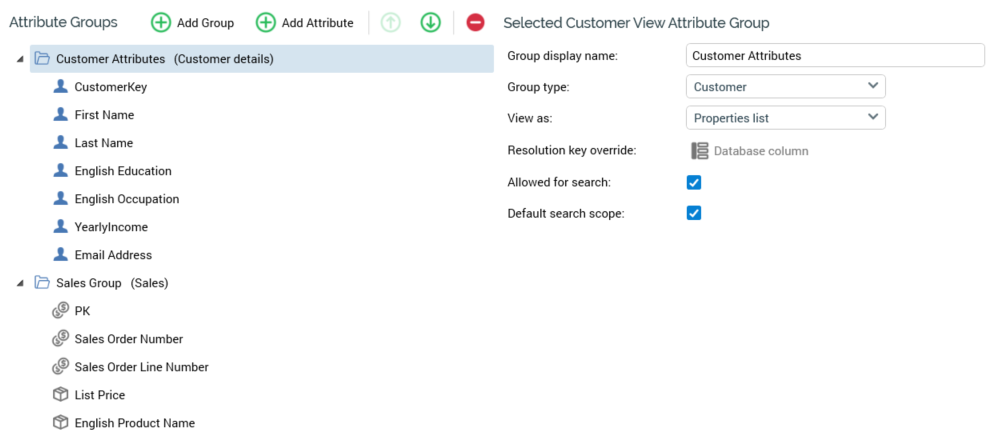
Attribute Groups
This property allows you define sets of attributes to be shown in the Single Customer View. It consists of a toolbar and a treeview.
-
Toolbar: exposing the following options:
-
Add Group: selecting this button adds a new group to the treeview. Its default Group display name is "New group" (an incrementing integer can be added to ensure the name's uniqueness), Group type is Other, and its View as property is set to Properties list.
-
Add Attribute: selecting this button adds a new attribute to the currently-selected attribute group, automatically expanding the same at the treeview. When an attribute is added in this way, its Attribute property is initially empty.
-
Move selected item up: this button is available when an attribute group or attribute that is not the first in the list is selected. Selecting it moves selected the item up one position in the treeview (any expanded attribute groups are rolled up in the process).
-
Move selected item down: this button is available when an attribute group or attribute that is not the last in the list is selected. Selecting it moves selected the item down one position in the treeview (any expanded attribute groups are rolled up in the process).
-
Remove selected item: selecting this button removes the currently-selected item from the treeview. An "Are You Sure?" dialog is not displayed.
-
Treeview
The Attribute Groups treeview lists all of the customer view’s attribute groups, in the order in which they are to be shown in the Single Customer View. Each customer has an initial attribute group, with a Group display name of "New group". Its Group type is set to Customer Details. Attribute groups are displayed as folder nodes within the treeview. For each, the following are displayed:
-
Group name (Group type)
Attributes are shown as leaf nodes within attribute groups. For each, the following are displayed:
-
Icon
-
Attribute name
You can drag an attribute from the toolbox onto an attribute group within a treeview to add it. The use of array attributes is not supported in this context.
Note that it is mandatory for a customer view to contain at least one attribute group. It is also mandatory for an attribute group to contain at least one attribute.
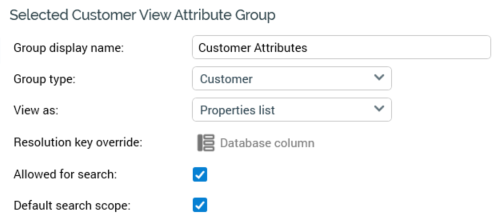
Selected Customer View Attribute Group
The following properties are displayed to the right of the Attribute Groups treeview, when an attribute group is selected in that context.
-
Group display name: this mandatory property can be a maximum of 100 characters in length and must be unique within the customer view.
-
Group type: a dropdown field, which allows you to classify the attribute group. It exposes the following values: Address, Customer (the default), Orders, Products, Sales, Transaction and Other.
-
View as: this dropdown allows you to specify whether the attribute group will be displayed as a simple list of properties, or as a table. Typically, you would use the latter to display a list of related records – e.g. a customer’s transactions. A dropdown field, it exposes the values Properties list (the default) and Table.
-
Resolution key override: if required, you can choose a resolution key to be used by the attribute group other than the key associated with the chosen Audience definition. To do so, set this property to the required database column using the Choose Database Item dialog. You might do so:
-
To make queries more efficient (e.g. using a Customer Key directly from a Sales table, rather than forcing an unnecessary join to a Customer table).
-
To facilitate searching for related records at an auxiliary database.
-
Having chosen an override, you can Clear your selection.
-
Allowed for search: this checkbox, which is checked by default, allows you to define that the attribute group will be available in the Scope dropdown in the Single Customer View’s Search overlay.
-
Default search scope: this checkbox is checked by default. It allows you to define one attribute group only as that upon which the set of available search field displayed in the Single Customer View's Search overlay will be based. This property is only displayed when Allowed for search is checked.
-
Maximum number of rows: allows you to define the maximum number of related records that can be displayed in a table.
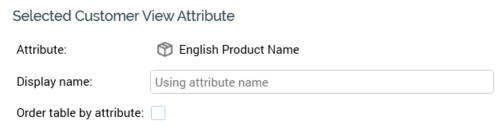
Selected Customer View Attribute
The following properties are displayed to the right of the Attribute Groups treeview, when an attribute is selected in that context.
-
Attribute: a mandatory RPI attribute file, which can be populated using browse or drag and drop. Once populated, you can view the attribute's details in the File Information Dialog. You can also clear the property. You cannot select an Exists in table or Parameter attribute in this context. Note that you can only include the same attribute once within an attribute group.
-
Display name: this property is set by default to the value "Using attribute name". You can overwrite the default Display name or specify one if required (a maximum of 100 characters are supported in this context).
-
Order table by attribute: this checkbox, which is unchecked by default, is only displayed at attributes within a table attribute group. It allows you to specify one attribute within the group by which the group’s records will be ordered. Checking the checkbox displays the Order by direction property.
-
Order by direction: this dropdown field is displayed when Order table by attribute is checked. It exposes values Ascending (the default) and Descending.