

Overview
You can invoke the Single Customer View in the following ways:
-
From a widget: more details are provided in the Dashboard Designer documentation. Selecting the Single Customer View option displays the interface in a new tab in RPI. You can open more than one Single Customer View at the same time, if required. Or from a widget exposed within the quick access menu.
Access to the Single Customer View is controlled via the Single Customer View functional permission. If none of the user groups of which you are a member are associated with this permission, you will not be able to access the Single Customer View.
Single Customer View basics
The Single Customer View is displayed in a separate tab in the RPI framework.
It consists of the following elements:
-
Search overlay
-
Toolbar
-
Attribute Groups
-
Events Timeline
-
Selected Event Details
Search Overlay
The Search overlay is displayed on initial invocation of the Single Customer View, and subsequently when the Search button is selected in the main interface.

It allows you to specify one or more search criteria, then execute a search for records matching those criteria. If one or more matching records is found, they are listed in the Search Results section, from where you can choose a single record in respect of which to view details in the main Single Customer View interface.
The Search overlay contains a toolbar, search criteria fields and Search Results sections.
Toolbar
The Search overlay toolbar exposes the following options:
-
View: this dropdown facilitates selection of a customer view. A customer view defines the set of search criteria that can be used to search for records and, having located a record to show in the main Single Customer View interface, the properties to be displayed for the chosen record. It is set to the default customer view, if one exists, else to the first customer view in the list. Note that customer views are managed within their own dedicated configuration interface.
-
Scope: this dropdown facilitates selection of an attribute group within the selected customer view that will be used to provide the set of search criteria fields. It is set by default to the attribute group that is defined as the Default search scope.
Search Criteria
If the Single Customer View is invoked without any customer views having been defined, a message is shown at the Search Criteria section within the Search overlay that states “No customer views have been configured”.
The fields displayed within the search criteria section are defined by the selected View and Scope property values. Data type masks are provided as appropriate. Note that searches are case-dependent, and that the use of wildcard characters (e.g. ‘%’) is not required.
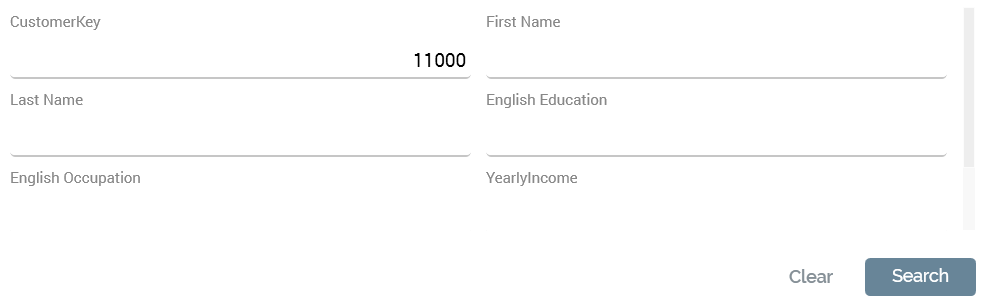
In addition, two buttons are shown below the search criteria:
-
Clear: this button is enabled on a value being entered in a search criterion field. Selecting it removes from display all entered search criteria, as well as Search Results (if any are shown).
-
Search: this button is enabled on a value being entered in a search criterion field. Selecting it displays a "Refreshing" icon at the Search Results section and creates a Customer View Search job (note that the My Jobs dialog is not displayed). Once the job has completed, any matching search results are displayed in the Search Results section. If no results are found, a message is displayed instead.
Search Results
This section is initially blank. It is populated using the Search button, displayed below the search criteria. When results are shown, they are displayed in a grid, and are ordered by resolution key.
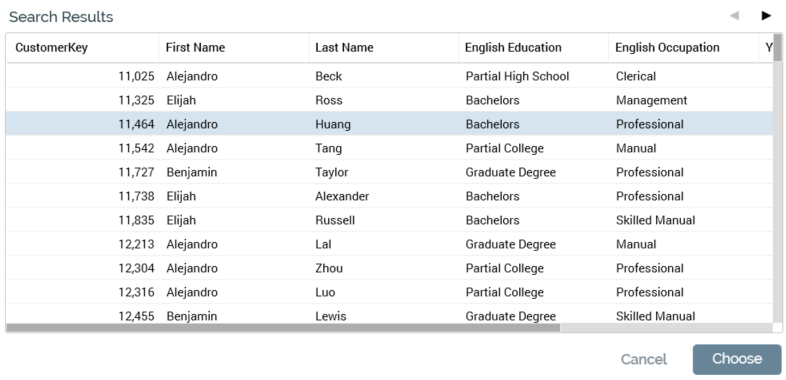
The columns shown are defined by the selected Scope. Paging is supported, with Previous/Next page buttons providing access to the same (the page size is set to 50).
Two buttons accompany the Search Results grid:
-
Cancel: selecting this button removes the Search overlay from display and displays an empty Single Customer View interface.
-
Choose: this button is enabled when a Search Results record is selected. Invocation removes the Search overlay from display and creates a Customer View job (note that the My Jobs dialog is not displayed). Once the job has completed, the chosen record is displayed in the main Single Customer View interface. Double-clicking a search result has the same effect as selecting Choose.
Toolbar
The Single Customer View toolbar exposes the following options:
-
Current View: a read-only representation of the customer view selected in the Search overlay, which provided the properties now displayed in the Single Customer View.
-
Search: selecting this button redisplays the Search overlay.
-
Copy results to clipboard: selecting this button copies all of the information displayed in the Single Customer View to the clipboard.
-
Refresh: selecting this button creates a Customer View job in respect of the currently-selected record and displays the record's most up-to-date details on its completion.
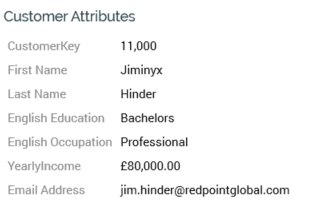
Attribute Groups
This section displays values for the current record for each of the attribute groups (Properties list and/or Table) defined in the current customer view.
If the Search overlay was cancelled prior to choosing a record, a message is displayed instead that states “Please click Search to locate a record to view”.
If a record is displayed, each attribute group is displayed in the order defined at the customer view. All data is read-only and formatted appropriately. The name of each attribute group is displayed at the top of each.
If the attribute group is shown as a Properties list, it contains a list of properties displayed in the order defined at the attribute group:
If the attribute group is to be used to list related records (e.g. details of transactions or products purchased by a customer), it can be shown as a Table.:
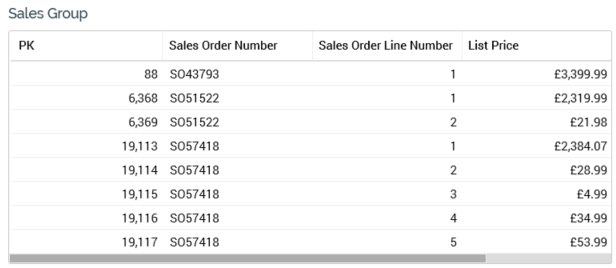
A series of records is displayed, with the columns and order thereof being as defined at the attribute group in the customer view. The maximum number of related records that can be displayed in a table attribute group is defined by its Maximum number of rows property.
Events Timeline
This section displays, in reverse chronological order, all instances of the current customer’s having been touched using a medium known to RPI.
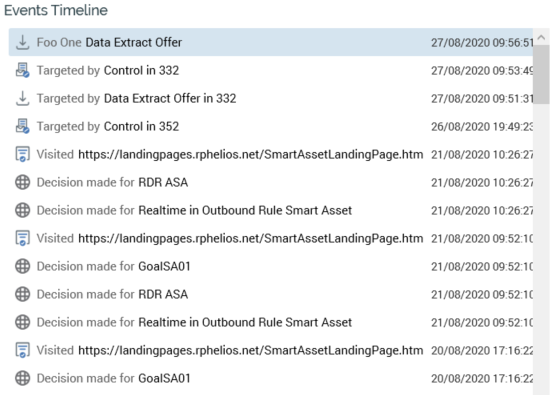
The following event types are shown:
-
Fulfillment activity: representing a customer having been targeted by a Production fulfillment activity (e.g. an offer, export or control) within an interaction. The following is displayed at a fulfillment activity: "Targeted by [Activity name] in [Interaction name]".
-
Fulfillment state: representing a customer assuming a fulfillment state following being targeted by a fulfillment activity. For example, a user would assume the "Opened" state following receipt, and opening, of an email offer. The following is displayed at a fulfillment state: "[Fulfillment state] [Activity name]".
Only explicitly-assumed states stored in Offer History States (such as Opened, Clicked Through, etc.) are shown in the Events Timeline.
-
Page visit: representing a customer having visited an RPI landing page. The following is displayed at a page visit: "Visited [URL]".
-
Realtime decision: representing a customer having been the subject of a Realtime decision (effected via a smart asset). A Realtime decision event is also created in respect of the customer having been the subject to a call to an RPI file via the RPI Realtime API. The following is displayed at a Realtime decision: "Decision made for [Asset name]".
Page visit and Realtime decision events are only listed when the currently-selected customer view’s Enable Realtime lookup property is checked.
Selected Event Details
The section displayed to the right of the Events Timeline displays additional details of the currently-selected event. The following properties can be displayed:
-
Type:
-
Fulfillment activity
-
Fulfillment state
-
Page visit
-
Realtime decision
-
Decision result
-
-
Timestamp
-
Activity name:
-
Only shown if a Fulfillment activity or Fulfillment state event.
-
-
State name
-
State detail
-
File:
-
If a Fulfillment activity or Fulfillment state, the related interaction is shown.
-
If a Page visit, the related landing page is shown.
-
If a Realtime decision, the related smart asset is shown.
For each file, you can invoke the following functionality using the buttons provided: -
Open latest version
-
Open file location
-
-
Asset Preview:
-
Shown only if a Realtime decision event, this property displays a representation of the content that was rendered to the user.
-
-
Channel:
-
Shown only if a Fulfillment activity or Fulfillment state event.
-
-
Realtime decision type:
-
Shown only if a Realtime decision event.
-
-
Delivery method:
-
If a Fulfillment activity or Fulfillment state, the related interaction activity's delivery method is shown.
-
If a Page visit, delivery method is set to "Web Page".
-
If a Realtime decision, delivery method is set to "Realtime".
-
Closing the Single Customer View
You can close the Single Customer View at any time by closing the tab within which it is displayed, or by shutting down RPI itself.