

Overview
Let’s review the fields available within the Options tab.
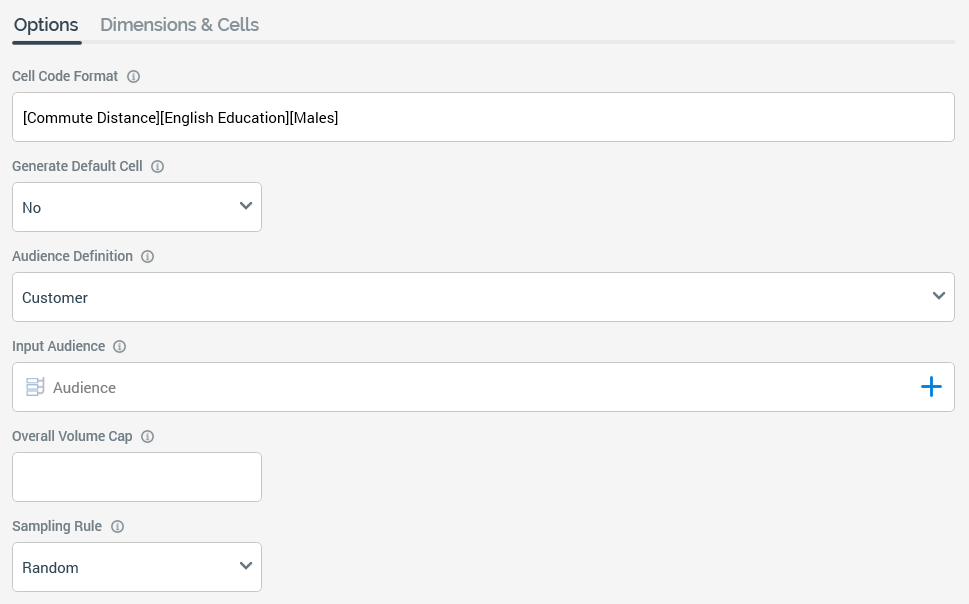
The following cell list options can be set:
Cell Code Format
This button allows you define the format of automatically-generated cell codes. When a cell code format has not been set, the button’s text reads “Click here to design the format”. When it has been set, an example cell code format is shown on the button itself.
Selecting the button displays the Design Code Format dialog.
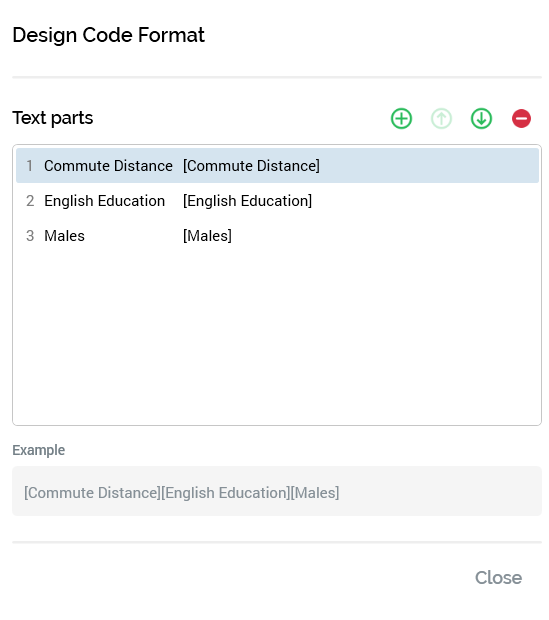
The Design Code Format dialog allows you to build up a format for cell codes that are generated automatically. A format consists of text parts. Several types of text part are available for inclusion in a cell code format, and each is discussed below.
The Design Code Format dialog contains the following:
-
Text parts toolbar: the toolbar exposes the following options:
-
Add a new Text Part: invocation of this option displays a submenu that in turn exposes the following options:
-
Add String
-
Add Date part
-
Add Cell number
-
Add Audience instance id
-
[For each dimension in Dimensions list,] Add [Dimension Name]
Selection of a text part adds it to the Text parts list and updates the example cell code format shown at the bottom of the dialog immediately. The example shown at the Cell code format button is updated at the same time.
-
-
Move the selected Text Part up: this button is available when a text part other than the first in the list is selected. Invocation moves the text part up one position in the list. Example cell code formats are updated immediately.
-
Move the selected Text Part down: this button is available when a text part other than the last in the list is selected. Invocation moves the text part down one position in the list. Example cell code formats are updated immediately.
-
Remove the selected Text Part: this button is available when a text part is selected in the list. Invocation removes the selected text part without display of an “Are You Sure?” dialog.
-
-
Text parts list: the Text part list displays any text parts included within the current cell list’s cell code format. For each, the following are displayed:
-
[Ordinal position indicator]: a read-only, system-supplied integer.
-
[Text part type]: read-only. One of: String, Date part, Cell number, Audience instance id, or [Dimension Name].
-
[Value]: this is set in accordance with the text part’s type:
-
String: a text field is displayed, blank by default, within which you can specify a value for the text part. Provision of a value is optional. The specified value is shown “as is” both in the cell code format examples, and also in any automatically-generated cell codes.
-
Date part: a dropdown field is shown, exposing the following values:
DayOfTheMonth(the default),DayNameShort,DayNameFull,Month,MonthNameShort,MonthNameFull,Year2Digits,Year4Digits,Hour,Minutes,Seconds, andMilliseconds. Having selected a value, the cell code format example, and any generated cell codes, default to the current date and time. The actual cell codes applied to any cells generated during audience execution will include date parts set in accordance with the date and time of execution. -
Cell number: shown as a read-only “[CellNo]” in the Text parts list and example cell code formats. When included as part of a cell’s cell code, a cell number text part is set to an integer representing the cell’s ordinal position in the Cells list.
-
Audience instance id: shown as a read-only “[AudienceID]” in the Text parts list, example cell code formats and within auto-generated cell codes in the Cells list. When included as part of a cell’s cell code, at audience execution, an Audience ID text part is set to the audience’s unique integer ID value.
-
Dimension: shown as a read-only “[Dimension Name]” in the Text parts list and example cell code formats (e.g. “[Financial Group]”). Within auto-generated cell codes in the Cells list, a dimension text part is set to the dimension value for the current cell (e.g. “High Flyers”).
-
-
-
Example: a read-only example of the cell code format is shown at the bottom of the Design Code Format dialog. It displays an example cell code in accordance with the rules outlined above:
-
String text part values are displayed as entered
-
Date text part values are displayed in accordance with the part’s dropdown setting
-
Cell number text parts are displayed as “[CellNo]”
-
Audience instance ID text parts are displayed as “[AudienceId]”
-
Dimension text parts are displayed as “[Dimension Name]”
-
Note that the maximum length for a cell code format is 100 characters – above this length, a validation error is raised.
Selecting Close removes the Design Code Format dialog from display and applies the cell code format to any cells displayed in the Cells list that do not have manually-overridden cell codes. Selecting off the dialog has the same effect.
Generate Default cell
This dropdown, exposing “Yes” and “No” (the default) values, allows you to define whether the cell list will support the creation of a default cell, into which will fall all records not targeted explicitly by a cell in the Cells list. Setting the property to “Yes” turns on the Default cell code and Default cell metadata fields.
Default Cell Code
And is available when Generate Default Cell is set to “Yes” (in which case provision of a Default Cell Code is mandatory). The code can be a maximum length of 100 characters. The Default cell code is assigned to all records that are not targeted explicitly by a defined cell, and so end up in a “remainder” cell.
Default Cell Metadata
Allows you to assign metadata attribute values to the default cell. Default Cell Metadata is only available when Generate default cell is set to “Yes”. By default, “No overrides” is displayed as the text on a button which, when selected, displays the Cell Metadata dialog, in which you can record metadata attribute values for the default cell.
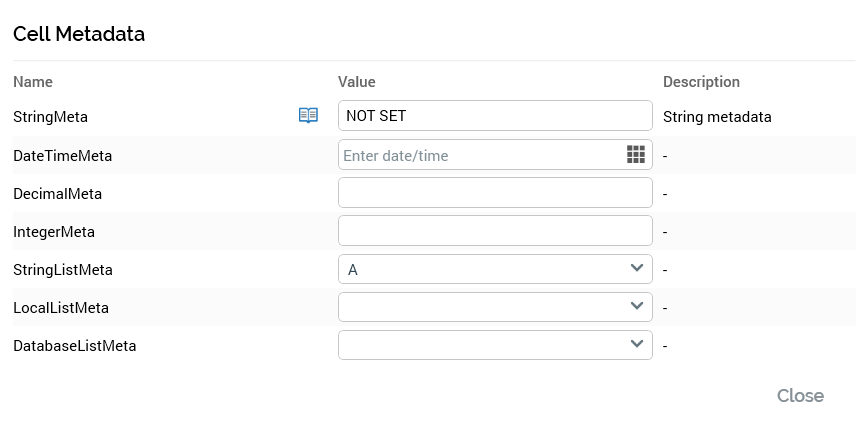
Upon overriding the default cell’s metadata, the button text is updated to “[n] override[s]” (where n is the number of metadata attribute values overridden at the default cell).
Audience Definition
This field defines the output tables where cells will be created and metadata values persisted). Audience Definition is set using a dropdown that lists all audience definitions configured within the current RPI client. Provision of an Audience Definition is mandatory, and the field defaults to the first audience definition alphabetically.
Restricting access to specific audience definitions is carried out in the Audience Definitions configuration interface, in which you can link an audience definition to one or more organization nodes.
If your user account is linked to an organization node user group that matches an audience definition’s linked organization node, you will have access to that audience definition. If an audience definition is associated with more than one organization node, a user need be associated with only one of the nodes to access the audience definition. If an audience definition is associated with a descendent node from an organization hierarchy, a user associated with an ancestor node may access the audience definition.
For more information, please see the Configuration Workbench documentation.
When you select the button, it is selected, and its text set to Hide restricted items. A list of audience definition levels is displayed at the bottom of the chooser.
You can select a restricted audience definition; however, on its display at the cell list, it is accompanied by a warning indicator. A tooltip is shown when you hover over the warning icon.
Restricted Items are hidden again on redisplay of the chooser. If no restricted audience definitions exist, the Restricted Items button is not shown.
Input Audience
This field is allows you to select an optional input audience to allow code generation based on metadata values or audience segments.
You can, optionally, select an audience to serve as the cell list’s Input Audience. When a cell list block configured with the cell list is executed in an audience, the rules defined within the Input Audience are executed, output cells are generated and metadata values are applied to them. These cells then serve as the input to the cell list block and allow two additional types of dimension to be added to the current cell list.
Metadata-based dimensions allow you to determine cell membership within the current cell list based on metadata values assigned during Input Audience execution.
Output-based dimensions allow you to determine cell membership within the current cell list based on the output cell from the Input Audience to which records belong.
You can browse for an Input Audience using the File System Dialog or populate the field by dragging and dropping an audience sourced from the toolbox. Selecting an Input Audience turns on the Use segments as dimension checkbox. Having selected an audience, you can open its latest version in the Audience Designer.
Once set, you can also clear the Input Audience; clearing the property removes any associated metadata attribute and output dimensions and any cells that depend on dimensions of either type and unchecks the Use segments as dimension checkbox.
A validation error is raised if the selected Input Audience contains a cell list block configured with the current cell list. A runtime validation error is raised if the Input Audience’s audience definition is incompatible with the current cell list’s audience definition.
Use input audience segments as dimension
This checkbox allows you to specify whether the segments of the Input Audience will be used as a dimension. It is unchecked by default. Checking adds an “Audience Segment” dimension to the Dimensions list. One dimension value is available per Input audience segment.
Note that, if the input audience’s segment structure changes, such changes are not reflected at any cells generated using the same. Any changes will need to be reflected by manually re-generating cells.
Overall Volume Cap
An optional integer field that allows you to define a maximum number of records that can be output by the cell list. For example, if you have a cell list that produces three equal cells capped at 10,000 records each, and you define an Overall volume cap of 15,000 records, the first cell will contain 10,000 records, the second 5,000 records and the final cell will be empty (but will still be created).
Sampling Rule
This property allows you to define whether, if cell capping is to be applied, records will be selected randomly or in accordance with a specified priority order. A dropdown, the property exposes the following values:
-
Random: selected by default.
-
Cap on attribute order: when this option is selected, the Sampling Order Attributes property is displayed.
Sampling Order Attributes
This property is displayed when Sampling Rule is set to “Cap on Attribute Order”.

The list displays the cell list's sampling order attributes, which define the order in which records will be selected when capping is applied. Each entry in the list exposes the following:
-
Attribute: provision of an attribute file is mandatory. You can browse for an attribute, or you can provide one using drag and drop. Having populated the property, you can View Information relating to the attribute in the File Information Dialog. You can also clear your selection. Exists in table and parameter attributes are not supported in this context.
-
Order By: this dropdown field allows you to specify the attribute value sort order (Ascending/Descending) when capping is applied. By default, the property is set to “Ascending”.
-
Actions: exposing the following options:
-
Move up
-
Move down
-
Remove
-
Not protected by “Are You Sure?”.
-
-
An Add new Sampling Order attribute button is displayed at the bottom of the list. You can also add a sampling order attribute by dragging an attribute from the toolbox and dropping it onto the list.
Sampling Order Attributes are applied when cells are generated, and when one or more cells’ capping values have been specified (Sampling Mode being set to one of Volume or Percent).