Overview
Full details of the parallel steps to be undertaken within the RPI client application’s Configuration Workbench can be found in the RPI reference guide.
Setting up a Kafka instance in AWS
This section describes how to setup your Kafka instance in AWS. Please follow the steps below:
-
On your web browser, navigate to the AWS console.
-
Create or log in to an AWS account.
-
Navigate to Amazon MSK service and select Create cluster.
-
Follow the instructions provided on the page.
-
Once the Cluster is created, select the cluster name.
-
Go to the Client Integration Information page to review the details.
-
In the Plaintext section, select Copy link.
-
Go to the Kafka Queue Provider Config page in Redpoint Interaction (RPI) and paste the copied link n the Bootstrap servers field.
Setting up AWS MSK
This section describes how to setup AWS MSK instance.
Create a MSK Cluster with IAM Auth
-
Log in to AWS Console.
-
Go to MSK service and select Create cluster.
-
For creation method, select Custom create.
-
Enter cluster name.
-
For cluster type, select Provisioned.
-
For the Apache Kafka version, select latest (recommended).
-
In Configuration Custom configuration and Create configuration.
auto.create.topics.enable=true
default.replication.factor=2
min.insync.replicas=2
num.io.threads=8
num.network.threads=5
num.partitions=1
num.replica.fetchers=2
replica.lag.time.max.ms=30000
socket.receive.buffer.bytes=102400
socket.request.max.bytes=104857600
socket.send.buffer.bytes=102400
unclean.leader.election.enable=true
zookeeper.session.timeout.ms=18000
-
In Networking, select your VPC, Public subnets, and security group. Select Next.
-
In Security, choose IAM role-based authentication and select Next.
-
After reviewing, select Create cluster.
Enable public access
-
Go to cluster properties.
-
Choose Edit Networking settings.
-
Select Enable Public Access.
Create IAM policy
-
Go to IAM service and choose Policies.
-
Select Create policy.
-
In Create policy, select JSON.
-
Paste the sample policy included below.
{
    "Version": "2012-10-17",
    "Statement": [
        {
            "Sid": "VisualEditor0",
            "Effect": "Allow",
            "Action": [
                "kafka-cluster:AlterGroup",
                "kafka-cluster:CreateTopic",
                "kafka-cluster:DescribeCluster",
                "kafka-cluster:AlterTopic",
                "kafka-cluster:ReadData",
                "kafka-cluster:AlterCluster",
                "kafka-cluster:DescribeTopic",
                "kafka-cluster:DescribeGroup",
                "kafka-cluster:Connect",
                "kafka-cluster:WriteData"
            ],
            "Resource": [
                "arn:aws:kafka:*:656810741044:group/*/*/*",
                "arn:aws:kafka:*:656810741044:cluster/*/*",
                "arn:aws:kafka:*:656810741044:topic/*/*/*"
            ]
        }
    ]
}
-
Add tags.
-
Review your work and select Create policy.
Create IAM User
-
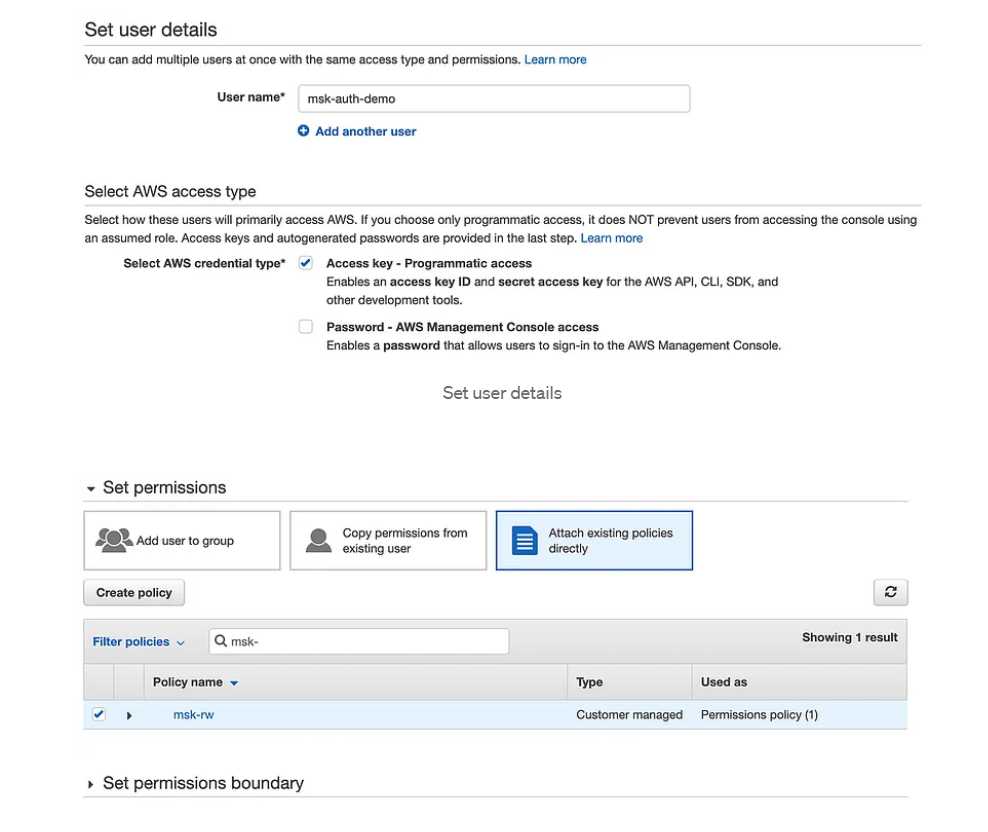
In IAM service, select Users.
-
Choose Add Users.
-
Enter the username.
-
Select Access key - Programmatic access.
-
Under Set permissions, select Attach existing policies directly.
-
Search for the policy you created and select the policy.
-
Select Next.
-
Add tags.
-
Review your work and select Create user.

Don’t forget to download and save credentials. Use the Access Key and Secret Key to configure the Kafka Queue provided in Redpoint Interaction
Get Bootstrap Servers
-
Open the Amazon MSK console.
-
Choose the name of a cluster to view its description. The table shows all the clusters for the current region under this account.
-
On the Cluster summary page, choose View client information.


