

Overview
This page walks you through setting up the integration with Redpoint Data Management (RPDM) and Redpoint Interaction (RPI) to support coupon assignment. The upcoming sections outline the steps to set up and test the use of RPI Data Process Projects to assign coupon codes. In order to test this fully, there is some testing and configuration that needs to be done in each product; the configuration and testing go back and forth between RPDM and RPI.
See also: Advanced coupon concepts
-
Support for multiple resolutions/audiences
-
Resending coupons that have not been used
Step 1: Import RPDM repository archive
Before you start, download the associated RPDM repository archive, which contains the coupon project as well as other supporting projects and documentation. This archive will get updated over time, so it may not look exactly the same as the references in this document, but it should be relatively similar. The naming convention below contains a version variable V<x>, where <x> represents the version number. Check with support or your professional services contact to ensure you have the latest version of the archive.
Archive Reference Name: RPDM_CouponAssignmentArchive_V<x>.dlb
Versions can be found in Appendix F later in this section.
-
Log into RPDM.
-
Right-click the repository and Load Archive. The archive contains the RPI root folder and sub-folders along with associated projects and files.
Be careful not to overwrite anything if you already have an RPI folder. It is always recommended to take a backup of your existing repository, even if it is backed up regularly, before loading the archive.
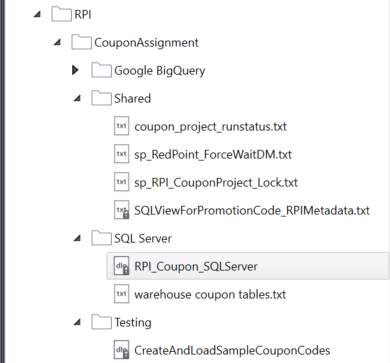
RPDM reference repository folder structure (multi-database support) – RPI, sub-folders, and documents:
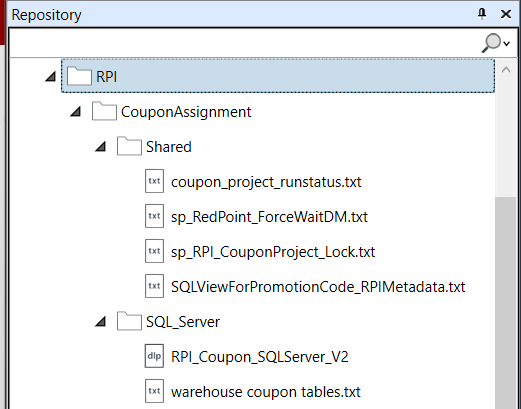
Reference RPDM repository (SQL Server) folder structure – RPI, sub-folders, and documents:
Step 2: Create tables to support coupon assignment project
There are two tables in the Primary database and another utility table to support the calling of the project concurrently. The utility table can be in the Ops DB or the Primary DB, depending on the database technology.
Within the RPDM archive, you will find a set of folders.
-
Go to the folder that is related to the database technology that the RPI primary database uses. In our case, that will be SQL Server.
-
In that folder you will find a document called
warehouse coupon tables.txt. You can view/edit that file, and you can copy out thecreatestatements for the tables needed to support coupon assignment.
Alternatively, refer to Appendix A to find the create table statements.
In addition, there is a table that is used to support the stored procedures that are documented in the following section. The document can be found in the repository under the shared folder coupon_project_runstatus.txt.
Alternatively, you can find the create statement at the end of Appendix B.
Step 3: Create supporting stored procedures
There are two stored procedures that are used by the RPDM project to allow for debugging and to preventing concurrency of the project. Preventing concurrency is implemented to mitigate assigning the same coupon code to more than one target.
These stored procedures are defined for MS SQL Server. If you are using a different type of database technology for your primary database RPI connects to, you may need to install these stored procedures in the Operational Database Server, as RPI currently requires that to be MS SQL Server. In future releases, MS SQL Server may not be required for an operational database, at which point you can look at modifying the scripts for the database technology that is being deployed.
It is also recommended that you create a separate database to load the stored procedures to as well as the table coupon_project_runstatus. These two stored procedures and one table will be the only objects that exist in that database, a suggested name could be RPI_Utility. Whatever you choose is fine, just make note of the name, as you will need to set up a data connection in RPDM to use that database as a part of configuring the RPDM project.
Store procedure reference
Below are some descriptions of the Store Procedures.
sp_RedPoint_ForceWaitDM
This stored procedure allows for debugging the RPDM project. You pass a single variable to configure the project.
Variables:
There is one variable as a part of the stored procedure, but the RPI metadata/data process project variable RPIIsDebug needs to also be set to True (T) for the delay to be taken into account.
|
Stored procedure variable name |
RPDM project variable |
Variable description |
|---|---|---|
|
|
|
This variable is used to set the duration of the delay within the RPDM project. |
sp_RPI_CouponProject_Lock
This stored procedure is designed to limit the potential that two coupon assignment projects will be kicked off at the same time from RPI and assign the same coupon code to two different entities; we have added in a stored procedure to mitigate that risk. This stored procedure determines if a coupon project is currently being executed, and if there is one that is running, it will wait for a configurable amount of time and try again. The number of tries is also configurable.
Variables:
There are two variables as a part of the stored procedure.
|
Stored procedure variable name |
RPDM project variable |
Variable description |
|---|---|---|
|
|
|
This variable is used to set the number of times to try to get a lock before failing the RPDM Project and subsequently the RPI Audience or Interaction. |
|
|
|
This variable is used to set the duration between each of the retries. |
Step 4: Create a view to return unique promotion codes
One of the steps required to apply coupon codes using RPI is to set up a metadata field to identify which coupon pool the codes should be assigned from. To do this, start by creating a view to pull in the distinct promotion codes values to be used in RPI to dynamically create a list of the available promotion codes that are used to identify the promotion code (pool of codes) to assign from. This will allow the metadata list in RPI to always have the latest promotion codes available to select for assignment.
In the SQL Server folder, you will find a document called warehouse coupon tables.txt, which contains the create statement for the view.
Alternatively, you can go to Appendix A to find the create statement.
Step 5: Load coupons to the coupon pool table
The first part of being able to assign coupon codes starts with having a table full of coupons to assign. The expectation is that there is a source system that generates the coupons and it will provide a file of coupons to be loaded to the coupon pool table.
There is a simple RPDM project that can be used to load test coupons to the coupon table for configuration and evaluation. It is just meant to allow you to test and have a reference project, but it will need to be modified to support the specific needs of the implementation. In addition, the expectation is that an automation will be made to call the project and load a file of coupon codes.
This is not the focus of this document, and there is an expectation that you have the ability to set up an RPDM project that can load a file to a table, whether by yourself, within your organization, or with help from Redpoint Professional Services.
The reference project is named as follows and is found in the coupon archive in the test folder.
Sample Project: CreateAndLoadSampleCouponCodes
Step 6: Synchronize the catalog in RPI to expose new tables and views
The first step in RPI is to synchronize the catalog to expose the tables and views that were created in the previous steps. In the following steps, we will create attributes and joins as well as other objects to support coupon assignment.
Step 7: Create attributes in RPI for coupon assignment table
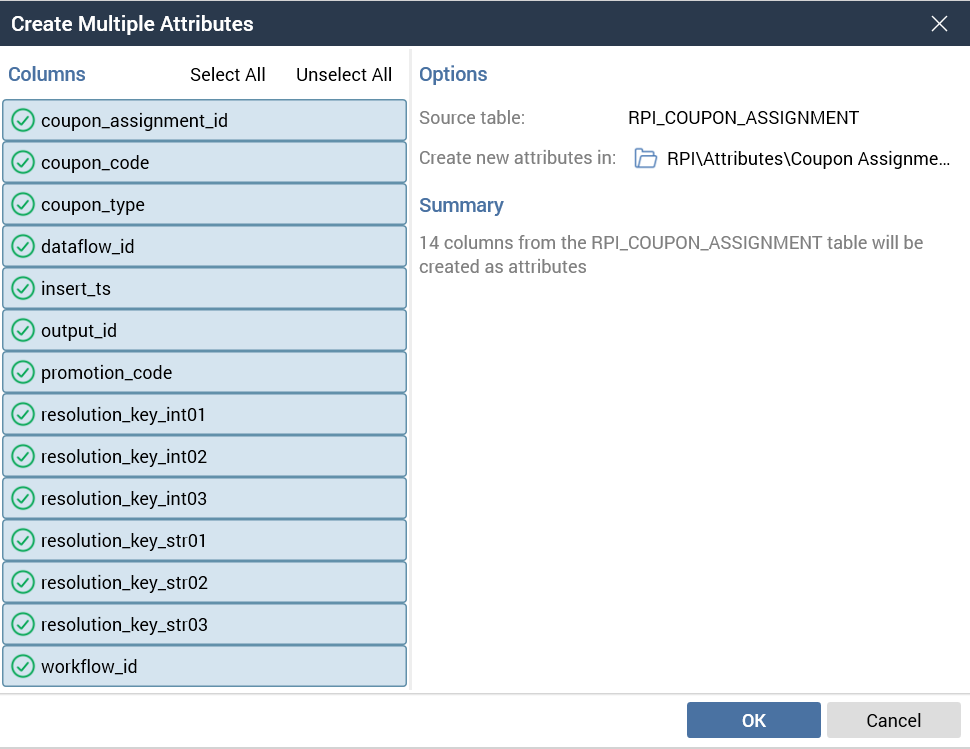
In order to be able to use the assigned coupon codes in an extract or email content, we first need to create the attributes in RPI. Previously, we synchronized the catalog, and now we should create a set of attributes from the coupon assignment table (RPI_COUPON_ASSIGNMENT). Select the coupon assignment table in the catalog and create the attributes in the appropriate place.
Step 8: Create joins in RPI to support coupon assignment
These joins are the key to being able to use the coupons that have been assigned by the RPDM project in outbound fulfillment activities like extracts or emails or other activities. We will use an extract to both demonstrate and test the coupon assignment functionality.
We will create a join from the OfferHistory table to the coupon assignment table, which is the key to how the appropriate coupons are selected for each coupon assignment execution. As mentioned previously, we will focus on a single resolution being used to assign coupons, but later in this document we will elaborate on how you can extend this functionality to multiple resolutions.
This join is crucial to the coupon assignment functionality and is important for implementors to understand. The join will be made on a minimum of three fields: Resolution Key, WorkflowID, and DataflowID. There are additional details related to using multiple Resolution Keys later in this document; for now we will just focus on the minimal fields for the join.
The first thing to note is that Resolution Key can be any field that is defined as the Database Key of the Resolution that is being used by the Audience Definition that will be used when assigning coupon codes. In our case, the Resolution for the Audience Definition will be Individual and the Database Key will be PID; therefore, the Resolution Key is PID.
Resolution of Individual has a Resolution Key (Database Key) of PID:

Individual Audience Definition Set to Use Individual Resolution and thus PID as Resolution Key:

Coupon assignment table and associated generic field names
The coupon assignment table has been defined generically to allow for various configurations based on the needs of the implementation. We have arbitrarily defined three integers as resolution_key_intX and three strings as resolution_key_strX fields that can be used to store the Resolution Key (Database Key) of the resolution that is being used. Again, in our example we will use PID as the resolution key, which is an integer, so we will be storing it in one of the integer fields (resolution_key_int01).
It is good to note that the generic fields names can be used, or you can rename the fields to be specific to the resolution key name. In this example, we will just use the generic names. In addition to the value of the resolution key, the name of the resolution key field name is loaded to the field RPIResolutionKey in the coupon assignment table. This can be helpful when looking at the data to know what ID was used when calling the coupon assignment project.
Configuring joins
Proceed to the configuration section of RPI and select the Joins tab. We are going to create a simple join between the offer history and coupon assignment tables, and a multiple join between the resolution table (Person) and coupon assignment tables.
Simple join
Create a simple join from OfferHistory to RPI_COUPON_ASSIGNMENT on PID/Resolution_key_int01, workflow_id, dataflow_id.
Cardinality: 1to1

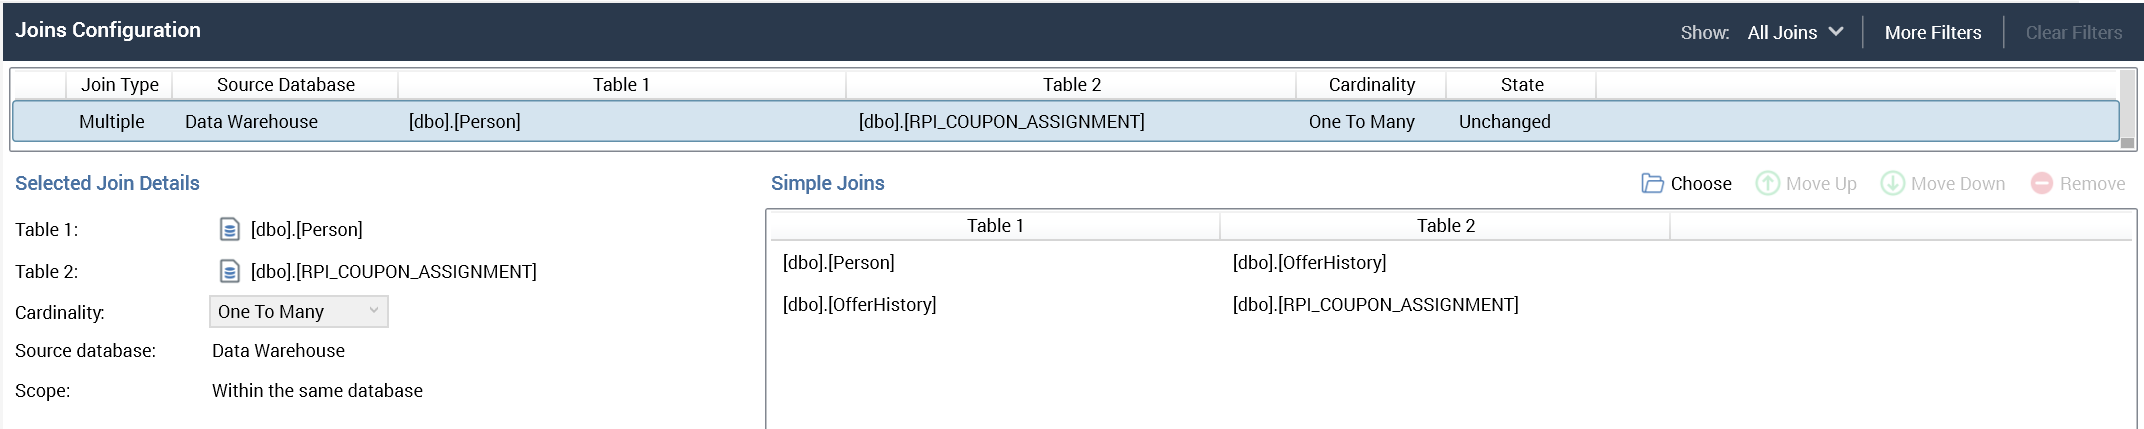
Multiple join
Create a multiple join from Person to RPI_COUPON_ASSIGNMENT. Person to OfferHistory to Coupon Assignment.
Step 9: Configure RPI to connect to RPDM
There are some RPI system configuration settings that need to be defined in order to set up RPI to call RPDM. Refer to Configuring and Using Data Process Projects in RPI, which outlines setting up and using Data Process Projects in RPI.
Refer to Appendix C for reference information about this configuration. The assumption in this documentation is that the connection between RPI and RPDM has already been established.
Step 10: Create RPI data process project
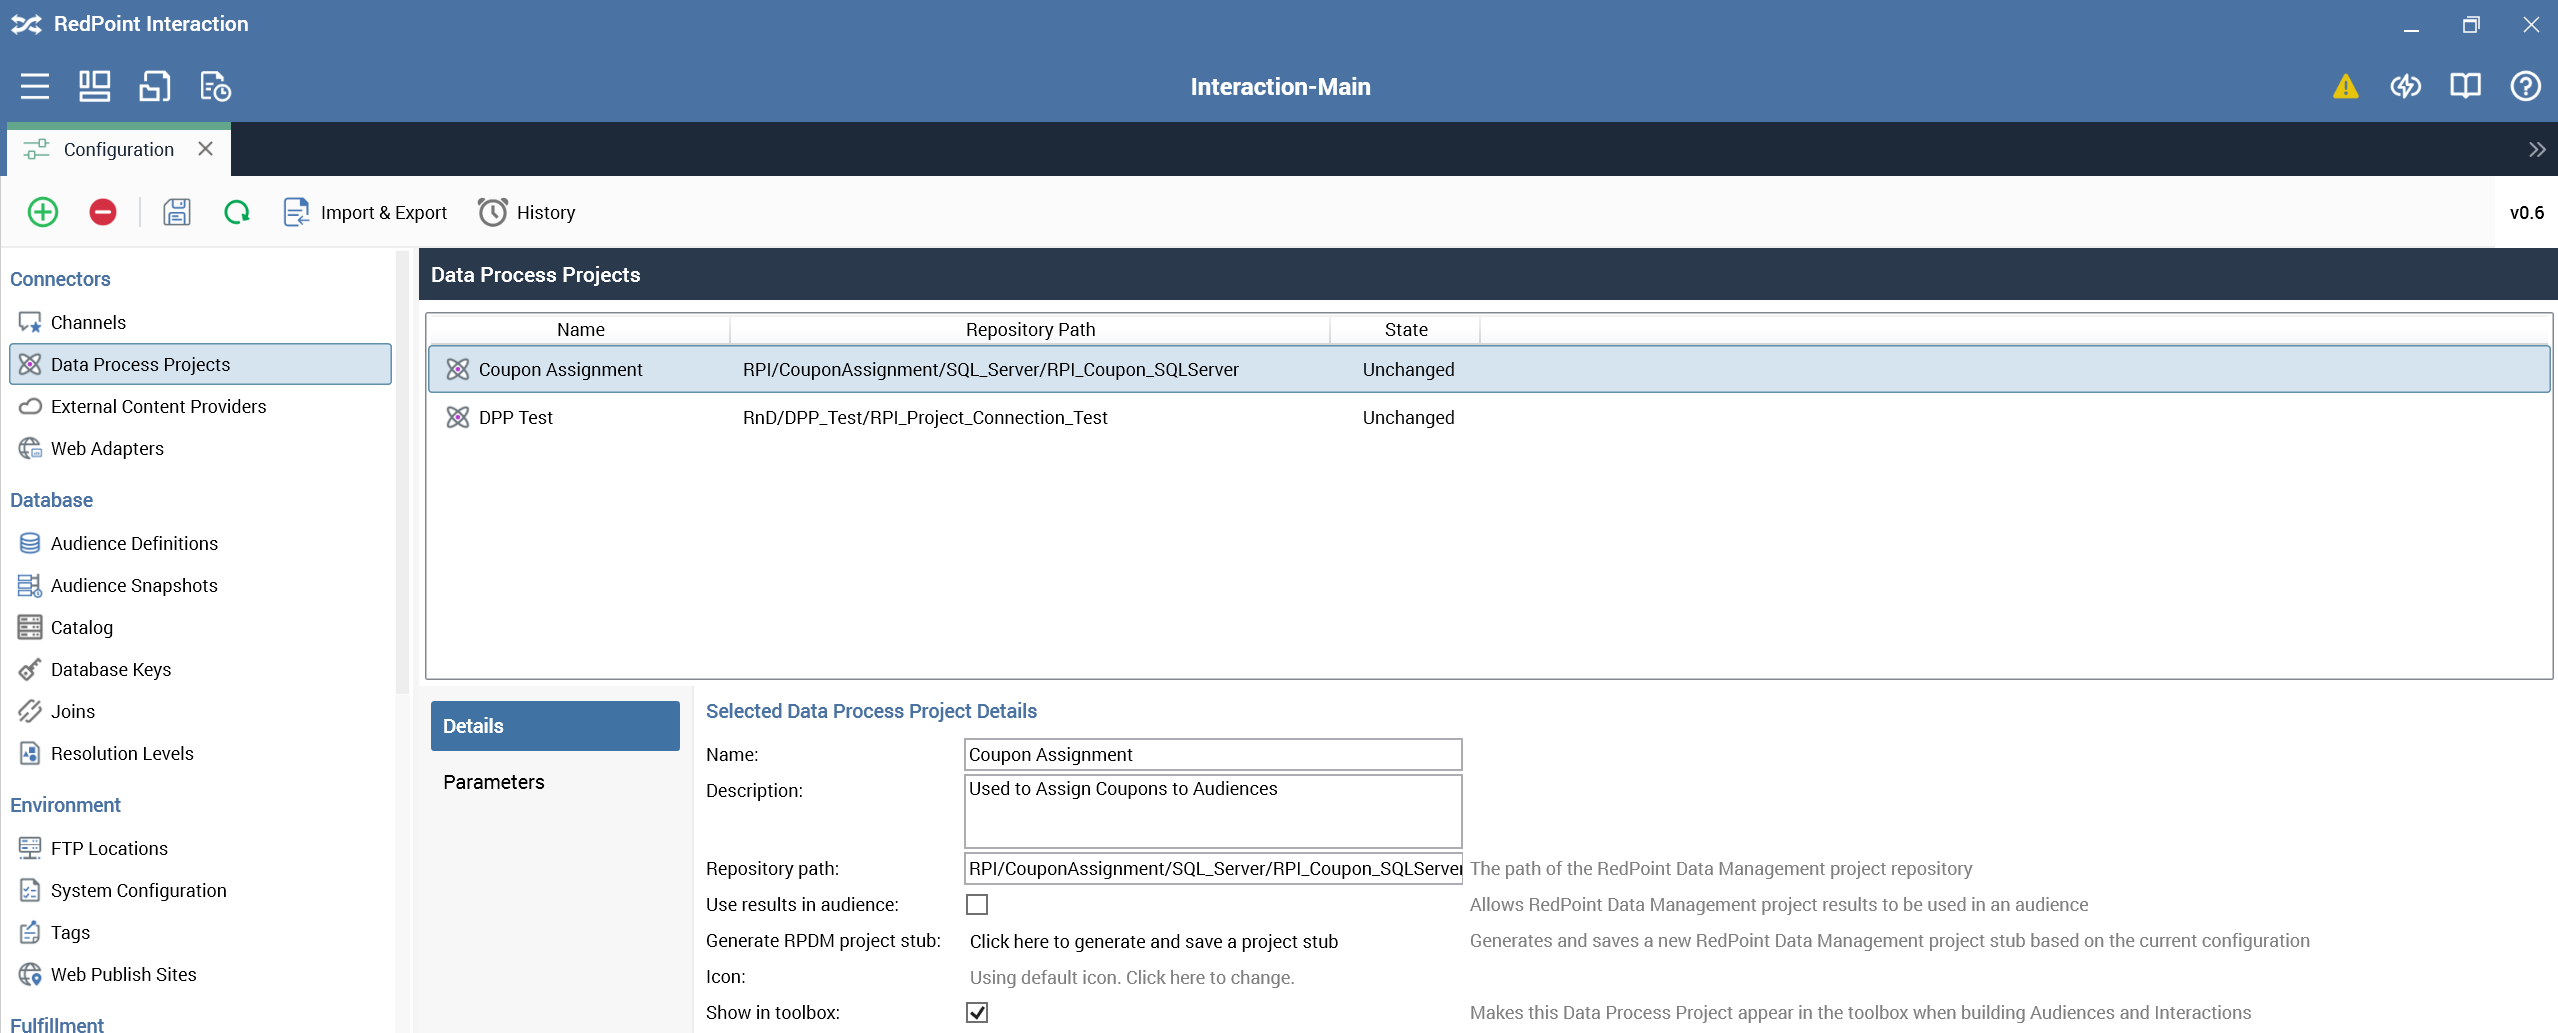
The first step in using a data process project in RPI is to create one in the configuration section of RPI. In configuration, select Data Process Projects and create a new one.
Detail configuration
Below is the information related to configuring the detail section of the data project.
-
Name the Data Process Project as you see fit. Here we named it “Coupon Assignment”.
-
Include a description for project.
-
Set Repository Path. This is the location of the coupon project in RPDM. Repository is implied and can be left off, but the full path down to the project should be included along with the project name itself. In this case
RPI/CouponAssignment/SQL_Server/RPI_Coupon_SQLServer_<versions>, where<versions>should match what is in the repository. -
Leave the Use results in an audience check box unchecked, as this project will be used in interactions and not audiences.
-
Generate RPDM project stub is not needed, because you should have loaded the coupon project from the coupon archive mentioned earlier in this guide.
-
Icon can be set to any image that you want or left as default.
-
Show in toolbox should be checked off so that the project appears in the toolbox in the Interaction Designer.
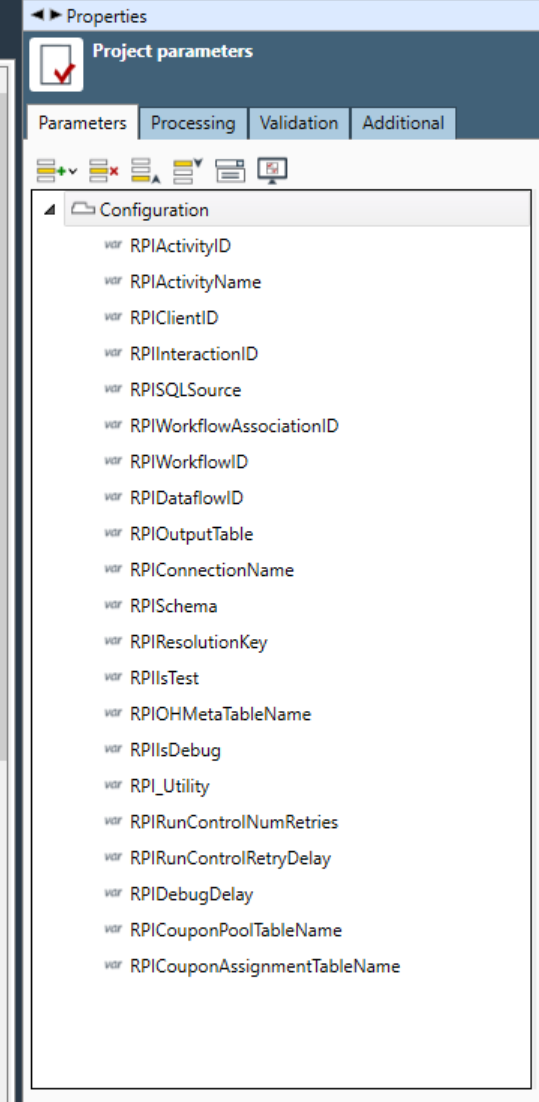
Parameter configuration
Below is the information related to configuring the Parameter section of the data project.
-
The names of the parameters need to be defined exactly how they are in the RPDM project as they are in the example below.
-
Not all of these variables are required.
-
These variables can be managed in RPDM and not exposed via RPI, but exposing them in RPI gives the user the most amount of configurability over the execution of the coupon project.
-
These variables do not have to be updated in RPI.
-
All of the default values configured will be used.
RPIIsDebug
Used if you want to debug data process project in RPDM. This gives you a chance to attach to the project in RPDM via management and watch the specific execution of the coupon project to ensure it is functioning as expected. Default value is F, and the other value in the list is T.
RPIDebugDelay
Used to determine how long to delay if the RPIIsDebug is set to T. It is set to one minute (00:01:00) by default. The format of the value should be hh:mm:ss, e.g., 00:01:00 for 1 minute.
RPIRunControlNumRetries
Used to define the number of times the project will attempt to acquire a lock and be able apply coupon codes. In the example, we set it to 3.
RPIRunControlRetryDelay
Used to determine how long to delay if the project is not able to acquire a lock because another project is running. The default is set to 30 seconds (00:00:30), and the process will try to acquire a lock and assign coupon codes for 30 seconds for each of the retry attempts. The format of the value should be hh:mm:ss, e.g., 00:00:30 for 30 seconds.
RPICouponPoolTableName
The name of the table in the warehouse that contains the pool of coupons. Should be set to RPI_COUPON_POOL by default.
RPICouponAssignmentTableName
The name of the table in the warehouse that tracks coupon assignments. Should be set to RPI_COUPON_ASSIGNMENT by default.
RPI_Utility
The name of the RPDM database connection which points to the database housing the run control table and helper procedures
RPIOHMetaTableName
The name of the OfferHistoryMeta table that the couponing project should use when determining promotion code and coupon type for each output

Step 11: Define metadata to support coupon assignment project
In order to be able to assign coupons to individuals or to groups, there are a couple of metadata fields that are required to support this. These fields will need to be defined for any of the audience definitions that you will be using when assigning coupons. The primary focus of this document is to outline how to do this for a single audience definition, but we will also touch on how the same project can be used to assign coupons using multiple audiences later in this document.
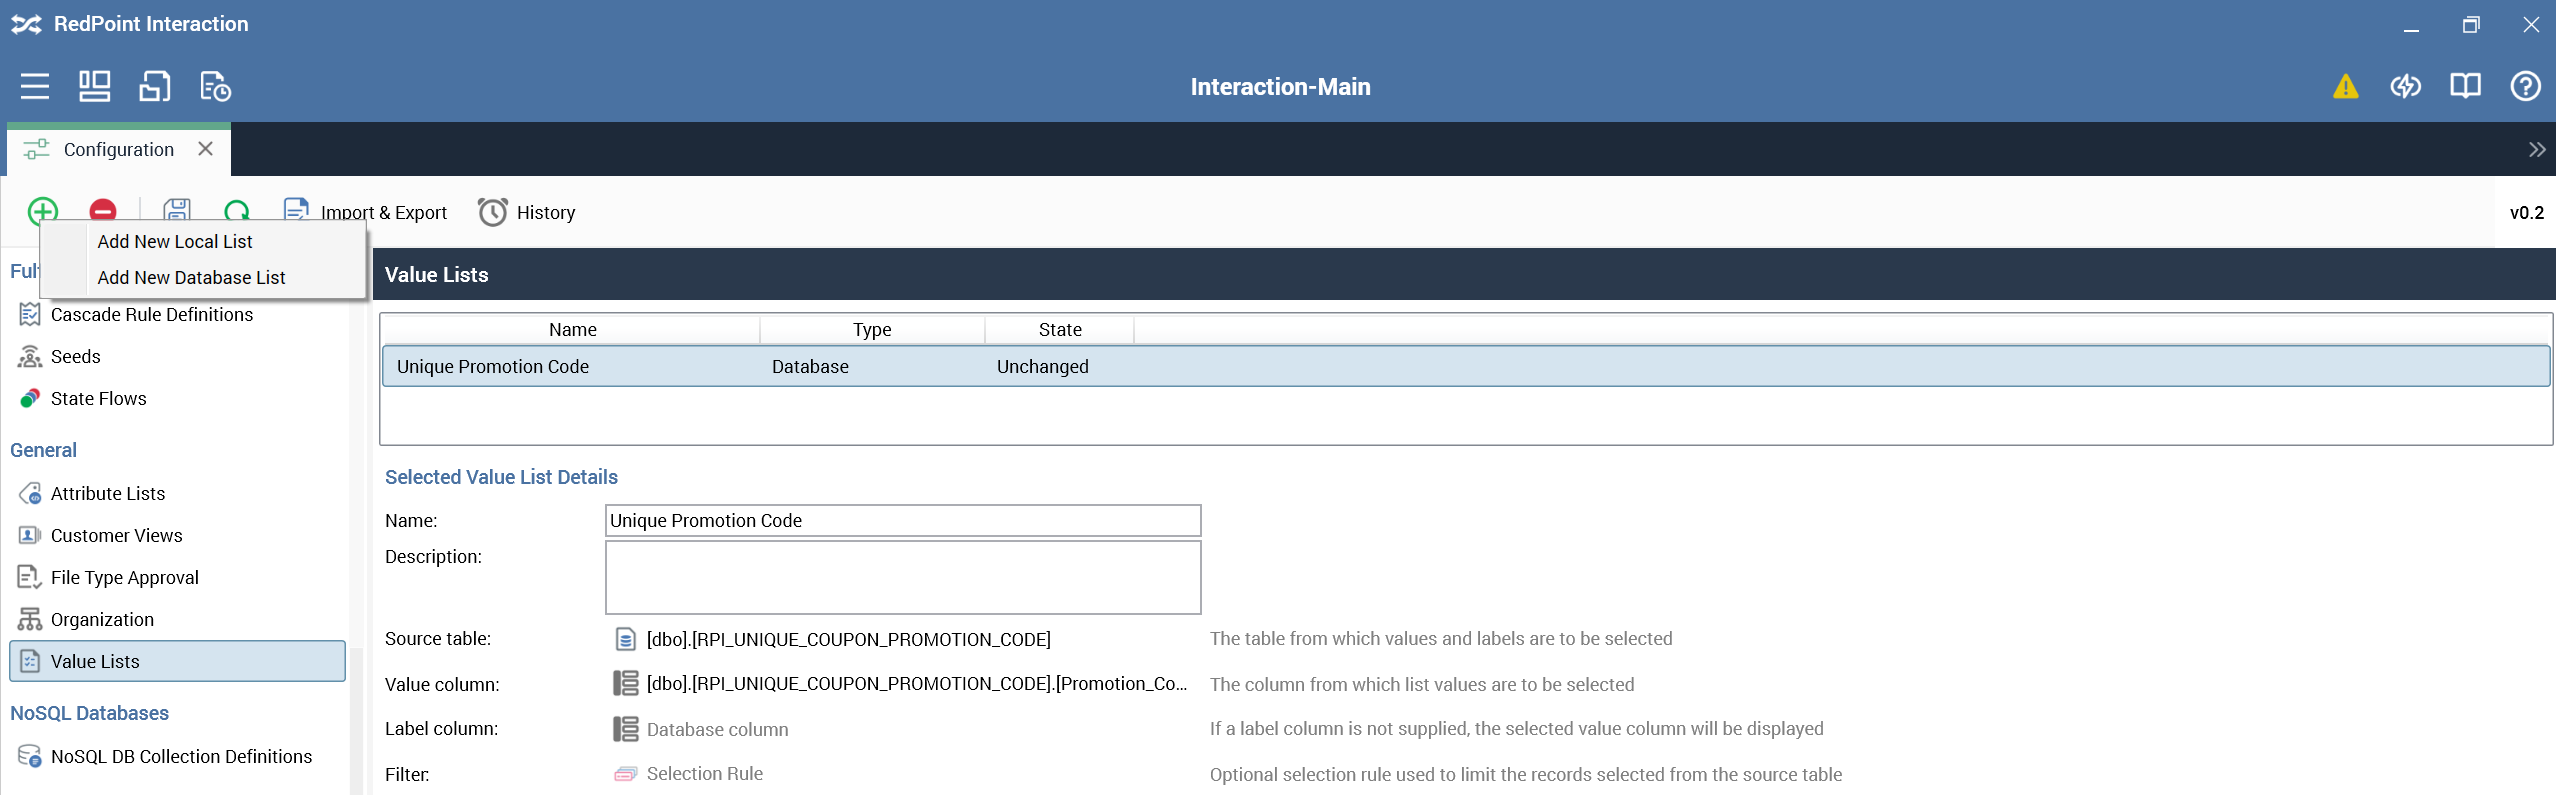
Step 11a: Create value lists
As a part of setting up the metadata for supporting the coupon project, we’ll create a value list for Promotion code and for Coupon type.
-
Start by creating a value list based on the view that we created earlier in this document, named "Unique Promotion Code". Add a “New Database List” and select the view (
RPI_UNIQUE_COUPON_PROMOTION_CODE) we created earlier in the document as the source table and only column in the view as the value column.
-
Then create a Local value list for Coupon type.
.png?cb=032290f1828a22a706bc56192f44c9fb)
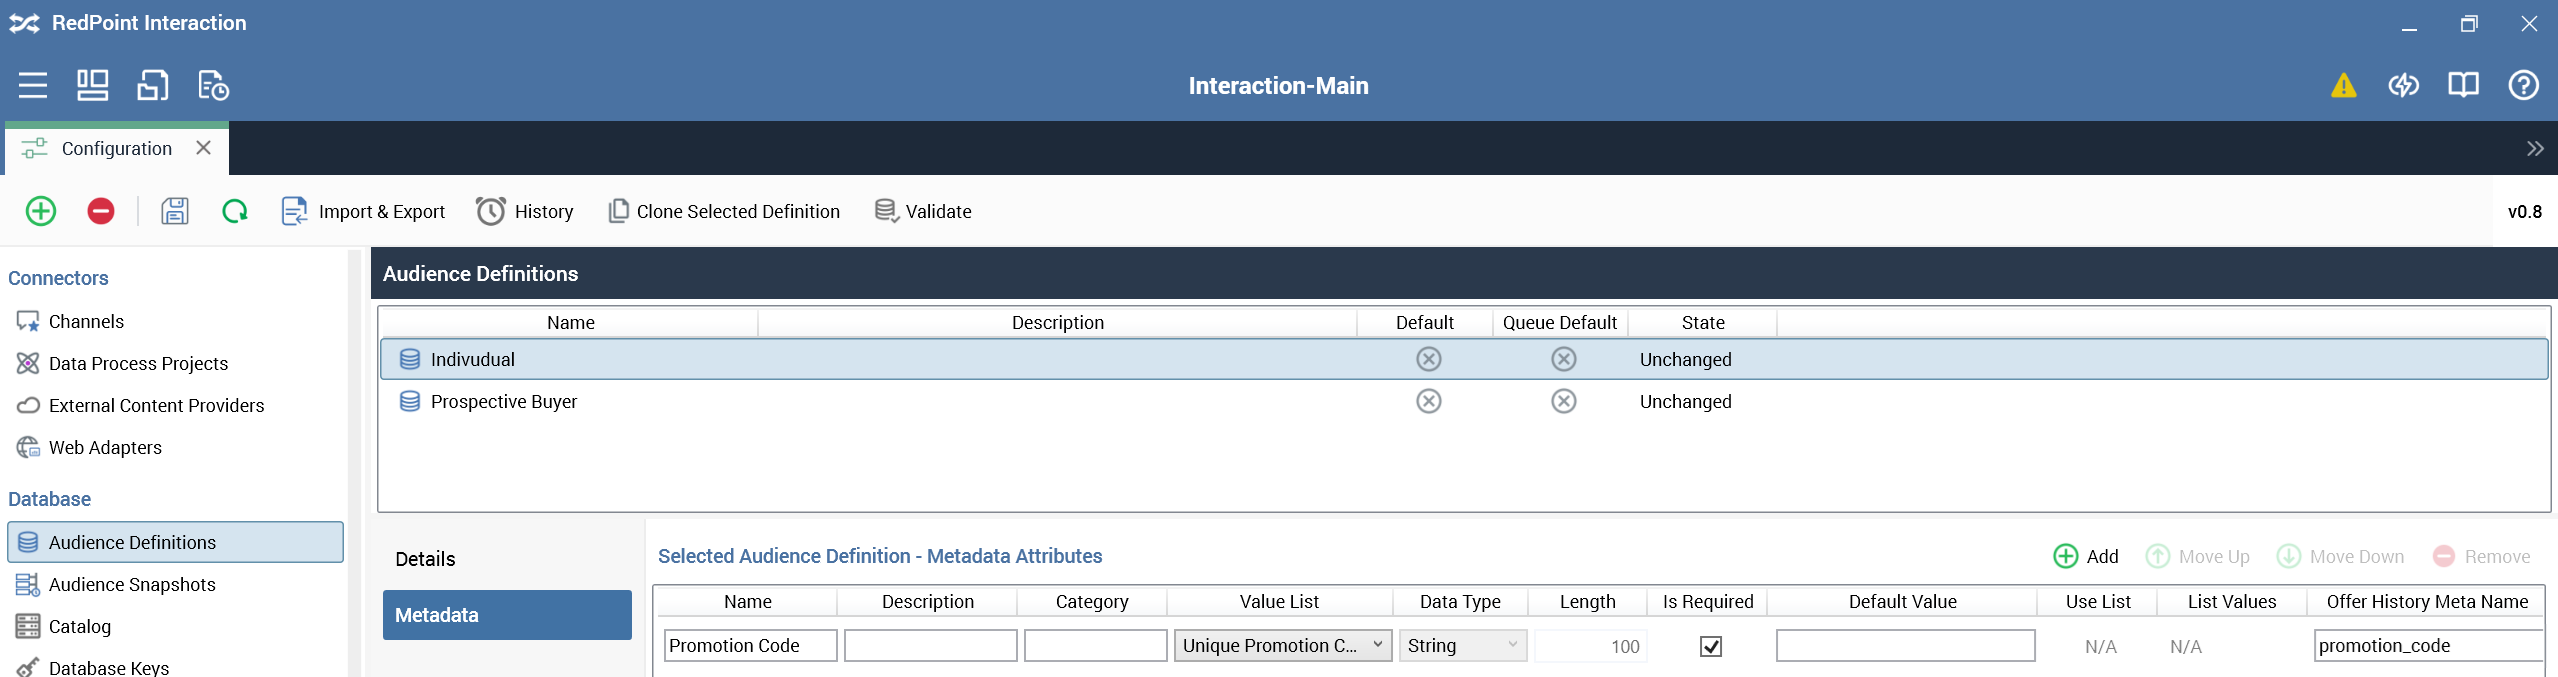
Step 11b: Configure the metadata in audience definitions
A critical part of being able to assign coupon codes is the use of metadata to inform the RPDM project on how to allocate the coupons to the target audiences.
There are two required metadata fields that need to be added to each audience definition to support using the coupons assignment data process project. The “Offer History Meta Name” values (field names) need to be spelled exactly as seen here, or the RPDM project may need to be modified to support that field name spelling.
Promotion code
Promotion code is used to specify the name of the group of codes in the coupon pool table to select and assign based on the coupon type. This metadata field should be based on the value list that we created previously.
The offerHistory_meta field name should be promotion_code. Casing may matter, depending on the database technology being used.
Coupon type
Coupon type has two values: Individual or Group. This informs the RPDM project whether a single code (Group) should be applied to the target segment or if a unique code (Individual) should be assigned per resolution key.
The offerHistory_meta field name should be coupon_type. Casing may matter, depending on the database technology being used.
.png?cb=f3d0bade515266b0b3a9b7569f7e612f)
Step 12: Set up interaction to configure, validate, and test coupon assignment project
At this point, you have loaded the reference RPDM archive and have the supporting projects available. You have configured a Data Process Project in RPI and added the appropriate metadata to the audience definition. The next steps will be to set up a test interaction and finalize the configuration of the coupon assignment project.
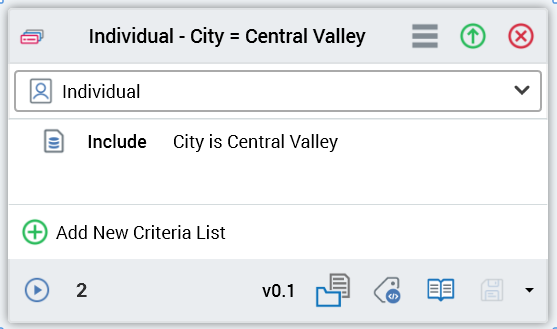
Step 12a: Create selection rule
Start by creating a simple selection rule to use to test with.
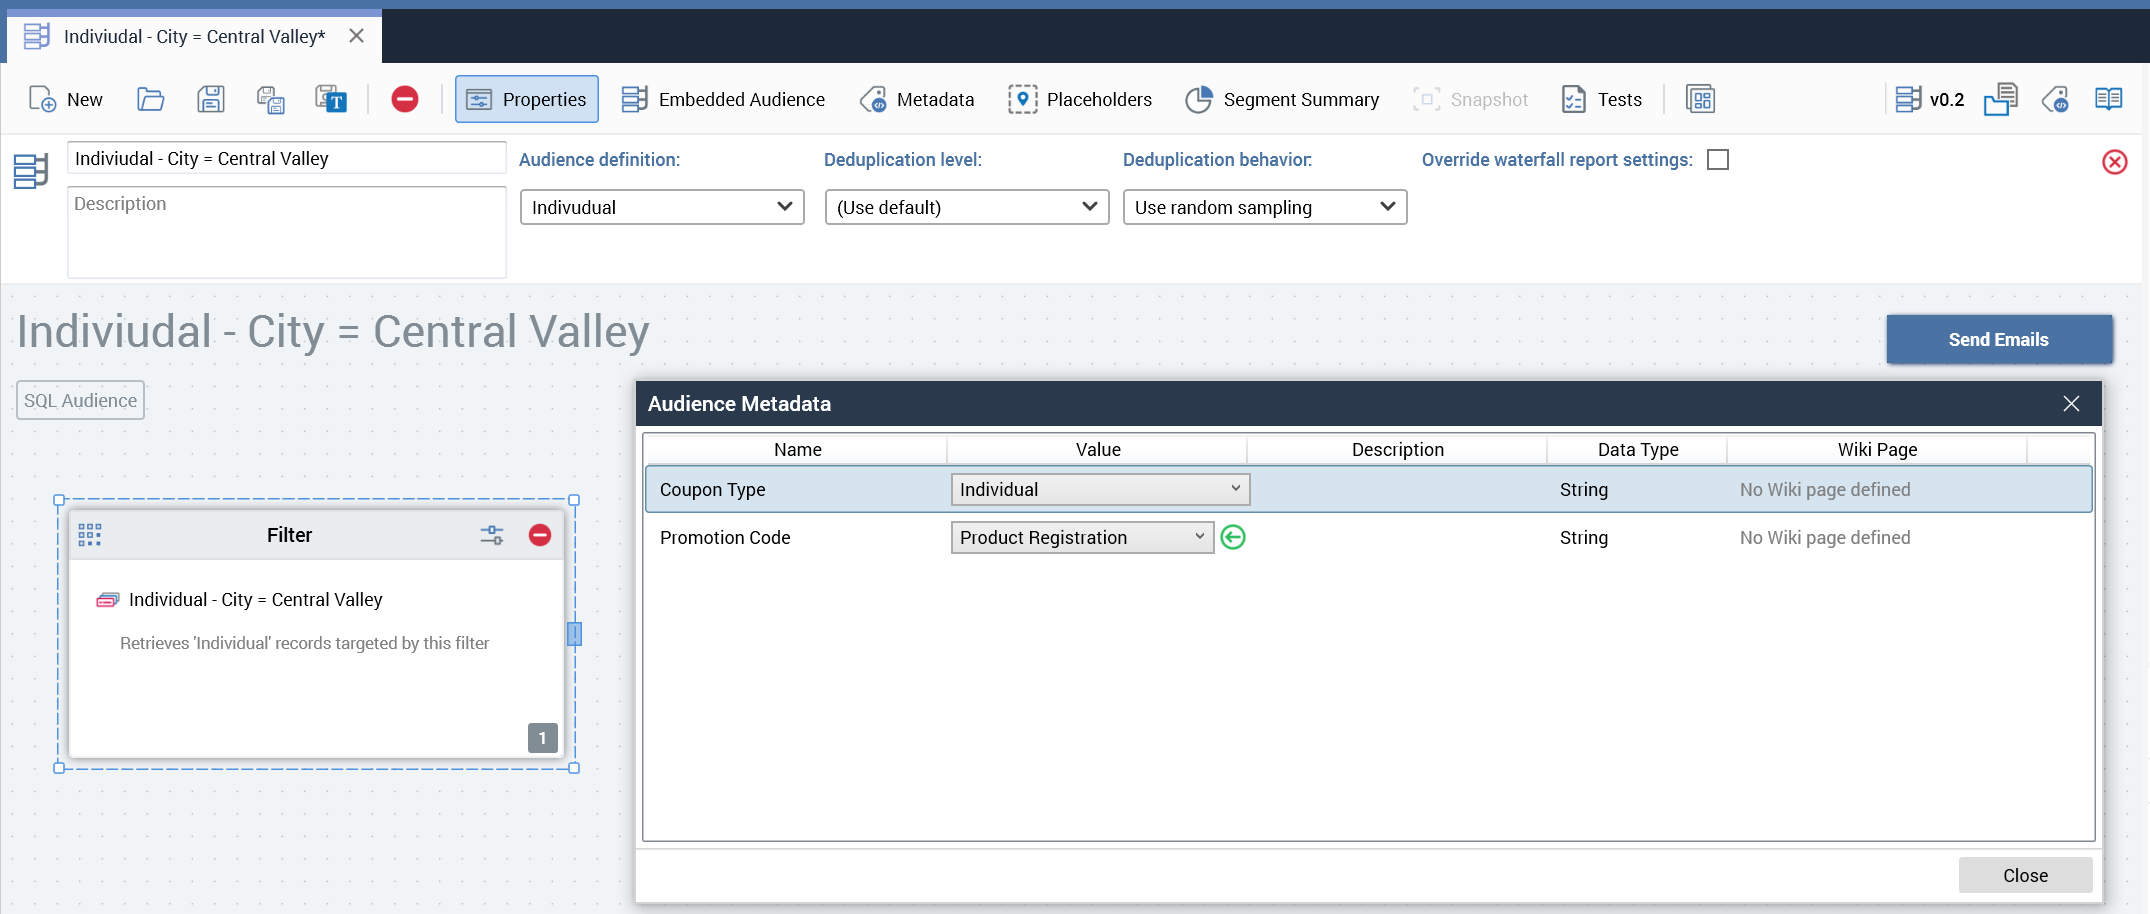
Step 12b: Create audience
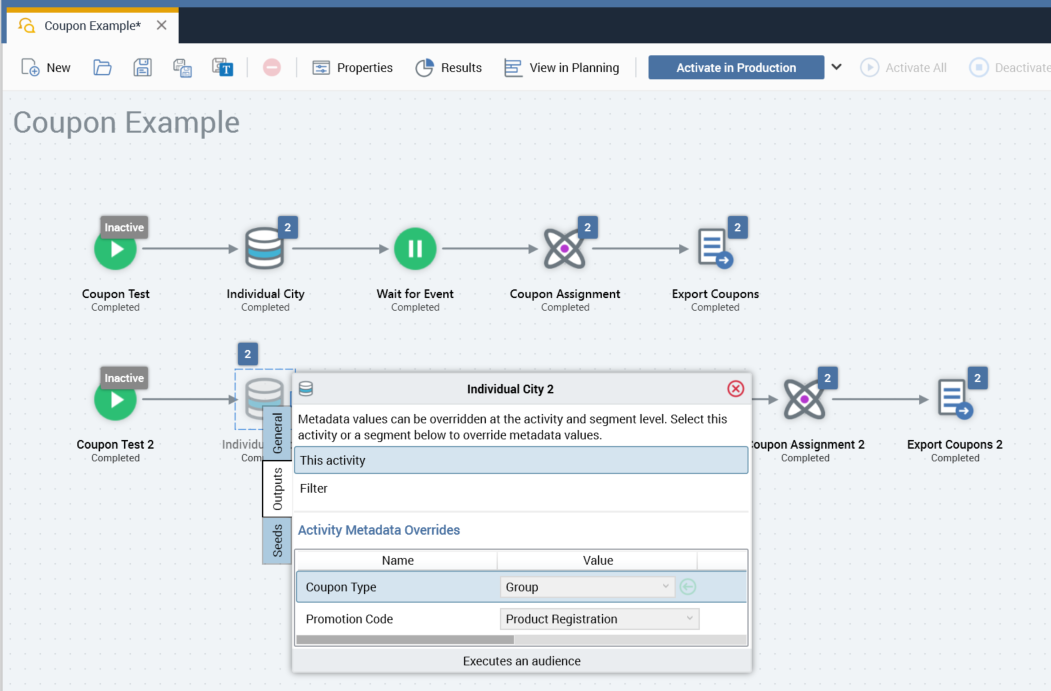
Create a simple audience using an audience definition of Individual and set the metadata appropriately for testing. We will start off by setting the coupon type to Individual and promotion code to Product Registration. The set of promotion codes were loaded to the coupon pool table earlier in this document and are provided as a project in the RPDM archive.
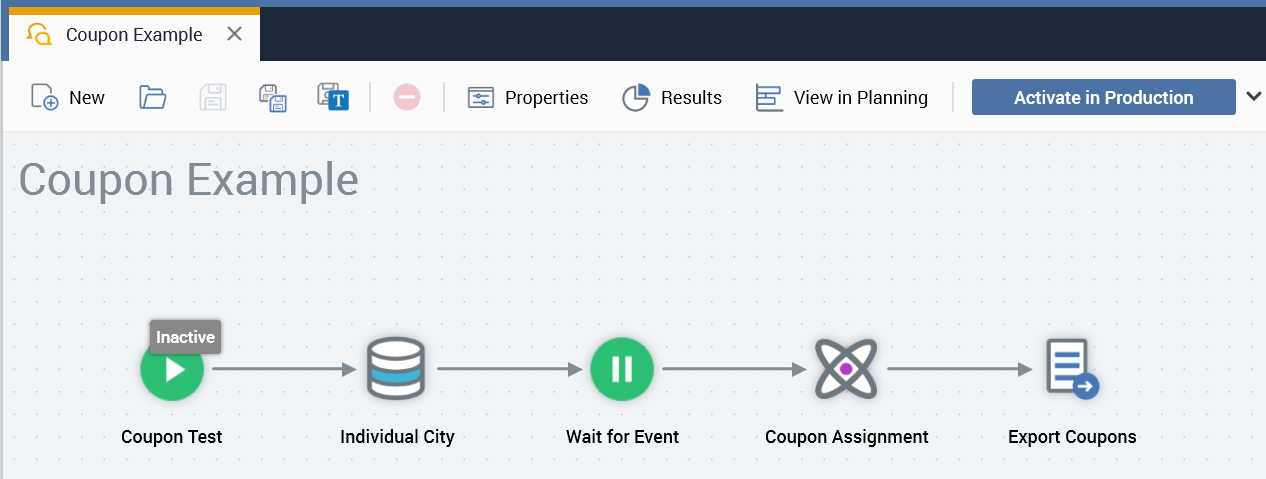
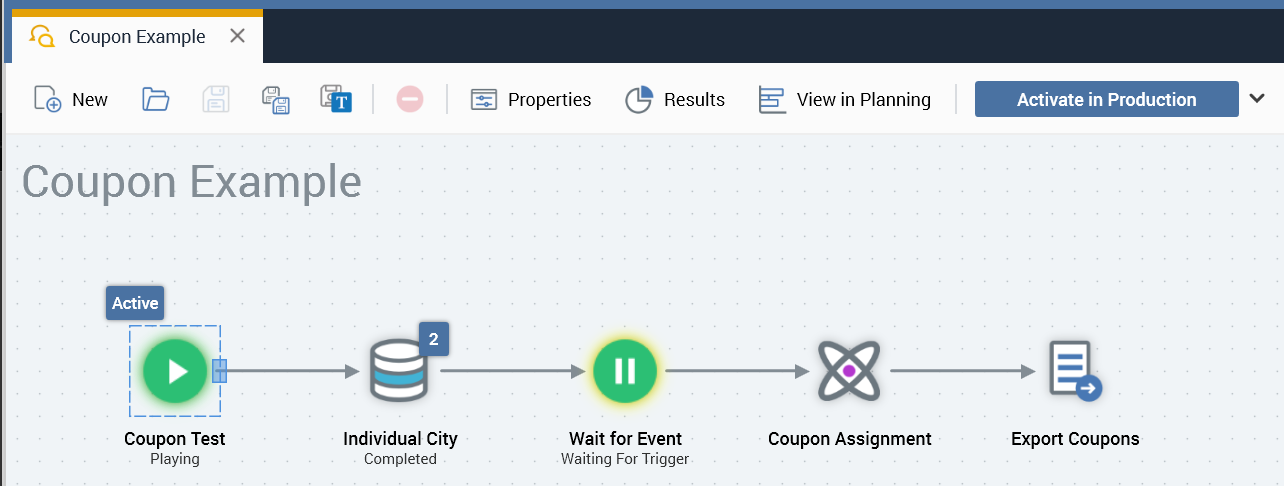
Step 12c: Create interaction
Create an Interaction to help to finalize the configuration of the RPDM project and test assigning coupon codes. In the interaction, we will use an extract to validate the assignment of the coupon codes.
Start with a manual trigger connected to a batch audience, which is referencing the audience completed in the previous step. Then add a wait for event, which will allow us to run the Interaction up to the coupon project followed by an extract. In order to make the workflow valid, we will create an Export Template first and then configure the interaction as stated above.
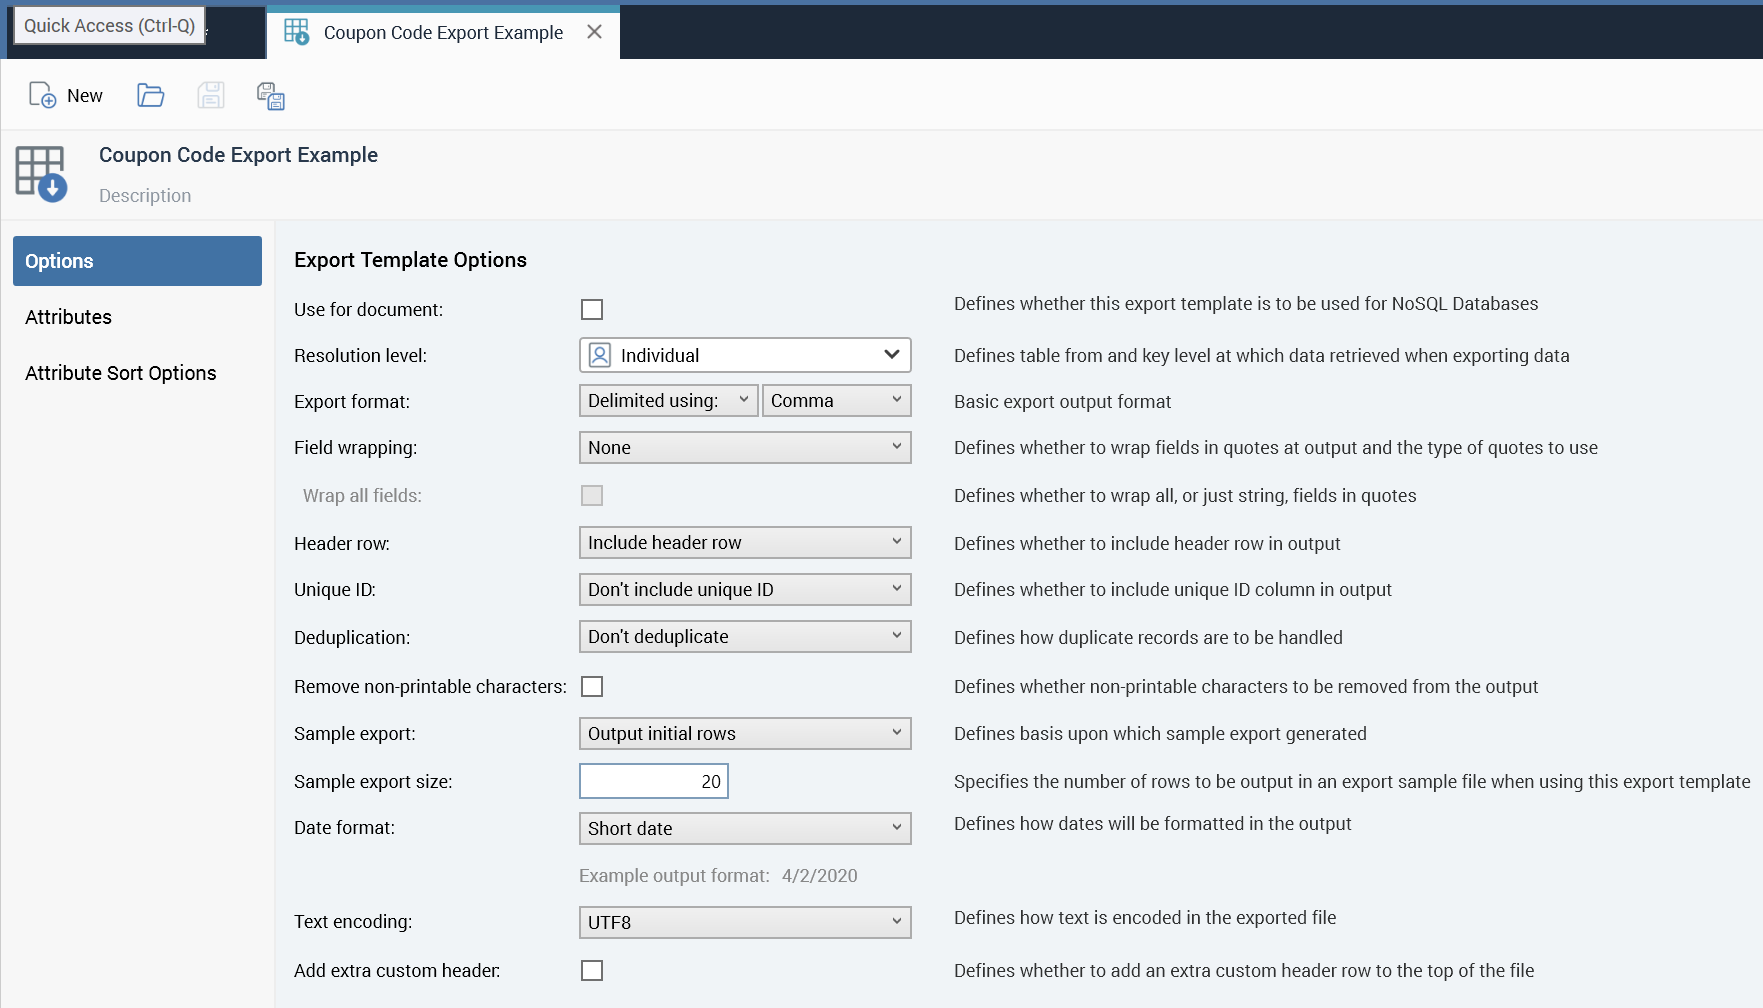
Export template options configuration
The export template options section can use all default values, but ensure that you set the appropriate resolution level, in this case Individual.
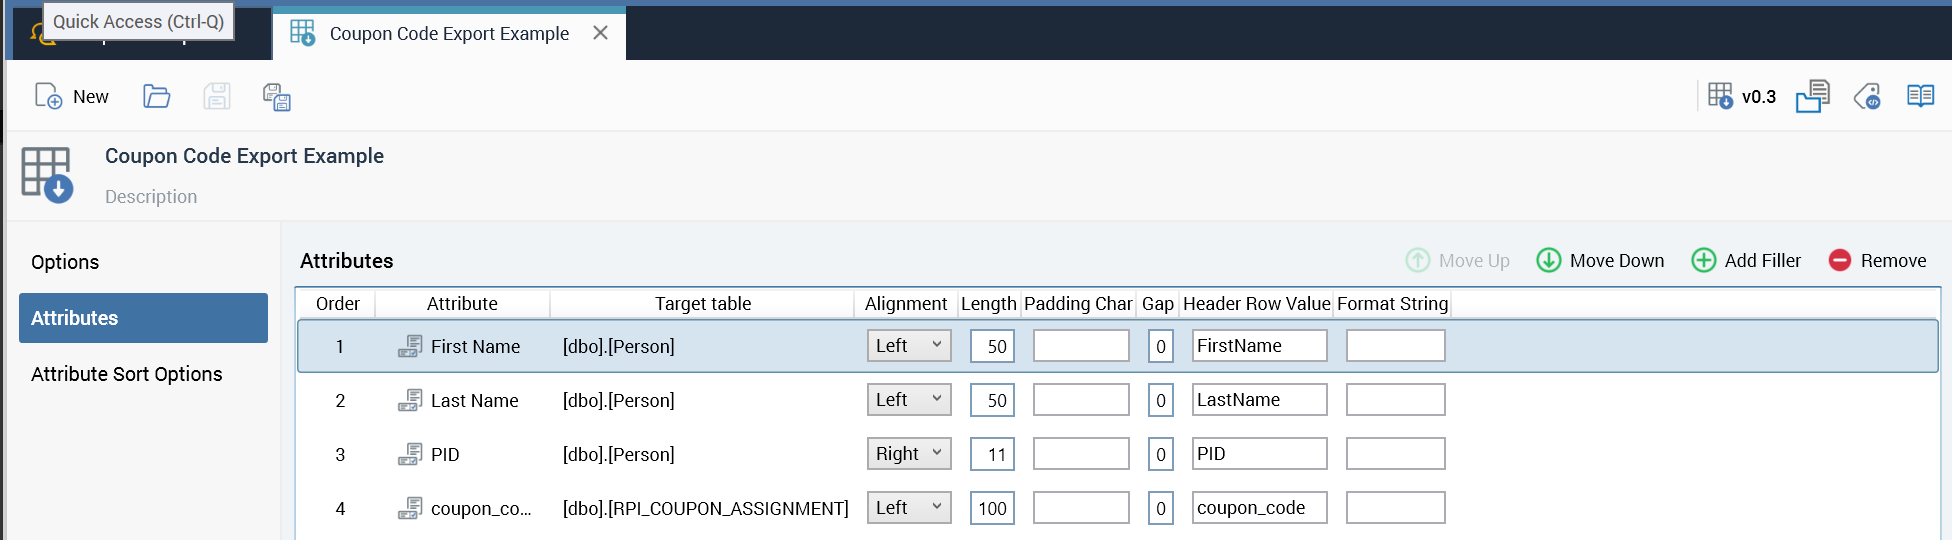
Export template attributes configuration
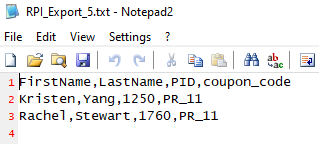
For example purposes we will include First Name, Last Name, and PID from the Person table and Coupon Code from the Coupon Assignment table.
Step 12d: Test interaction
As described above, this is an Interaction configured to finalize the configuration of the RPDM project as well as test the application of the codes to the targets records.
Run the Interaction in Test or Production mode up to the Wait for Event. The reason it is OK to run in Production mode is that we are only performing an Export and we will rollback the workflow as we perform testing and after testing is complete.
Step 12e: Configure and test RPDM project
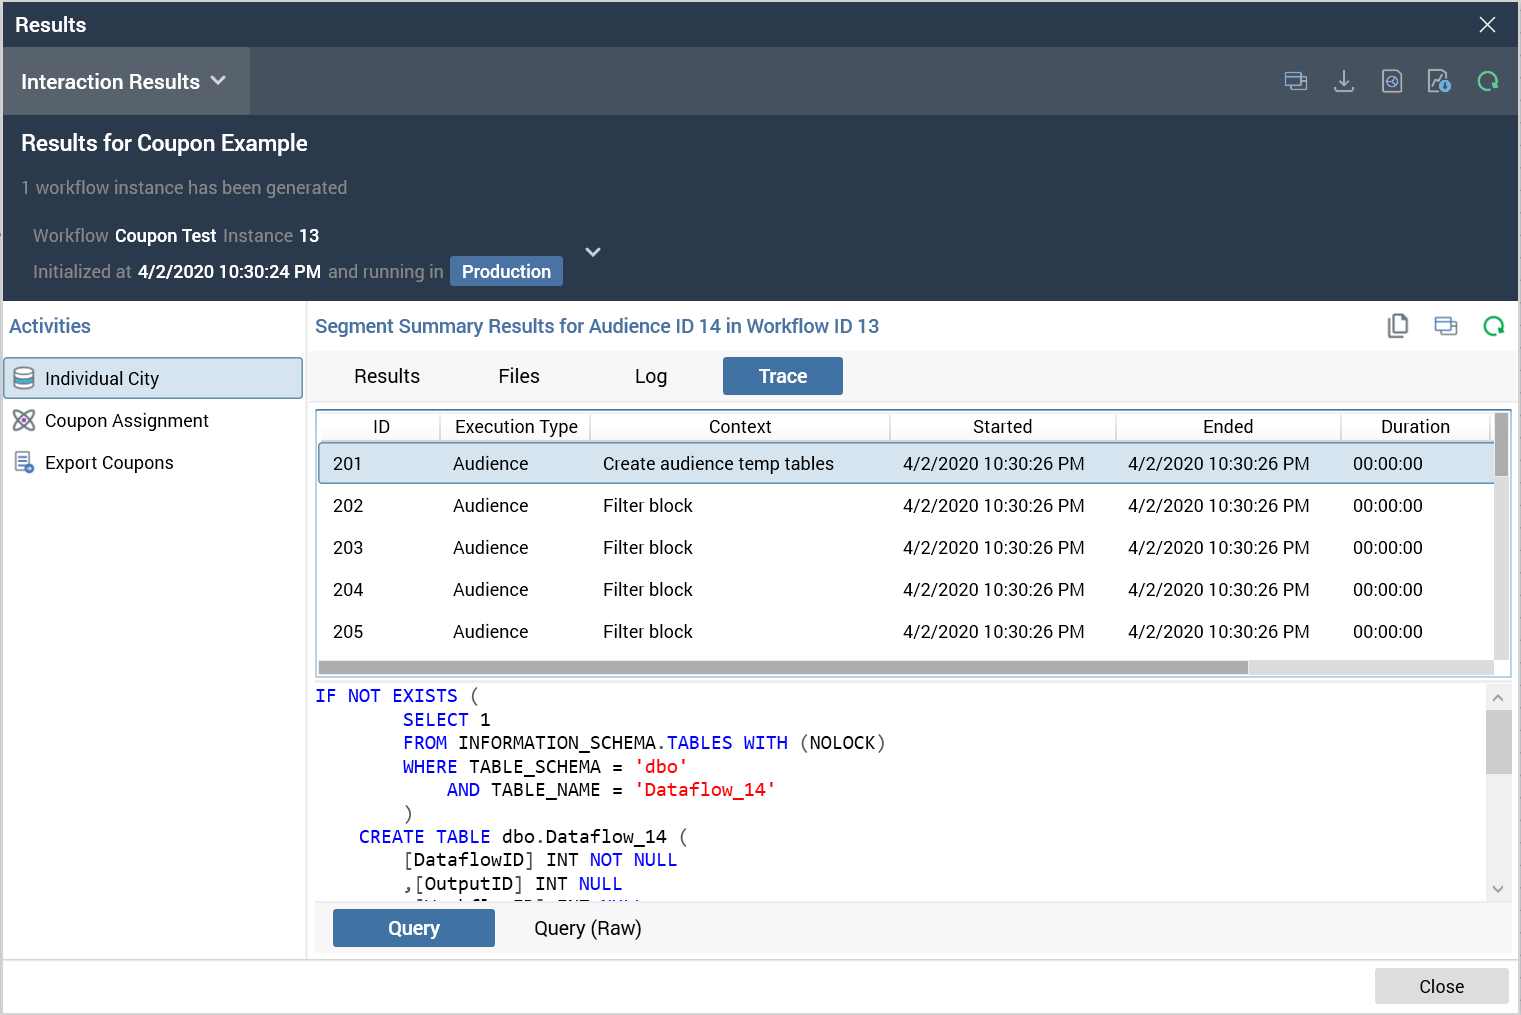
Now that we have executed the batch audience, we can take the temp table that was created and then go into the RPDM project and finalize the configuration and testing of the RPDM project.
-
Start by opening the results of the batch audience.
-
Go to the Trace tab and select the first log.
-
Take note of the dataflow table and ID that are referenced. In this example
Dataflow_14is what we will use to test with.
Get Dataflow ID:
Step 12f: Finalize configuration and testing of RPDM project
At this point we will take the temporary dataflow table and we will use that to complete the configuration and testing of the RPDM project. We will start by configuring each of the project parameters in the coupon project.
List of Parameters:
Details of Parameters:
|
Parameter name |
Parameter sample value |
Parameter notes |
|---|---|---|
|
|
|
|
|
|
|
|
|
|
|
|
|
|
|
|
|
|
|
This is the reference to the temp table that holds the data currently being processed through the RPI workflow. It is a crucial part of any Data Process Project. |
|
|
|
|
|
|
|
|
|
|
|
|
|
|
|
This is the table that is used when a data process is used to enhance segmentation in an audience. |
|
|
|
RPDM connection name that aligns with the primary data warehouse in RPI. |
|
|
|
Schema which aligns with the primary data warehouse in RPI. |
|
|
|
Resolution Key being used in the audience or interaction that is executing a Data Process Project. |
|
|
|
Indicates whether the audience or interaction is being run in test mode or not. |
|
|
|
Given that each audience definition within RPI allows for you to define a set of offer history and meta tables, this allows for you to dial it in to the specific metadata table to use. |
|
|
|
This is a Data Process Project variable that determines if the Project should execute in debug mode or not. |
|
|
|
This defines the database that the utility stored procedures and table reside in. |
|
|
|
This is a Data Process Project variable that determines the number of times to attempt to evaluate if this is project is running exclusively. |
|
|
|
This is a Data Process Project variable that determines the duration to wait between evaluating if this project is running exclusively. |
|
|
|
This is a Data Process Project variable that determines the duration to pause the project so that it can be attached to for debugging. |
|
|
|
The name of the table that contains the coupon pool. |
|
|
|
The name of the table that contains the coupon assignment table. |
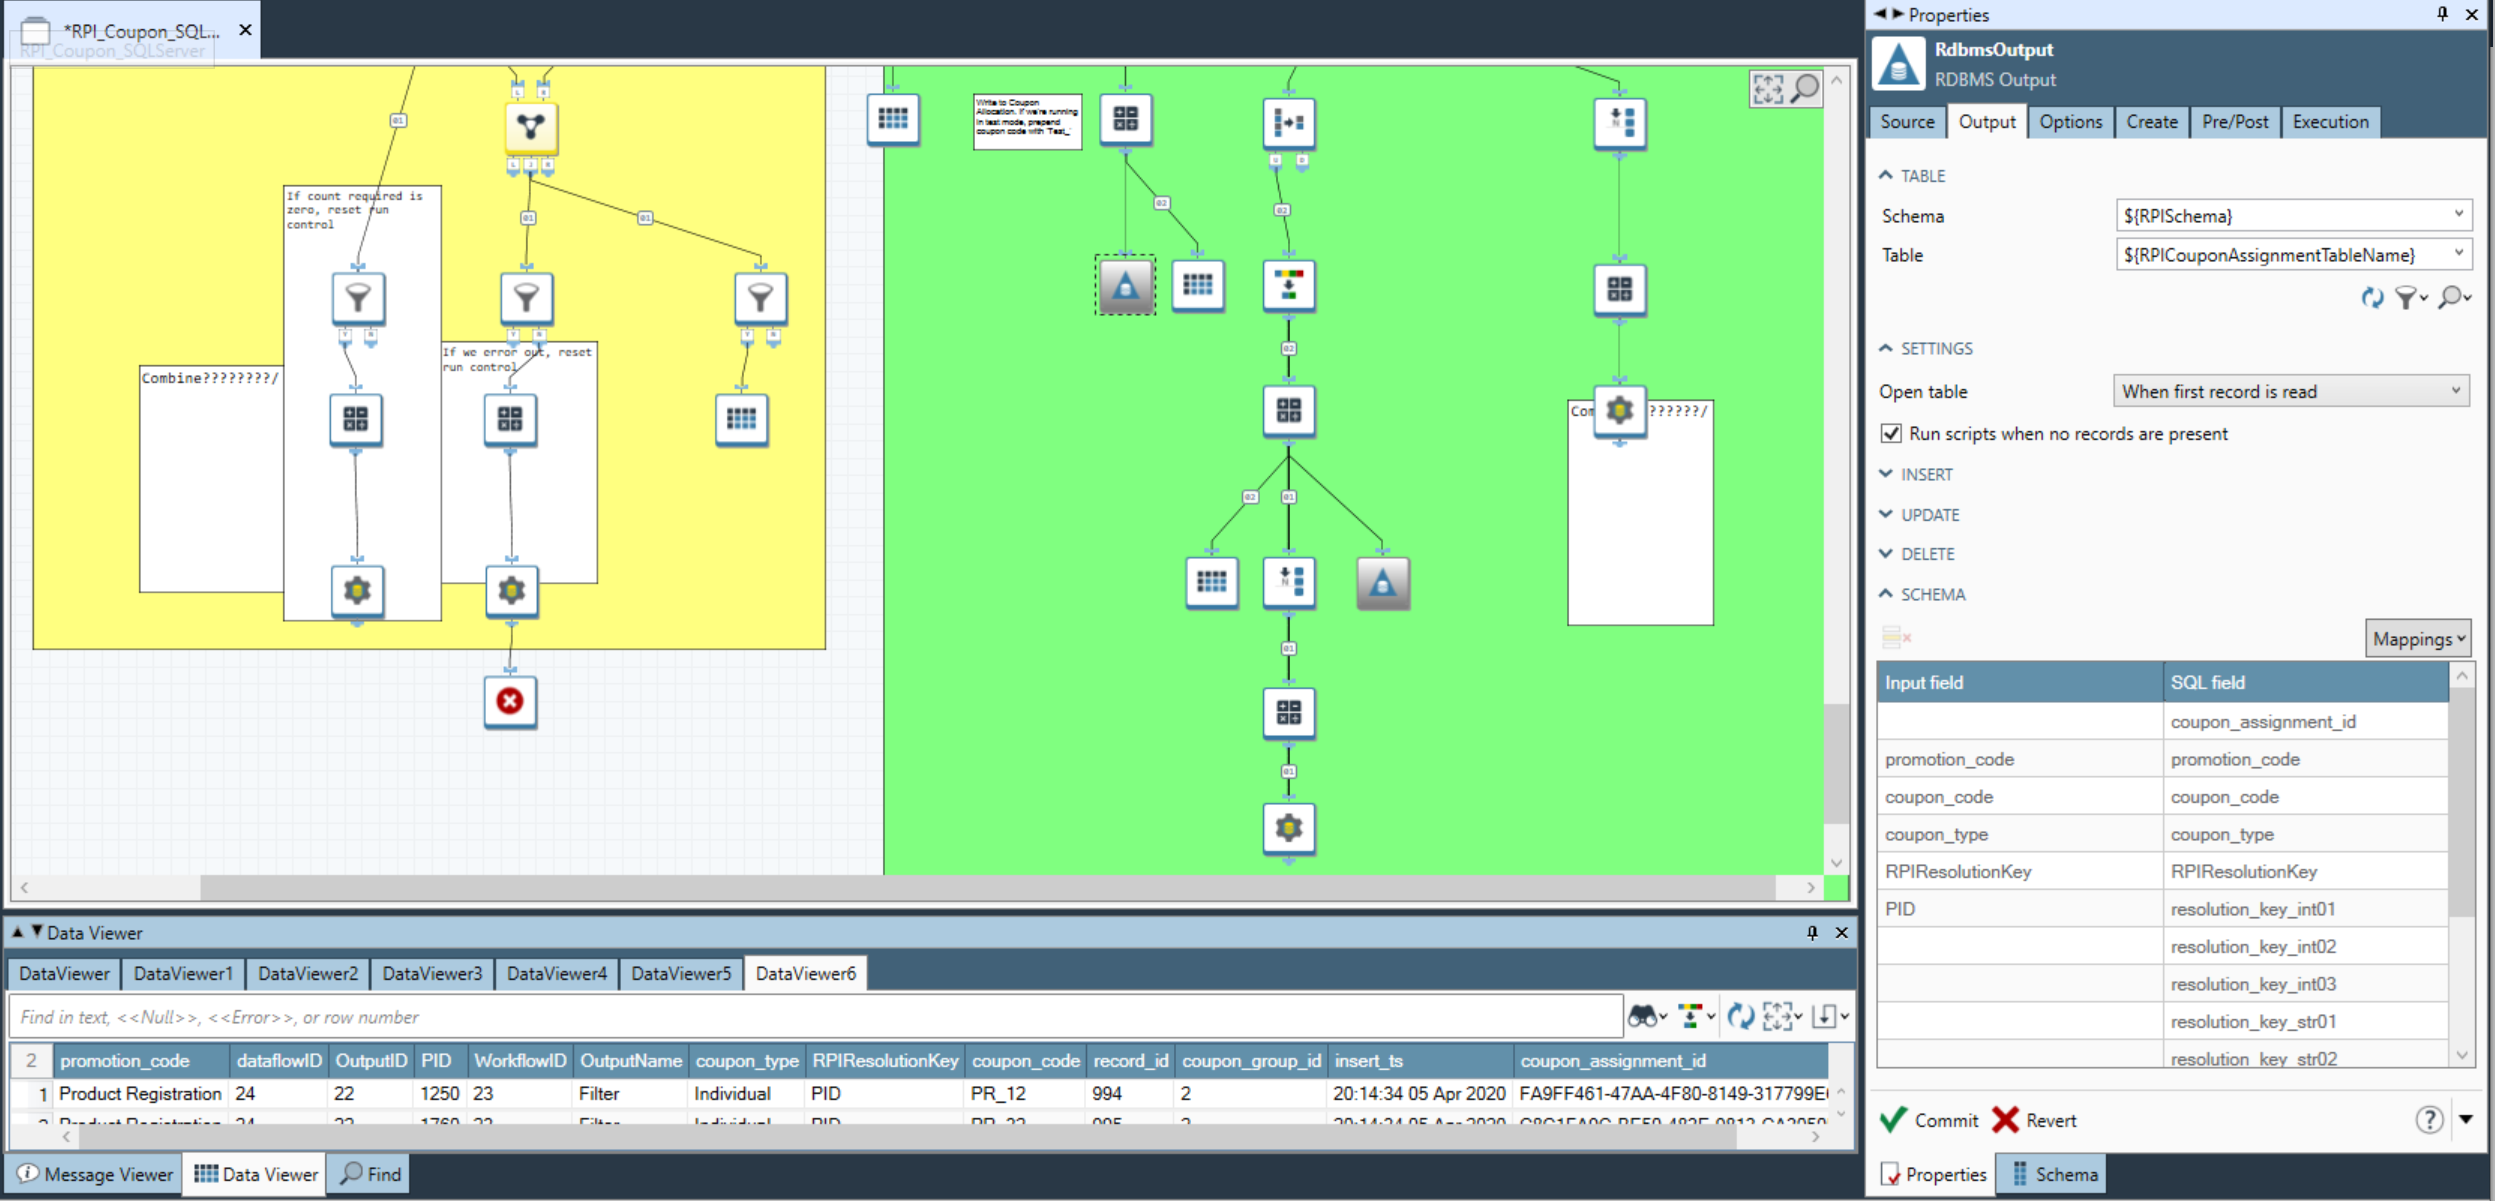
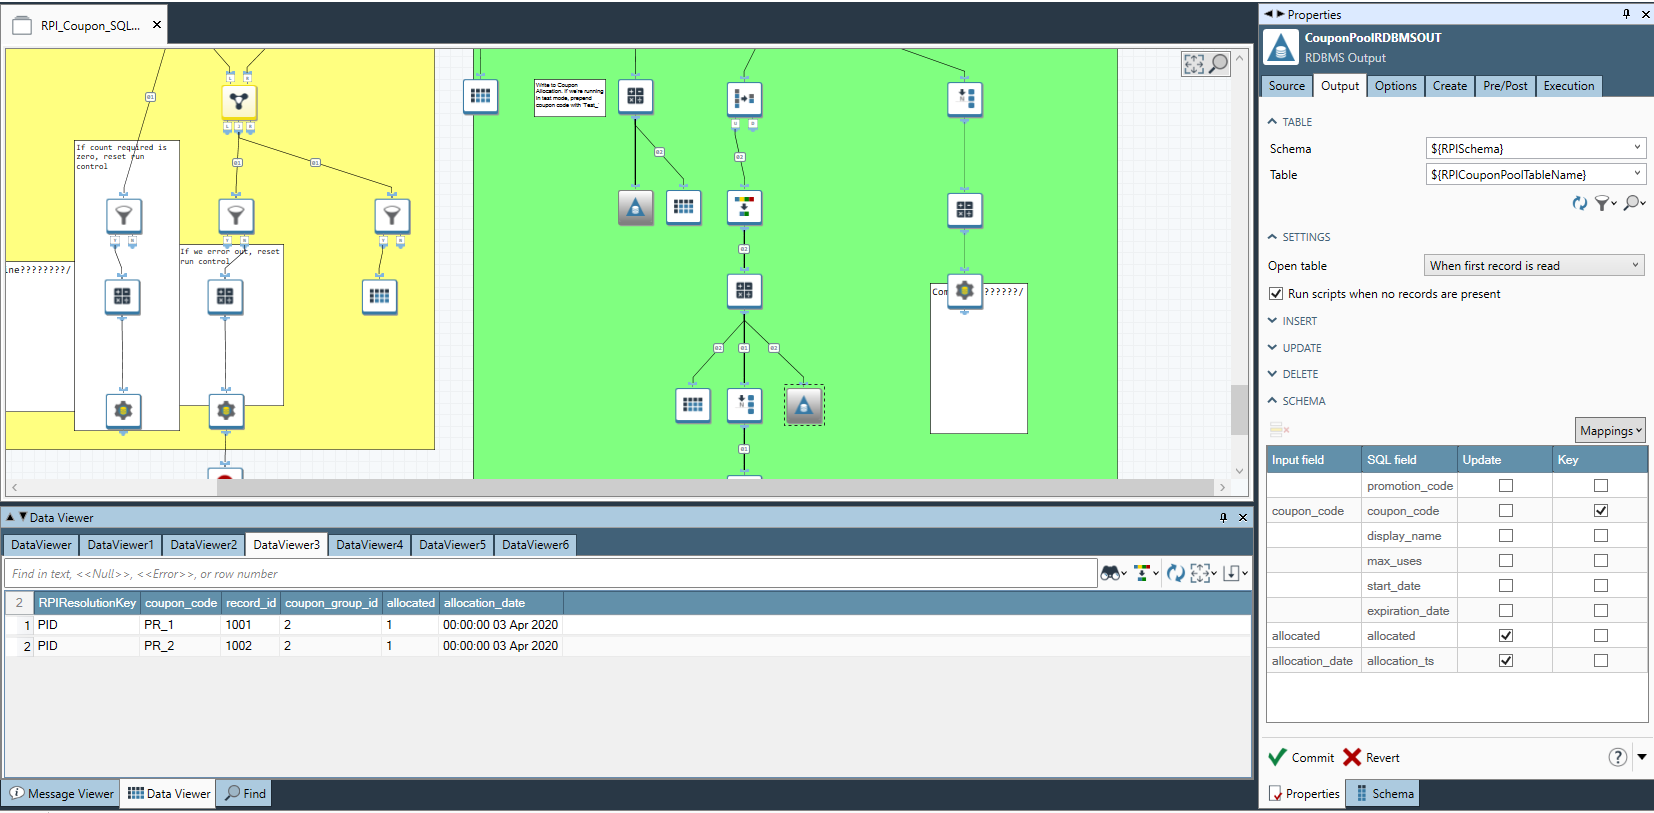
At this point, configure the RPDM parameters of the coupon assignment project in RPDM based on your configuration, and disable the RBDMS outputs. This will allow you to run the RPDM project and evaluate if it is operating as expected. To do that, you want to ensure that the data viewers that are at the end of the project are showing the expected results. If things look to be behaving as expected, then you are ready to execute the RPDM project from RPI.
Example of the RDBMS outputs disabled as well as showing the data viewer of the data that will be used when inserting into the coupon assignment table.
-
In our case
PIDis the resolution key value and it is an integer, so we assign that to the fieldresolution_key_int01. -
Also, we are assigning the
RPIResolutionKey, in this example will be the textPID. -
There are additional fields that are inserted in this activity, but the ones noted are the only ones that require specific configuration.
-
Notice in this case we are not assigning the Coupon Assignment ID and that is because in SQL server this is an Identity field, but in databases like Google Big Query you may need to use a string, which is assigned in the previous calculate block.
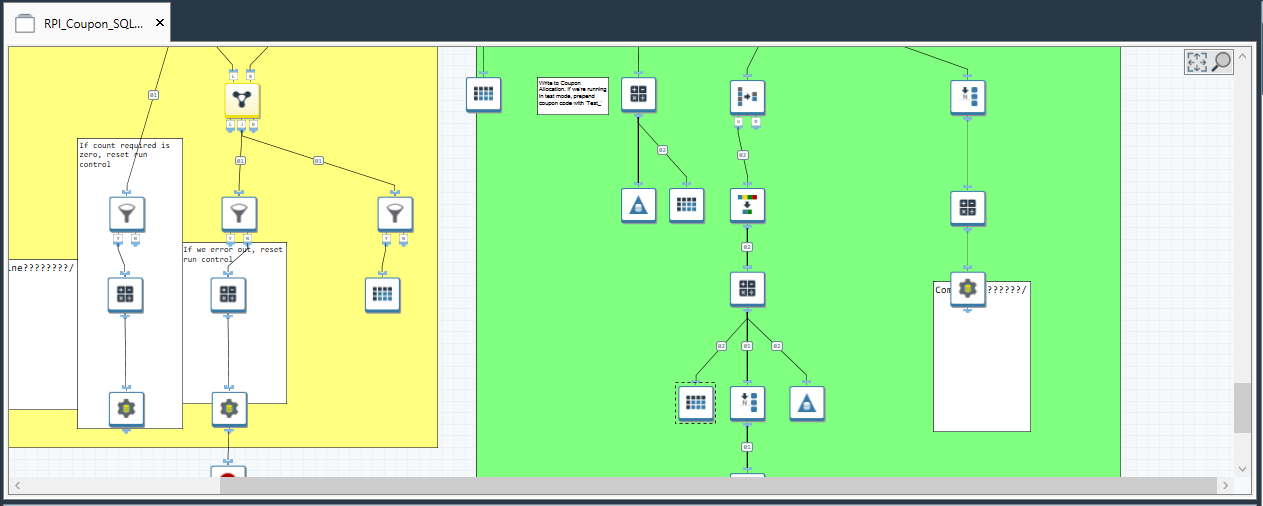
This is a look at the data that will be used to update the Coupon Pool table. Nothing needs to be changed for this tool to be functional.
At this point if you have data flowing to the RDBMS outputs and the data looks to be accurate relative to the configuration you made in the Interaction, then you are ready to enable the two RDBMS outputs and save the project.
Step 12g: Complete interaction and review results
-
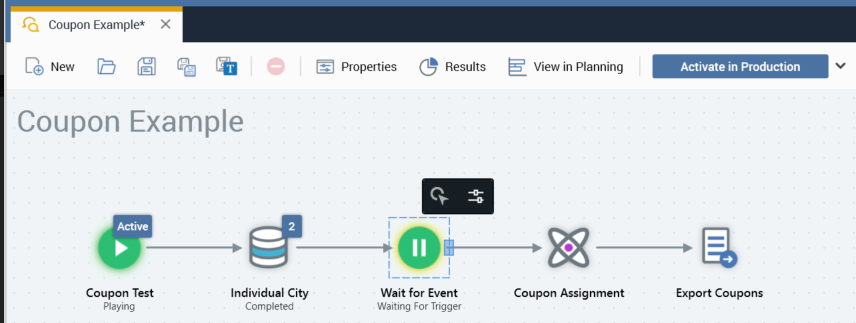
Go back to RPI, fire off the wait for event (continue the wait for event control by selecting the arrow in the circle icon next to the configuration button), and allow the remainder of the workflow in the Interaction to complete.
Example of arrow and circle to select for the wait for event to continue:
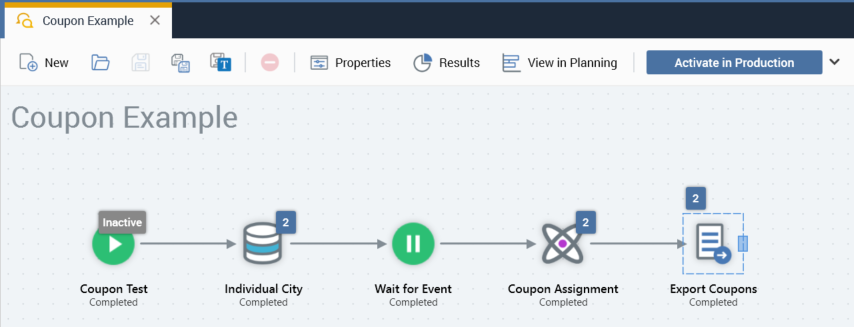
This is the state after the workflow has completed successfully:
-
Then proceed to open the file that is generated and evaluate if the proper coupon assignment occurred.
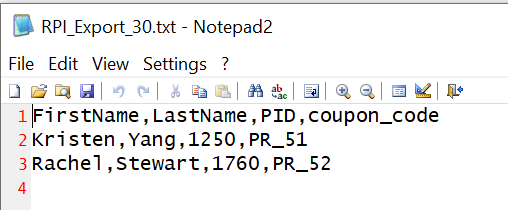
Here is the sample file that was generated for the two records:
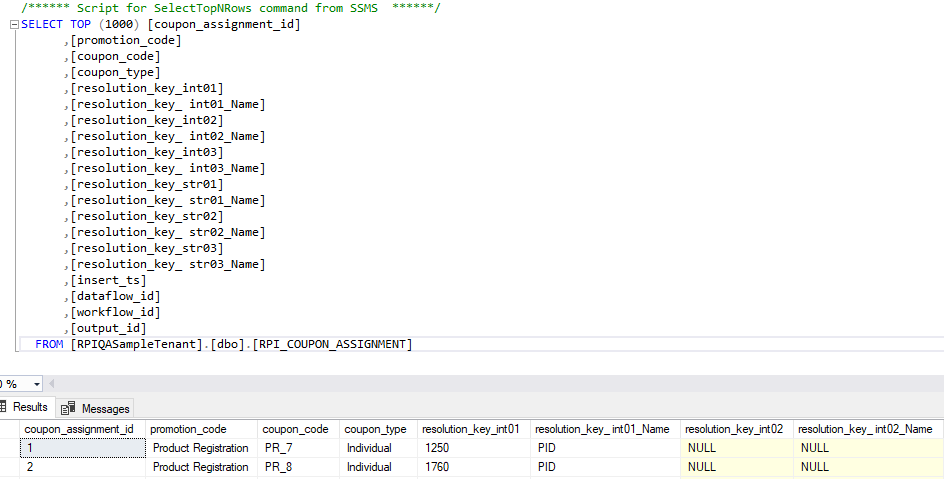
Here are the records in the coupon assignment table:
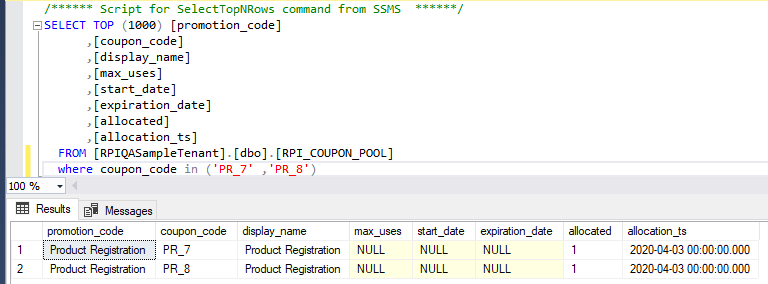
Here are the records updated in the Coupon Pool Table:
The allocated and allocation_ts has been assigned.
Step 13: Continue testing
At this point, you can remove the wait for delay and continue to test and set the metadata and any of the data process projects parameters to continue to evaluate the functionality of the coupon project and ensure it is behaving as expected.
Additional run using Group coupon type instead of individual from the same pool:
File extract showing the same code was applied to both records:
Additional notes
There are a few additional notes that are worth calling out:
-
If there are not enough unallocated coupons in the coupon poll to fulfill the number of records in the audience, then RPDM will throw an error and fail the data process project.
-
Rollback of the workflow will not remove the records from the coupon assignment table or make the coupons unallocated in the coupon pool table. This would have to be done manually in the database.
Next steps
Now that you have the basic coupon assignment configuration complete, refer to…
-
The Advanced coupon concepts topics for additional options
-
The Appendices for important reference information about coupon projects