

Overview
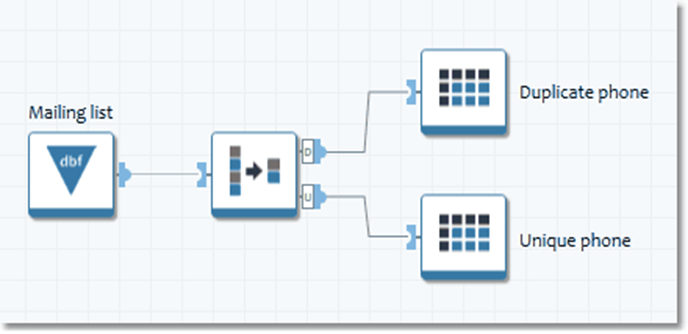
Data Management provides a set of drawing tools similar to those found in most drawing programs, so you can annotate the projects you create on the canvas. You can use annotations to label data sources, describe processes, and turn your Data Management project into a printable visual explanation. An annotated project might look something like this.
You can add lines, polygons, rectangles, ellipses, and text to a project. These annotation objects can be cut, copied, pasted, and formatted.
You can also use tool containers to organize collections of tools on the Data Management canvas.
The table below describes how to draw each type of object and perform other drawing-related tasks.
|
To… |
Do this… |
|---|---|
|
Insert a tool container |
Select the Add Tool Container button, and then select and drag on the canvas until the container is the desired length and width. |
|
Insert an image |
Select the Add Image button and then select and drag on the canvas until the image box is the desired length and width. On the Properties pane, select Load Image, and browse to the desired image file. Supported formats are |
|
Draw a rectangle |
Select the Draw Rectangle button and then select and drag on the canvas until the rectangle is the desired length and width. |
|
Draw an ellipse |
Select the Draw Ellipse button and then select and drag on the canvas until the ellipse is the size you want. |
|
Select the Add Text button and then select and drag on the canvas until the text box is the size you want. Double-click the box to enter text. |
Add text annotations
Text objects are similar to rectangle objects. A rectangular box is drawn around the border of the text object using the line properties. If the line property is set to transparent, no border is visible. The text object can be formatted, moved, and scaled. The four points that make up the bounding rectangle of the text object can be manipulated. You can also rotate the text object by selecting the object and then click-dragging the Rotate icon above the object.
The text object can be configured to support either a single line or multiple lines of text. Similarly, the automatic word wrap feature can be enabled or disabled. Text can be aligned within the box, and font formatting changed. By default, text objects are placed behind tools and connectors and in front of other annotation objects.
To add a text annotation, do one of the following:
-
Select the Text button

-
Copy some text, select the canvas, and paste.
Format annotations
-
Select an annotation object, and then go to the Configuration tab on the Properties pane.
-
Configure the object's properties:
-
Text Properties define how text is displayed:
-
Select Wrapping to enable word wrap.
-
Select Alignment and select the desired vertical and horizontal orientation. Vertical alignment can be set to top, middle, or bottom. Horizontal alignment can be set to left, center, or right.
-
Select Font to select Font, Size, and other typographical effects.
-
Select Text color to select color.
-
-
Fill Properties define how an object is filled:
-
Select Transparent for a see-through effect, or clear it to specify a fill.
-
Select Background style to select a Solid or Hatched fill. Select a Foreground color, and if you specified a Hatched fill, a Background color. Select Hatch style to specify a fill pattern.
-
-
Line Properties define the appearance of an object's border:
-
Select Transparent for a see-through effect, or clear it to specify line attributes.
-
Select Width and specify line width in pixels, and then select Color to select line color. Select Style to specify a line pattern.
-
Layer specifies the object's visibility in relation to tools and connectors. By default, Data Management places text annotations on the "back" layer, and other annotation objects on the "very back" layer. Select the Layer box and select Front, Back, or Very back from the list. See Arranging objects for a more detailed description of layer order.
-
-
Set annotation defaults
-
Select User Settings on the View menu, and then select the Annotations tab on the Properties pane.
-
Select your preferred settings for annotation objects.
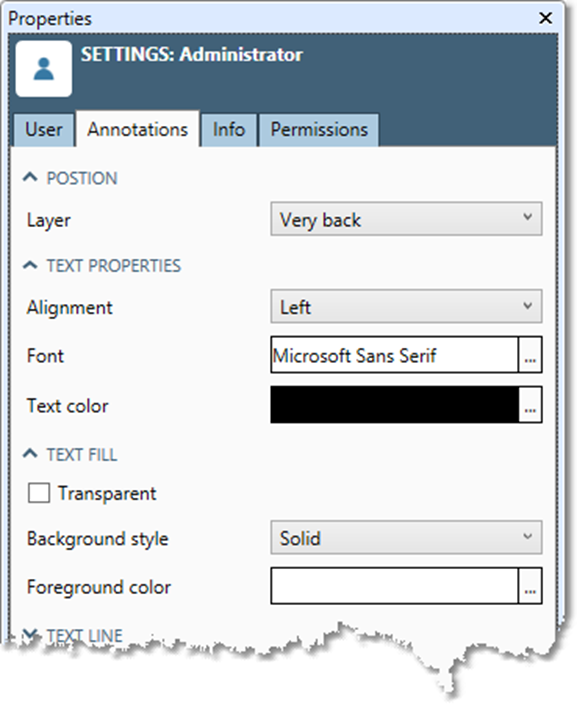
These default annotation properties also apply to Tool containers.
Change annotation layers
You can assign an annotation object to a different layer by selecting the object and then right-clicking on its shortcut menu:
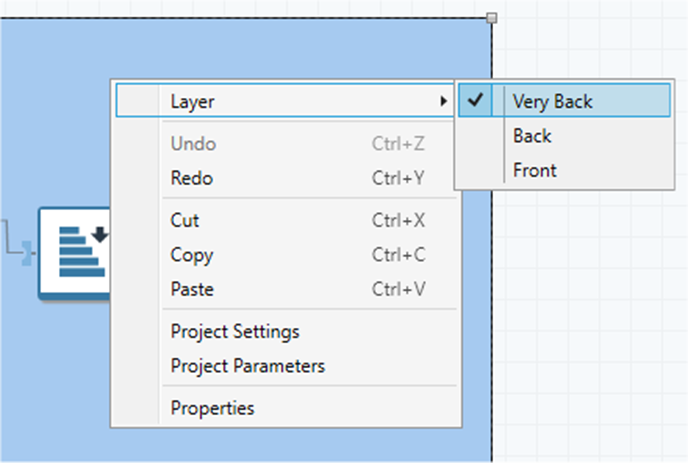
See Arrange objects for a full explanation of Data Management's layering system.