

Overview
The repository sync-to-disk feature supports bi-directional synchronization between the Data Management repository and the file system. This offers fine-grained control over the repository, with support for "promotion" processes, easier backup, and interoperability with version control systems.
-
You can perform synchronization from the command line (using the command-line tool rpdm_sync) or from the repository tree in the Data Management client.
-
You can sync repository objects contained in folders, including macros, projects, automations, data, settings, formulas, and schemas.
-
You can sync the entire repository, starting at the root, or select a single folder containing objects to be synchronized to disk.
The sync process maps these objects to a representation specific to each object type.
While you cannot sync repository archives or Data Management packages, you can sync to and from ZIP archive files.
Extension mapping
With repository sync-to-disk , each selected repository folder and object has a one-to-one correspondence to a synchronized disk folder or file. The repository and disk names will usually be identical, with some exceptions where a file name extension is used to indicate object-type:
|
Object type |
File name extension |
|
Project |
|
|
Macro |
|
|
Automation |
|
Metadata
Repository objects have metadata (type and subtype) which are not present in disk files and folders. Because this metadata is not readily represented in disk files, synchronization creates discrete metadata files at each folder level, which are stored on disk as rpdm_metadata.json. Metadata files are maintained by both the load and save processes. A sync-to-disk process may merge new information into an existing metadata file.
Special folders
By default, the Users, Groups, and Settings repository folders are excluded from sync operations performed on the repository root (unless the operation specifies the folder explicitly).
These folders are critical to Data Management operations, and handling them improperly can cause problems.
You can include these folders in sync operations in the Data Management client, or from the command line:
-
In the client's Synchronize Repository window, select Include users and groups and/or Include settings.
-
On the rpdm_sync command-line, add the
-includeUsersGroupsand/or-includeSettingsoption.
The Autosave and Automation States folders represent system states rather than configuration, and are never included in sync operations.
Repository sync in the client
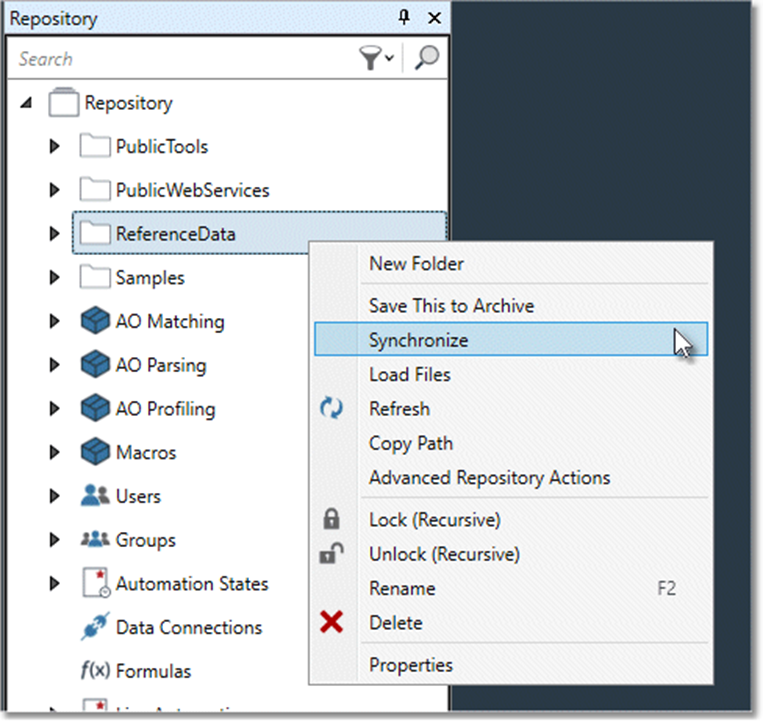
You can right-click any folder in the repository tree (including the repository root and special folders like Settings) and choose Synchronize.
You can also select the Repository Synchronization button on the Data Management toolbar.
To synchronize the repository
-
In Data Management, right-click the desired repository folder, and then select Synchronize.
-
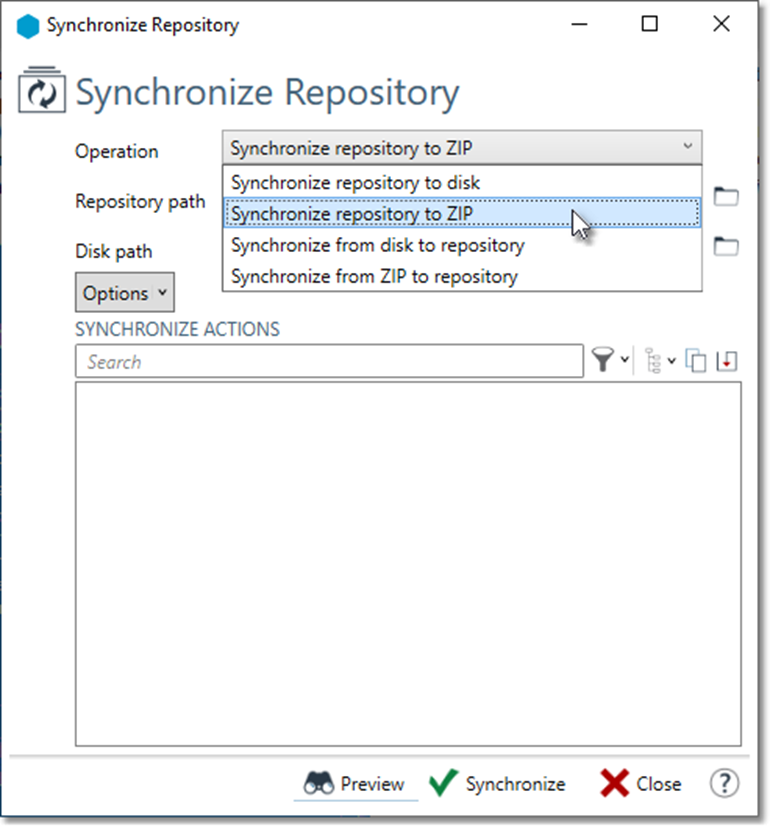
In the Synchronize Repository window, select the desired Operation:
-
Synchronize repository to disk: the resulting directory structure will include only the current version of items under Repository path.
-
Synchronize repository to ZIP: the resulting directory structure will include only the current version of items under Repository path.
-
Synchronize from disk to repository: this will create a new version of existing items, (unless Skip destination items that are newer than source items is selected and the source item is older than the destination item).
-
Synchronize from ZIP to repository: this will create a new version of existing items, (unless Skip destination items that are newer than source items is selected and the source item is older than the destination item).
-
-
Select Repository path, and browse to (or specify) the repository path if necessary.
-
Select Disk path and browse to (or specify) the disk folder. This must be a new empty folder, or a folder that you have previously synchronized to/from. If you are syncing to or from a ZIP archive, include the name of that file.
-
Select Options to configure advanced sync options:
|
Option |
Description |
|
Delete destination items that do not exist in source |
Deletes items from disk if a corresponding item does not exist in the repository. This option is useful when using repository sync with version-controlled objects. This option is destructive, replacing the contents of the target folder with those of the repository folder. Mistakes can be costly! Consider using repository sync from the command line in a script to automate the sync if you need this option. |
|
Skip destination items that are newer than source items |
Prevents overwriting items in the target that are newer than items in the repository. This option checks the timestamp of the file on disk. If your disk folder is a version control system (VCS) workspace, the file time will be the last checkout time, not the time of update in the VCS. For this reason, you should not use this option to sync to a VCS workspace. Instead, let the files be overwritten, and review the changes at VCS commit time. |
|
Continue syncing when errors are encountered |
Prevents synchronization from stopping on error. |
|
Allow unmanaged disk files |
Attempts to infer metadata (object type, subtype, and repository name) for any objects found on disk that not already described by the repository metadata. Select this option to address the error: |
|
Include Users and Groups
|
These options are available if you specified the repository root as Repository path. These folders are critical to Data Management operations, and handling them improperly can cause problems. |
-
Select Preview to view a list of actions that will be taken.
-
Select Synchronize to start the sync operation.
Repository sync from the command line
While synchronizing the Data Management repository from the the repository tree displayed in the Data Management client is easy and intuitive, there may be times when you want to perform synchronization from the command line. Run the rpdm_sync command with the -help option to display a summary of the available options.
Syntax
rpdm_sync: -repo=folder -disk=folder <command> [<connect>] [<login>] [options]
|
Parameters |
Usage |
|
|
(Required) Repository folder to be synchronized. |
|
|
(Required) Disk folder or ZIP file path corresponding to repository folder. Must be a new empty folder, or a folder that you have previously synchronized to/from. It may be any of the following forms:
|
|
Command |
Usage |
|---|---|
|
|
Synchronize from repository to disk. The resulting directory structure will include only the current version of items under the selected path.
|
|
|
Synchronize from disk to repository. This operation will create a new version of existing items (unless - |
|
Connect |
Usage |
|---|---|
|
|
Connect to a site server at the specified address instead of localhost; |
|
|
Force a plain TCP connection. |
|
|
Force a secure TCP connection. |
|
Login |
Usage |
|---|---|
|
|
Login with the specified user name. Defaults to Administrator if not specified. |
|
|
Login with the specified password. Defaults to Administrator if not specified. |
|
|
Login using the specified |
|
Options |
Usage |
|---|---|
|
|
Only report the actions that would be taken. |
|
|
Do not overwrite target files/objects with a newer timestamp than the source. |
|
|
Delete target items when the corresponding source item is missing. |
|
|
Force creation of a package instead of a folder in the repository. Generally used only by the Data Management installer. |
|
|
When syncing the root of the repository, include Users and Groups folders. These folders are critical to Data Management operations, and handling them improperly can cause problems. |
|
|
When syncing the root of the repository, include the Settings folder. This folder is critical to Data Management operations, and handling it improperly can cause problems. |
|
|
When errors are encountered syncing to repository, do not abort sync. |
|
|
Infer metadata for objects encountered on disk that are not described by metadata. |
|
|
Disk path is a compressed ZIP file. |
Command-line sync examples
Synchronize to disk
The following command performs a "preview" of a save from repository to disk:
$ rpdm_sync -save -repo=/Samples/COBOL -disk=f:/temp/synctest -test
Create f:\temp\synctest
Create f:\temp\synctest\AmsReceiptComplex.dlp
Create f:\temp\synctest\AmsReceiptMulti.dlp
Create f:\temp\synctest\AmsReceiptSingle.dlp
Create f:\temp\synctest\Data
Create f:\temp\synctest\Data\copybook.txt
Create f:\temp\synctest\Data\data.txt
Let's run the same command, but eliminate the -test option and define the disk folder as local, which means that it will work even if the rpdm_sync command is run on a remote system:
$ rpdm_sync -save -repo=/Samples/COBOL -disk=local:///f:/temp/synctest
Package Samples/COBOL
Package Samples/COBOL/AmsReceiptComplex
Package Samples/COBOL/AmsReceiptMulti
Package Samples/COBOL/AmsReceiptSingle
Package Samples/COBOL/Data
Package Samples/COBOL/Data/copybook.txt
Package Samples/COBOL/Data/data.txt
Create f:\temp\synctest
Create f:\temp\synctest\AmsReceiptComplex.dlp
Create f:\temp\synctest\AmsReceiptMulti.dlp
Create f:\temp\synctest\AmsReceiptSingle.dlp
Create f:\temp\synctest\Data
Create f:\temp\synctest\Data\copybook.txt
Create f:\temp\synctest\Data\data.txt
The messages tell us that first the server is packaging the content for the remote changes, and then that the changes are being made to local disk.
If we run the command again:
$ rpdm_sync -save -repo=/Samples/COBOL -disk=local:///f:/temp/synctest
Skip f:\temp\synctest
Skip f:\temp\synctest\AmsReceiptComplex.dlp
Skip f:\temp\synctest\AmsReceiptMulti.dlp
Skip f:\temp\synctest\AmsReceiptSingle.dlp
Skip f:\temp\synctest\Data
Skip f:\temp\synctest\Data\copybook.txt
Skip f:\temp\synctest\Data\data.txt
no further changes are made.
Open the repository project /Samples/COBOL/AmsReceiptSingle in Data Management, make a change to an annotation, save the project, and then run the command again:
$ rpdm_sync -save -repo=/Samples/COBOL -disk=local:///f:/temp/synctest
Skip f:\temp\synctest Skip f:\temp\synctest\AmsReceiptComplex.dlp
Skip f:\temp\synctest\AmsReceiptMulti.dlp
Update f:\temp\synctest\AmsReceiptSingle.dlp
Skip f:\temp\synctest\Data
Skip f:\temp\synctest\Data\copybook.txt
Skip f:\temp\synctest\Data\data.txt
Synchronize from disk
Continuing with the above example, use a text editor to edit the file f:/temp/synctest/Data/copybook.txt, adding a blank line to the end and then saving the file.
Running the following command will preview the changes that would be made to update the repository:
$ rpdm_sync -load -repo=/Samples/COBOL -disk=local:///f:/temp/synctest -test
Skip Samples/COBOL
Skip Samples/COBOL/AmsReceiptComplex
Skip Samples/COBOL/AmsReceiptMulti
Skip Samples/COBOL/AmsReceiptSingle
Skip Samples/COBOL/Data
Update Samples/COBOL/Data/copybook.txt from f:\temp\synctest\Data\copybook.txt
Skip Samples/COBOL/Data/data.txt
Delete the file f:/temp/synctest/Data/copybook.txt from disk and run the command again, adding the -delete option:
$ rpdm_sync -load -delete -repo=/Samples/COBOL -disk=local:///f:/temp/synctest -test
Skip Samples/COBOL
Skip Samples/COBOL/AmsReceiptComplex
Skip Samples/COBOL/AmsReceiptMulti
Skip Samples/COBOL/AmsReceiptSingle
Skip Samples/COBOL/Data
Skip Samples/COBOL/Data/data.txt
Synchronization and version control
Since Data Management synchronization operations update their targets when there is a change, you can set up interoperability with a version control system (VCS) by defining the disk folder as the workspace folder for a VCS such as Subversion or git.
Prerequisites
Before you use Data Management with a VCS:
-
Create or choose a VCS repository.
-
Check-out or clone the VCS repository to a disk workspace folder.
-
Designate a sub-folder within the workspace folder (or the entire workspace folder if the VCS repository is dedicated to Data Management) to hold the Data Management objects.
-
Decide which folder or folders within Data Management will be checked into the VCS.
Add objects to version control
Once version control system (VCS) prerequisites have been met, you're ready to add Data Management objects to version control.
To add Data Management objects to version control in the client
-
In your version control system (VCS), create or select a branch for your Data Management objects.
-
In Data Management, right-click the repository folder you want to check into the VCS, and select Synchronize.
-
In the Synchronize Repository window, select Operation and then choose Synchronize to Disk.
-
Select Repository path, and browse to (or specify) the repository path if necessary.
-
Select Destination path and browse to (or specify) the target disk folder in your VCS workspace.
-
Optionally, select Preview to view a list of actions that will be taken.
-
Select Start to start the sync operation.
-
In your VCS, add and check-in the new Data Management objects.
To add Data Management objects to version control using the command line
-
In your version control system (VCS), create or select a branch for your Data Management objects.
-
Run
rpdm_syncfrom the command line:rpdm_sync -save -repo=repofolder -disk=diskfolder. -
In your VCS, add and check-in the new Data Management objects.
Work on version-controlled objects
Once you have added Data Management objects to your version control system (VCS), you can use Data Management's synchronization feature to access those version-controlled objects.
The workflow is:
-
Get the latest from your VCS.
-
Sync changes from disk to Data Management.
-
Work in Data Management.
-
Sync changes from Data Management to disk.
-
Commit changes to the VCS.
To work on version-controlled Data Management objects in the client
-
In your version control system (VCS), select the repository and branch containing your Data Management objects, and then get the latest updates from your VCS (for example,
git pull). -
Create a new branch in the VCS to contain the changes you are about to make.
-
If the Data Management repository folder containing the Data Management objects does not yet exist, create it.
-
In Data Management, right-click the repository folder and select Synchronize.
-
In the Synchronize Repository window, select Operation and then choose Synchronize from Disk.
-
Select Repository path, and browse to (or specify) the repository path if necessary.
-
Select Disk path and browse to the source disk folder in your VCS workspace.
-
Optionally, select Delete destination items that do not exist in source to track deletions that occurred in the VCS.
-
Optionally, select Preview to view a list of actions that will be taken.
-
Select Start to start the sync operation.
-
Do your work in Data Management, creating and changing items in the repository folder.
-
In Data Management, right-click the repository folder you want to check into the VCS, and select Synchronize.
-
In the Synchronize Repository window, select Operation and then choose Synchronize to Disk.
-
Select Repository path, and browse to (or specify) the repository path if necessary.
-
Select Disk path and browse to the source disk folder in your VCS workspace.
-
Optionally, select Delete destination items that do not exist in source to track deletions you made in the repository.
-
Optionally, select Preview to view a list of actions that will be taken.
-
Select Start to start the sync operation.
-
In your VCS, add and check in new or changed Data Management objects.
-
Merge your changes with the base branch in the VCS.
To work on version-controlled Data Management objects using the command line
-
In your version control system (VCS), select the repository and branch containing your Data Management objects, and then get the latest updates from your VCS (for example,
git pull). -
Create a new branch in the VCS to contain the changes you are about to make.
-
Run the
rpdm_synccommand from the command line. The-deleteis optional but recommended to track deletions made in the VCS:rpdm_sync -load -repo=folder -disk=folder -delete -test. -
View the the previewed list of actions. If it is acceptable, run the command again without the
-testoption. -
Do your work in Data Management, creating and changing items in the repository folder.
-
Run the
rpdm_synccommand from the command line. The-deleteis optional but recommended to track deletions you made in the repository.rpdm_sync -save -repo=folder -disk=folder -delete -test -
View the the previewed list of actions. If it is acceptable, run the command again without the
-testoption. -
In your VCS, add and check in new or changed Data Management objects. You should carefully review changes in your VCS before committing.
-
Merge your changes with the base branch in the VCS.
Limitations and workarounds
Data Management's synchronization operations cannot detect potential collisions and ambiguities in the change sequence. This may cause problems under the following scenarios.
Simultaneous change
If you and another user of the version control system (VCS) simultaneously change the same item in the same branch, Data Management's sync will not detect this, and the procedure described in Work on version-controlled objects will not detect a conflict during VCS check-in, because your changes will simply be deemed "the latest" and will overwrite.
Workaround: always create a new branch when you start work destined for the VCS.
Merge conflict
If you encounter a conflict when merging your VCS branch back to the base branch, a standard merge editor like kdiff3 may not be sufficient to edit the complex XML structure of an Data Management project.
Workaround: Perform whatever merging you can in the merge editor, then use Data Management to simultaneously open the "mine", "theirs", and "merged" versions of the project. Manually copy/paste changes to the merged version and save it.