

Overview
RPI Realtime consists of the following web services:
-
RPI Realtime: facilitates the making of content applicability decisions, and the recording of events undertaken by a site visitor, for example.
-
RPI Realtime Agent: provides access for the RPI Realtime service to the RPI operational and data databases.
RPI’s relationship with a tenant’s website is discussed in the Redpoint Interaction Realtime section of the RPI Reference Guide. To summarize briefly, an integration between RPI and a public website can take place in the following contexts:
-
Landing pages can be created in RPI and published to a website.
-
Web forms can be included in landing pages, which, when completed and submitted by a site visitor, can serve as a useful data capture tool.
-
An outbound RPI communication (e.g., an email offer) can contain a link to a landing or other web page, and results can be collated in respect of visitors’ behavior at the same and presented in the context of the outbound offer activity within an interaction.
-
In the same context, a target web page can contain dynamic content, served by smart assets, which can be varied in accordance with the known visitor’s characteristics.
-
Realtime decisions can be used to personalize content in a dynamic asset hosted in a landing or other web page. Such personalization can be effected on several bases—e.g., the visitor’s browser, location, time of day, current weather conditions or, if a known visitor, her or his attribute values.
-
Goals, such as the selecting of a link or the submission of a web form, can be defined within a landing page, and visitor’s attainment of the same can be monitored as conversion rates.
-
Goal driven assets can be used to effect A/B/n testing within a website, with the results of the initial presentation to visitors of random pieces of content being analyzed statistically to determine the most efficacious piece of content in encouraging goal attainment. The winning content can then be served to subsequent visitors.
Deploying RPI Realtime
The following steps must be undertaken to deploy RPI Realtime:
-
Deploy the RPI Realtime and RPI Realtime Agent web services. These can be deployed as two separate container images, or, more typically, as a single image.
-
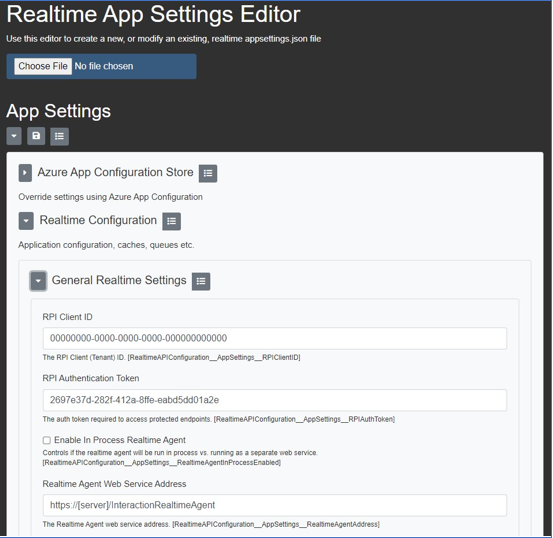
Having deployed the RPI Realtime containers, their application settings must be configured using either
appsettings.jsonfiles or environment variables. The minimum configuration to be undertaken is dependent on the range of use cases to be realized using RPI Realtime:-
If configuring RPI Realtime to make Realtime decisions, configure a cache in the Cache Settings section (refer to Realtime Cache Setup).
-
If configuring RPI Realtime to capture web event details (refer to Web Events Setup, below).
-
If configuring RPI Realtime to process web form submissions (refer to Web Forms Setup, below).
-
-
If the RPI containers cannot access the external Realtime API address, then they need to be configured with the address that will work on the internal Kubernetes network. This can be achieved by setting the application setting
RealtimeAPIAddressOverrideon all containers other than the Configuration Service.
RPI Realtime application settings
The RPI Configuration Service exposes an option that can assist in the configuration of RPI Realtime application settings:
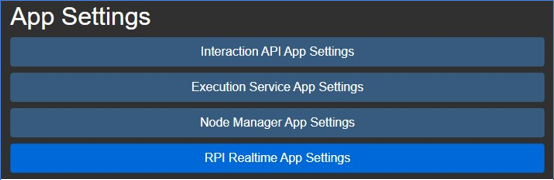
Selecting the RPI Realtime App Settings button displays the following interface, which can be used to access each setting.
RPI Realtime JavaScript web client
The RPI Web Client JavaScript library is used to:
-
Register page visitors with RPI Realtime
-
Send additional Realtime Parameters to the RPI Realtime visitor cache
-
Raise custom RPI Realtime web events
-
Get and render RPI published decisions
RPI Web Client documentation is available; please see the link at the RPI Realtime Home Page.
When server-side cookies are turned on, RPI will set a server-side cookie that contains visitor and device IDs for a request. For every incoming request, if the visitor and/or device IDs specified in the request do not match the server side values, the service will override the values sent in with the request with the values from the server-side cookie. The response will include the updated visitor and device IDs and the consuming application will need to handle that appropriately. The Realtime Web Client (JavaScript SDK) will automatically pick up this change and set the client side visitor cookie appropriately.
Web events setup
Web events are a mechanism used by RPI to effect communication between the RPI Realtime application and a website. They are used to:
-
Facilitate communication between RPI landing and other web pages and RPI.
-
Capture states and metrics generated through visitors’ website behaviors.
-
Monitor goals and visitors’ attainment of the same.
Web events adapters, which provide web events capabilities, are configured within a dedicated RPI configuration interface, details of which can be found in the RPI Reference guide.
To configure web events for RPI, please follow these steps:
-
Create a new
rpiwebeventsqueue, using your queue provider of choice. -
Ensure the
EventsQueuePathapp setting references the aforementioned queue. -
In the RPI System Configuration configuration interface, ensure
WebEventQueuePathis set to the path of the queue. -
In the RPI Web Adapters configuration interface, create and configure a Web Events adapter. Optionally describe any metrics and/or states to be tracked (see the RPI Reference Guide for more information).
-
In the
Operations.SystemTasks interface, ensure that the Web events importer system task is turned on.
Please refer to the following RPI Reference Guide sections for detailed information about the operational usage of web events.
-
Configuration Workbench: covers the setup of web events adapters, and attachment to channels to obtain state information at outbound activity execution.
-
Rule Designer: documents Web Realtime decisions, which can leverage the states and metrics defined at a web events adapter.
-
Landing Page Designer: covers use of web events in landing pages.
-
Interaction Designer: describes the collation of metric and state information, using a web events adapter, at outbound channel execution.
Web forms setup
Web forms can be hosted in RPI landing or other web pages and allow you to identify and elicit responses from site visitors. Form field data values are persisted in the data warehouse and can be used in due course as the basis for further targeting.
To set up web forms, please follow these steps:
-
Create a new
rpiwebformsubmissionqueue, using your queue provider of choice. -
Ensure the
FormQueuePathapp setting references the aforementioned queue. -
In the RPI System Configuration configuration interface, ensure that
FormSubmissionQueuePathis set to the path of the queue. -
In the
Operations.SystemTasks interface, ensure that the Web form processor task is turned on.
Web form functionality is available in a standalone capacity, without the need for a full RPI Realtime installation. The following application setting facilitates this scenario: RealtimeAPIConfiguration__AppSettings__IsWebFormProcessorOnly]