

Create new Channel
This is carried out using the Create new Channel toolbar button.
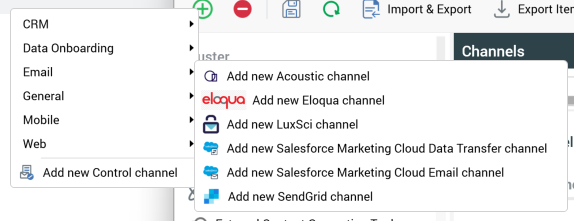
Upon invocation, an initial sub-menu is shown, allowing you to choose the category of channel you wish to create:
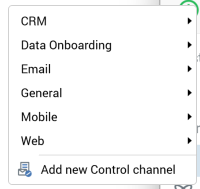
Selecting a category allows you to select the specific type of channel to be created:
The new channel is added to the channels list at the appropriate alphabetical ordinal position. Its name is New [Type] Channel; if New [Type] Channel already exists, its name is New [Type] Channel 2.
This number can be incremented accordingly.
The new channel’s Delivery method is accordant with the channel type, its State upon creation is Added and its row is selected.
When adding a channel in NoSQL mode, the following channel types are available at invocation of Create new Channel:
-
CRM
-
Salesforce
-
-
Data Onboarding
-
Facebook Audience
-
Google Ads Customer Match
-
LiveRamp
-
Realtime Cache
-
-
Email
-
Acoustic
-
Cheetah Digital
-
Eloqua
-
LuxSci
-
Salesforce Marketing Cloud
-
Salesforce Marketing Cloud Data Transfer
-
SendGrid
-
-
General
-
Data Extract
-
Outbound Delivery
-
-
Mobile
-
Airship Push Direct
-
Azure Notification
-
Azure Push Direct Notification
-
Google Firebase
-
Google Firebase Direct
-
mPulse SMS
-
Twilio SMS
-
-
Web
-
Alchemer
-
If you attempt to create a new channel, and the number of configured channels is the same as system configuration setting MaxChannels, a warning is displayed, advising that the maximum number of channels that can be configured has been reached.
This setting is set by default to value 50, and accepts a minimum value of 10, and a maximum value of 1000.
Configure existing channel
This is carried out in the simple fields in Selected Channel Details. You can select an existing channel to view its details. If multiple channels are selected, a message is displayed that states “Please choose one of the Channels above to make changes”.
When you make changes to a previously-saved channel and its State is set to Edited.
Delete selected Channels
This is carried out using the Delete selected Channels toolbar button. A deleted channel's state is set to “Deleted”, and its row text color to red. You are no longer able to select a deleted row.
You can delete multiple channels concurrently.
Save changes to Channels
This is carried out in the toolbar. When invoked, the changes you have made are validated. Any validation errors are advised in a dialog. You are not able to proceed with Save until you have resolved them. Following a successful save, channels are displayed in alphabetical order. All channels' states are updated to “Unchanged”. Any Deleted channels are removed from display.
Refresh
This option reloads the contents of the interface from the operational database. If changes have been made, a “Save Changes?“ is shown.
Clone selected Channel
This option is only available when a single channel is selected. Invocation creates a copy of the selected channel. Its name is set to that of the original channel, to which an integer is appended to ensure uniqueness (this value can be incremented if required). Its initial state is “Added”, and its other properties are as per the original channel. It is listed immediately after the original channel and is selected.
-
If you clone a default channel, the newly-created clone is not marked as a default.
-
If you attempt to create a new channel, and the number of configured channels is the same as system configuration setting
MaxChannels, a warning is displayed, advising that the maximum number of channels that can be configured has been reached.
Validate
This button allows you to validate that the system tasks and database tables required for the currently-configured channels all exist. If any are missing, they are created.