

Overview
Each widget contains two views: the configuration overlay and display mode.
Configuration overlay
The Configure Pulses Widget configuration overlay contains the following:
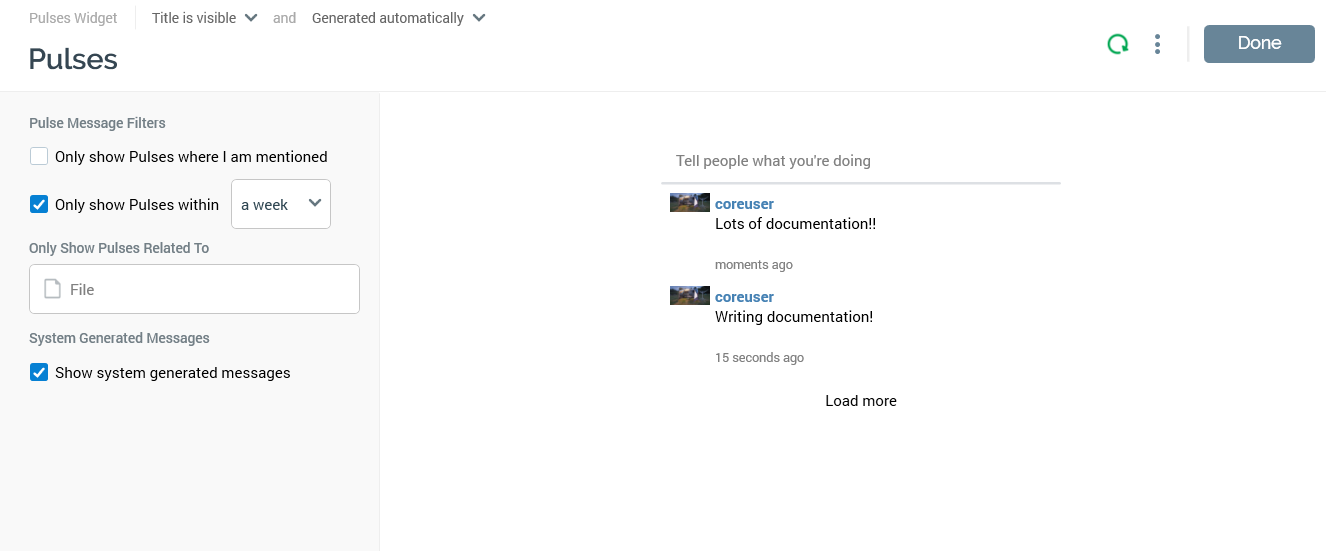
Properties toolbox
-
Pulse Message Filters section: containing two checkboxes, both unchecked by default:
-
Only show pulses where I am mentioned: if checked, only pulses where you are mentioned are shown. These include pulses that you posted, and pulses created in reply to your postings.
-
Only show pulses within: if checked, you must select a time period (from a drop-down list that ranges from a day to a week). Pulses are limited to only those posted within this time.
-
-
Only Show Pulses Related To: you can select a file from the accessible folders within the RPI file system, using the File System Dialog. Pulses are filtered to only those related to the file you select. Having selected a file, you can clear it. You can also open the related file, which is shown in an appropriate designer. Not checked by default.
-
System Generated Messages: this checkbox is unchecked by default. If unchecked, only user-posted pulses are shown. If checked, both user-posted and system-generated pulses are listed.
Preview
A preview of the widget, based on its current settings, is displayed to the right.
Display mode
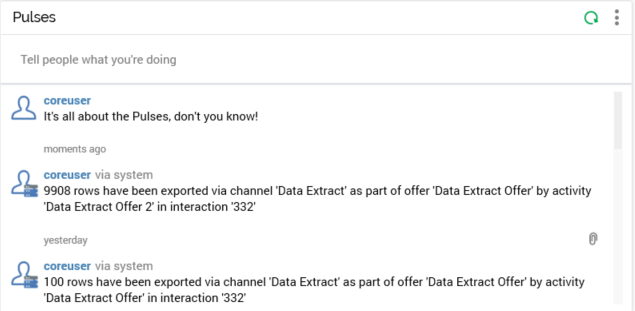
Pulses allow you and your colleagues to communicate whilst using RPI. A pulse is a short message that you can post, which is then made available to all interested users.
Pulses are also generated automatically by the system upon the occurrence of significant events; in addition, when such an event occurs in respect of a file, a link is created between that file and the pulse (note that you can also add attachments to a pulse manually).
Pulses are accessible at the Pulses widget and within an independent Pulses Window.
The Pulses widget is unavailable at the Dashboard Designer if system configuration setting EnablePulseMessages is set to false.
The following features are available at a Pulses widget:
-
Tell people what you’re doing: this text field allows you to type a pulse. When you begin typing in the field the default text is removed. A pulse must be a minimum of 1 character in length and may be a maximum of 500 characters. When you enter pulse content, a toolbar is displayed. The toolbar exposes the following options:
-
Attach files to this pulse: invoking this option displays the File System Dialog. All file types are listed. You can navigate accessible folders in the RPI file system in order to locate one or more files to attach to your pulse. You can associate many files with a single pulse, although they must be attached one at a time. Selected files are listed below the pulse prior to its posting and are accompanied by an icon indicating their type.
If you have registered for the “Pulse Related object” email alert, if a pulse is sent by another user with an attached file that you created or modified, an email alert is sent to your registered email address. It is entitled “Pulse received relating to an object you have worked with”, and it contains the pulse, sender details, file name and type and date and time sent. -
Send to one or more specific Recipients: selecting this option displays a list of all existing approved users in the current RPI installation (other than your own user). You can check the user(s) to whom the pulse is to be sent directly. When posted, the pulse is visible to all users.
If you have registered for “Pulse Direct receipt” alerts, upon receipt of a direct pulse, an email alert is sent to your registered email address. The email’s title is “[username] has sent you a new pulse”, and it contains the pulse, the name of the sender and the date and time sent. -
Post new Pulse: invoking this option displays two rotating icons. Initially a “Posting pulse” icon is displayed over the pulse text field and accompanying toolbar, followed by a “Loading Pulses” icon displayed over the grayed-out pulses list. Upon its having been posted, a new pulse is added to the top of the pulses list. Note that you can also post a pulse by pressing Return when entering the pulse text.
Prior to posting a pulse, a Remove Attachment button is shown when hovering over an attachment. Invocation of this option removes the attachment from the pulse. An “Are you sure” dialog is not shown. It is not possible to remove an attachment following a pulse's posting. -
Cancel post: invoking this option removes the “Tell people...” toolbar and any attached files and reverts the text field to its default text.
-
-
Pulses list: pulses are shown in reverse chronological order. For each pulse, the following items are displayed:
-
User image: the initiating user’s user image is displayed to the left of the pulse. If a system pulse created in response to an action by a user, the user image is accompanied by an icon.
-
[Posted by]: the username of the user who posted the pulse. If the pulse was posted manually by a user, only the user’s username is shown. If it was posted by the system in response to an action undertaken by a user, it is shown as “[username] via system”. If the pulse was posted as a reply, it is shown as “[username] in reply to [username]”.
-
[Pulse content]: the message to be posted in the pulse. If a user-initiated pulse, the message text as posted by user is shown. If a system-generated pulse, a description of the action undertaken is displayed.
If the pulse content contains a hyperlink, it is shown in blue. When you select it, the website to which it points is displayed in your default browser. Note that the ‘http://’ protocol is not shown. -
[When posted]: one of:
-
Moments ago (posted in last 10 seconds)
-
[n] seconds ago (posted in last minute)
-
[n] minutes ago (posted in last hour)
-
[n] hours ago (posted in last day)
-
yesterday (posted in last day)
-
[n] days ago (posted in last 21 days)
-
over 21 days ago
When you hover over a pulse, a toolbar is displayed.
The toolbar exposes the following options:
-
-
Reply to this pulse: when you invoke this option, the cursor placed in the text field, and the default text is updated to “Enter your reply”. A read-only label is displayed to the left: “To [username]”. Upon posting your reply, it is shown in the pulses list as “[Poster 2] in reply to [poster 1]”.
If you have registered for “Pulse Direct receipt” alerts, upon receipt of a reply to a pulse that you posted, an email alert (entitled “[username] has replied to your pulse”) is sent to your registered email address. -
View all Pulses in this thread: displays the current pulse and all other pulses in the same conversational thread in the Pulses Window. For more information on threaded pulses, please see the Pulse Window documentation.
-
Delete this pulse: this option is only available if the pulse was posted by you (or by the system on your behalf) and is protected by an “Are you sure?” dialog. If you proceed with the deletion, the pulse is removed from the pulses list.
-
[Attachments] button: displayed only if the pulse has attachments and indicated by a paperclip icon. Note that system pulses attach the related file automatically. The name(s) of all attachment(s) are shown in a context menu and are accompanied by an icon indicating the file type.
When you select an attachment context menu button, what happens depends upon the type of attachment:-
If the attachment can be opened, it is shown within the relevant designer. If the file type is other than selection rule or Realtime decision, and if the file is not already displayed in a designer, it is shown in a new designer instance. If the file is already displayed in a designer, the existing designer instance receives the focus.
-
If the file is a selection rule or realtime decision, if the Rule Designer is not open, the rule is shown in a new Rule Designer instance. If the Rule Designer is already open without displaying the rule, the rule is displayed in the existing Designer instance. If the Rule Designer is already open and the rule is shown, the rule receives focus in the existing Designer instance.
-
If the attachment is an attribute, the File Information Dialog is shown.
-
If the attachment cannot be opened, a message is displayed.
-
-
By default, 20 pulses are displayed in the pulses list. You can invoke Load more to view additional pulses. This button is displayed after the final message in the list. Selecting the button adds an additional 20 pulses to the list. Pulses continue to be displayed in reverse chronological order, with the oldest pulses at the bottom of the list. More pulses are always loaded in accordance with your current filter settings. Subsequent invocation adds 20 older pulses to the bottom of the list. The maximum number of pulses displayable within the pulses list is defined by system configuration setting MaxPulsesInList.
If system configuration setting EnablePulseMessages is set to false, when you attempt to view a Pulses widget in the Dashboard Viewer, a message (“Pulses are currently disabled. To enable, please contact your System Administrator”) is shown instead.
If a Pulse generated by sharing widget content is displayed in a Pulses widget, an inline preview image, showing the state of the shared widget at the point of the Pulse's posting, is shown at the same. You can select the preview to view a larger image in the Pulse Image Preview dialog.
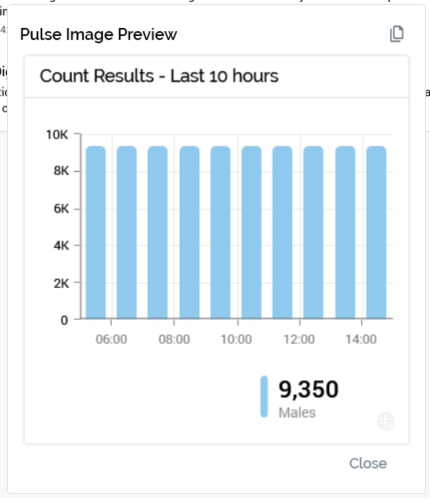
A Copy Image to Clipboard button is available at the top right of the dialog.