

Options tab
The Export Template Designer’s Options tab contains a series of properties that define the format of an exported file based upon the export template.
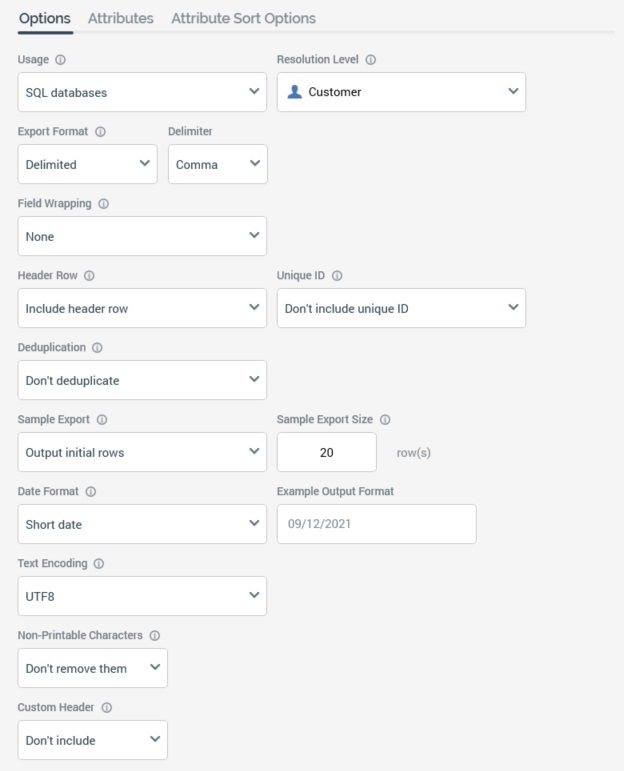
The following properties can be configured:
-
Usage: see The Export Template Designer and NoSQL Databases.
-
Resolution Level: selected using a dropdown, which displays all existing resolution levels. Resolution level is accompanied by the text: “Defines table from and key level at which data retrieved when exporting data”.
If the current RPI client has been configured with one or more auxiliary databases, you can choose an auxiliary database resolution level. The export template can then be used when exporting selection rules with auxiliary resolution levels. You cannot use an auxiliary export template in an interaction.
Restricting access to specific resolution levels is carried out in the Resolution Levels configuration interface, in which you can link a resolution level to one or more organization nodes.
If your user account is linked to an organization node user group that matches a resolution level’s linked organization node, you will have access to that resolution level. If a resolution level is associated with more than one organization node, a user need be associated with only one of the nodes to access the resolution level. If a resolution level is associated with a descendent node from an organization hierarchy, a user associated with an ancestor node may access the resolution level.
For more information, please see the Configuration Workbench documentation.
When you select the button, it is selected, and its text set to Hide restricted items. A list of restricted resolution levels is displayed at the bottom of the chooser.
You can select a restricted resolution level; however, on its display at the export template, it is accompanied by a warning indicator. A tooltip is shown when you hover over the warning icon.
Restricted Items are hidden again on redisplay of the chooser. If no restricted resolution levels exist, the Restricted Items button is not shown.
-
Export Format: this property allows you to define the template’s basic export format. It is set using the following fields:
-
Export Format: a drop-down list, which exposes the following values:
-
Delimited (the default)
-
Fixed width
-
JSON
-
-
Delimiter: displayed when Delimited is selected. A dropdown field, it exposes the following values:
-
Comma
-
Pipe
-
Space
-
Tab
-
Custom
-
-
Custom Delimiter: displayed when Delimiter is set to “Custom”. A text field, it is limited to a single character only. Its default is blank.
-
JSON Format: displayed when Delimiter is set to “JSON”. A dropdown field, it allows you to define to type of JSON to be written at export execution. It exposes the following values:
-
Object List: the default value. When selected, output files will contain a series of JSON objects, one per line. Note that objects are not separated by newline characters when appending records to an existing file.
-
Array: when selected, output files will contain a JSON array.
When Export Format is set to “JSON”:
-
-
Field Wrapping is disabled and set to “None”.
-
Wrap All Fields and Header Row are not shown.
-
-
Field Wrapping: this dropdown allows you to define whether and how to wrap values in the export file in quotes. It exposes the values None (the default), Single quote and Double quote. This property is not available for fixed-width export templates.
-
Wrap All Fields In Quotes: this checkbox, disabled if Field wrapping is set to None, allows you to control whether all, or just string, fields are to be wrapped in the selected quote type. This property is not available for fixed-width export templates.
-
Header Row: a drop-down list, constrained to values "Include header row" and "Don't include header row". Default is Include header row. Header row is accompanied by the text: "Defines whether to include header row in output".
-
Unique ID: a drop-down list, constrained to values "Include unique ID" and "Don't include unique ID". Default is Don't include unique ID. If a unique ID is required, an additional column (RowCounter) is added to the output and populated with an incrementing integer value (preceded by zeroes, to a maximum of 9 characters in length). Unique ID is accompanied by the text: "Defines whether to include unique ID column in output".
-
Deduplication: note that this field is only of relevance when the export template is being used during selection rule export. It is used when a selection rule's output contains multiple rows per resolution level deduplication key and describes how duplicate rows are to be eliminated in such a situation. It is populated using a drop-down list, which is constrained to the values "Don't deduplicate", "Use random sampling", "Sample ascending using" and "Sample descending using".
If Sample ascending using or Sample descending using is selected, you may specify an attribute by which to deduplicate. You can browse for an attribute or select a recently-used one. You can also drag an attribute from the toolbox and drop it directly onto Deduplication. Exists in table and parameter attributes are not supported in this context.
Deduplication’s default value is Don't deduplicate. The field is accompanied by the text: "Defines how duplicate records are to be handled".
-
Sample Export: another drop-down list, constrained to values "Output initial rows" and "Output evenly-distributed rows". Default is Output initial rows. Sample export is accompanied by the text: "Defines basis upon which sample export generated".
-
Sample Export size: this mandatory property specifies the number of rows to be output in an export sample file when using the current export template. It defaults to 20 and supports a minimum value of 1. It controls the maximum number of rows to be output in a sample file when executing an export activity based on the export template, or a data extract offer using a channel configured with the export template.
-
Date Format: allows you to specify the format of any date attributes output within a file based on the export template. Date format is set using a drop-down field that exposes the following values:
-
Custom format
-
Long date
-
Long date and long time
-
Long date and short time
-
Long time
-
Month day
-
Short date (default)
-
Short date and long time
-
Short date and short time
-
Short time
-
Sortable
-
Year month
-
If Use custom format is selected, it is mandatory to supply a custom format. The maximum custom format length is 100 characters.
-
Example Output Format: provided to illustrate the selected date format value. The example output format uses the local culture selected on your client application machine to determine the precise format to use – for example, if your client application’s culture is set to US English, an example of the US version of Long date will be displayed ("Monday, July 05, 2010"). When a custom format is specified, the example is displayed dynamically as the format is entered. Date format is accompanied by the explanatory text: "Defines how dates will be formatted in the output". The field is read only and set to Sortable if using a JSON Export format.
-
Text Encoding: a dropdown allows you to specify the type of text encoding to be used by the export template. The following options are available:
-
UTF8 (the default)
-
Unicode
-
UTF7
-
UTF32
-
ASCII
-
Big Endian Unicode
-
Custom encoding
-
If Custom encoding is selected, you must specify a custom text encoding string in the field supplied.
-
Non-Printable Characters: this setting allows you to define whether any non-printable control characters are to be removed from the output. A dropdown field, it exposes values "Don’t remove them" and "Remove them". If set to the latter, any non-printable characters are removed at export file generation.
Note that control characters are formatting and other non-printing characters, such as ACK, BEL, CR, FF, LF, and VT. T The Unicode standard assigns code points from \U0000 to \U001F, \U007F, and from \U0080 to \U009F to control characters.
-
Custom Header: this dropdown allows you to define whether an extra custom header row will be included at the top of any files generated using the export template. If set to "Include", a property to the right allows you to design the custom format using the Design Custom Header dialog. Having specified a custom header, it is displayed as the button text. The Design Custom Header dialog contains the following:
-
Toolbar: exposing the following options:
-
Add a new Text Part: invocation of this option displays a context menu, which exposes the following. Selection of a context menu option adds a text part of the selected type to the Text Parts list.
-
Move the selected Text Part up: this option is available at text parts other than the first in the list. Selecting it moves the selected text part up one position in the list.
-
Move the selected Text Part down: this option is available at text parts other than the last in the list. Selecting it moves the selected text part down one position in the list.
-
Remove the selected Text Part: invocation of this option removes the selected text part without display of an "Are You Sure?" dialog.
-
-
Text Parts list: any text parts added to the list are shown. For each, the following are displayed:
-
Ordinal number: read-only.
-
Text part type: read-only.
-
If a String: a text field is displayed, and provision of a value therein is mandatory. The maximum permissible length of a provided value is 100 characters.
-
If Date part: a dropdown facilitates selection of a specific date part to show.
-
If File name: [File name].
-
If Record count: [Record count].
-
-
Example: this section displays a read-only representation of the specified text parts, which are shown as follows:
-
String: displayed as entered.
-
Date part: the current date/time is displayed in accordance with the selected date part type.
-
If File name: [File name].
-
If Record count: [Record count].
-
-
Close: selecting this button removes the dialog from display. Any changes made therein are persisted automatically. Note that selecting off the dialog has the same effect.
-
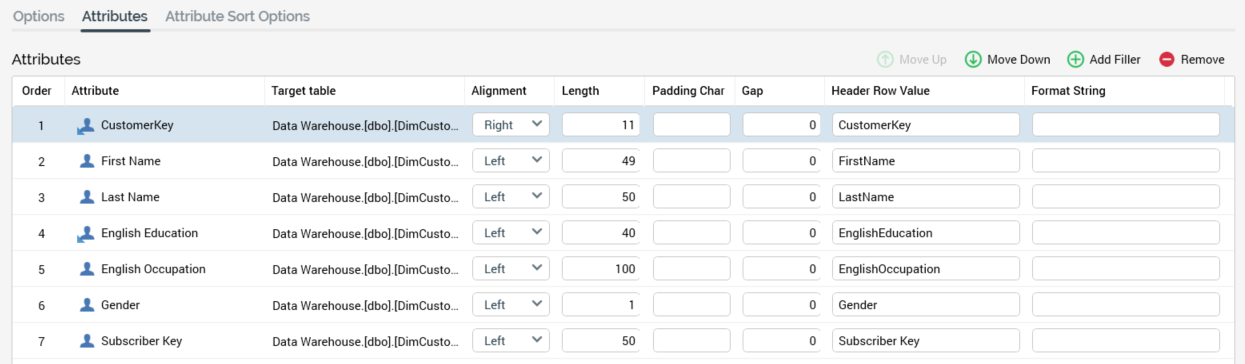
Attributes tab
The Attributes tab contains a grid that is used to define the columns to be output when using the export template.
Attributes toolbar
A toolbar is displayed above the Attributes grid:
The toolbar exposes the following options:
-
Move Up: this option is only available when an attribute other than the first in the grid is selected. Invocation moves the attribute up one position.
-
Move Down: this option is only available when an attribute other than the last in the grid is selected. Invocation moves the attribute down one position.
-
Add Filler: selecting this button adds a filler attribute. If no attributes are present in the Attributes grid, the filler attribute is shown at the top of the grid. If attributes are present, the filler is added at the current cursor position. A filler attribute's properties exhibit the following characteristics:
-
Attribute: set to "Filler". This property is read-only, is shown in italicized text, and is not incremented on the addition of further filler attributes.
-
Target Table: disabled.
-
Alignment: disabled.
-
Length: available; must be greater than 0.
-
Padding Char: available.
-
Gap: disabled.
-
Header Row Value: set to "Filler_[n]" (where [n] is an integer value that can be incremented to ensure uniqueness).
When one or more filler fields are included in an export file's output, they are automatically displayed in accordance with their Length and Padding character settings
-
-
Remove: invocation of this option removes the selected attribute from the grid. An "Are You Sure?" dialog is not displayed.
Attributes grid
When empty, a message is displayed in the attributes grid:
"No attributes have been added to this export template. Add attributes here by dragging and dropping them from the toolbox."
Provision of one or more attributes at an export template is optional (an export template with no attributes can be used to define the structure of backfill files—for more information, please see the Audience Definition section in the Configuration documentation).
Any existing attributes are displayed within the grid. You can add one or more attributes to an export template by dragging them from the toolbox and dropping them onto the attributes grid. Attributes added in this way are displayed above the ordinal position at which they were dropped. When the grid contains more attributes than may be displayed at once, it is scrolled automatically on the addition of a new attribute dropped at the bottom position.
You can also drag and drop existing attributes up and down within the grid.
An export template must contain at least one attribute. You cannot add an Exists in table attribute to an export template. Parameter attributes are supported. The link between an export template and an attribute is static—that is, the link is created between the template and the state of the attribute at the point of its being saved.
You can view the following columns within the attributes grid:
-
Order: a read-only, system-generated ordinal integer indicating the position of the attribute relative to its peers. Order is incremented or decremented accordingly as attributes are re-ordered within the grid.
-
Attribute: the read-only name of the attribute as sourced from the toolbox. When you hover over an attribute, a button is displayed next to its name, which you can select to view details of the attribute in the File Information dialog.
-
Target Table: the table upon which the attribute is based.
-
Alignment: an indication of how the attribute's data will be output within the export file; set using a drop-down list, constrained to values "Left" and "Right". Text alignment defaults according to an attribute's data type (string, date: Left; integer, decimal: Right).
-
Length: must be a positive integer value. Length defaults in accordance with an attribute's underlying length in the database. Note that, when added to an export template, a Cassandra attribute's length defaults to zero, and will need to be updated manually to a positive integer value.
-
Padding Char: mandatory. May be a single character only. Defaults to space. Used to pad white space in fields in a fixed-width export template.
-
Gap: must be a positive integer value. Gap defaults to "0". It is used to define the space to be provided between attributes in a fixed-width export template.
-
Header Row Value: this value defaults to the value of an attribute’s underlying database column. Its provision is optional, and it can be a maximum of 100 characters in length.
-
Format String: this optional property can be a maximum of 100 characters in length. It supports provision of standard Microsoft .NET format strings. For examples please see the following:
-
Standard Numeric format strings: https://learn.microsoft.com/en-us/dotnet/standard/base-types/standard-numeric-format-strings
-
Custom Numeric format strings: https://learn.microsoft.com/en-us/dotnet/standard/base-types/custom-numeric-format-strings
-
Standard Date and Time format strings: https://learn.microsoft.com/en-us/dotnet/standard/base-types/standard-date-and-time-format-strings
-
Custom Date and Time format strings: https://learn.microsoft.com/en-us/dotnet/standard/base-types/custom-date-and-time-format-strings
-
When a file is generated using the export template, the supplied format string is applied to numeric and date-based values. An attempt to apply a format string to a string attribute results in an error.
Fields Text alignment, Length, Padding char and Gap are only relevant to fixed-width export templates, but are displayed whether the template is fixed-width or delimited.
If required; it is possible to include the same attribute more than once in an export template.
To include metadata attributes within an export file you will need to set up the appropriate attributes from the offer history meta table.
You can only use anonymous auxiliary database attributes in an export template resolving to an anonymous auxiliary database. Only a single attribute can be included in this context.
Attribute Sort Options tab
The Attribute Sort Options tab allows you to specify one or more attributes by which to sort data output by the export template.
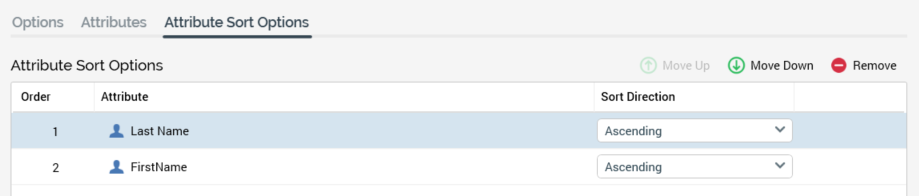
Data is sorted, in the specified Sort Direction, by each attribute in turn in the order in which they are presented in a grid.
A toolbar is shown at the top of the grid, exposing the following options:
-
Move Up: this option is available when a row other than the first is selected. Invocation moves the row up one position in the grid.
-
Move Down: this option is available when a row other than the last is selected. Invocation moves the row down one position in the grid.
-
Remove: invocation removes the selected row from the grid and is not protected by an "Are You Sure?" dialog.
The grid itself displays a message when empty ("No sort options have been defined. Drag attributes from the toolbox and drop them onto the grid to add them"). Following these instructions allows you to specify the template’s Attribute Sort Options.
The following columns are shown:
-
Order Number
-
Attribute: an RPI attribute. Once populated, you can view information about the attribute in the File Information dialog. A validation error is raised if the same attribute is used more than once in the template. You cannot use an exists in table or parameter attribute in this context.
-
Sort Direction: a dropdown, exposing values Ascending (the default) and Descending.
You can use anonymous auxiliary database attributes as Attribute Sort Options in an export template resolving to an anonymous auxiliary database. Only database column attributes are supported in this context.