

Overview
A toolbar above the joins list allows you to filter its contents.
The following filter options are available:
Show
This dropdown exposes the following values. It allows you to filter the list to display only joins of the selected type.

More Filters
This toggle button controls the display of a dialog:
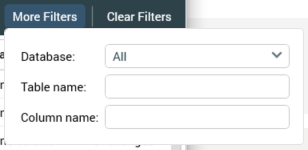
The following additional filters are available:
-
Database: this dropdown exposes the following values:
-
All (the default)
-
Data Warehouse
-
[For each configured auxiliary database: Auxiliary Database Name]
-
It allows you to filter the list to display only joins with a Source Database property that matches the selected value.
-
Table name: this property allows you to filter the list to show only joins including a table with the supplied string value in its name.
-
Column name: this property allows you to filter the list to show only joins including a column with the supplied string value in its name.
Having specified a filter, it is applied automatically. Selection of more than one filter applies the results of all thereof cumulatively.
When Table and/or Column name is/are provided, only simple joins containing tables and/or columns matching the filters supplied, or multiple joins containing such simple joins, are listed. If you provide a Table name and a Column name filter, only joins containing tables that match the Table name filter and join key columns that match the Column name filter, are shown.
Note that multiple joins are not displayed if a Column name filter is applied.
Clear Filters
Selecting this button clears any applied filter criteria and redisplays all of the joins. It is only available when one or more filters has been applied.
Note that any column sortation applied will be preserved when joins are filtered.
Joins List
A list of all existing joins is displayed.
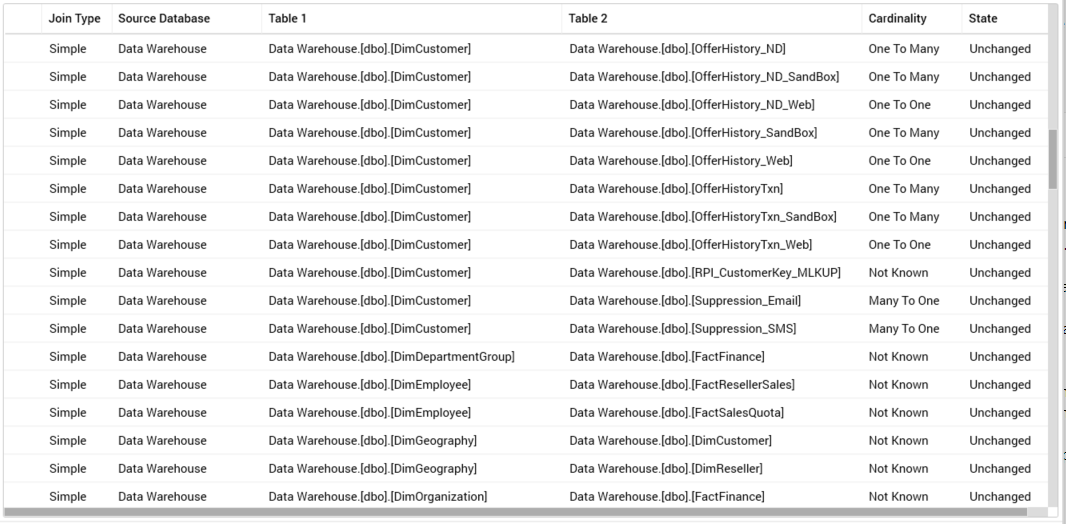
The following read-only columns are shown:
-
Add this Join to the current Multiple Join’s list of Simple Joins: this button is only displayed against simple joins, and only when a multiple join is selected. The button allows you to add a simple join to the current multiple join's joins list.
-
Join type: one of Simple or Multiple.
-
Source database: if the current join is not cross-database, this property displays the name of database from which the join's tables are sourced. If a cross-database join, it displays the auxiliary database's name
-
Table 1: the first table to be joined. When one or more auxiliary databases have been configured at the current RPI tenant, table names are qualified with the database to which they belong.
-
Table 2: the second table to be joined. When one or more auxiliary databases have been configured at the current RPI tenant, table names are qualified with the database to which they belong.
-
Cardinality
-
State: one of Unchanged, Added, Edited or Deleted.
You can select on a column header to order the list of joins in accordance with that column’s values (selecting on the initial column has the effect of sorting by Join Type).
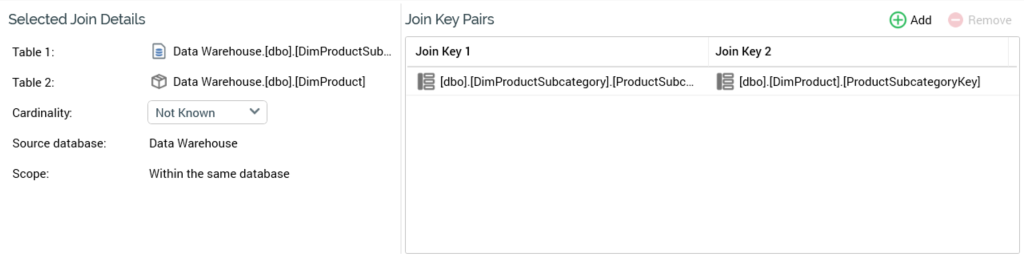
Selected Join Details
Join configuration is carried out in this section, the contents of which differ in accordance with the type of join selected. Simple joins and Multiple Joins are discussed separately.
Simple Join
If the join is a simple join, the following fields are displayed:
The following rules must be observed before a multiple join can be saved:
-
Table 1 must be contained in the multiple join's first simple join
-
Table 2 must be contained in the multiple join's last simple join
-
It must be possible to navigate the multiple join’s simple joins. Navigation is effected from top to bottom. One table within a following simple join must be present within its preceding simple join.
Cross-database multiple joins are supported. A validation error is raised at saved in the event of a multiple join’s configuration containing a schema mismatch.
Selected Join Details
-
Table 1 and Table 2: both populated by selecting a recently-used table, or by using the Choose Database Item dialog.
A Filter field is provided at the top of the interface, which allows you to enter characters to limit the items displayed in the list to only those with names containing the supplied string.
If one or more auxiliary databases has been configured at the current RPI tenant, the Choose Database section is displayed. This allows you to specify the context from which databases will be listed. Databases that do not support joins (currently only Cassandra) are not listed.
Choose Database is not shown if no auxiliary databases have been configured at the current RPI tenant.
All tables from the selected context are shown. You must select both Table 1 and Table 2. Tables 1 and 2 must be different.
You can select tables from within a single database, or you can select a data warehouse and auxiliary table to create a join between databases.
When one or more auxiliary databases have been configured at the current RPI tenant, table names are qualified with the database to which they belong.
Changing a table removes all existing join keys from the Join key details grid (it is therefore necessary to specify the join's tables before its join key pair(s)).
Note that, when creating a cross-database join to an anonymous auxiliary database, you can join to a suppression table only.
-
Cardinality: this property is only available for simple joins and is unavailable for multiple joins. A simple join’s cardinality defines the relationship between records in one of the join’s tables and records in the other…for example, Customer and Orders tables might have a One to Many cardinality (a given customer might have several orders). Cardinality is set using a dropdown that exposes the following values:
-
Not Known (the default value)
-
One to One
-
One to Many
-
Many to One
-
Many to Many
-
Cardinality is used during the execution of selection rules, audiences and fulfillment activities. An incorrectly-set join cardinality can result in a failure at audience execution (e.g. when Customer to Order is defined as Many to One).
-
Source database: if the current join is not cross-database, this read-only property displays the name of database from which the join's tables are sourced. If a cross-database join, it displays the auxiliary database's name
-
Scope: this read-only property is set on selection of both Table 1 and 2, and provides an indication of the nature of the join, being set to one of two values:
-
Within the same database
-
From auxiliary database to data warehouse
-
Join Key Pairs
A separate grid listing existing join key pairs. It contains two columns (Join keys 1 and 2).
A new join key pair is added automatically upon selection of Table 1 and Table 2. Table 1’s Join key is set to the table’s primary key. If no primary key exists, the first column (alphabetically) is selected instead. Table 2’s Join key is set to the same column name as Table 1’s (if it exists), else to its primary key, or the first column (alphabetically) in the absence of a primary key.
You can also add a new join key pair manually. The new join key pair's Join keys 1 and 2 default to the first columns (alphabetically) in the respective tables. You can also configure an existing join key pair. Again, the Choose Database Item dialog is used to specify columns (this time it lists only columns from the relevant table). You can remove one or more existing join key pairs. Finally, at least one join key pair must be specified.
Multiple Join
If the join is a multiple join, the following is displayed:
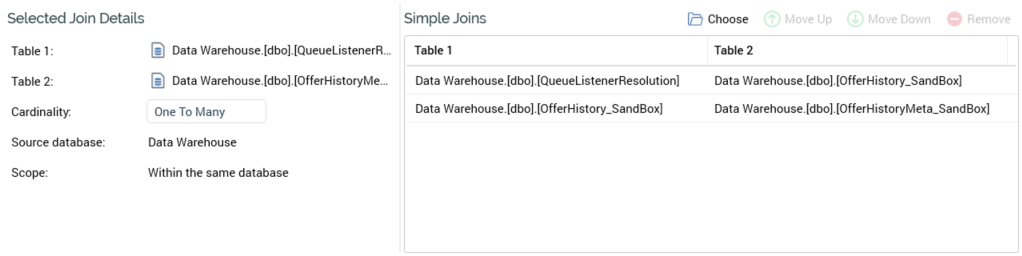
A multiple join consists of a series of simple joins, which can be traversed in sequence to create a join between Table 1 and Table 2.
When a new multiple join is created, and no simple joins have been added to the list thereof, RPI automatically identifies a series of traversable simple joins between Tables1 and 2 (if such exists), and adds them to the Simple Joins list.
Simple joins can also be added using the Simple Joins list’s Choose button (see below), or the Add this Join… button displayed in the Joins List (documented separately).
The following properties are shown for multiple joins:
Selected Join Details
-
Table 1 and Table 2: both populated by selecting a recently-used table, or by using the Choose Database Item dialog.
A Filter field is provided at the top of the interface, which allows you to enter characters to limit the items displayed in the list to only those with names containing the supplied string.
If one or more auxiliary databases has been configured at the current RPI tenant, the Choose Database section is displayed. This allows you to specify the context from which databases will be listed. Databases that do not support joins (currently only Cassandra) are not listed.
Choose Database is not shown if no auxiliary databases have been configured at the current RPI tenant.
All tables from the selected context are shown. You must select both Table 1 and Table 2. Tables 1 and 2 must be different.
You can select tables from within a single database, or you can select a data warehouse and auxiliary table to create a join between databases.
When one or more auxiliary databases have been configured at the current RPI tenant, table names are qualified with the database to which they belong.
Changing a table removes all existing join keys from the Join key details grid (it is therefore necessary to specify the join's tables before its join key pair(s)).
Note that, when creating a cross-database join to an anonymous auxiliary database, you can join to a suppression table only.
-
Source database: if the current join is not cross-database, this read-only property displays the name of database from which the join's tables are sourced. If a cross-database join, it displays the auxiliary database's name
-
Scope: this read-only property is set on selection of both Table 1 and 2, and provides an indication of the nature of the join, being set to one of two values:
-
Within the same database
-
From auxiliary database to data warehouse
-
Simple Joins toolbar
Exposes the following:
-
Choose: allows you to choose simple joins to associate with the multiple join. Invocation displays the Choose Joins for [Table 1] to [Table 2] dialog.
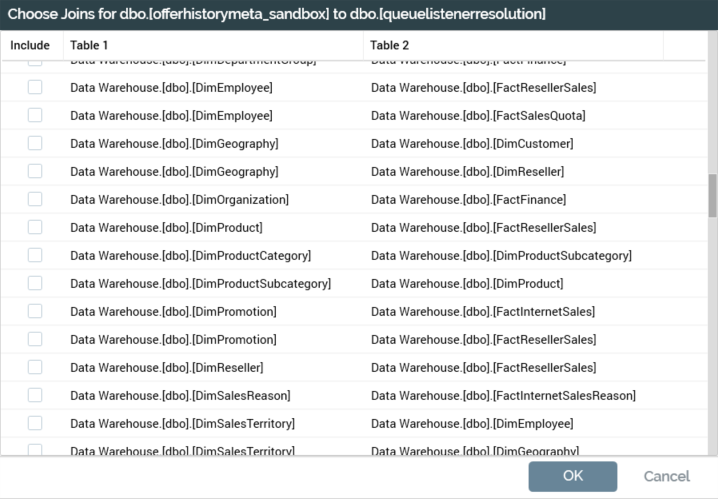
The dialog displays a grid listing all simple joins. You can select on a column header to order the grid's contents by the column in question. The following columns are shown:
-
Include: a checkbox, the checked state of which reflects the simple join's presence in the multiple join’s Simple Joins list. Checking a simple join adds it to the list on invocation of Accept Changes.
-
Table 1: the first of the simple join’s tables. When one or more auxiliary databases have been configured at the current RPI tenant, table names are qualified with the database to which they belong.
-
Table 2: the second of the simple join’s tables. When one or more auxiliary databases have been configured at the current RPI tenant, table names are qualified with the database to which they belong.
-
Accept Changes: invocation of this option reflects the simple join selection in the dialog in the multiple join’s Simple Joins list. The dialog is removed from display and newly-added simple joins are appended to the end of the list.
-
Cancel: invocation of this option removes the dialog from display without changing the multiple join’s Simple Joins list.
-
-
Move Up: only available if a simple join other than the first in the list is selected. Invocation moves the join up one position in the list.
-
Move Down: only available if a simple join other than the last in the list is selected. Invocation moves the join down one position in the list.
-
Remove: removes the join from the list. Not protected by an “Are You Sure?” dialog.
Simple Joins list
Lists simple joins that collectively make up the multiple join. You can add a simple join to the list by selecting the button in the first column in the main Joins grid. Doing so updates the state of the multiple join to Edited. It is not possible to add the same simple join to the list more than once. You can remove one or more joins from the list.
Note that at least one simple join must be selected. Finally, it must be possible to navigate from Table 1 to Table 2 using the specified simple joins list.