Overview
The following features are available at a NoSQL selection rule when it is displayed in expanded mode.
Toolbox
The NoSQL selection rule’s toolbox is shown to the left.
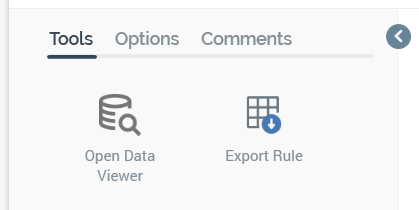
Its display is controlled using the Show/Hide Toolbox button. The toolbox is shown by default.
The toolbox contains three tabs: Tools, Options, and Comments.
Toolbox: Tools tab
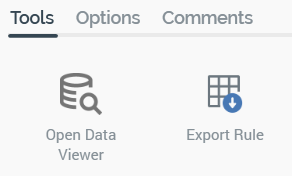
The toolbox’s Tools tab exposes the following:
-
Open Data Viewer: selecting this button displays the Data Viewer Window. The Data Viewer allows you to view a sample of the records targeted by the current NoSQL selection rule. For more information, please see the Rule Designer documentation.
-
Export this Rule: allows you to export the records that match the NoSQL selection rule's criteria to a file. For more information, please see the Rule Designer documentation.
Toolbox: Options tab
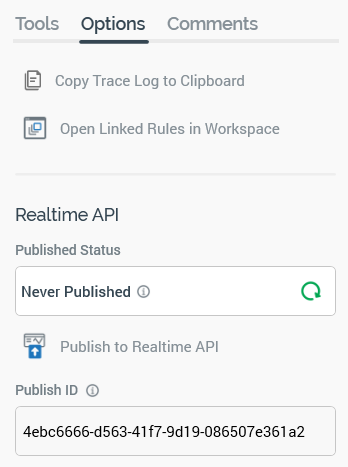
The toolbox’s Options tab exposes the following:
-
Copy Trace log to Clipboard: this option is always available, irrespective of as to whether the NoSQL selection rule has been saved or contains outstanding changes. If the rule has not been run before, an informational message advises that “No trace log entries were found for this selection rule”. If the rule has been run, a message advises that the SQL trace log has been copied to the clipboard. The content contains the trace logs associated with the NoSQL selection rule's count execution. A maximum of 100 log entries are copied to the clipboard. The following are captured for each log entry:
-
Execution type
-
Context
-
Query status
-
Query result
-
Started
-
Ended
-
Duration
-
File
-
Query string
-
Error Message (if applicable)
-
-
Open Linked Rules in Workspace: upon invocation, all selection rules linked to the current rule are opened in the same Rule Designer instance. Linked rules are opened in collapsed mode. Any rules that are already open in the workspace are ignored. A message is displayed to advise of any rules that are already open in other Rule Designer instances. A message is also shown if no rules are found to open.
-
Realtime API section: containing the following:
-
Published Status: read-only, and one of:
-
Never Published: tooltip says “This file has never been published. This file can be published to the Realtime API manually”.
-
Published: tooltip says “This file is currently published. This file can be published to the Realtime API manually”. The tooltip also contains the latest published details:
-
Published version
-
Publish method
-
Last published
-
Published by
-
Instance ID
-
-
Unpublished: tooltip says “This file is currently unpublished. This file can be published to the Realtime API manually”. The tooltip also contains the latest published details:
-
Published version
-
Publish method
-
Last published
-
Published by
-
Instance ID
-
-
-
Refresh: you must select this button to manually refresh the file's latest Published Status (published status changes are not displayed automatically).
-
Publish to Realtime API: selecting this button allows you to publish the file for use with the RPI Realtime API. It is available when the file is valid, and contains no unsaved changes. Invocation creates a Publish job and displays it in the My Jobs dialog. Following a successful publish, the file's Published Status is set to Published, and the Unpublish from the Realtime API button is displayed.
-
Unpublish from Realtime API: this button is displayed and available when a file is Published. Selecting it unpublishes the file, meaning it can no longer be used by the RPI Realtime API, and is protected by an "Are You Sure?" dialog. Upon invocation, an Unpublish job is created and displayed in the My Jobs dialog. Following a successful unpublish, the file's Published Status is set to Unpublished, and the Unpublish from the Realtime API button is hidden.
-
Publish ID: this read-only GUID is used to uniquely identify the rule during evaluation by the Realtime API. You can select it to copy it to the clipboard.
-
When a rule is evaluated using the Realtime API, if its criteria are satisfied, the returned ResultContent is true. If not satisfied, the returned ResultContent is false.
Note that a rule’s NoSQL database collection definition’s Use in-memory queries for Realtime settings are taken into account at Realtime evaluation. For more information, please see the NoSQL Database Collection Definition configuration documentation.
Toolbox: Comments tab
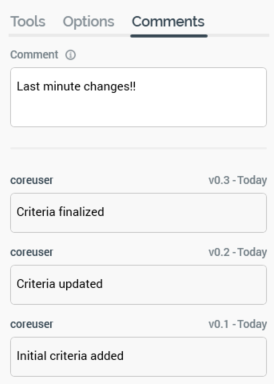
The toolbox’s Comments tab exposes the following:
-
Comment: you can add optionally add comments to the rule, which will be persisted with the new version of the file created when it is next saved. Comments are added using a multi-line text field, and can be a maximum of 1000 characters in length.
-
Comment history: if no comments have been saved with the rule, a message is displayed that says “There is no comment history available for this file”. If comments have been saved, they are displayed in reverse chronological order. The following read-only information is displayed for each comment in the comment history:
-
Username
-
File version
-
Date/time added
-
Comment
-
Definition
This dropdown allows you to select a NoSQL database collection or offer history definition, which will be interrogated when the NoSQL selection rule is run.

Selection of a definition is mandatory, as the selected definition provides the basis for the criteria with which the rule can be configured. The Add New Criterion and Add Criteria list buttons are unavailable when no definition has been selected.
If you change a rule’s definition having added one or more criteria, any existing criteria are cleared without display of an “Are You Sure?” dialog.
Count
A NoSQL selection rule’s count describes the number of records that matched the rule’s criteria at the point in time when the count was last refreshed.

The date and time at which the count was generated is display immediately below the count itself.
When you open a selection rule, if a count had been generated previously, the most recently-generated version thereof is displayed automatically at the panel. If the count is more than an hour old, an information icon is shown. A tooltip is shown on hovering over the same:

Refresh Count
You can refresh a NoSQL selection rule's count by selecting the green play button shown to the right of its count.
A Refreshing count… indicator is displayed while the system determines the number of records that match the rule’s criteria.
The act of getting a NoSQL selection rule’s count creates a Count job. The My Jobs Dialog is not shown automatically at such a job’s creation. You can view count jobs that match the current filter settings within the Dialog. Details of the job and Dialog are provided in the My Jobs documentation.
If an error occurs when refreshing a NoSQL selection rule's count, exception details are written to the server and client logs.
All/Any
This dropdown property is displayed just below a NoSQL selection rule’s header.

It allows you to define how a NoSQL selection rule’s criteria are to be treated when a rule’s count is generated. Two options are available: All (the default) and Any.
If All/Any is set to All, for a record to be targeted, all criteria in the rule must be satisfied. If set to Any, any one of the criteria needs to be met for the rule to be satisfied.
Note that All/Any is always displayed, even if a NoSQL selection rule contains only a single criterion. In this case it has no effect.
All/Any is also shown at a criteria list, to determine how the criteria listed therein are to be treated at the parent rule’s execution.
Add New Criterion button
This button allows you to add a criterion to a NoSQL selection rule.

It is unavailable when a definition has not been selected. Selecting the button displays a slide-out panel.
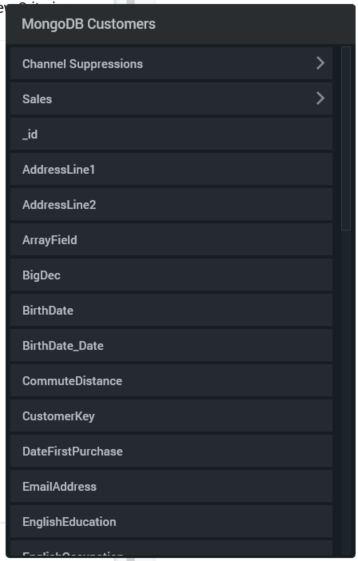
The panel's header initially reflects the currently-selected context at the point of its being displayed. If the rule as a whole was selected, the panel's header is set to the currently-selected definition's name. If a criteria list selected, its name is displayed instead. A "<" button is displayed to the left of the panel's header. You can select the header to return to the parent context.
All criteria applicable to the current context are listed in the panel. If a DisplayName was provided for a criterion, it is shown instead of its Name.
Nested collections are displayed alongside criteria and are shown with a ">" button to the right. If selected, the contents of the panel are replaced with the contents of the nested collection, and the panel's title is updated to reflect the same.
Selecting a criterion within the panel adds a matching criterion to the NoSQL selection rule. The newly-added criterion is presented in Edit mode by default. If you were editing an existing criterion when Add New was selected, Edit mode is exited in the former context, and the new criterion is shown in Edit mode.
Note that, as well as adding a criterion using the Add New Criterion button, you can also drag a parameter attribute from the toolbox and drop it at an appropriate position within a NoSQL selection rule to create a criterion. A tooltip describes where the attribute will be dropped relative to the current position.
Canvas
A NoSQL selection rule’s canvas initially displays a message:
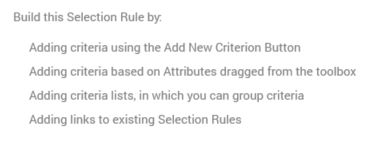
The following options are available when you right-click a NoSQL selection rule’s canvas:
-
Add New Criteria List: adds a new, empty criteria list to the NoSQL selection rule.
-
Paste: only available if the clipboard contains something that may legitimately be pasted into the rule (e.g. a criterion or criteria list).
Criteria
Criteria define the records to be targeted by a NoSQL selection rule. By adding criteria to a NoSQL selection rule you limit the records to be counted when the rule is run. For example, adding a “Gender is female” criterion causes only female records to be counted.
A dark border is displayed at a criterion when it is when selected.

Provision of criteria is optional If you get a NoSQL selection rule's count with no criteria specified, a count of all records in the selected collection is returned.
You can add a criterion to a NoSQL selection rule by selecting the Add New Criterion button. You can also do so by dragging a parameter attribute that is present in the rule’s definition from the toolbox and dropping it onto the rule.
When adding a criterion from a collection other than the top level within a NoSQL selection rule, if adding the criterion at the level of the NoSQL selection rule itself, a parent criteria list is created automatically, and the new criteria created within. If a criteria list matching the level of the nested criterion is selected at its creation, the new criterion is added within the criteria list. If a criteria list with a level other than the new criterion's level is selected at the criterion's creation, a warning is thrown.
A validation error is raised if the element on which the criterion is based cannot be located in the currently-selected definition (this may occur if, for example, you change the definition after a criterion has been added).
You can re-order criteria within a NoSQL selection rule using drag and drop. If you attempt to drag a criterion into an incompatible parent criteria list, a message is displayed to advise that you are unable to do so.
You can also drag and drop criteria between NoSQL selection rules. Drag and drop is not supported at criteria when in edit mode.
Criteria can be presented in either read-only or edit mode.
When in read-only mode, the following are shown:
-
Plain text interpretation of settings: consisting of the criterion name, operator and any specified values; e.g.:

-
Configure: selecting this button puts the criterion into edit mode.
-
Actions: selecting this button displays a context menu, which exposes the following:
-
Cut
-
Copy
-
Remove: removes the criterion without displaying an "Are You Sure?" dialog.
-
Note that the same context menu is shown when right-clicking a criterion.
When in edit mode, the following are shown:
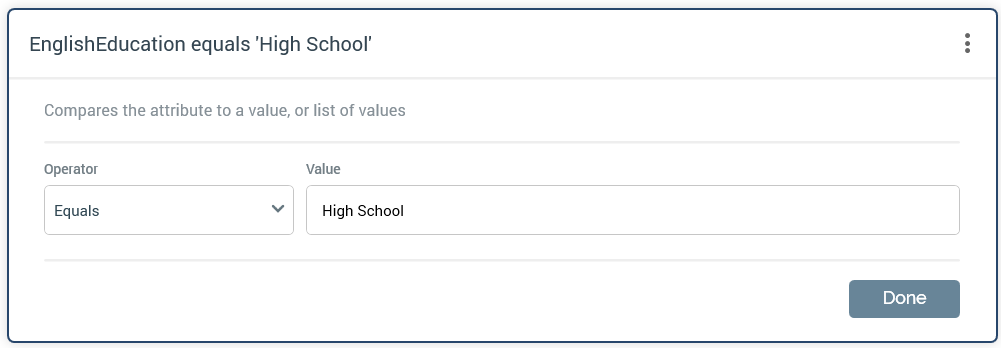
-
Textual criterion description.
-
Operator: a dropdown field, the values exposed by which are data type-appropriate.
-
Value(s): the values supported at a criterion are appropriate for its data type. If a criterion supports the provision of values, a message saying “No values. Click to select” is initially displayed at its value.
-
If a string criterion type, if predefined values exist for the decision criterion type, selecting the value field displays the Choose Values dialog, in which you can select the values you require. More information on the Choose Values dialog can be found in the RPI Framework documentation.
-
If predefined values are not supported, values are supplied using the Specify Values dialog. More information on the Specify Values dialog can also be found in the RPI Framework documentation.
-
If a numeric criterion type, a masked field restricts data entry to a numeric value. If one of the “Is in list” or “Is not in list” operators is selected, multiple values can be supplied using the Specify values dialog (see above for details).
-
If a date criterion type, display depends on the selected operator.
-
If “Equals” or “Does not equal” is the operator, a date or datetime picker, defaulting to today/now, is shown. Selecting the button to its right sets the value to the Current date/time.
-
If “After”, “Before”, or “Within” is the operator, you can enter amount of time before or after a date/time.
-
If “Is” is the operator, choose from a dropdown that defaults to “Today”.
Note that if set, values are calculated using the time zone specified in system configuration settingRuleTimezoneOverride. If blank, the server time zone is used.
-
-
If a Boolean decision criterion type, the following values are available:
-
Is True
-
Is False (the default)
-
-
Note that if an Exists or Does not exist operator has been selected, Value is not shown.
-
Done: selecting this button returns the criterion to read-only mode.
The following keyboard shortcuts are supported at read-only criteria:
-
Ctrl-C: copy
-
Ctrl-X: cut
-
Delete: remove
Please note the following:
-
You can get a NoSQL selection rule's count when one or more criteria are in edit mode.
-
You can put a read-only criterion into edit mode by double-clicking it.
Criteria List
A criteria list allows you to group related criteria, in order treat such criteria as independent blocks that must be entirely satisfied or not satisfied (using All/Any as required).
The following are displayed at a criteria list:

-
Include/Exclude: defines whether the criteria within the group must be satisfied or not satisfied for the criteria lists to be satisfied.
-
All/Any: defines how the criteria within the criteria list are to be treated. If set to All, all criteria within the criteria list must be satisfied for the group as a whole to be satisfied. When set to Any, one or more criteria must be satisfied for the group to be satisfied.
-
List Definition: this can be set in accordance with the rule’s currently-selected Definition, or, if its criteria exist within a child collection within the SQL database definition, to a value matching that collection’s name.
-
Criteria List Description: this optional property can be a maximum of 1000 characters in length.
-
Actions: selecting this button displays a context menu, which exposes the following:
-
Cut
-
Copy
-
Remove
-
Removes the criteria list without displaying an "Are You Sure?" dialog.
-
-
Note that the same context menu is shown when right-clicking a criteria list.
You can re-order criteria lists within their peer criteria and criteria lists using drag and drop. You can also re-order criteria within a criteria list. You cannot drag a criterion out of its parent criteria list.
Nested criteria lists are supported; the maximum number of nested criteria lists that can be added is limited to 5.
The following keyboard shortcuts are supported at criteria lists:
-
Ctrl-C: copy
-
Ctrl-X: cut
-
Ctrl-V: paste
-
Delete: remove
When adding a criterion from a collection other than the top level within a NoSQL selection rule, if adding the criterion at the level of the NoSQL selection rule itself, a parent criteria list is created automatically, and the new criteria created within. If a criteria list matching the level of the nested criterion is selected at its creation, the new criterion is added within the criteria list. If a criteria list with a level other than the new criterion's level is selected at the criterion's creation, a warning is thrown.
Add New Criteria List
This button is displayed below the NoSQL selection rule’s canvas.
Selecting it adds a new, unconfigured criteria list to the NoSQL selection rule. The criteria list is added to the root level of the currently-selected rule, after all existing criteria, criteria lists and linked selection rules.
Linked NoSQL Selection Rule
You can create a link to a NoSQL selection rule within an outer NoSQL selection rule by dragging a NoSQL selection rule file from the toolbox and dropping it into the outer rule. You cannot create a link to a standard or basic selection rule within a NoSQL selection rule.
When a link is created to a NoSQL selection rule within a NoSQL selection rule, it is shown like this:

The following are shown:
-
Include/Exclude: this setting allows you to specify that the linked NoSQL selection rule's criteria should be met or not met for its usage in this context to be satisfied.
-
NoSQL selection rule name
-
Open latest version: selecting this button opens the linked NoSQL selection rule in the current Rule Designer tab.
-
Pop out: displays the linked rule in an independent, modeless Window. For more information, please see the Rule Designer documentation.
-
Actions: selecting this button displays a context menu, which exposes the following:
-
Cut
-
Copy
-
Remove
-
Removes the linked selection rule without displaying an "Are You Sure?" dialog.
-
-
Note that the same context menu is shown when right-clicking a linked selection rule.
The following keyboard shortcuts are supported at linked rules:
-
Ctrl-C: copy
-
Ctrl-X: cut
-
Delete: remove

