Overview
You can invoke the Rule Designer in the following ways:
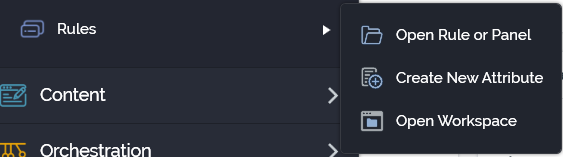
From the quick access menu’s Rules menu. The menu exposes the following options:
-
From a Tasks or File Type widget. Typically, these might be displayed at your Home Page. For more information on widgets, please see the Dashboard Designer documentation.
-
By double-clicking a rule file in the File System Dialog, or by highlighting a rule and selecting OK in the same context.
-
By viewing the latest version of a file contextually – for example, from a filter in the Audience Designer.
Note that access to the Rule Designer is controlled via the following functional permissions:
-
Analysis Panel – Design
-
Realtime Decision – Design
-
Selection Rule – Basic – Design
-
Selection Rule – NoSQL – Design
-
Selection Rule – Standard – Design
If you are associated with at least one of these permissions, you will be able to access the Rule Designer. The files you will be able to work with therein will depend on your user group membership – for example, if you have only the Analysis Panels – Design permission, you will only have access to the Analysis Panels section in the Rule Designer toolbox.
Rule Designer basics
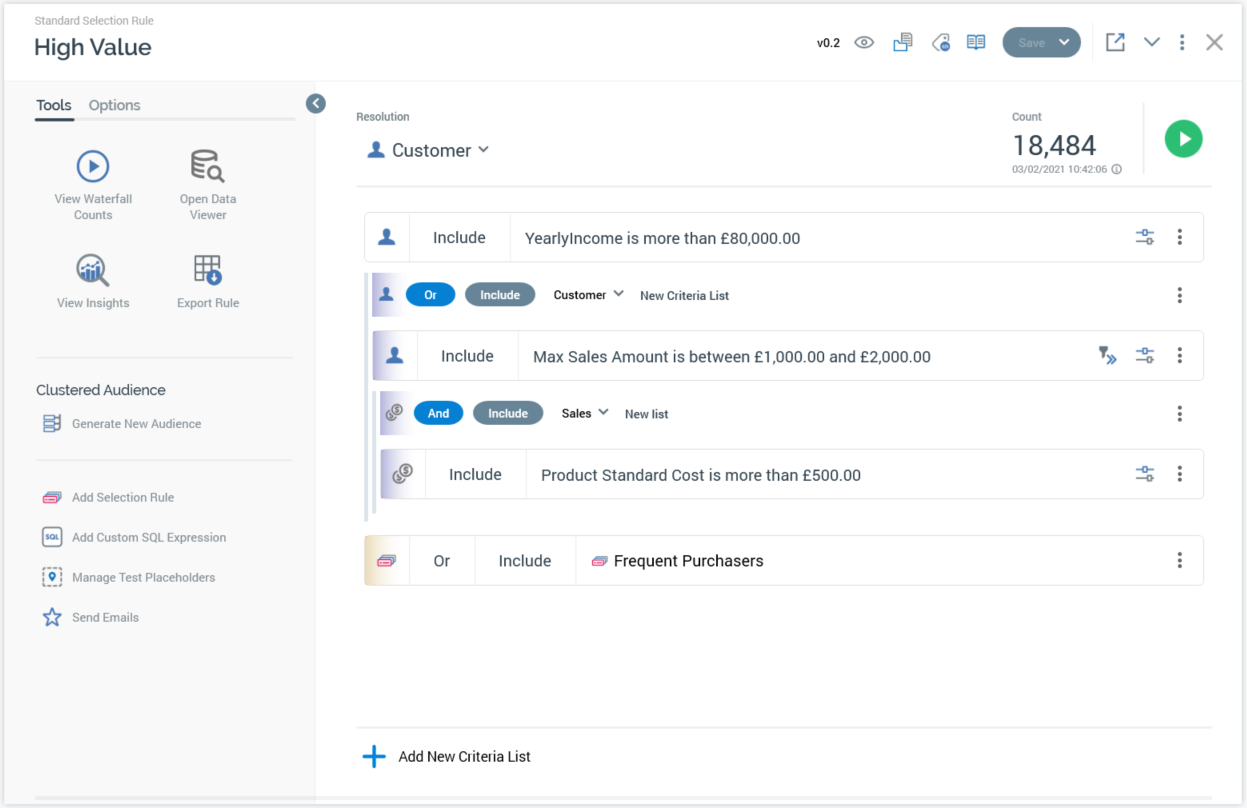
The Rule Designer is presented as an interface within the RPI application framework tab set.
It contains the following elements:
-
Toolbar
-
Toolbox
-
Workspace
When you close the Rule Designer, the tab within which it is shown is removed from display. If changes have been made in one or more files displayed in the Rule Designer, an “Are you sure?” dialog is displayed for each changed rule, inquiring whether you wish to save the changes you have made. You may select Yes, No, or Cancel.
-
Yes saves the changes and closes the Rule Designer.
-
No discards the changes and closes the Rule Designer.
-
Cancel abandons closing the Rule Designer.
Start page
The Rule Designer Start page is shown upon invocation of Rules at the quick access menu, and also on selecting Add new Rule or Panel at the Rule Designer toolbar. It contains the following:
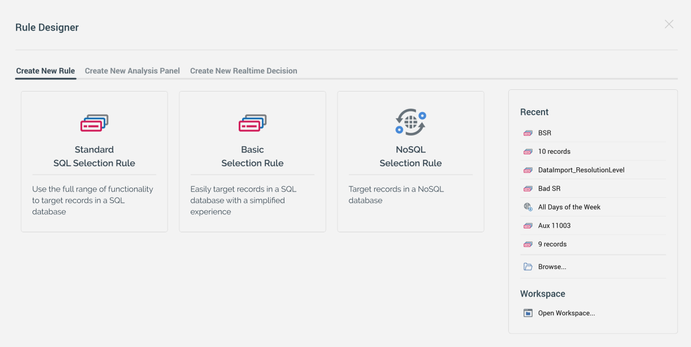
Three tabs facilitate the creation of new files:
-
Create New Rule (options available as appropriate)
-
Standard SQL Selection Rule
-
Basic Selection Rule
-
NoSQL Selection Rule
-
-
Create New Analysis Panel
-
Chart Analysis Panel
-
Crosstab Analysis Panel
-
Pivot Table Analysis Panel
-
Venn Diagram Analysis Panel
-
Word Cloud Analysis Panel
-
-
Create New Realtime Decision
-
Attribute List Realtime Decision
-
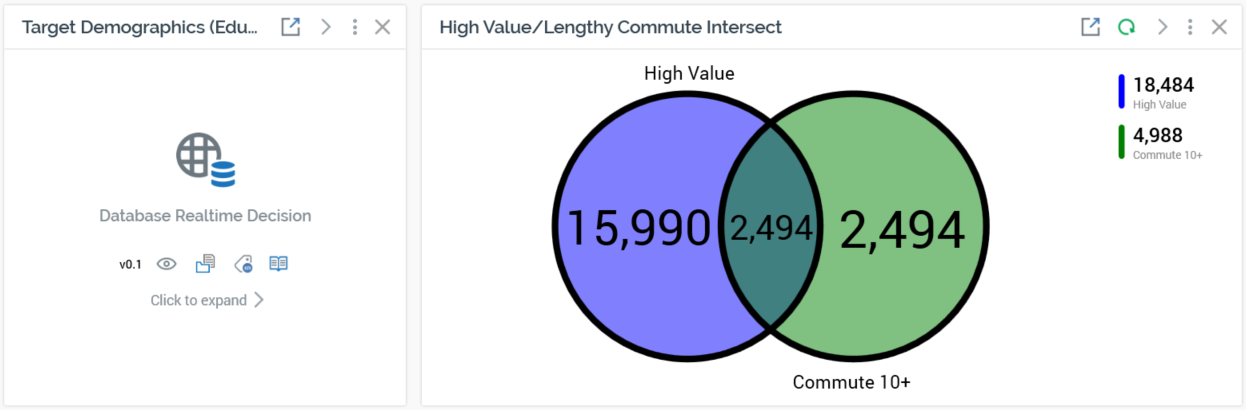
Database Realtime Decision
-
Decision Scorecard
-
Facebook Realtime Decision
-
JSON Realtime Decision
-
Model Score Realtime Decision
-
Orchestration Realtime Decision
-
Web Realtime Decision
-
The following additional options are also available:
-
Recent: lists recently-accessed Rules, facilitating the opening of the same.
-
Browse: displays the Open Rule File System Dialog, allowing you to select a rule to open.
-
Workspace section: exposing a single option:
-
Open Workspace
-
A Close button is shown at the top of the Start Page. Selecting it removes the Start Page from display, and displays the main Rule Designer interface.
Toolbar
The Rule Designer toolbar is displayed above the toolbox and workspace.

It contains the following:
-
Workspace name: if the currently-displayed Rule Designer workspace has not been saved, the read-only text “Workspace” is displayed to the left of the toolbar.
If the Rule Designer contains a previously-saved workspace, its name is displayed instead. The name is updateable, mandatory, and can be a maximum of 100 characters.
-
Add new Rule or Panel to the current Workspace: selecting this button displays the Rule Designer Start Page, which is documented separately.
-
Review: this button allows you to review the standard and/or basics selection rules displayed in the Rule Designer in a standalone Selection Rule Review Window. It is available when one or more rules or panels are displayed in the workspace. Invocation when one or more standard or basic selection rules are shown displays the Selection Rule Review non-modal Window, which is covered separately. If no standard or basic selection rules are shown, the Window is not displayed, and an advisory message is presented instead
-
Open: selecting this button displays the Open Rule, Panel, Scorecard, or Workspace File System Dialog. You can navigate accessible folders in the RPI file system to locate one or more files that you wish to open. Selection rule, analysis panel, Realtime decision, decision scorecard and workspace files are shown. Having selected one or more files of a type other than workspace, you can select OK to open them in the Rule Designer. You can only open a single workspace at a time. You can also double select a file to open it. Selecting Cancel closes the File System Dialog without opening a file.
-
Save Workspace: RPI allows you to treat a Rule Designer workspace as an autonomous object that can itself be saved to the RPI file system. By saving a workspace, you can open it at a later date and continue working with the files that were displayed there when it was saved, even if the files therein were not saved. Two options are supported at this button and its attendant dropdown menu:
-
Save the current Workspace: saves the current Rule Designer workspace contents as a file within the RPI file system. If the workspace has yet to be saved, Save behaves as Save As.
-
Save the current Workspace as...: displays the File System Dialog, allowing you to specify a folder within which to save the current Rule Designer workspace contents as a file within the RPI file system.
-
When a previously-saved workspace is shown in the Rule Designer, the following are also shown at the toolbar (for more information, please see the Framework documentation):
-
File Version
-
Follow File
-
File Options
-
View File Information
-
Open File Location
-
-
Linked Page Options
-
Refresh Workspace: selecting this button gets counts or refreshes all appropriate rules and/or panels displayed in the workspace. Displayed files are not refreshed if invalid. Not that this option has no effect at Realtime decisions and decision scorecards.
-
Workspace Actions:
-
Expand All: selecting this button displays all rules or panels open in the current workspace in an expanded state.
-
Collapse All: selecting this button displays all rules or panels open in the current workspace in a collapsed state.
-
Toolbox
The Rule Designer toolbox contains a folder search component, which can be used to source files needed when building rules in the Rule Designer. The following file types are displayed:
-
Analysis Panel
-
Asset
-
Attribute
-
Decision Scorecard
-
Export Template
-
Model Project
-
Offer
-
Realtime Decision
-
Selection Rule
-
Smart Asset
Workspace
The Rule Designer workspace is a “canvas” upon which you can design and build selection rules, analysis panels, Realtime decisions and decision scorecards.
When the Rule Designer is empty, the following message is displayed:

It is possible to work with, by default, a maximum of 20 files concurrently within the workspace (this value is defined by configuration setting MaxItemsPerWorkspace). These may be a combination of newly-created files and files that have been opened, having been saved previously. On attempting to exceed this number, either by adding a new or opening an existing file, a warning message is displayed.
Rules and panels displayed within the workspace can be shown as expanded:
…or collapsed:
…using the button supplied at the rule or panel’s header toolbar.
You can resize an expanded file vertically. When closed and re-opened, it is displayed with the same vertical height.
You can drag collapsed rules and panels to reposition them within the workspace. When you do, blue shading is displayed to indicate the position at which a dragged file will be dropped: