

Overview
Triggers are used to start workflows within an interaction. RPI supports four types of trigger, which are described on this page.
Manual trigger
As its name implies, a manual trigger is used to manually initiate activity within a workflow.
The following options are available in the mini toolbar when you select a manual trigger:
-
Activate Trigger button: used to initiate execution of a manual trigger’s workflow.
-
Rollback current Workflow Instance: only available post-completion of production execution. Removes the workflow instance entirely.
-
Play/Pause workflow instance:
-
If the currently-executing activity’s status is Playing, the button is available. Its accompanying tooltip reads Pause workflow instance. Invocation pauses the workflow instance.
-
If the currently-executing activity’s status is Paused, the button is available. Its accompanying tooltip reads Play workflow instance. Invocation plays the workflow instance.
-
If the currently-executing activity’s status is not Playing or Paused, the button is not displayed.
-
-
Stop workflow instance: the button is only available if the currently-executing activity’s status is Playing or Paused.
-
Reactivate trigger: this button is only available when a workflow instance is Stopped in Production mode.
-
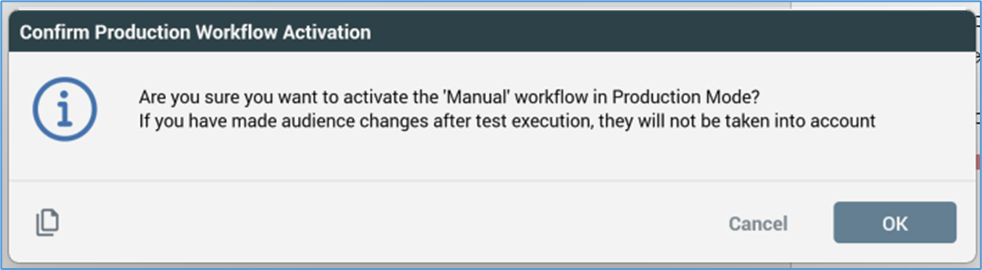
Activate Trigger Using Test Audience: when all of the following apply:
-
A trigger is in a Test Completed state.
-
Within the workflow, at least one batch audience activity with no data inputs from an upstream activity exists.
-
The audience's definition's No of days to persist audience test tables property is set to a value greater than 0.
-
At the first batch audience in the workflow, existing test audience results are used, rather than the audience being executed again.
-

-
View results: displays the Results Window, within which the current workflow’s results are displayed.
-
Show configuration panel.
A manual trigger’s configuration panel contains General, Prioritization, Auto Replay, and Alerts tabs:
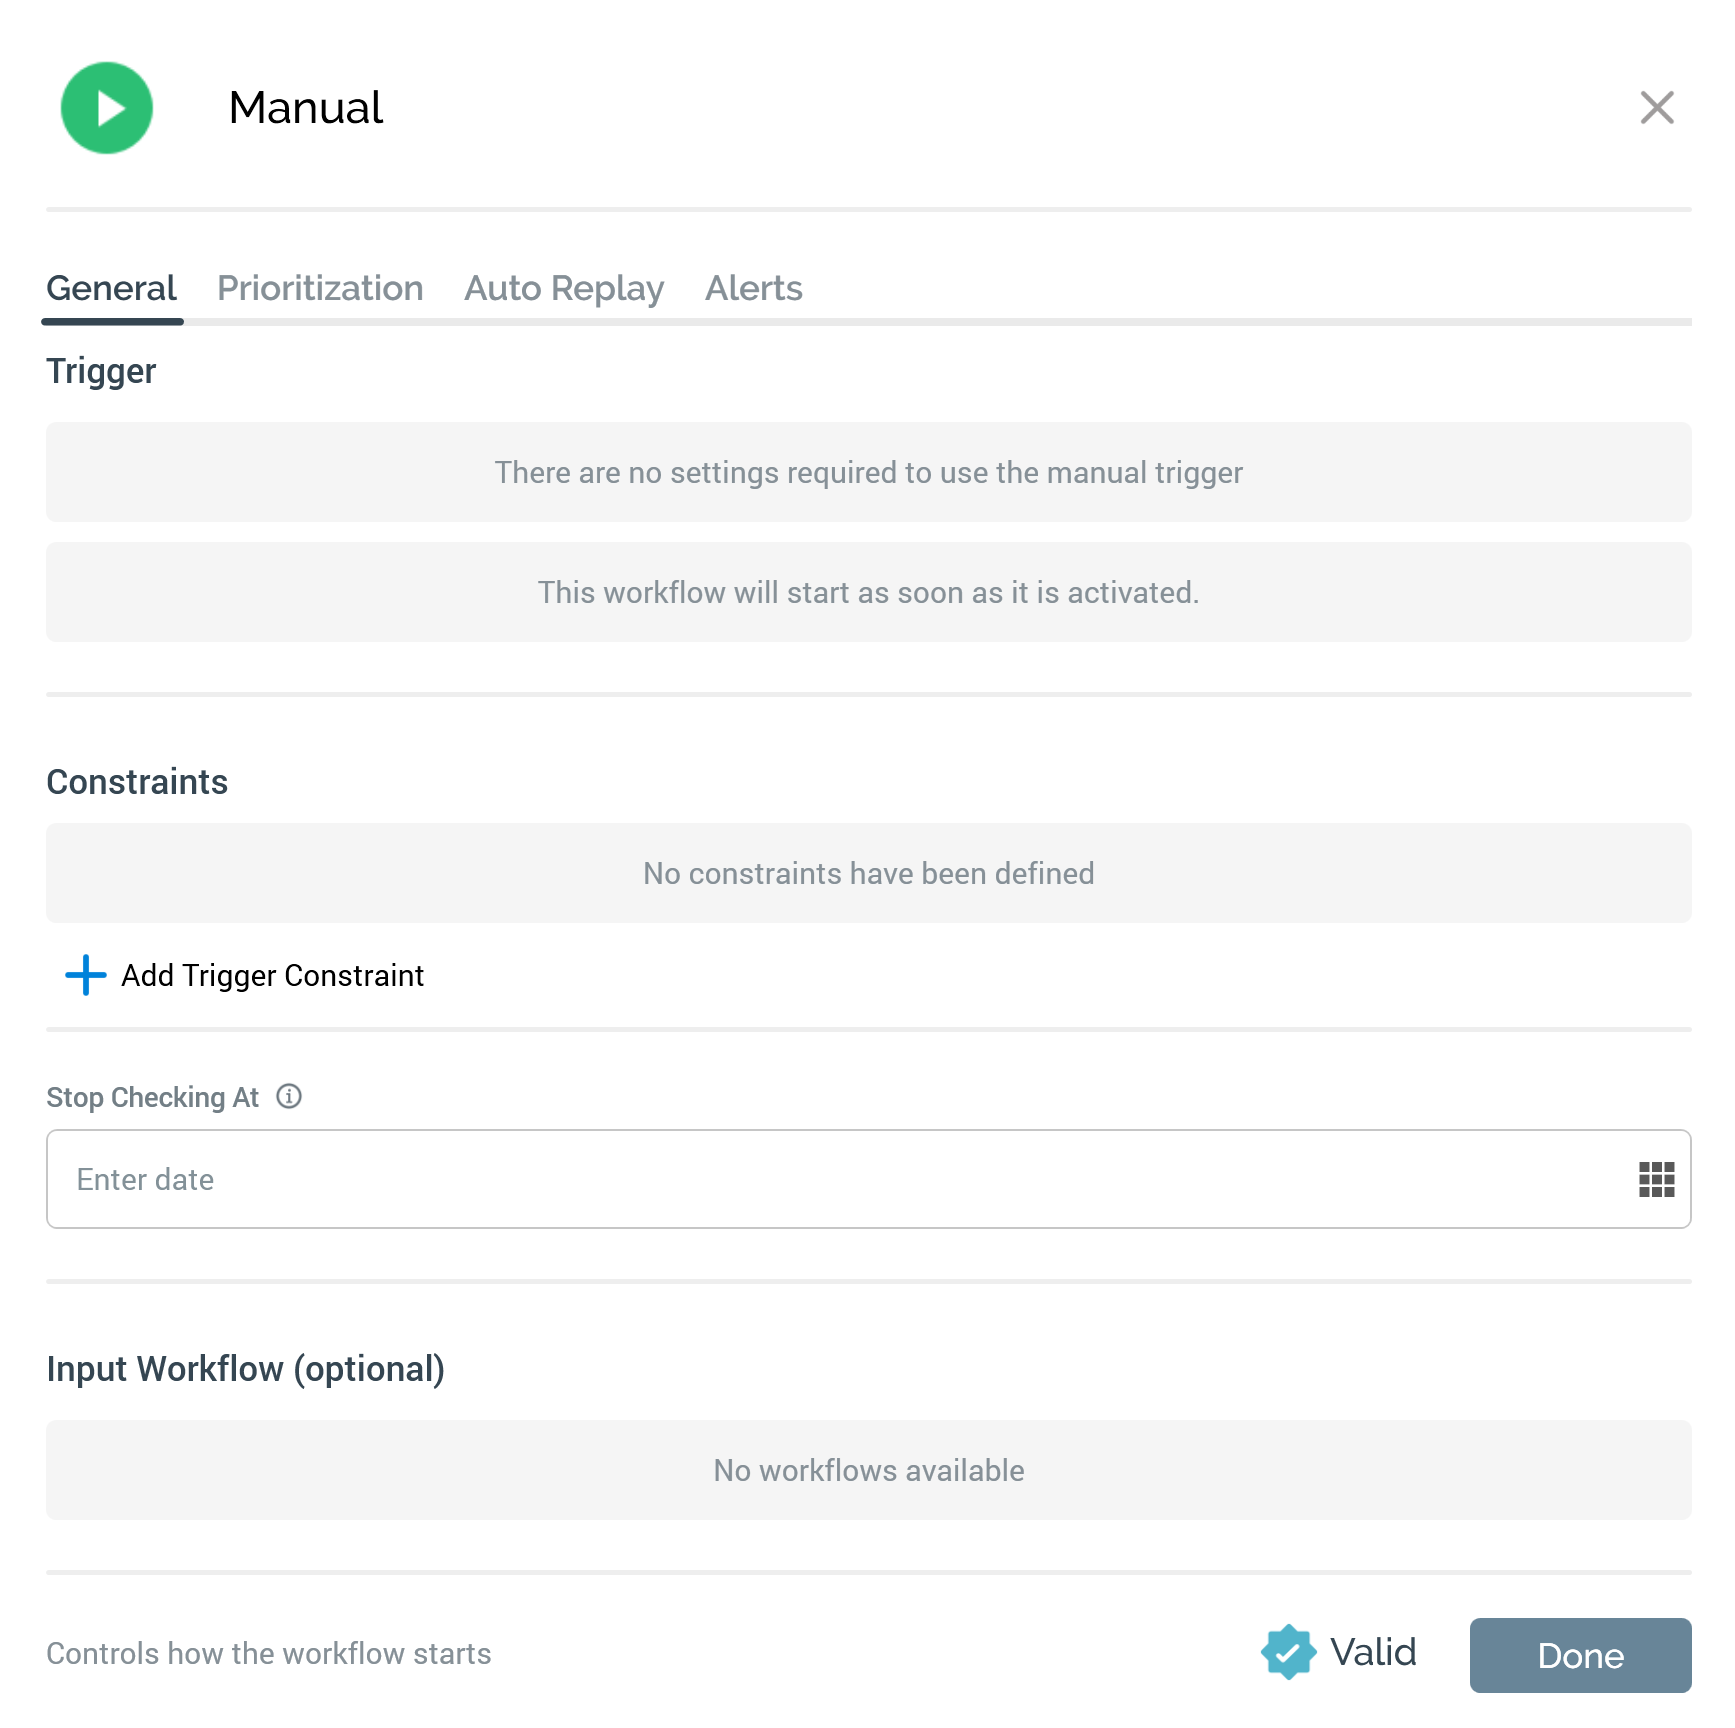
The General tab contains a label advising that no configurable settings exist for a manual trigger (Input Workflow is documented separately). The Constraints and Input Workflow sections are displayed on the General tab.
Learn more about the trigger tab set.
Scheduled trigger
A scheduled trigger is used to initiate activity within a workflow at a specified date and time.
The following options are available in the mini toolbar when you select a scheduled trigger:
-
Activate/Deactivate trigger:
-
If the interaction contains no unsaved changes, the workflow’s active status is Inactive and the interaction contains no validation errors, the button is available and its tooltip reads Activate trigger. Invocation causes the workflow to enter a Waiting for Trigger status.
-
If the workflow’s status is Inactive and the interaction has validation errors, the button is available and its tooltip reads Activate trigger. However, attempting to activate the trigger causes display of a warning message, and the workflow is not activated.
-
If the workflow’s status is Waiting for Trigger, the button is available and its tooltip reads Deactivate trigger. You can re-activate the trigger if required.
-
-
Rollback current Workflow Instance: only available post-completion of production execution. Removes the workflow instance entirely.
-
Fire trigger: fires the trigger immediately, creating a workflow instance.
-
Play/Pause workflow instance:
-
If the currently-executing activity’s status is Playing, the button is availabled and its tooltip reads Pause workflow instance. Invocation pauses the workflow instance.
-
If the currently-executing activity’s status is Paused, the button is availabled and its tooltip reads Play workflow instance. Invocation plays the workflow instance.
-
If the currently-executing activity’s status is not Playing or Paused, the button is unavailable.
-
-
Stop workflow instance: only available if the currently-executing activity’s status is Playing or Paused.
-
Reactivate trigger: this button is only available when a workflow instance is Stopped in Production mode.
-
Activate Trigger Using Test Audience: when all of the following apply:
-
A trigger is in a Test Completed state.
-
Within the workflow, at least one batch audience activity with no data inputs from an upstream activity exists.
-
The audience's definition's No of days to persist audience test tables property is set to a value greater than 0.
-
Activate in Production is selected.
-
...then an Activate Trigger Using Test Audience button is shown at the trigger's mini toolbar. On invocation, the following dialog is displayed:
At the first batch audience in the workflow, existing test audience results are used, rather than the audience being executed again.
-
View results: displays the Results Window, within which the current workflow’s results are displayed.
-
Show configuration panel
A scheduled trigger’s configuration panel contains General, Prioritization, Auto Replay and Alerts tabs:

General tab
The General tab contains the following properties:
-
Scheduled date: the date and time at which the trigger will fire. Scheduled date defaults to the time the trigger was added to the workspace. You can specify it manually, or by using a calendar control. The property is accompanied by an information tooltip that says “Using time zone specified below”.
-
Time Zone: you can specify the time zone to be used when the trigger fires. The property defaults to the current time zone. Note that changing the Time Zone will have an effect on the displayed time, which may need to be adjusted to reflect the selection.
-
Input workflow: optionally, you can elect to define an input workflow for the scheduled trigger. Learn more about input workflows.
The Constraints and Input Workflow sections are displayed on the General tab.
Learn more about the trigger tab set.
Recurring trigger
Essentially an extension of the scheduled trigger, not only does a recurring trigger allow you to specify the date and time at which a workflow will start, but also the number of instances of the workflow that will execute, in addition to a wealth of recurrence options. As a simple example, you could use a recurring trigger to initiate regular, monthly campaigning activity across a whole year.
The following options are available in the mini toolbar when you select a recurring trigger:
-
Activate/Deactivate trigger:
-
If the interaction contains no unsaved changes, the workflow’s active status is Inactive and the interaction contains no validation errors, the button is available and its tooltip reads Activate trigger. Invocation causes the workflow to enter a Waiting for Trigger state.
-
If the workflow’s status is Inactive and the interaction has validation errors, the button is available and its tooltip reads Activate trigger. However, attempting to activate the trigger causes display of a warning message, and the workflow is not activated.
-
If the workflow’s status is Waiting for Trigger and a workflow instance has not yet been created, the button is available and its tooltip reads Deactivate trigger. You can re-activate the trigger if required.
-
If the workflow’s status is Waiting for Next Trigger, the button is available and its tooltip reads Deactivate trigger. Invocation causes the workflow to assume a Completed status. You can re-activate the trigger if required.
-
If you have created a workflow instance in a production recurring workflow, you can make changes to its configuration post-deactivation.
-
If you deactivate a production recurring workflow that has yet to create a workflow instance, you can make changes to its configuration.
-
You cannot execute in Test mode a deactivated Production recurring workflow.
-
-
Rollback current Workflow Instance: only available post-completion of production execution. Removes the most recent workflow instance entirely.
-
Fire trigger: fires trigger immediately, creating the next workflow instance.
-
Play/Pause workflow instance:
-
If the currently-executing activity’s status is Playing, the button is available and its tooltip reads Pause workflow instance. Invocation pauses the workflow instance.
-
If the currently-executing activity’s status is Paused, the button is available and its tooltip reads Play workflow instance. Invocation plays the workflow instance.
-
If the currently-executing activity’s status is not Playing or Paused, the button is deactivated.
-
-
Stop workflow instance: only available if the currently-executing activity’s status is Playing or Paused.
-
View results: displays the Results Window, within which the current workflow’s results are displayed.
-
Show configuration panel
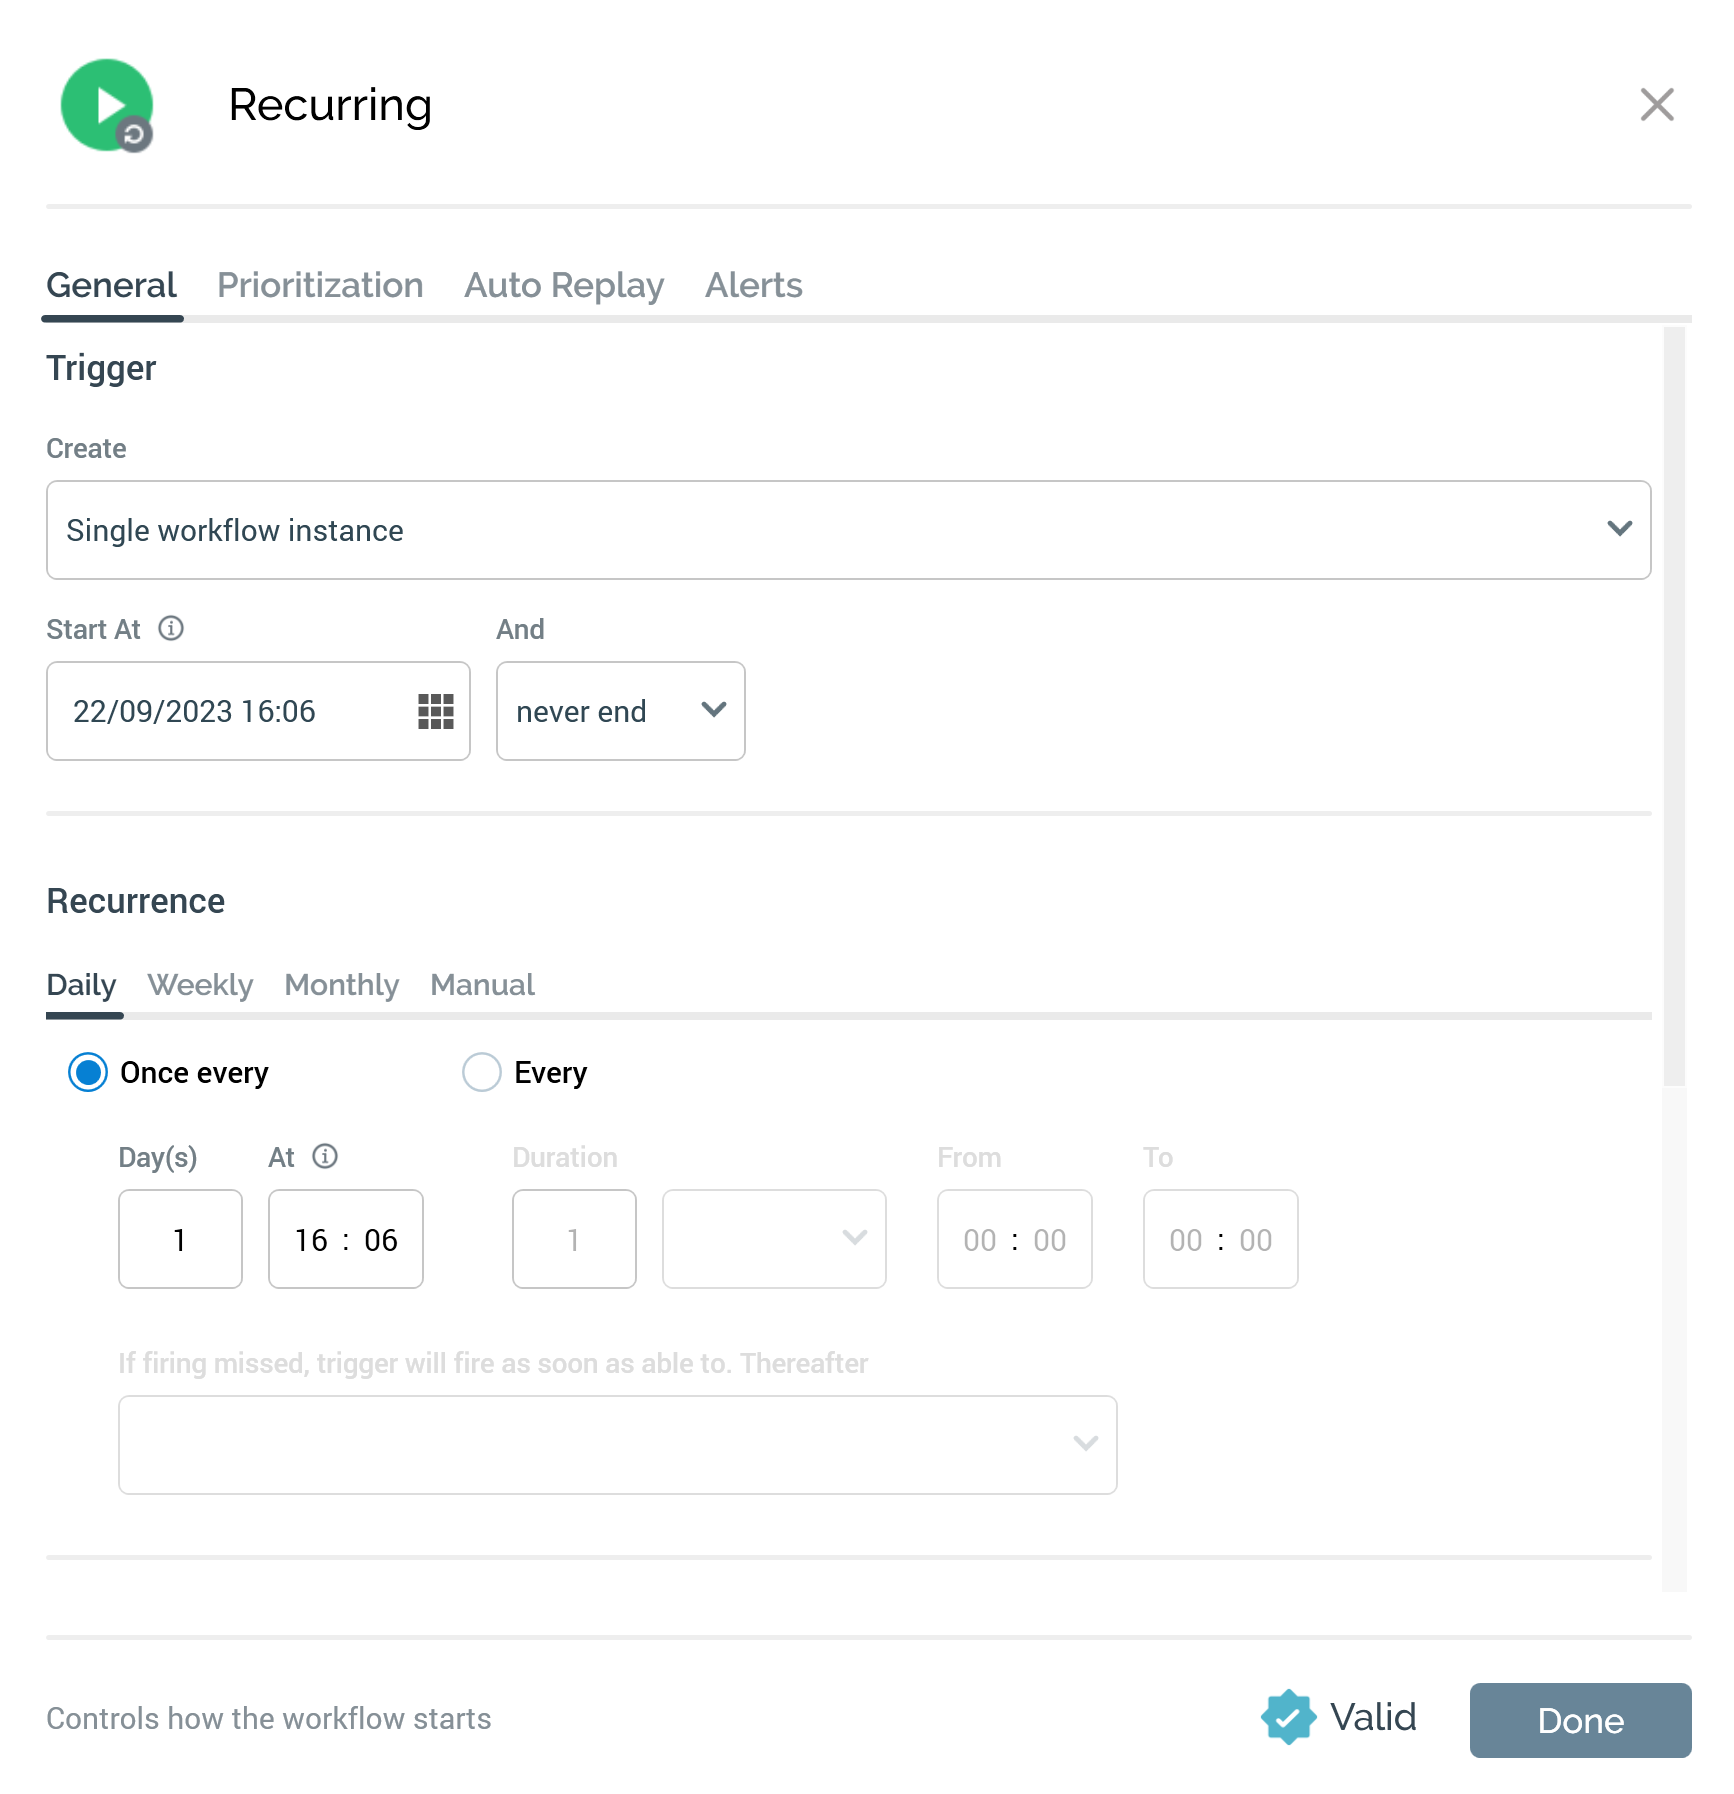
A recurring trigger’s configuration panel contains General, Prioritization, Auto Replay and Alerts tabs:
General tab
The General tab contains the following properties:
Trigger section
-
Create: this dropdown field allows you to define whether the recurring workflow will create a single or multiple workflow instances. It exposes the following values:
-
Single workflow instance: the default value. If this is selected, when the trigger is activated, a single workflow instance will be created. Any contacts targeted within the workflow will only ever be contacted once.
-
New workflow instance each time trigger fires: selecting this option allows the recurring trigger to be responsible for the creation of multiple workflow instances. If a contact is targeted within a workflow instance, he or she may also be contacted within the others, meaning that the recurring trigger can be responsible for the same person receiving communications multiple times.
-
-
Start at: the date and time at which to commence creating workflow instances. Start at defaults to the date and time at which the trigger was added to the interaction.
It refers to the date and time at which the system will begin checking as to whether to create a new workflow instance; for example, if set to 06:00 and scheduled to fire Daily, Once every 1 day at 18:00, the trigger would fire at 18:00, not 06:00. Between 06:00 and 18:00 the trigger's status would be Waiting for Trigger.
An information icon is displayed to the right of the property. Hovering over it displays a tooltip that says “Using local time zone”.
You can specify Start at manually, or by using a calendar control. Provision of a Start at date/time is mandatory.
-
“and”: a dropdown is provided, exposing the following values, each of which necessitates additional configuration:
-
never end: this value is selected by default and specifies that the recurring trigger will continue creating workflow instances, in accordance with its configuration settings, in perpetuity. No other configuration accompanies selection of this value
-
end after: this value indicates that the trigger will create a specific number of workflow instances. When selected, an accompanying text field is displayed (‘event(s)’) that defines the number of workflow instances to be created. Provision of this integer value, which defaults to 2 and which must be greater than 0, is mandatory.
-
end by: if this value is selected you must define a date and time at which the recurring trigger will cease creating workflow instances. The date defaults to today’s date + 1 week; the time defaults to the trigger’s original Start at time (the time at which the trigger was added to the interaction). You can set the date/time manually, or by using a calendar control.
-
Recurrence section
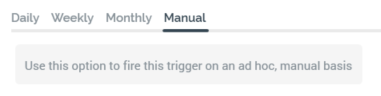
Four tabs are presented within the section. Selection of one of Daily, Weekly, Monthly, or Manual defines the basis upon which workflow instances will be created by the recurring trigger.
If an interactive activity executing on a specified schedule is paused and the execution cadence is modified, the new cadence will activate after the next execution of the original schedule once the interactive activity is resumed (in Play state).
For example, if an interactive activity is set up to fire every hour starting at 8AM, and it fires as scheduled at 8AM and then 9AM; then at 9:45AM, the cadence is modified to execute every minute; since the original "next fire" is 10AM, the interactive activity will fire at 10AM, and then every minute after that (10:01AM, 10:02AM, etc.).
Daily:
Daily is selected by default. If selected, the following fields are shown:
-
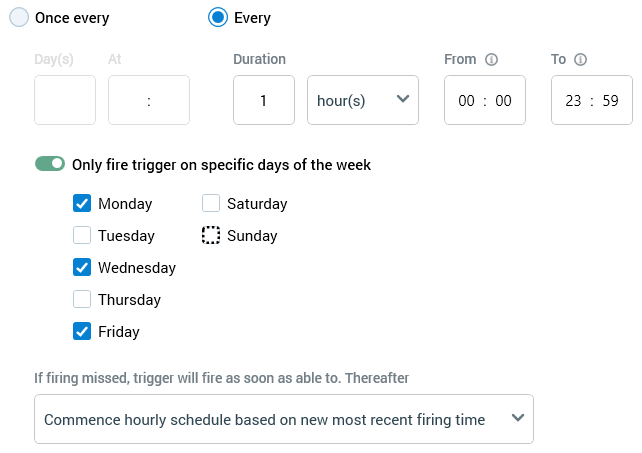
Once every…: this field is accompanied by a radio button that is selected by default (its counterpart is Every…, which is also accompanied by a radio button). If the radio button is selected, the following fields are available:
-
Day(s): a mandatory integer that defaults to 1, and which must be greater than 0.
-
At: separate, mandatory hour and minute fields that default to the time the trigger was added to the interaction. An information icon is displayed to the right of the properties. Hovering over it displays a tooltip that says “Using time zone specified below”.
-
-
Every…: this field is accompanied by a radio button and is a counterpart to Once every…. If selected, the following fields are available:
-
Duration: a mandatory integer that defaults to 1, and which must be greater than 0.
-
[units]: a dropdown field exposing the values minute(s) and hour(s) (the default).
-
From: a mandatory hour and minute field that defaults to 00:00. An information icon is displayed to the right of the property. Hovering over it displays a tooltip that says “Using time zone specified below”.
-
To: a mandatory hour and minute field that defaults to 23:59. An information icon is also shown to the right of the property.
-
Only fire trigger on specific days of the week: this switch allows you to specify that the trigger should only fire on the selected day(s) of the week. It is switched off by default. When on, separate checkboxes are displayed for each day of the week. All are checked by default. If firing missed, trigger will fire as soon as able to.
-
Thereafter: this property is displayed when a recurring trigger's Recurrence is set to Daily, Every... is selected and units is set to hour(s). It allows you to define the action to be taken when an hourly trigger is unable to fire. A dropdown field, it exposes the following values:
-
“Commence hourly schedule based on new most recent firing time” (the default).
-
“Continue original hourly schedule based on Start at time”.
When set to Commence..., if the trigger fails to fire due to the Node Manager service's unavailability: -
The trigger fires as soon as the service becomes available.
-
The next firing time occurs in one hour's time.
-
An hourly cadence is maintained thereafter.
When set to Continue...: -
The trigger fires as soon as the service becomes available.
-
The next firing time occurs when the trigger's Start at time is reached.
-
An hourly cadence is maintained thereafter.
-
-
Weekly:
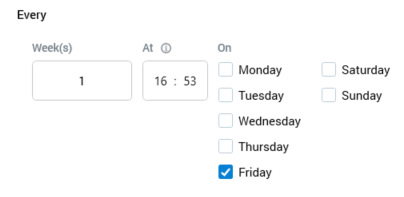
If Weekly is selected, the following are shown to the right of the General tab:
-
Week(s): a mandatory integer that defaults to 1, and which must be greater than 0.
-
At: a mandatory hour and minute field that defaults to the current time. An information icon is displayed to the right of the properties. Hovering over it displays a tooltip that says “Using time zone specified below”.
-
On: one separate checkbox is provided for each day of the week. The current day is checked automatically.
Monthly:
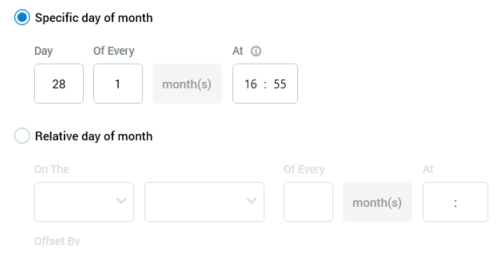
If Monthly is selected, the following fields are shown to the right of the General tab:
-
Specific day of month: accompanied by a radio button that is selected by default (its counterpart is Relative day of month, which is also accompanied by a radio button). If the radio button is selected, the following are available:
-
Day: a mandatory integer, which must be greater than 0. Day [x] defaults to today’s date. If set to e.g. ‘31’, the trigger will fire on the last day of the month if the same falls on another date.
-
Of Every: a mandatory integer that defaults to 1, and which must be greater than 0.
-
At: a mandatory hour and minute field that defaults to the current time. An information icon is displayed to the right of the properties. Hovering over it displays a tooltip that says “Using time zone specified below”.
-
-
Relative day of month: accompanied by a radio button and is a counterpart to Specific day of month. If selected, the following fields are available:
-
On The: a dropdown field that exposes the following values: first (default), second, third, fourth and last.
-
[Day of week]: a dropdown that lists the days of the week, which defaults to the current day. In addition, two other values – weekday and weekend day – are also available
-
Of Every: an integer that defaults to 1.
-
At: a mandatory hour and minute field that defaults to the current time. An information icon is displayed to the right of the property. Selecting it displays a tooltip that says “Using time zone specified below”.
-
-
Offset By: two fields accompany this setting, which allows you to adjust the trigger’s scheduled firing time by pulling it forward or pushing it back by a given number of days:
-
[n]: this integer value defaults to 0 and can be maximum of 999.
-
[offset type]: this dropdown field exposes values “None” (the default), “day(s) after” and “day(s) before”.
-
Manual:
The manual tab allows you to fire the trigger on an ad hoc, manual basis.
-
Time Zone: this dropdown property allows you to specify the time zone within which the trigger's recurrence pattern will operate. It defaults to the local time zone. Note that the specified time zone only affects the trigger's recurrence once active; its Start time will be acted upon on a local basis.
Note also that changing the Time Zone will have an effect on the displayed time, which may need to be adjusted to reflect the selection.
-
Input Workflow: optionally, you can elect to define an input workflow for the recurring trigger. This property is documented separately elsewhere as it shared across all trigger types.
Note that all time values specified reference your local time setting.
The Constraints and Input Workflow sections are displayed on the General tab.
Learn more about the trigger tab set.
Activity State trigger
An activity state trigger is used to initiate workflow activity when one or more activities within a preceding workflow start or complete. The activities contained in the activity state’s workflow can optionally act upon the data set output by the preceding workflow.
The following options are available in the mini toolbar when you select an activity state trigger:
-
Activate/Deactivate trigger: if the interaction contains no unsaved changes, the workflow’s active status is Inactive and the interaction contains no validation errors, this button is available and its tooltip reads Activate trigger. Invocation causes the workflow to activate. If the conditions in respect of the trigger’s input workflow have not been met, the trigger enters a Waiting for trigger state. If the conditions have been met, the workflow commences Playing. This also occurs at the point at which the conditions are met.
If the workflow’s status is Inactive and the interaction has validation errors, the button is available and its tooltip reads Activate trigger. However, attempting to activate the trigger causes display of a warning message, and the workflow is not activated.
If the workflow’s status is Waiting for Trigger, the button is available and its tooltip reads Deactivate trigger. You can re-activate the trigger if required.
-
Rollback current Workflow Instance: only available post-completion of production execution. Removes the workflow instance entirely.
-
Play/Pause workflow instance: if the currently-executing activity’s status is Playing, the button is available and its tooltip reads Pause workflow instance. Invocation pauses the workflow instance.
If the currently-executing activity’s status is Paused, the button is available and its tooltip reads Play workflow instance. Invocation plays the workflow instance.
If the currently-executing activity’s status is not Playing or Paused, the button is deactivated.
-
Stop workflow instance: only available if the currently-executing activity’s status is Playing or Paused.
-
Reactivate trigger: this button is only available when a workflow instance is Stopped in Production mode.
-
Fire trigger: this option is available when the trigger is in a Waiting for Trigger state, and when its Use data from input workflow property is unchecked. It allows you to manually override the rules governing the point at which the trigger is scheduled to commence execution.
This means that, should something untoward occur within the trigger’s preceding workflow, you always have the option to commence execution at the activity state trigger. Key to availability of this option is the fact that the trigger does not source its input data from the preceding workflow – in such a case this option would not be viable, due to non-availability of input data at the point of the trigger’s being fired manually.
-
View results: displays the Results Window, within which the current workflow’s results are displayed.
-
Show configuration panel
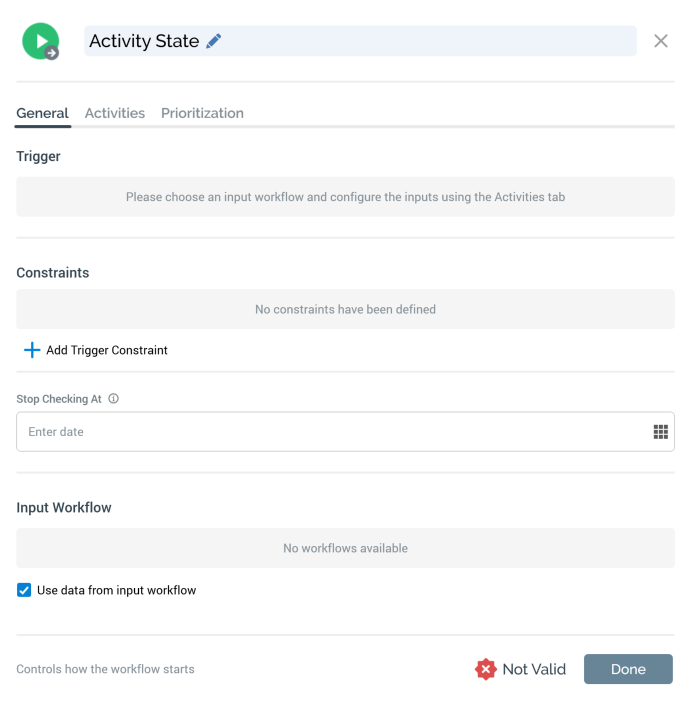
An activity state trigger’s configuration panel contains General, Activities, Prioritization, Auto Replay, and Alerts tabs.
General tab
The General tab displays a message:
You can select an Input Workflow using the dropdown, which lists all other workflows’ triggers within the interaction. Having selected an Input Workflow, you can clear it. Selection of an Input Workflow is mandatory for an activity state trigger.
Note that an activity state trigger does not support selection of a queue listener Input Workflow.
A checkbox (Use data from input workflow) is displayed at the bottom of the General tab. It is checked by default. If checked, the input data for the activity state trigger's workflow will be sourced from its input workflow – you must define within any activities downstream from the activity state trigger the fulfillment states that are to apply. For example…
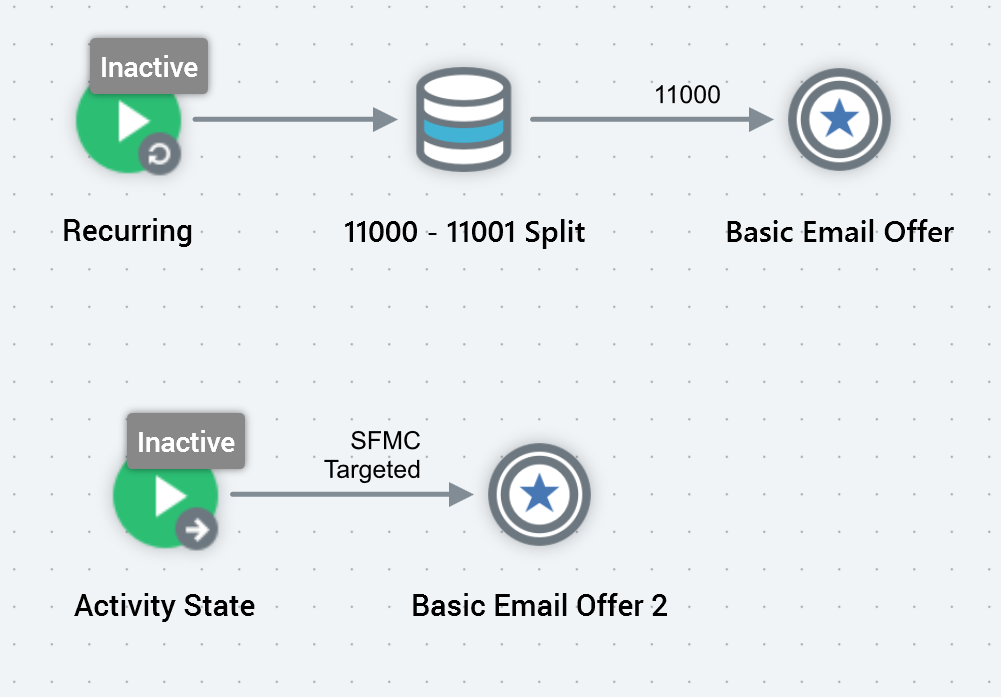
…in this case, all records output by ‘Basic Email Offer’ (i.e. those in a ‘Targeted’ state) will serve as the input to ‘Basic Email Offer 2’.
If Use data from input workflow is unchecked, the trigger's workflow's data will be sourced independently from its input workflow. This means that the activity state workflow remains entirely independent from the input workflow (other than in activity within the latter initiating activity within the former). In this case it is mandatory for the activity state workflow to contain an audience.
Constraints and Input Workflow sections are displayed. They are covered separately in this documentation.
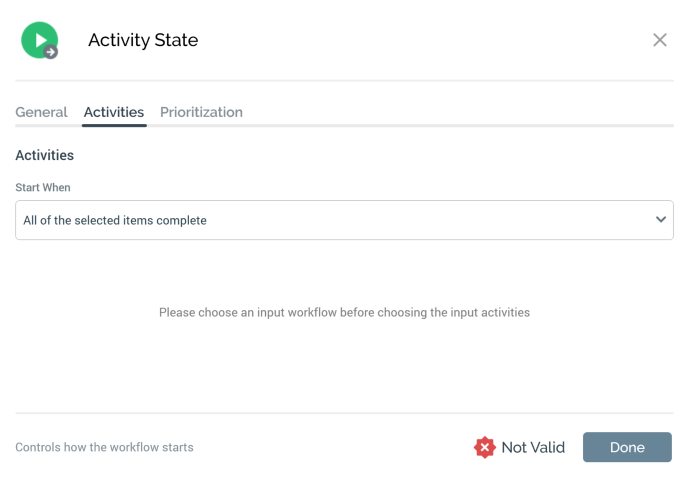
Activities tab
The Activities tab contains the following:
-
Start when: defines the type of conditions within the input workflow that must be met before activity state execution can begin. The dropdown exposes the following values:
-
Any one of the selected items starts playing
-
Any one of the selected items completes
-
All of the selected items complete (default)
-
-
When no input workflow has been selected, a message is shown that says “Please choose an input workflow before choosing the input activities”.
-
When an input workflow has been selected, the panel below Start when… lists all of the input workflow’s activities following its trigger. Each is accompanied by a checkbox. It is mandatory to select at least one checkbox. By selecting checkboxes, you define the activities within the input workflow to which the conditions defined by Start when will apply.

The Prioritization and Alerts tabs are documented separately.
A validation error is raised in the event of an activity state trigger's Input Workflow being configured with a recurring, multi-instance workflow.