

Overview
The steps in the Data group determine the movement of data into and out of the automation.
Detect Format
The Detect Format step tests an input file against one or more user-specified formats, signals an appropriate control-flow connection and puts the converted data on a staging connection. If no format matches the input file, the error connector is signaled.
Configuring a Detect Format step:
-
Select the Detect Format step.
-
Go to the Configuration tab on the Properties pane.
-
Specify the Data file.
-
Optionally, specify an Analysis line limit to limit the number of input lines to be examined. The larger this number is, the longer the analysis will take, but more likely that the results will be correct.
-
Select the Format definitions grid, and then use the Name, Quality, and Format controls to define one or more file formats:
-
Name is the user-assigned name of the format to be matched.
-
Quality is the percentage of records that must match the defined format before a format is considered to be a match.
-
Format specifies file input type. Options are DLD, DBF, CSV, Text (flat file), and XML.
-
-
If Format is DLD or DBF, specify a Sample file to test input data against. If Format is CSV, Text, or XML, specify a Schema for the same purpose. The sample file or schema should be representative of acceptable input data. Its fields and types are displayed in the grid.
-
In the fields grid:
-
Select the Optional column to allow a field to be missing from the input. Missing fields with this option selected will be created and filled with nulls. Otherwise missing fields are errors.
-
In the Aliases column, optionally enter a list of alternate names that can be used to identify a field in input files. An input file field with one of the alternate names will be mapped onto the defined name (unless a field with the defined name already exists). For example, for an ADDRESS field you might add ADDR, ADDR1, and so on. The Optional and Aliases columns do not apply for Flat-file inputs or CSV files with no name header, because the field names cannot be deduced from the file. For these file formats, the field names must match exactly.
-
-
Optionally, select the Execution tab and set execution options:
-
Select Skip to bypass this step at run time. Do not leave this option enabled in production environments.
-
Select Ignore error on this step to suppress step failure and continue processing in case of error.
-
FileSystem
A FileSystem step performs one of the following actions:
-
Create a directory
-
Delete a directory
-
Delete files
-
Copy a file or multiple files
-
Move a file or multiple files
-
Rename a file
-
List files
Configuring a FileSystem step:
-
Select the
FileSystemstep. -
Go to the Configuration tab on the Properties pane.
-
Select an Action and configure its options.
|
Action |
Option |
|---|---|
|
Create directory |
Directory is the fully-qualified path to create. |
|
Delete directory |
Directory is the fully-qualified path to delete. |
|
Delete files |
File pattern is a wildcard pattern specifying which files to delete. |
|
Copy file
|
From file is the full path and name of the file to be copied or moved. Wildcards are not allowed. To folder is the target directory, and must not include a file name. |
|
Copy files
|
Source is the folder containing source files. File pattern is a wildcard pattern specifying which files to copy or move. Destination is the folder to which files will be moved or copied. |
|
Rename file |
Directory is the folder containing the file. Old name is the file to rename. New name is the new name of the file. |
|
List files |
If you specify a File pattern in combination with the Recursive option, files from the specified directory and all its sub-directories whose names match the pattern will appear in the staging output. Select Path as URI to output paths as full URIs instead of native operating system paths. A staging output will be created on the "D" staging connector containing the list of files. This staging file will have the following columns:
|
-
If Action is Delete files, Copy files, or Move files, you may optionally select Stop on first error to stop the running automation when the
FileSystemstep encounters an error. -
Optionally, select the Execution tab and set execution options:
-
Select Skip to bypass this step at run time. Do not leave this option enabled in production environments.
-
Select Ignore error on this step to suppress step failure and continue processing in case of error.
-
Tip
Delete files, Copy files, Move files and optionally List files use wildcard characters to specify the desired file sequence.
|
Character |
Matches |
Example |
|---|---|---|
|
Any number of characters in the same position as the asterisk. |
|
|
? (question mark) |
Any single character in the same position as the question mark. |
|
Reader
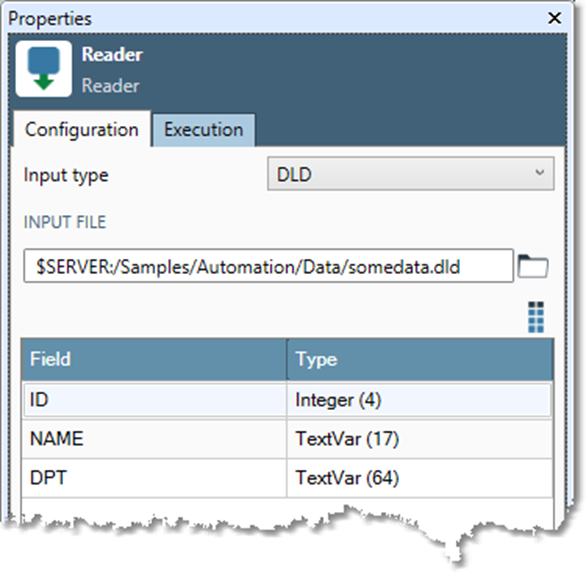
The Reader step reads an input data file or database, and presents the results on its "D" staging connector. Supported input formats are DLD, DBF, CSV, Flat, XML, or RDBMS.
If you select a CSV, Text, or XML input, you'll also need to specify a repository schema that defines the input configuration. Schemas are separately-defined file formats that are stored in the repository.
If you select an RDBMS input, you'll need to specify a data connection. Data connections are separately-defined RDBMS connection configurations that are stored in the repository.
Configuring a Reader step:
-
Select the Reader step.
-
Go to the Configuration tab on the Properties pane.
-
Select the Input type.
-
Define input settings.
|
Input type |
Settings |
|---|---|
|
DLD, DBF |
Browse to desired Input file. |
|
CSV, Text, XML |
|
|
RDBMS |
|
-
Optionally, select the Execution tab and set execution options:
-
Select Skip to bypass this step at run time. Do not leave this option enabled in production environments.
-
Select Ignore error on this step to suppress step failure and continue processing in case of error.
-
SQL
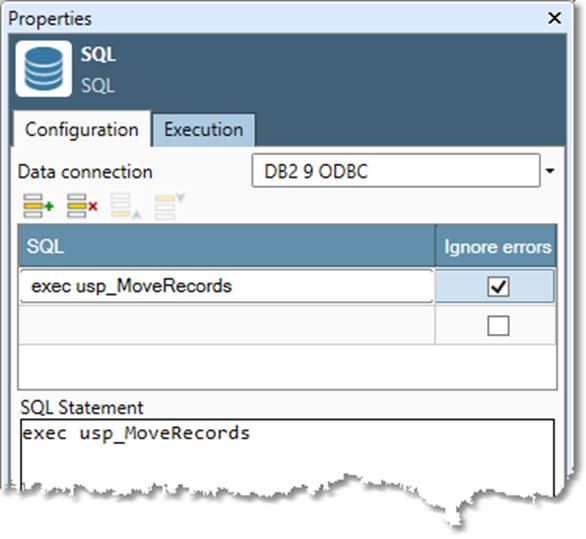
The SQL step connects to a RDBMS and executes one or more SQL statements that do not involve fetching records.
The SQL tool does not perform any type of data flow. Rather, you select a repository data connection and then configure SQL statements to execute. Typically these are stored procedures or other transformational statements. For example, you might want to access a stored procedure to move a group of records between tables.
Configuring an SQL step:
-
Select the SQL step.
-
Go to the Configuration tab on the Properties pane.
-
Select a repository Data connection.
-
In the Statement grid, select a row and then define an SQL statement:
-
Enter an SQL statement in the SQL Statement box.
-
Optionally, select Ignore SQL errors to suppress reporting of SQL errors.
-
-
Repeat step 3 to define additional SQL statements. Statements are executed in the order in which they are listed in the grid. To change this order, select a statement, and then select the


-
Optionally, select the Execution tab and set execution options:
-
Select Skip to bypass this step at run time. Do not leave this option enabled in production environments.
-
Select Ignore error on this step to suppress step failure and continue processing in case of error.
-
Writer
The Writer step writes a data file or RDBMS table using data from the "D" staging input connector. Supported output formats are DLD, DBF, CSV, Flat, XML, or RDBMS.
If you select an RDBMS input, you'll need to specify a data connection. Automations can only operate on RDBMS inputs that have been previously defined as repository data connections.
Configuring a Writer step:
-
Select the Writer step.
-
Go to the Configuration tab on the Properties pane.
-
Select the Output type.
-
Define output settings.
|
Output type |
Settings |
|---|---|
|
DLD, DBF |
Browse to desired Output file. |
|
CSV, Text (flat), XML |
File splitting is not supported. |
|
RDBMS |
|
-
Optionally, select the Execution tab and set execution options:
-
Select Skip to bypass this step at run time. Do not leave this option enabled in production environments.
-
Select Ignore error on this step to suppress step failure and continue processing in case of error.
-