

Overview
This topic provides information about the Flat File Input and Flat File Output tools.
With a fixed-width flat-file format, Data Management assumes column width is measured in bytes rather than characters. This is an important distinction when working with variable-length encodings where a single character can consume one, two, or more bytes (e.g., UTF-8). While those columns can contain variable-length-encoded data, that will not change how the Flat File Input and Output tools interpret the columns' width. When working with variable-length encodings, we recommend choosing a better-suited format (e.g., delimited files with the CSV Input and Output tools).
Flat File Input
The Flat-File Input tool reads fixed-width text files (although it can read "short" records if they end in newlines). You'll need to define field sizes and record layout in the tool's configuration dialog box.
Use the Flat File Input tool when:
-
The data you must work with is only available in flat file format.
-
You have a choice of formats, and want the best performance. Reading from a DBF or flat file is significantly faster than reading from a relational database. You can typically read 25,000 records per second from a flat file—up to ten times faster than direct database access, and faster than any other data source except DLD input.
If you have a choice between flat file text and DBF formats, always choose DBF because it is self-configuring.
Flat File Input tool configuration parameters
The Flat File Input tool has two sets of configuration parameters in addition to the standard execution options.
Configuration
|
Parameter |
Description |
|---|---|
|
Compression type |
Compression strategy to use for output file. Options are:
If not otherwise specified, Data Management may attempt to autodetect the compression format upon Analyze. |
|
Input file |
The file containing the records, or a wildcard pattern matching multiple files. |
|
Use repository schema |
If selected, configure the field layout using the specified Schema instead of configuring fields directly. |
|
Schema |
If Use repository schema is selected, a schema must be specified. |
|
Code page |
Name of the encoding of the source data. This is optional and defaults to 8859-1 (Latin-1). See About code pages. |
|
Line break |
The method for determining the end of the record. This is optional and defaults to Newlines only. |
|
Record size |
If specified, sets the length of the records. The columns in the data sample will visually line up when the record size is correctly specified. Does not apply if Line break is set to Newlines only. |
|
Data offset |
The starting position of the record data, if other than 0. |
|
Field |
Name that uniquely names the field amongst all fields in the record. |
|
Type |
Sub-configuration describing the type of the new field. See Configuring Data Types. |
Options
|
Parameter |
Description |
|---|---|
|
Limit records |
If selected, limits the number of records read. |
|
Read only the first |
If Limit records is selected, specifies the number of records to be read. |
|
Produce file name field |
If selected, the file name will be output as a record field. |
|
Output full path |
If Produce file name field is selected, optionally outputs the entire path to the record file name field. |
|
Output URI path |
If Output full path is selected, express path as a Uniform Resource Identifier (URI). |
|
Field name |
If Produce file name field is selected, name of the column to be used for the file name. This is optional and defaults to |
|
Field size |
If Produce file name field is selected, size of the field to be used for the file name. This is optional and defaults to |
|
Error handling |
Configures how errors in the input data will be handled:
|
|
Parsing errors |
Specify how to handle input containing invalid XML that cannot be processed. The Issue warning option is not available for this type of error. |
|
Conversion errors |
Specify how to handle input data that cannot be correctly converted to its specified data type (such as converting "Jane Smith" to a Date). |
|
Truncation errors |
Specify how to handle input with truncated field values (such as storing "John Smithson" in a Unicode(1) field). |
|
Missing fields |
Specify how to handle input with fields that are missing or contain empty values. |
|
Extra fields |
Specify how to handle input with extra elements that are not defined in the tool's configuration. |
|
Send errors to Message Viewer |
If selected, all error types configured to either Issue warning or Reject record will send warnings to the Message Viewer. The Report warnings option must be selected on the Execution tab. If selected, all error types configured to either Issue warning or Reject record will send warnings to the Message Viewer, even if the Report warnings option on the Execution tab is not selected. |
|
Send errors to Error Report connector |
If selected, creates an E "Error Report" output connector. All error types configured to either Issue warning or Reject record will send detailed error messages to that connector. Attach a downstream Data Viewer or other output tool to review these messages. |
Configure the Flat File Input tool
To configure a Flat File Input tool, you need the following information about the input file:
-
The input file name.
-
How records are terminated.
-
Whether short records are allowed.
-
The offset to the first data record.
-
The list of fields and their types.
Data Management provides several ways to specify this information.
|
If you have... |
Do this |
|---|---|
|
A Flat File schema for this file already defined in the repository. |
Configure the Flat File Input tool using a repository schema. |
|
A layout file. |
Configure the Flat File Input tool using a layout file. |
|
None of the above. |
Configure the Flat File Input manually. |
You can configure a single Flat File Input tool to read a sequence of files with the same layout and format.
...using a repository schema
To use this method of configuring a Flat File Input tool, you must have a Flat File schema for the input file already defined in the repository.
To configure the Flat File Input tool using a repository schema:
-
Select the Flat File Input tool.
-
Go to the Configuration tab on the Properties pane.
-
Specify the Compression type.
-
Specify the Input file.
-
Select Use repository schema and select the schema from the drop-down list.
-
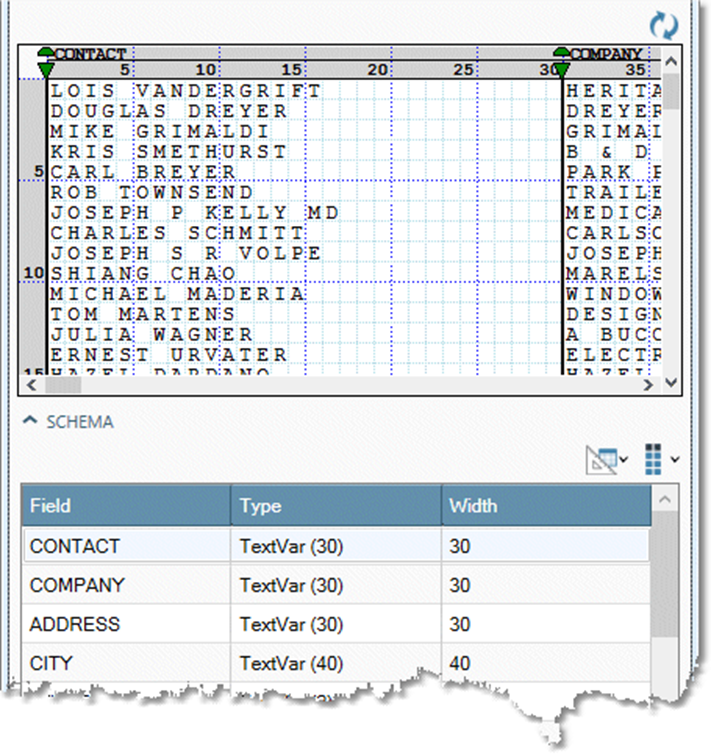
Examine the data preview and field grid to verify that the format is correct and the sample data is correctly aligned.
-
If the fields and sample data appear incorrect, choose or create a different schema appropriate for the input file, or use another method to configure the Flat File Input tool.
-
Optionally, select the Options tab and configure advanced options:
-
To include the name of the input file as a new field, select Produce file name field and specify a Field name and Field size. Select Output full path to include the complete file specification. This can be useful when reading a wildcarded set of files. Select Output URI path to express the complete file specification as a Uniform Resource Identifier.
-
If you don't want to process the entire file, select Limit records and type the desired number of records to process.
-
Configure error handling.
-
-
Optionally, go to the Execution tab and Enable trigger input, configure reporting options, or set Web service options.
...using a layout file
To use this method of configuring a Flat File Input tool, you must have a multi-column layout file for the input file.
To configure the Flat File Input tool using a layout file:
-
Select the Flat File Input tool.
-
Go to the Configuration tab on the Properties pane.
-
Specify the Compression type.
-
Specify the Input file.
-
Select

-
Browse to the layout file that describes the input file, and then select Open.
-
Examine the data preview and field grid to verify that the format is correct and the sample data is correctly aligned.
-
If the sample records seem slightly skewed, try setting Line break to Newlines only or Length only.
-
If the data does not start at the beginning of the file, set the correct Data offset value.
-
If the fields and sample data still appear incorrect, choose or create a different layout file appropriate for the input file, you can adjust the columns manually or use another method to configure the Flat File Input tool.
-
-
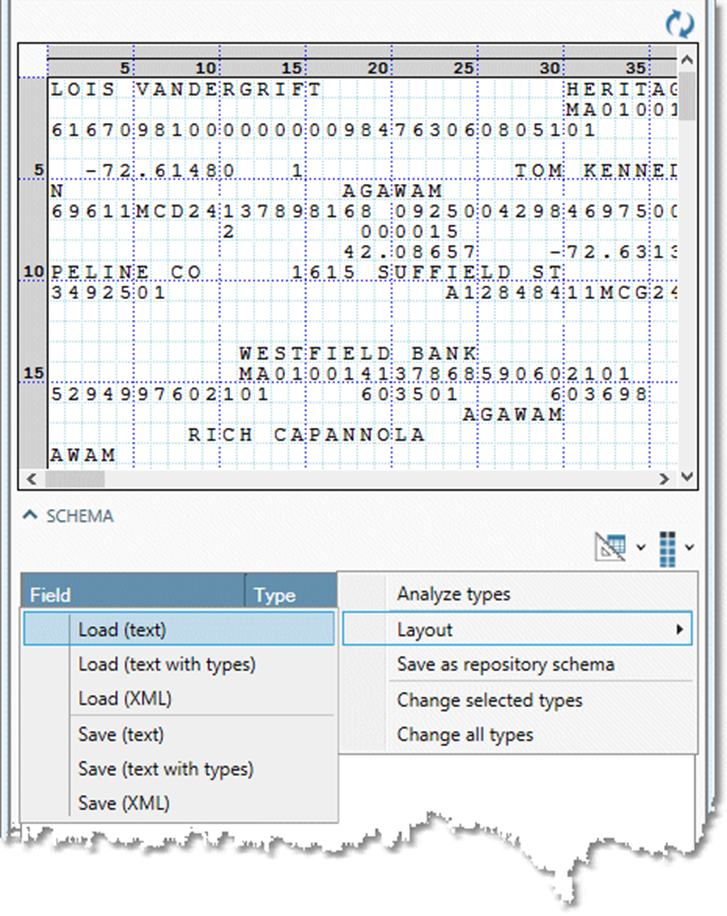
If your layout file did not specify types, select Analyze

You don't need to set the data type unless you will perform calculations or comparisons using the field, or intend to export the information to a strongly-typed database.
-
Optionally, select the Options tab and configure advanced options:
-
To include the name of the input file as a new field, select Produce file name field and specify a Field name and Field size. Select Output full path to include the complete file specification. This can be useful when reading a wildcarded set of files. Select Output URI path to express the complete file specification as a Uniform Resource Identifier.
-
If you don't want to process the entire file, select Limit records and type the desired number of records to process.
-
Configure error handling.
-
-
Optionally, go to the Execution tab and Enable trigger input, configure reporting options, or set Web service options.
...manually
If your flat input file has many fields, this method of configuring a Flat File Input tool can be tedious. An easier method is to create a layout file and use it to configure the Flat File Input tool.
To configure the Flat File Input tool manually:
-
Select the Flat File Input tool.
-
Go to the Configuration tab on the Properties pane.
-
Specify the Compression type.
-
Specify the Input file.
-
Select the method for determining Line breaks:
-
Length or newlines: record ends at Record size or newline, whichever is encountered first. Long records are split.
-
Newlines only: record ends at newline. Long records are truncated. Do not select this if your data file contains newlines embedded in data fields.
-
Length only: newlines are ignored. Records always end at Record size.
-
-
In the Record size box, set the length of the records, if necessary. The columns in the data sample will visually line up when the record size is correctly specified.
Does not apply if Line break is set to Newlines only.
-
If your record data does not start at the beginning of the file, enter the starting position in the Data offset box.
-
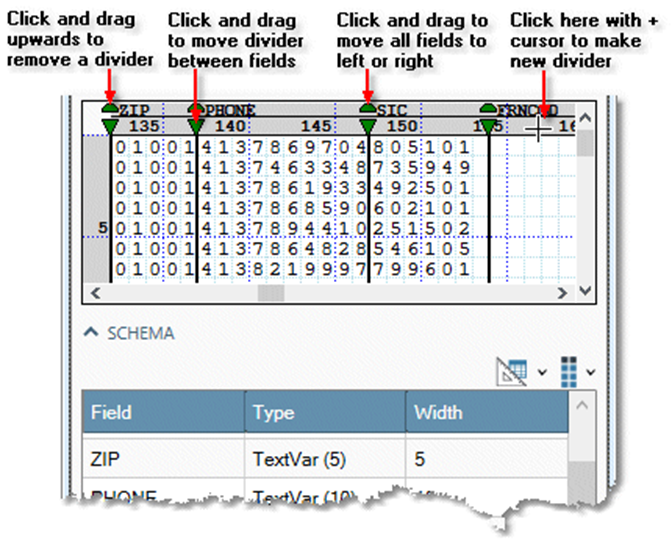
Define field positions and sizes using the interactive grid.
-
Select the Schema grid and enter information for each field:
-
Type the field name in the Field column. Each field name must be unique within the record.
-
If some fields are not text, select Analyze

-
Field size is shown in the Width column, but you cannot edit the size of the field within the grid. Instead, change the size of a field by dragging its field divider.
-
-
Optionally, select the Options tab and configure advanced options:
-
If you don't want to process the entire file, select Limit records and type the desired number of records to process.
-
To include the name of the input file as a new field, select Produce file name field and specify a Field name and Field size. Select Output full path to include the complete file specification. This can be useful when reading a wildcarded set of files. Select Output URI path to express the complete file specification as a Uniform Resource Identifier.
-
Configure error handling.
-
-
Optionally, go to the Execution tab and Enable trigger input, configure reporting options, or set Web service options.
Flat File Output
The Flat File Output tool writes data to a formatted text file with fixed length records. Use this tool when you want to create a portable data file, and the system or application that will read the file accepts only flat file formats. Where possible, choose DBF format over flat files, because DBF encodes field and type information in its header, making it easier to use.
Flat File Output tool configuration parameters
The CSV Output tool has one set of configuration parameters in addition to the standard execution options.
|
Parameter |
Description |
|---|---|
|
Output file |
The output file name. |
|
Layout
|
If selected, saves the output as the specified layout file or repository schema. |
|
Open file time |
Specifies when the output file will be opened:
|
|
Write empty file if no records are read |
If selected, writes an output file even when no records are read. This is unavailable if Open file time is When project is started. |
|
Code page |
Name of the encoding of the source data. This is optional and defaults to 8859-1 (Latin-1). See About code pages. |
|
Output BOM |
If selected, prepends byte-order marker to data stream. |
|
End of line |
The character sequence identifying the line termination. Must be one of:
|
|
Split files |
If selected, splits the output file by Size, Record count, or Data. |
|
Split size (MB) |
If Split files by size is selected, specifies the maximum size of the split files. Output file names are appended with a sequence number between the file root and the extension. Defaults to 1024 MB (1Gb). |
|
Split count |
If Split files by record count is selected, specifies the maximum number of records in the split files. Output file names are appended with a sequence number between the file root and the extension. Defaults to 1,000,000. |
|
Split field |
If Split files by data is selected, name of the field to be used to split the data. A separate file will be created for each unique value of the specified field. Data must be grouped by the split field. |
|
Suppress split field |
If selected, the Split field is omitted from files created using Split files by data. |
|
Treat output file as folder |
If selected, the Split field value is used as file name for files created using Split files by data. |
|
Append to existing file |
If selected, appends the new output to existing output file rather than overwriting it. The Append option is ignored if you specify Split files options after selecting Append to existing file. |
|
Replication factor |
Number of copies of each block that will be stored (on different nodes) in the distributed file system. The default is 1. |
|
Block size (MB) |
The minimum size of a file division. The default is 128 MB. |
Configure the Flat File Output tool
-
Select the Flat File Output tool.
-
Go to the Configuration tab on the Properties pane.
-
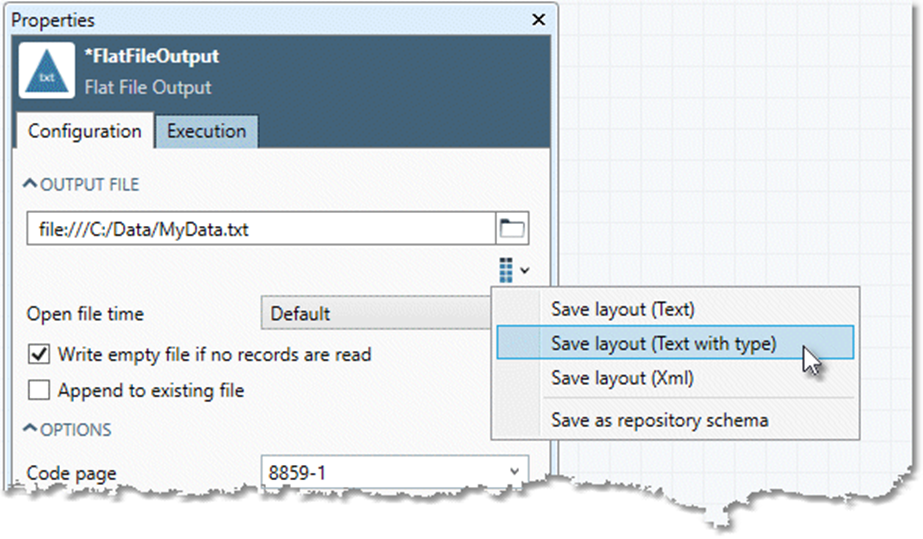
Specify the Output file.
-
Optionally, generate a layout file or repository schema: select Layout and choose Save layout (Text), Save layout (Text with type), Save layout (XML), or Save as repository schema.
-
Optionally, specify Open file time.
|
Option |
Description |
|---|---|
|
Default |
Use the site/execution server setting. If you select this, you can optionally select Write empty file if no records are read. A warning will be issued if the tool setting conflicts with the site/execution server setting. |
|
When project is started |
Open output file when the project is run. |
|
When the first record is read |
Open output file when the first record is read. If you select this, you can optionally select Write empty file if no records are read. |
|
After the last record is read |
Output records are cached and not written to the output file until the tool receives the final record. If you select this, you can optionally select Write empty file if no records are read. |
-
Optionally, select Write empty file if no records are read. This is unavailable if Open file time is When project is started.
-
Optionally, select Append to existing file to append the new output to the existing output file rather than overwriting it.
-
Optionally, configure the Code page and BOM to match the operating system that will read the resulting file.
-
Optionally, select the End of line sequence to match the operating system that will read the resulting file. Choices are:
-
CR-LF (DOS, Windows, OS/2)
-
LF (UNIX)
-
CR (Mac)
-
Each of these is also available with a Trim option, which allows writing "ragged" files by removing trailing spaces from the final field of the record.
-
-
Optionally, you can split the output file into smaller, more manageable pieces. Check the Split files box, and then select By size, By record count, or By data.
-
If you select Split files by size, specify Split size as the maximum file size (in megabytes). The resulting output files will have the name you specified, with a sequential number appended.
-
If you select Split files by record count, specify Split count as maximum number of records. The resulting output files will have the name you specified, with a sequential number appended.
-
If you select Split files by data, select the desired Split field name from the drop-down list. Data must be grouped by the split field. The resulting output files will have the name you specified, augmented by inserting the value of the specified field before the extension. For example, splitting output by ZIP Code produces file names of the form
output_file01234.csv.
-
-
To generate file names where the entire name is determined by the value of the specified field, select Treat output file as folder and specify the output directory in the Output file box, using the form:
F:\output_directory. -
If you do not want the specified field to appear in the output, select Suppress split field.
-
Optionally, go to the Execution tab and Enable trigger output, configure reporting options, or set Web service options.
The Split into several files option is useful when you want to write a file to media (CD-ROM, DVD, external drive) and the raw file is too large for a single disk. Set the maximum file size to equal the capacity of the target media.
You can configure a single Flat File Input tool to read a sequence of files with the same layout and format. This is an easy way to reassemble a file that's been split as described above. Since Data Management always reads wild card input files in alphabetical file name order, they are guaranteed to be reassembled in order.
Consider using the Extract Layout tool to create "layout" files describing the layout of the flat file. These layout files are directly readable by Data Management using the Import Layout feature, and can also assist others in reading the files.