Overview
The steps in the External group cause the automation to interact with the environment by invoking external processes, connecting to other computers, soliciting user input, or sending notifications.
Execute
The Execute step executes a specified process and waits for it to finish running before activating the output connector.
Configuring an Execute step:
-
Select the Execute step.
-
Go to the Configuration tab on the Properties pane.
-
Specify the Process:
-
Process is the executable file name and path.
-
Arguments are optional command-line arguments to be passed to the specified executable.
-
-
Configure Process I/O options:
-
Standard input specifies how the executable's "stdin" file descriptor is treated. Options are:
-
(none): connects a null input.
-
From file: connects stdin to the file specified in Stdin file name.
-
-
Standard output specifies how the executable's "stdout" file descriptor is treated. Options are:
-
(discard): all output is discarded.
-
Log as info: output text lines are turned into information-level execution report entries.
-
Log as warnings: output text lines are turned into warning-level execution report entries.
-
Log as errors: output text lines are turned into error-level execution report entries.
-
To file: connects stdout to the file specified in Stdout file name.
-
-
Standard error specifies how the executable's "stderr" file descriptor is treated. Options are:
-
(discard): all output is discarded.
-
Log as info: output text lines are turned into information-level execution report entries.
-
Log as warning: utput text lines are turned into warning-level execution report entries.
-
Log as error: output text lines are turned into error-level execution report entries.
-
Log as file: connects stderr output to the file specified in Stderr file name.
-
-
-
Specify a Working directory. This is the directory where the process will execute. If no path is specified, the working directory is undefined. You can use expression replacement to set Working directory to the value of a variable. For example if the variable
FILENAMEis a ForEach variable used for looping over files, enter${DirectoryFromPath(FILENAME)}to set the working directory to the directory containing the current file. -
Optionally, select the Execution tab and set execution options:
-
Select Skip to bypass this step at run time. Do not leave this option enabled in production environments.
-
Select Ignore error on this step to suppress step failure and continue processing in case of error.
-
FTP
Support for insecure FTP has been deprecated and will be removed in a future version. Refer to Deprecation notices for details.
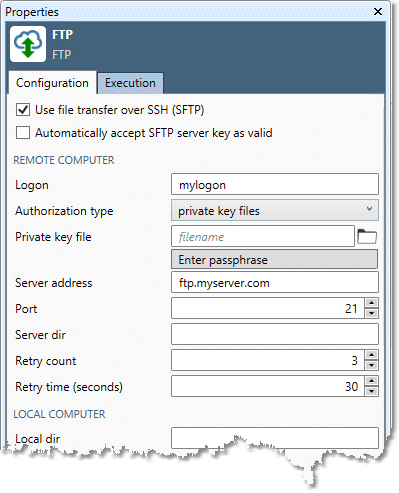
An FTP step logs into an FTP (File Transfer Protocol) server using a specified login, password, server, transfer mode, and passive mode, then executes a sequence of FTP commands.
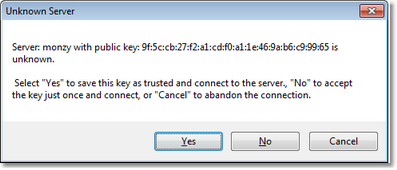
You can optionally enable SSH File Transfer Protocol (also called SFTP or Secure FTP), a secure file transfer protocol that takes place over the secure shell (SSH). When you specify SFTP, you can choose to automatically accept the SFTP server's secure key and save it to the repository as a trusted server. If you do not enable this option, at runtime the automation will require user input.
If an SFTP server is already stored as a trusted host in the known_hosts file and its host key changes due to key rotation, the new key may not be recognized automatically. In such cases, the existing entry must be manually removed from the known_hosts file before reconnecting to the server.
The known_hosts file is located under Repository > ssh. Updating this file requires logging in with an RPDM account that has Administrator privileges.
Configuring an FTP step:
-
Select the FTP step.
-
Go to the Configuration tab on the Properties pane.
-
Optionally, select Use file transfer over SSH (SFTP). You can also select Automatically accept SFTP server key as valid to save the SFTP key to the repository for future use. If you do not select Automatically accept SFTP server key as valid, at run time the automation will generate a dialog box requesting user confirmation for the connection.
-
Specify connection information for the Remote computer.
|
Setting |
Explanation |
|---|---|
|
Logon |
The FTP server login. This can be anonymous for anonymous FTP. |
|
Authorization type |
If you selected Use file transfer over SSH (SFTP), specify either the FTP server password, or private key file. |
|
Password |
If Authorization type is password, the FTP server Password or Key Vault reference. |
|
Private key file |
If Authorization type is private key file, the public key file. |
|
Passphrase |
If Authorization type is private key file, you may optionally be required to decrypt the key files with a passphrase or Key Vault reference. |
|
Server address |
The address of the FTP server in standard format (for example, |
|
Port |
The TCP port of the FTP server. If unspecified, defaults to 21 for standard or 22 for SFTP. |
|
Server dir |
(Optional) The target directory on the FTP server. |
|
Retry count |
Number of times to retry connection in case of connection failure. Defaults to 3. |
|
Retry time |
Interval (in seconds) between retries. Defaults to 30. |
-
Specify connection information for the Local computer.
|
Setting |
Explanation |
|
Local dir |
The local directory for transfers to/from the automation server. |
|
Log |
If selected, logs every line of server response to the automation log. |
-
In the Commands section, select a line in the Command grid and then select a Command from the drop-down list and configure its options.
|
Command |
Options |
|---|---|
|
get (download single) |
|
|
mget (download multiple) |
Remote pattern consists of wildcards specifying the remote files to download. Remove, if selected, deletes the remote files after successful transfer. |
|
put (upload single) |
|
|
mput (upload multiple) |
Local pattern consists of wildcards specifying the local files to upload. Remove, if selected, deletes the remote files after successful transfer. |
|
delete |
Remote pattern consists of wildcards specifying the remote files to delete. |
|
rename |
|
|
dir (list) |
Staging label is the name of the staging output containing the list of files. This staging file will have the following columns:
|
|
lcd (change local directory) |
Path is the local directory to make current. |
|
cd (change directory) |
Path is the remote directory to make current. |
|
mkdir (create directory) |
Path is the remote directory to create. |
|
rmdir (remove directory) |
|
|
Allow command failure |
Select to continue processing if the command fails. Useful, for example, when creating a remote directory where the specified directory may already exist. |
-
Repeat step 5 to define additional commands. These will be executed in the order in which they are listed in the grid. To change the order, select a commands then select the


-
Optionally, select the Execution tab and set execution options:
-
Select Skip to bypass this step at run time. Do not leave this option enabled in production environments.
-
Select Ignore error on this step to suppress step failure and continue processing in case of error.
-
Notification
The Notification step issues a notification via the specified method:
-
Email sends the message via email.
-
SMS sends the message via SMS.
-
Log writes the message to the automation log.
Optionally, you can select Stop and exit with error message to cause the automation to stop and send an error message to the Message Viewer.
Configuring a Notification step:
-
Select the Notification step.
-
Go to the Configuration tab on the Properties pane.
-
Select the Notification type. If you select Email or SMS type, configure settings.
|
Setting |
Explanation |
|---|---|
|
Use server |
If selected, specify a SMTP Server and Port, as well as Username and Password (or Key Vault reference). Some networks may not allow applications to send directly. In such cases, you may specify your ISP's or company's SMTP server to broker the transmission. If this is not selected, Data Management uses the DNS MX record associated with the From value. |
|
Server |
If Use server is selected, the address of the SMTP server in standard format (for example, |
|
Port |
If Use server is selected, the TCP port of the SMTP server. If unspecified, defaults to standard (25). |
|
Username
|
If Use server is selected, the credentials required to access the SMTP server. |
|
Use secure connection |
If selected, enables SMTP connections over SSL. |
|
Timeout (seconds) |
Time limit to establish connection. Defaults to 180. |
|
Retry count |
Number of times to retry connection in case of connection failure. Defaults to 3. |
|
Retry time |
Interval (in seconds) between retries. Defaults to 30. |
|
From |
Email address to use in the message From header. |
|
To
|
If Notification type is Email, recipient of email message: one or more destination email addresses. |
|
Carrier
|
If Notification type is SMS, recipient of SMS message: one or more destination phone numbers, including carrier specification. |
|
Log all communications |
If selected, logs every line of server response to the automation log. |
|
Subject |
If Notification type is Email, optional subject line for email message. |
|
Attachment |
If Notification type is Email, optional file to attach to the email message. |
Support for notifications via SMS has been deprecated in version 9.4.5 and will be removed in future Data Management releases.
-
Select the severity Level that will generate a message: Information, Warning, or Error.
-
Enter the text of the notification in the Message box.
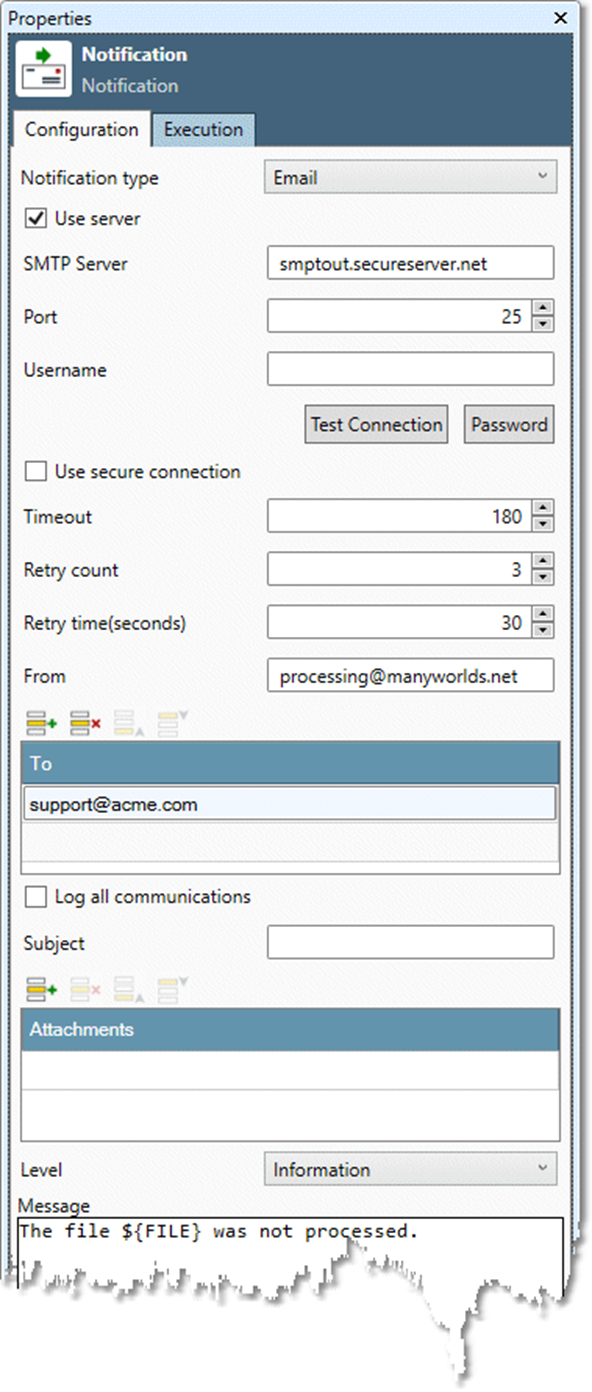
Variables can be used in the Message, for example: Automation ${system.AutomationName} failed at step ${system.LastErrorStepName} at ${system.LastErrorDateTime}.
-
Optionally, select Stop and exit with error message to stop the automation and send an error message to the Message Viewer.
-
Optionally, select the Execution tab and set execution options:
-
Select Skip to bypass this step at run time. Do not leave this option enabled in production environments.
-
Select Ignore error on this step to suppress step failure and continue processing in case of error. Do not enable this if you selected Stop and exit with error message.
-
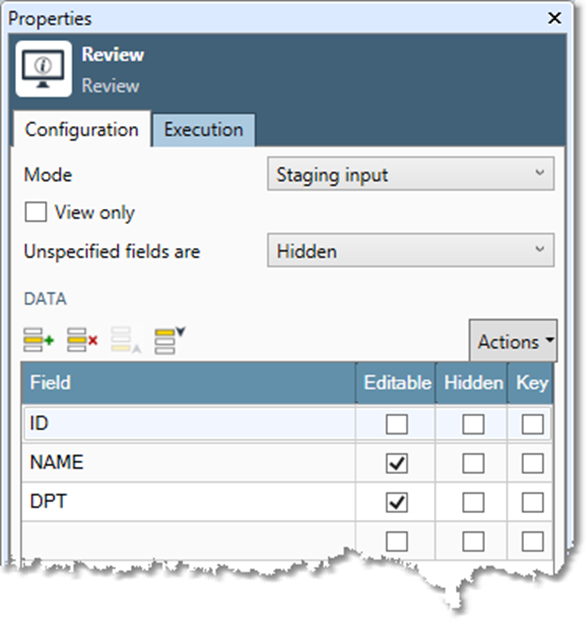
Review
A Review step pauses processing, presents a view of the data at that point in the process, and optionally permits user editing of the data before proceeding. Modified records can be saved back to the file or database under review. The user can save intermediate review results, or postpone reviewing for a later time.
When an automation triggers a Review step, the data is pre-processed, and then the Data Management client waits for user intervention before proceeding. If you have the automation open in the Data Management client, you will see the review step turn yellow. A box at the bottom indicates that action is required.

If the user cancels the step, the step pauses and can be restarted later.
Review supports two editing modes: Staging input, and RDBMS Table.
-
In Staging input mode, "D" input and output staging connections are enabled. The editable columns of the staging file from the input are presented for editing and results saved to the output. You can specify which fields should be displayed to the user, the order in which they are displayed, and which are editable and which hidden.
-
In Table mode, specified columns of a database table are presented for review and editing. Committing the changes will cause the editable columns in the database table to be updated. You can specify which fields should be displayed to the user, the order in which they are displayed, which are editable, which hidden, and which are to be used as keys in the final table update (keys cannot be editable).
Configuring a Review step:
-
Select the Review step.
-
Go to the Configuration tab on the Properties pane.
-
Select the review Mode:
-
Staging input: enable "D" input and output staging connections and present editable columns of the input staging file for review and editing.
-
Table: present columns of a database table for review and editing.
-
-
Optionally, select View only to present data as read-only.
-
Define mode settings.
|
Mode |
Settings |
|---|---|
|
Staging input |
|
|
RDBMS table |
|
-
Optionally, select the Execution tab and set execution options:
-
Select Skip to bypass this step at run time. Do not leave this option enabled in production environments.
-
Select Ignore error on this step to suppress step failure and continue processing in case of error.
-
In Table or Stage editing modes, you can change the order in which fields are displayed by selecting a field then choose the ![]()
![]()
User Interface
The User Interface step halts processing and solicits user input before processing continues.
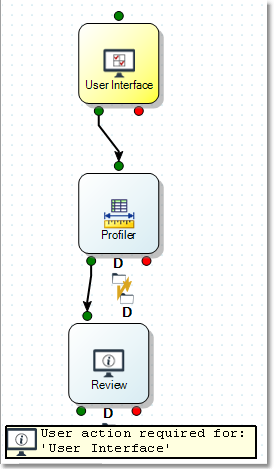
The user selects the User action required box to view the step's interface.
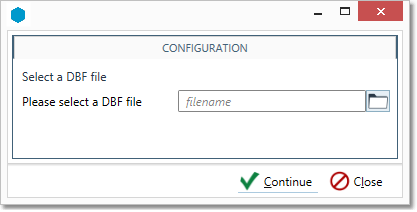
Once the user performs the requested action, processing continues. The user input is assigned to predefined variables and can be referenced in subsequent processing.
You can create two types of controls:
-
A simple dialog box sets a single Boolean result variable.
-
Property configuration controls can build more complex dialog boxes with multiple inputs and variables.
Configuring a User Interface step:
-
Select the User Interface step.
-
Go to the Configuration tab on the Properties pane.
-
Select and configure a Control type:
-
Simple Yes/No uses a simple dialog box to set a Boolean Result variable:
-
Specify Title and Prompt.
-
Select an existing Result variable from the list or define a new one. This automation variable will be assigned a value of True if the user selects Yes, and False if the user selects No.
-
-
Property configuration lets you design a custom dialog box to solicit one or more user inputs and assign each to a designated Variable.
-
-
Optionally, select the Execution tab and set execution options:
-
Select Skip to bypass this step at run time. Do not leave this option enabled in production environments.
-
Select Ignore error on this step to suppress step failure and continue processing in case of error.
-
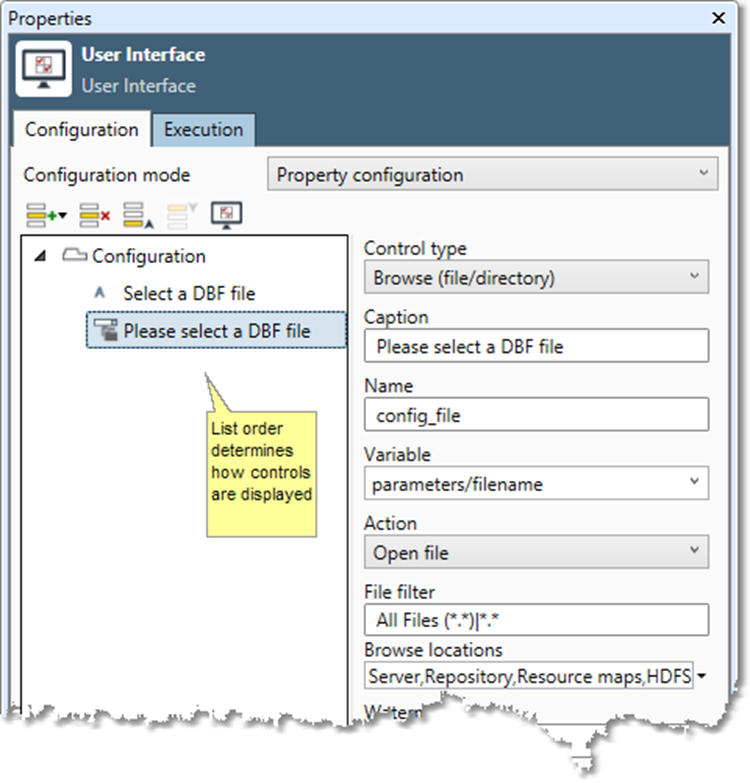
Designing a custom dialog box
You can use the User Interface step to build a dialog box that solicits a variety of information from the user and assigns it to automation variables that can be used in downstream processing.
-
Select a Configuration mode of Property configuration.
-
Select the


-
Select the control and configure options in the Editor section.
-
Control type is the user interface element used to collect configuration information from the user on the Properties pane. These elements can be configured to be part of a Dynamic interface group. See Building dynamic interfaces for more information.
-
Caption is the property label the user will see in the project's configuration dialog.
-
Name is the name of the parameter. Use any string containing, letters, numbers, or the underscore character ( _ ). In most cases, this should be the same as Variable.
-
For all control types except Tab page, Header, and Label:
-
Select a Variable from the list or define a new variable to receive the user input.
-
Optionally, specify a Default value for the variable.
-
Depending on the type selected, use the

-
-
|
Icon |
Type |
Function |
Additional options |
|---|---|---|---|
|
|
Tab page |
Organizes and labels user interface elements. |
None. |
|
|
Browse (file/directory) |
User selects browse button on file selection tool to perform Action. |
|
|
|
Check box |
|
Triggers. See Building dynamic interfaces. |
|
|
Combo box (drop-down) |
User selects a single value from a list of values or optionally enters text value. |
|
|
|
Date |
User selects date from calendar control. |
None. |
|
|
Date/Time |
User selects date and time from calendar control. |
None. |
|
|
Field select |
Primarily useful for macros. User selects the Input name from which the table schema will be obtained. This matches the Input label in the Macro Input Proxy tool. The table schema contains the list of available input fields from which the user can select. Implicit default value is Input. |
Select Required to require the user to set the parameter. If your project has more than one input connector tool, specify Input name as the name of the input connector from which the field is to be chosen. |
|
|
Group |
Organizes and labels user interface elements. |
None. |
|
|
Label |
Organizes and labels user interface elements. |
None. |
|
|
Number (up-down) |
User selects an integer value. |
|
|
|
Output map |
Primarily useful for macros. Maps new fields produced by the project onto output field names. This matches the Output label in the |
Select Required to require the user to set the parameter. Select Always create on output if you want the field to be created on output, even if it does not exist on the input connection. This makes it easy to set up with logic like "If the user-specified field exists on input, use it and alter its value on output. Otherwise make a new field that the macro alters and makes available on output. |
|
|
Password |
User enters a password, which is masked. |
None. |
|
|
Text (single line) |
User enters simple text. |
|
|
|
Text (multiple lines) |
User enters arbitrary text. |
None. |
|
|
Trigger group |
Defines group of controls targeted by defined Triggers. See Using trigger groups in dynamic interfaces. |
None. |
|
|
File selector |
User selects browse button on file selection tool to perform Action. |
|
|
|
Time |
User selects time from calendar control. |
None. |
|
|
Variable |
Defines a global variable. |
Data type. |
-
Repeat steps 2-3 to add additional user interface elements.
-
Select Preview to view the dialog box as it will appear at run time.