

Overview
Data Management can be installed on servers running the x86-64 edition of one of the supported operating systems.
The Data Management client application is Windows-only, and is not installed on Linux.
Installing Data Management creates services that run the following executables:
-
rpdm_siteserver: The Data Management Site Server. This service manages meta-data, version control, settings, security, logging, and licensing. It communicates with one or more Execution Servers.
-
rpdm_executionserver: The Data Management Execution Server. This service manages the execution of Data Management projects and automations. It must communicate with a Site Server to function.
-
rpdm_wspserver: The Data Management Web Proxy Server. This service manages Data Management realtime web services. It must communicate with a Site Server and an Execution Server to function.
These services are independent and can be installed on the same or different computers. A simple installation will have all services on one computer. A larger installation will typically install all services on a main computer, and install Execution Servers on secondary "worker" computers in the computation cluster. A single Web Proxy Server may be installed on the main computer or on a secondary computer. These secondary computers talk to the main computer's Site Server to obtain shared meta-data, security, version controlled storage, logging, and other services.
Data Management servers can inter-operate between Windows and Linux. For example, a Site Server on Linux can communicate with an Execution Server on Windows. For help configuring such advanced installations, contact Data Management support.
Linux installation prerequisites
Installing Data Management for Linux requires some planning. All installations must be performed with root privileges.
Up-to-date operating system
Your operating system must be up-to-date before installing Data Management.
When preparing for a CentOS installation, run the command:
sudo dnf update
Or for an Ubuntu install, run these commands:
sudo apt update
sudo apt upgrade
This will ensure all installed packages are up-to-date.
Linux system libraries
Data Management for Linux requires a number of system libraries, which are provided by your Linux distribution. If the installer does not detect the required libraries, it will display an error and halt installation. If this happens, install the missing libraries and then retry the installation.
Write and execute permissions on the /tmp directory
The Data Management Linux installer for Linux requires write and execute permissions on the /tmp directory to confirm that the system can supply entropy sufficient to support the enhanced encryption introduced in Version 9. Without these permissions, installation will fail.
Entropy and cryptography
Data Management for Linux requires an entropy pool sufficiently large to support cryptography. If the installer determines that the system has insufficient entropy bandwidth, will display an error and halt installation. If this happens, install Rng-tools and then retry the installation.
Linux service user
If you want the Data Management services to run as a user other than root, you must create the desired user before installing Data Management. Consult the documentation for your OS for details.
Open service ports
In order for the Data Management client to be able to access the Data Management services, you must open the firewall ports associated with those processes. Consult the documentation for your OS for details.
|
Process |
Default ports |
|
Site Server |
20420 |
|
Execution Server |
20421-20426 |
|
Web Service Proxy |
20427 |
Requires write and execute permissions on the /tmp directory.
Linux, JDBC, and databases
Data Management for Linux includes JDBC support for the following databases:
-
AWS Aurora MySql
-
AWS Redshift
-
Azure Data Warehouse
-
Azure SQL
-
DB2
-
Microsoft SQL Server
-
MySQL
-
Netezza
-
Oracle
-
PostgreSQL
-
SAP HANA
-
Snowflake
-
Teradata
-
Vertica
Contact Redpoint Support for information about specific database driver versions supported.
To install the JDBC framework:
-
Download your vendor’s JDBC driver(s).
-
Install JDBC drivers into the
jdbc_driversdirectory. -
Refer to the database vendor documentation for specific installation instructions.
Upgrade Data Management
If you have a previous version of Data Management installed, you should back up your repository before installing version 9.5:
To back up the repository
-
Launch the Data Management client and connect to your Data Management installation.
-
Go to the repository, right-click the repository icon, and then select Create archive:
-
In the Create Archive dialog, select the root Repository checkbox.
-
Select OK.
-
Specify a location outside the Data Management installation directory where your repository backup should be saved, and then select Save.
Install Data Management
After you have installed the prerequisite software and defined users, follow these steps.
If you are upgrading from a previous Data Management version, back up your repository before proceeding.
Step 1: Obtain installation package
To install the Data Management software, you will need to download the Data Management server installer for your Linux distribution:
-
Red Hat Enterprise Linux-based distributions:
RedpointDM-Server-x.y.z.b-for-CentOS.run(where x.y.z.b is the version information). -
Ubuntu:
RedpointDM-Server-x.y.z.b-for-Ubuntu.run(where x.y.z.b is the version information).
Contact Data Management support or pre-sales support for download information.
Step 2: Run the installer
-
From the command prompt, type a command of the form:
admin_user@server_name-ubn16-1:~$ sudo ./RedpointDM-Server-9.0.1.1999-for-Ubuntu.run
You must have super user (root) privileges to install Data Management, even if you are going to run the services as a different user (see Linux installation prerequisites).
You will be presented with a series of questions. Each question is supplied with a default answer, which is capitalized.
Questions that have Yes/No answers accept any answer starting with a Y or y as a yes. Any other answer is treated as no.
-
Agree to the Data Management Use License (
y). -
Specify your installation type:
-
1. Enterprise: Install all Data Management components.
-
2. Worker: Install a Data Management worker node. A Site Server and Data Management repository must be available elsewhere on the network, and you will need to know that Site Server’s hostname and port number.
-
3. Repository: Install the Data Management Site Server and repository.
-
You cannot install individual services.
-
Configure additional installation options. Refer to the table below.
|
Option |
Explanation |
|
Upgrade/migration |
If the installer detects an existing Data Management Version 8 installation, you may elect to migrate it into your Version 9 installation, importing projects and some settings from the previous version. Advanced Security and custom JVM settings are not automatically migrated. If you have these configured in your version 8 installation, you may need to configure the |
|
Installation folder |
Choose the installation directory, or accept the default location If the installer detects that the installation directory is not empty, you will be prompted to keep or purge the directory's contents. |
|
Data folder |
Choose the data directory, or accept the default location |
|
Site Server address
|
If you selected Worker in step 3, specify the address and port of the Data Management Site Server. |
|
Site Server configuration |
If any ports in the range |
|
Enable Advanced Security |
Advanced security mode maps each Data Management user to an OS logon, applying the access privileges that the OS user has when logged on directly to the OS. If Enable Advanced Security is selected, you must run Data Management as root. |
|
Map OS user to Administrator logon |
If you enabled Advanced Security, you may optionally map an OS user to the Administrator logon. |
|
Execution Server configuration |
Specify the Site Server's Execution Server name and Execution Server network address, or accept the default values. |
-
Review your selected installation options, and then press Enter to begin installation.
If you selected Worker in step 3, when installation completes, you must copy crypto_keys from the installation directory of your Site Server to the installation directory of your Worker install.
Step 3: Verify the installation
To verify the installation, check that the Data Management processes are running:
[sqa@cdh-ha-en ~]$ ps -ef | grep rpdm
root 1263 1 0 Dec05 ? 00:07:51 /opt/RedpointDM9/program/rpdm_executionserver -daemon
root 1264 1 0 Dec05 ? 00:18:27 /opt/RedpointDM9/program/rpdm_siteserver -daemon
root 1270 1 0 Dec05 ? 00:19:59 /opt/RedpointDM9/program/rpdm_wspserver -daemon
Connect the client to a Linux host
The Data Management client software runs only on Microsoft Windows.
To install the Data Management client:
-
Download or obtain on CD-ROM/DVD-ROM the Data Management installer for Windows and run the Data Management installer on the workstation computer.
-
When prompted to select the type of installation to perform, choose Client.
-
Select Next to continue.
-
Choose the folder in which to install the software and select Next to continue.
-
When installation is complete, select Finish.
-
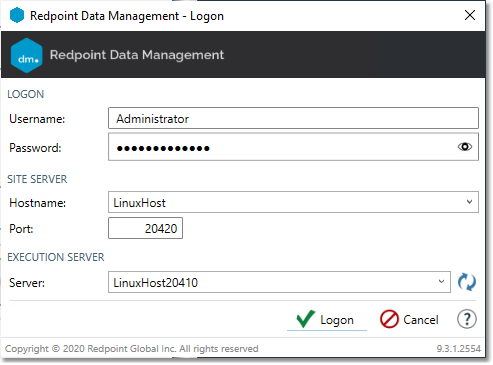
Run the Data Management client from the Windows Start menu. In the Logon dialog box, enter the default User Name and Password (Administrator/Administrator) and your Linux Hostname:
-
Under Execution Server, select Server and choose your Execution Server from the list.
-
Select OK.
If no Execution Server is shown, or the client fails to connect, confirm that your services are running, that your Windows client can resolve the Linux server host name, and that no firewall is blocking network access to the IP ports used by Data Management (20420-20426).
Contact Data Management support for assistance if the client is unable to connect.
Install CASS on Linux
-
Get the installer from the Redpoint Download Site. Sample command:
wget https://cdn.redpointglobal.com/rpdm-linux-cass/CASS-V9-2022-05/RedPointDM-CASS-1_9_2-2022-05-01-r20220505204340-for-Linux.tgz
-
Set read/write permissions on the installer file:
chmod 777 RedPointDM-CASS-1_9_2-2022-05-01-r20220505204340-for-Linux.tgz
-
Extract the
tgzfile:
tar -xvzf RedPointDM-CASS-1_9_2-2022-05-01-r20220505204340-for-Linux.tgz
-
A folder named
DMCass_2022-0xwill be extracted. Go inside the folder:
cd DMCass_2022_0x
-
Run the installer:
./install.pl
-
A series of questions will be presented. The first one is the license agreement. Press Enter if you agree (default =
yes).
-
Next are details on the Base install directory and the Base data directory. Confirm if the data directory is correct. (If an alternate data location is set on a different location other than the default, it should be pointing to that path.)
-
Ready to install? Press Enter to continue.
A successful install looks something similar below:
Installing...
/bin/cp -Rf ./CassUpdate_2022-05/module/* /opt/RedPointDM9/modules/cass/2022-05_2
Setting install date.
Creating DSO symbolic links
Updating dynamic link library system cache...Done
If you encounter the error Can't locate Data/Dumper.pm when running the installer, you might need to install the Perl data dumper package.
Can't locate Data/Dumper error when installing RPDM Modules in Linux
When installing RPDM modules in Linux such as CASS, Geocoder, etc., you might encounter an error when you try to run the installer.
The cause of the error is a missing package called perl-Data-Dumper.x86_64 in the operating system.
The fix is to install the Perl data dumper package:
Debian/Ubuntu
Only use sudo if the stack was installed as root.
sudo apt-get install perl
CentOS/Fedora/RHEL
Only use sudo if the stack was installed as root.
sudo yum install perl perl-Data-Dumper
Update RPDM modules [CASS/SERP/EWS] in Linux
To update RPDM modules [CASS/SERP/EWS] in Linux, follow the steps below:
Make sure to replace the sections marked as <download link address>, <downloaded file name>, <DMModule_2023-05>, and <downloaded zip file> with the actual relevant information in your context.
-
Login to the RPDM server using your credentials.
-
Download the Installer:
-
Visit the Downloads page on Data Solutions to locate the installer.
-
Use the
wgetcommand to download the installer:wget <download link address>
-
-
Change file permissions of the downloaded file to allow unzipping:
sudo chmod 777 <downloaded file name> -
Unzip the downloaded file using the following command:
sudo tar xvzf <downloaded file name> -
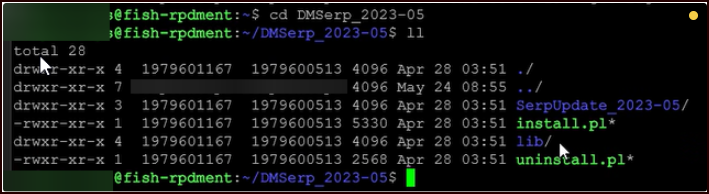
Navigate to the extracted directory using the
cdcommand:cd <DMModule_2023-05> -
Use the
llcommand to list the files in the directory and verify the extraction:ll
For example:
-
Start the installation process by executing the install script:
sudo ./install.pl-
Choose
Yesfor all further options to proceed with the installation. -
The installation process will begin.
For example: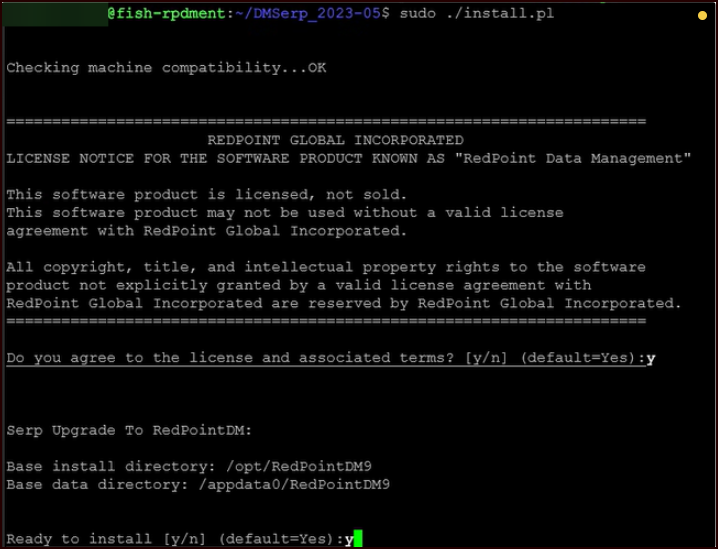
-
-
Verify completed installation. After the installation is completed, the output should resemble the following image:

-
To save disk space, delete the downloaded and extracted files using the following commands:
sudo rm -r <DMModule_2023-05>
sudo rm <downloaded zip file>
Purging obsolete CASS module updates
The CASS module installer does not automatically remove outdated monthly updates, each of which can consume 3GB or more of disk space. To manage storage efficiently, system administrators should periodically delete obsolete CASS updates. Since the USPS honors a grace period of approximately 90 days for CASS data, retaining older updates beyond that window is unnecessary.
Start by identifying the currently-active module:
-
In the Data Management client, navigate to Management Dashboard > Modules.
-
Under Modules installed on this site server and Modules installed on the execution servers, note the Data date (for example,
5/15/2025).
CASS module updates are stored in modules/cass in Data Management’s data directory. This is specified by CoreCfg.properties:data_directory, which defaults to the Data Management install directory.
CASS module updates follow the naming convention cass_$MONTH_$YEAR. So in our example, the active CASS update is cass_05_2025. This CASS update should not be removed; doing so will break any projects that depend on CASS. Instead, delete any directory whose name indicates it’s older (e.g., cass_04_2025, cass_03_2025, cass_02_2025, etc.) using standard filesystem actions supported by the host OS:
-
On Linux:
rm -rf cass_04_2025 -
On Windows:
rmdir /s /q cass_04_2025