

Overview
Data Management works with multiple security environments and models, supporting users with differing needs.
-
In simple security mode, Data Management runs as a single operating system (OS) logon, and all Data Management users run under the credentials of that single logon.
-
In advanced security mode, Data Management can use Active Directory on Windows or Pluggable Authentication Modules (PAM) on Linux to authenticate individual Data Management users. This binds user authentication to the operating system, with each user running with his or her own security credentials.
-
You can disable saving to local file system to prevent users without Administrator privileges from saving sensitive data to a local computer file system.
-
You can secure inter-process communications and published web services via SSL by configuring these to require signed certificates.
-
You can limit the ability of users to run external commands or define a set of approved external commands (
validate_executables).
Users and permissions
Data Management manages its own users and repository permissions, independent of the host OS (operating system). The Data Management Administrator or the creator of repository objects may restrict repository object access to specific users. Repository objects are owned by the creating user, and have Unix-style "owner/group/other" permissions for reading, writing, and deleting. Users are displayed in various places in the Management Dashboard to help track the state of the system. You should always create a separate Data Management user for each person using the system.
-
When Data Management is in simple security mode, all Data Management users map onto a single OS user (the logon running the Data Management services).
-
When Data Management is in advanced security mode, each Data Management user corresponds to an OS user:
|
OS User is specified in user configuration |
OS User is not specified in user configuration |
|---|---|
|
The specified OS User. |
OS users constructed from the Data Management User name, the Default domain, and the Pattern to use for building OS logins specified in the repository Site Settings. |
Groups and permissions
Each Data Management user belongs to a user group. Data Management manages its own groups, independent of the host OS (operating system). The Data Management Administrator or repository object creator may restrict repository object access to specific groups. The Data Management Administrator may also create groups with restricted roles, or configure Site Settings to prevent users without Administrator privileges from saving data to a local computer file system. By default, there is a single "Administrator" group, whose members have the privileges of the Administrator user.
The Data Management Administrator creates and manages Data Management groups in the repository, under the Groups section:

Group membership determines the User's permissions. To change a User's permissions, you can either change the Group to which the User is assigned, or change the permissions of the User's Group. Remember that if you change permissions for the Group, all members of that Group will receive the same permissions.
Disable “Remember me” in Logon dialog box
By default, the Logon dialog box has a Remember Me checkbox that users can enable to persist their username so they don’t need to re-enter it each time they log on to Data Management (they’ll still be required to enter their password). However, when security guidelines require, IT organizations can suppress the availability of this option.
To disable the Remember Me option, add a new DWORD registry value:
Computer\HKEY_LOCAL_MACHINE\SOFTWARE\RedPoint\DoNotRememberUsername
Data Management service logon
When you install Data Management on Windows or Linux, you specify the OS (operating system) user under which the Data Management site and execution services will run. On Windows, this should be a "domain user" with sufficient privileges to access the resources on your host OS and network that all users will need.
On Linux, the choice of service logon depends on whether you will want simple security mode or advanced security mode. If you want simple security, the Data Management service logon should be a logon with sufficient privileges to access the resources on your network that all users will need. For advanced security, the service logon must be "root."
Simple security mode
Data Management's default security mode is simple security, in which the entire system—browsing, projects, automations, and web services—runs under the Data Management service logon. Simple security is suitable for environments in which all users have the same OS privileges, or in which Data Management services are run separately on each user’s desktop or VM. In simple security mode, Data Management enforces permissions on its repository objects on a per-user basis.
Setup with simple security mode
In simple security mode, Data Management users exist independently of the OS. Each Data Management user is created using the Data Management client.
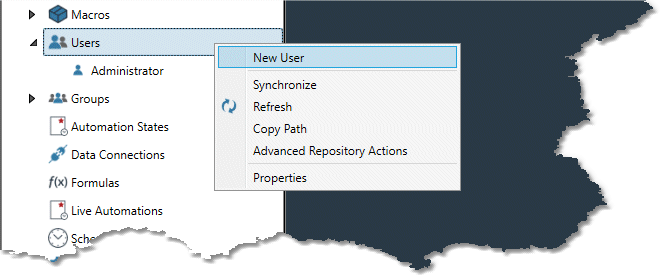
To create a Data Management user
-
Start the Data Management client on any computer, and log in as Administrator.
-
In the repository, right-click the Users icon, and then select New User.
-
Enter the User name and select the User group to which the user will belong.
-
Select OK.
-
Go to the Properties pane and enter the user's Password or a Key Vault reference.
Advanced security mode
Advanced security mode requires that projects be run by authenticated users. With Data Management's advanced security mode, organizations with more strict security needs can enforce access permissions on network and OS resources on a user-by-user basis. In advanced security mode, each Data Management user maps to an OS user, and has the same access privileges as he or she would have when logged on directly to the OS.
Data Management's Administrator user is an exception. When advanced security is enabled, you may optionally define the Administrator user as a specific OS user, authenticated using OS security by validating that user with the password entered in the OS logon dialog. The Administrator user has the same access privileges as he or she would have when logged on directly to the OS.
However, if the Administrator user is not defined as a specific OS user, the Administrator user's password is set in Data Management, and the Administrator user is mapped to the OS user running the Data Management services. The Administrator user has all the privileges of the service logon OS user.
Advanced security prerequisites
-
Windows: The service logon must be a domain user and cannot be LOCAL SYSTEM.
-
Linux: The service logon must be root.
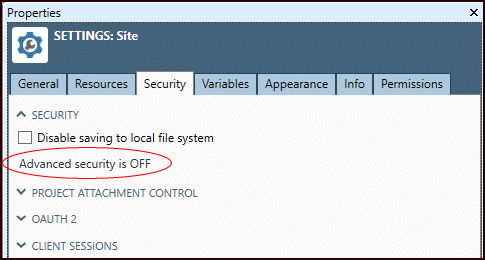
To check whether advanced security mode is enabled
-
Open the Settings folder in the repository, select Site.
-
Go to the Properties pane.
-
On the Security tab, open the Security section.
Enable advanced security
Advanced security is enabled in the Data Management file CoreCfg.properties with the keys enable_advanced_security and optionally administrator_os_user. You will need OS Administrator privileges to edit this file.
-
If
enable_advanced_securityisfalse, oradministrator_os_useris not specified, the Administrator user is authenticated using an internal password stored in Data Management. The Administrator user has the OS access permissions of the user running the Data Management services. -
If
enable_advanced_securityistrue, andadministrator_os_useris specified, the Administrator user is authenticated using OS security by validating the user specified byadministrator_os_userwith the password entered in the logon dialog. The Administrator user has the OS access permissions of theadministrator_os_user.
Before enabling advanced security, ensure that all temp spaces and mapped resources will continue to be accessible to these users. All users should save their work and log off. The Data Management services will restart when this setting is changed.
To enable advanced security with default Administrator authentication
-
Go to the Data Management installation folder, and then open the Data Management configuration file
CoreCfg.propertiesin a text editor. -
Add or edit this line:
enable_advanced_security=true -
Start the Data Management client on any computer, and log on as Administrator.
-
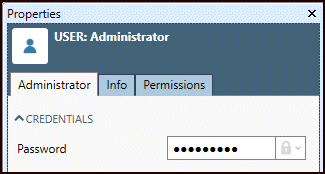
In the repository, open the Users folder, and then go to Administrator.
-
In the Credentials section, select Password, and then enter a password or Key Vault reference.
-
Select OK to finish.
To enable advanced security with OS Administrator authentication
-
Go to the Data Management installation folder, and then open the Data Management configuration file
CoreCfg.propertiesin a text editor. -
Add or edit these lines:
enable_advanced_security=true
administrator_os_user=domain\username
where domain\username is the OS logon of the Administrator user.
-
Start the Data Management client on any computer and log on as Administrator, entering the password of the OS user configured in step 2.
To disable advanced security
-
Go to the Data Management installation folder, and then open the Data Management configuration file
CoreCfg.propertiesin a text editor. -
Remove this line:
enable_advanced_security=true. -
Start the Data Management client on any computer, and log as Administrator.
-
In the repository, open the Users folder, and then select Administrator.
-
In the Credentials section, select Password, and then enter a password or Key Vault reference.
Setup with Active Directory integration
Active Directory integration is an attribute of the host operating system and indicates its authentication strategy. Active Directory is always used under Windows. It may also be used under Linux, if the OS has been configured to use Active Directory via LDAP or Kerberos for its user authentication. If you are unsure whether Active Directory integration is in effect on a Linux host, ask your system administrator. There is no setting in Data Management to enable or disable this attribute.
Once advanced security is enabled, follow these guidelines to configure Data Management for use in an Active Directory enabled environment.
To configure Data Management for Active Directory integration in advanced security mode
-
Start the Data Management client on any computer, and log on as Administrator.
-
In the repository, open the Settings folder, and then select Site.
-
On the Properties pane, go to the Security tab.
-
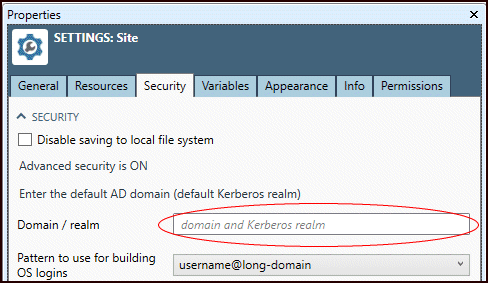
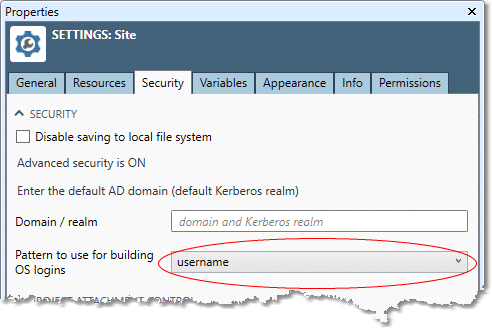
Open the Security mode section, and then enter default Active Directory domain as the Default domain.

The Default domain should be the "long" domain for your network (typically the DNS suffix), not just the first segment of the domain. Data Management will use the default domain to construct OS logons from Data Management user names, so you don’t have to explicitly map an OS user name for every Data Management user.
Unless your Active Directory configuration supports logons without a domain, you must either specify a Default domain, or specify a fully qualified OS User for each Data Management user.
Select the Pattern to use for building OS logins
-
username@long-domain: Default. OS users will be constructed of the form
username@BIG.DATA.COM. This always works for Windows, and works for many Active-Directory-enabled Linux configurations. -
long-domain\username: For Linux only. OS users will be constructed of the form
BIG.DATA.COM\username.
This may be necessary for some Linux environments. This corresponds to the username that you type when logging in an Active-Directory-authenticated user directly on the Linux OS. Check with your system administrator to determine if this is the correct choice.
-
short-domain\username: For Linux only. OS users will be constructed of the form
BIG\username.
This may be necessary for some Linux environments. This corresponds to the username that you type when logging in an Active-Directory-authenticated user directly on the Linux OS. Check with your system administrator to determine if this is the correct choice.
-
username: For Linux only. OS users will be constructed of the form
username.
This may be necessary for some Linux environments. This corresponds to the username that you type when logging in an Active-Directory-authenticated user directly on the Linux OS. Check with your system administrator to determine if this is the correct choice.
In advanced security mode, each Data Management user is mapped to an OS user. With Active Directory integration, you should leave most options in the Data Management User Properties empty to use the default user mapping.
To create Data Management Users in advanced security mode with Active Directory integration
-
Start the Data Management client on any computer, and log on as Administrator.
-
In the the repository, right-click the Users icon, and then select New User.
-
Enter the User name and select the User group to which the user will belong.
-
Select OK.
-
On the Properties pane, setting OS User is optional since advanced security is on.
-
Unless your Active Directory configuration supports logons without a domain, you must either specify a Default domain in Site Settings, or specify a fully qualified OS User for each Data Management user.
-
When OS User is blank, Data Management will construct OS users automatically from the User name, the Default domain, and the Pattern to use for building OS logons specified under Site Settings in the repository:
We recommend that you leave OS User blank and let Data Management construct OS user names automatically. This will simplify management of Data Management users. However, if this strategy is impossible, specify the OS user in exactly the form needed to log in to the host OS, including domain.
Setup on Linux without Active Directory integration
Once advanced security is enabled, follow these guidelines to configure Data Management for use on a Linux OS without Active Directory (LDAP) authentication. (Active Directory integration is always in effect for Windows.) If you are unsure whether Active Directory integration is in effect on a Linux host, ask your system administrator. There is no setting in Data Management to enable or disable this attribute.
To configure Data Management in advanced security mode without Active Directory integration
-
Start the Data Management client on any computer, and log on as Administrator.
-
In the repository, open the Settings folder, and then select Site.
-
View the Properties pane. On the General tab, you should normally leave Default domain in the Security mode section blank.
-
From the Pattern to use for building OS logins dropdown, select username, indicating that Linux logons will be short username-only logons.
In advanced security mode, each Data Management user is mapped to an OS user. Without Active Directory integration on Linux, you should normally leave most options in the Data Management User Properties empty to use the default user mapping.
To create Data Management Users in advanced security mode without Active Directory integration
-
Start the Data Management client on any computer, and log on as Administrator.
-
Right-click the Users icon, and then select New User.
-
Enter the User name and select the User group to which the user will belong.
-
Select OK.
Signed certificates
Data Management uses SSL/TLS for secure inter-server and client-server communication. Data Management's published web services can also be configured to use HTTPS/SSL. In both cases, Data Management automatically generates a self-signed certificate.
You can configure Data Management to use or require a signed certificate by editing Data Management configuration files. These files can be found in the Data Management installation folder. On Windows, this is typically C:\Program Files\RedpointDM9. You will need OS administrator permissions to edit these files. Alternatively, you can simply replace the default self-signed certificate keys located in the Data Management installation folder (cert.pem and private_key.pem) with signed key files of the same names. You can define a single public/private key pair to be used for both inter-process and web service SSL communications, or different key pairs for each.
Self-signed certificates
When secure inter-server and client-server communication (SSL/TLS) is enabled in Data Management but no signed certificates have been specified, Data Management generates self-signed certificates that expire one year from the creation date. If those credentials are not replaced or renewed within that period, the Data Management client will prevent users from logging on, and will display the following error message:
Unable to secure connection to RedpointDM services.
To renew a self-signed certificate
-
Go to the Data Management installation folder, and then delete the files
cert.pemandprivate_key.pem.
Use a signed certificate
To configure Data Management to use a signed certificate
-
Copy your public and private key files to
cert.pemandprivate_key.pemin the Data Management installation folder (unless you have specified an alternate location in the fileCoreCfg.properties). -
Set permissions for the public and private key files as follows:
-
Key files are owned by the user running the Data Management services.
-
The user running the Data Management services can read both key files (
private_key.pemandcert.pem). -
Other users can read the public key (
cert.pem) but not the private key (private_key.pem). -
Only the owner of the key files (or nobody if you are managing them manually) can write them.
-
On Linux, these settings correspond to the following file "chmod" modes:
-
private_key.pem: 600 -
cert.pem: 644
Go to the Data Management installation folder, and then open the Data Management configuration file in a text editor. You will need OS administrator permissions to edit these files.
|
If you have... |
Edit... |
|
One computer for both Site and Execution servers |
|
|
Separate computers for Site and Execution servers, and this is the Site Server |
|
|
Separate computers for Site and Execution servers, and this is the Execution Server |
|
Add entries with public_key and private_key entries containing the path to the public and private key files. For example:
public_key=C:\Program Files\RedpointDM9\my_certs\cert.pem
private_key=C:\Program Files\RedpointDM9\my_certs\private_key.pem
If these keys are configured, but the specified key files do not exist or are invalid, the Data Management services will fail to start.
Require a signed certificate
To configure Data Management to require a signed certificate
-
Go to the Data Management installation folder, and then open the Data Management configuration file
CoreCfg.propertiesin a text editor. You will need OS administrator permissions to edit this file. -
Add the entry
validate_ssl_certand set it to true. For example:validate_ssl_cert=true.
If this key is configured but no valid signed certificate can be found, the Data Management services will fail to start.
Use a different signed certificate for web services
When a web service is published over HTTPS, Data Management will look for and use keys in the following order:
-
webservice_public_keyandwebservice_private_keyin firstWSPServerCfg.propertiesand thenCoreCfg.properties. -
public_keyandprivate_keyin firstWSPServerCfg.propertiesand thenCoreCfg.properties.
If either of the above entries are configured, but the specified files do not exist (or are invalid), the web service will fail to listen for requests.
If neither of the above entries are configured, Data Management will use the default cert.pem and private_key.pem files located in the Data Management installation folder.
To configure Data Management to use a different signed certificate for web services
-
Copy your public and private key files to a location accessible to Data Management.
-
Set permissions for the public and private key files as follows:
-
Key files are owned by the user running the Data Management services.
-
The user running the Data Management services can read both key files (
private_key.pemandcert.pem). -
Other users can read the public key (
cert.pem) but not the private key (private_key.pem). -
Only the owner of the key files (or nobody if you are managing them manually) can write them.
-
On Linux, these settings correspond to the following file "chmod" modes:
-
private_key.pem: 600 -
cert.pem: 644
-
Go to the Data Management installation folder on the Site Server, and then open the file
WSPServerCfg.propertiesin a text editor. You will need OS administrator permissions to edit this file. -
Add entries with
webservice_public_keyandwebservice_private_keyentries containing the path to the public and private key files. For example:
webservice_public_key=C:\Program Files\RedpointDM9\my_web_certs\cert.pem
webservice_private_key=C:\Program Files\RedpointDM9\my_web_certs\private_key.pem
If these keys are configured but the specified key files do not exist or are invalid, the web services will fail to listen for requests.
Install SSL certificate (Wildcard) on an RPDM server
Data Management uses SSL/TLS for secure inter-server and client-server communication. By default, it is using a self-signed certificate generated by RPDM itself. This page provides the steps on installing a signed certificate (wildcard).
Before you start, make sure that the DNS entry of the RPDM server matches the certificate name. For example, if the wildcard certificate has a subject *.rphelios.net, the RPDM server should have a DNS entry with the same domain: hostname.rphelios.net.
-
Our wildcard certificate usually has a
.pfxextension name. You need to convert them into a keypair with.pemextension (cert.pemis the public key andprivate_key.pemis the private key).
Refer to the next subsection for information on how to convert .pfx into .pem files: Generating (cert) Public and (private_key) Private .pem Files from .pfx Certificate in OpenSSL.
-
Once you have successfully generated separate public and private
.pemfiles, replace the defaultcert.pemandprivate_key.pemfiles residing on the Redpoint installation folder (\Program files\RedPointDM9) as follows:-
Stop RPDM services and delete
cert.pemandprivate_key.pemfiles from\Program files\RedPointDM9. -
Place the new
.pemfiles into the same path:\Program files\RedPointDM9.
-
-
Open
Corecfg.propertiesfile. Change the value ofuse_ssltotrue. Change the value ofvalidate_ssl_certtotrue. Save the file. -
Start RPDM services.
-
Log in to the RPDM client. You should not see the warning
Untrusted certificate, else the installation is not successful.
Another symptom that the SSL cert install isn’t working is that the Site service isn’t starting. As a backout plan, stop RPDM services, delete the new cert.pem and private_key.pem files. Start RPDM services. RPDM will auto generate self-signed certificates.
Generating (cert) Public and (private_key) Private .pem Files from .pfx Certificate in OpenSSL
This section walks you through the process of generating separate public and private .pem files from a .pfx certificate using OpenSSL. These .pem files can be useful for various purposes, such as configuring SSL/TLS connections on RPDM or working with cryptographic operations.
OpenSSL must be installed on your system. If not installed, refer to the official OpenSSL website or your operating system's package manager to install it.
-
Open a terminal or command prompt on your system.
-
Navigate to the directory where the
.pfxcertificate file is located. You can use thecdcommand to change directories. For example:
cd /path/to/certificate/directory
-
To extract the private key from the
.pfxcertificate and save it as a.pemfile, execute the following command:
openssl pkcs12 -in certificate.pfx -out private_key.pem -nocerts -nodes
Replace certificate.pfx with the actual file name of your .pfx certificate. You can also specify a different name for the output .pem file if desired.
-
You will be prompted to enter the import password for the
.pfxfile. Enter the password when prompted and press Enter. Note that the password characters will not be displayed while typing for security purposes. -
Next, generate the public key
.pemfile from the.pfxcertificate by running the following command:
openssl pkcs12 -in certificate.pfx -out cert.pem -clcerts -nokeys
Again, replace certificate.pfx with your .pfx certificate's filename or path, and choose a suitable name for the output .pem file.
-
Similar to Step 4, you'll need to provide the import password for the
.pfxfile when prompted. Enter the password and press Enter. -
Next, you’ll verify the generated
.pemfiles. After the commands complete successfully, OpenSSL will create two files:private_key.pemandcert.pem. These files contain the private key and the public key certificate, respectively.
You have successfully generated separate public and private .pem files from your .pfx certificate using OpenSSL. These files can now be used for various cryptographic operations, SSL/TLS configurations, or other purposes that require working with PEM-encoded keys and certificates.
Remember to keep the private key file secure and protected, as it provides access to sensitive cryptographic operations.
Security configuration examples
These scenarios describe how to install and configure Data Management, define a user group, and add users.
To install and configure Data Management on a Windows OS using simple security
-
Download the current Data Management installer for Windows, which is an executable file.
-
Install Data Management. Specify a valid domain account for the service logon (not LOCAL SYSTEM) that can access all OS and network data resources that your users will need.
-
After installation is complete, start the Data Management client and log on as Administrator.
-
Define a "Power users" group that has all privileges except Administrator.
-
Add each new user, selecting the "Power users" group. Select Password and enter the password for each new user.
To install and configure Data Management on a Linux OS using simple security
-
Download the current Data Management installer for your Linux OS. This is a file ending in
.tgz. -
Log on to the Linux server as root.
-
In the folder containing the installer
.tgz, run the commands:
tar -xvfz installer-file.tgz
cd Data Management _Server
./install.pl -
Follow the installation instructions. If it is acceptable for the "root" user to run the Data Management services, you can select Enter for each prompt. Otherwise, choose a suitable user that can access all of the data resources that your users will need.
-
After installation is complete, start the Data Management client and log on as Administrator.
-
Define a "Power users" group that has all privileges except Administrator.
-
Add each new user, selecting the Power users group. The User name may not contain symbol characters. Select Password and enter the password for each new user.
To install and configure Data Management on a Windows OS using advanced security
-
Download the current Data Management installer for Windows, which is an executable file.
-
Specify a valid domain account for the service logon (not LOCAL SYSTEM) that can access all OS and network data resources that you want the Administrator logon to be able to use.
-
After installation is complete, stop the Data Management services.
-
Start the Data Management client and log on as Administrator.
-
In the repository Site Settings, select the Security tab and:
-
Enter the Default domain as your primary Windows domain. This should be the "long form" like
DOMAIN.MYCOMPANY.COM, not justDOMAIN. -
Leave Pattern to use for building OS logons at its default setting of
username@long-domain.
-
-
Define a Power users group that has all privileges except Administrator.
-
Add each new user, selecting the "Power users" group. The User name should be the same as the Windows domain user without the domain. Leave OS User blank.
To install and configure Data Management on a Linux OS with no LDAP/Active Directory using advanced security
-
Download the current
<%PRODUCT%>installer for your Linux OS. This is a file ending in.tgz. -
Log on to the Linux server as root root (or use sudo to run the installer command).
-
In the folder containing the installer
.tgz, run the commands:
tar -xvfz installer-file.tgz
cd Data Management _Server
./install.pl -
Follow the installation instructions. Select Enter for each prompt. Data Management must run as the root user.
-
After installation is complete, stop the Data Management services.
-
Start the Data Management client and log in as Administrator.
-
In the repository Site Settings, select the Security tab.
-
Select Pattern to use for building OS logons and select username.
-
Define a "Power users" group that has all privileges except Administrator.
-
Add each new user, selecting the "Power users" group. The User name should be the same as the corresponding Linux host logon. Leave OS User blank.
Data Management on Linux with advanced security and LDAP/Active Directory
-
Download the current Data Management installer for your Linux OS. This is a file ending in
.tgz. -
Log into the Linux server as root.
-
In the folder containing the installer .tgz, run the commands:
tar -xvfz installer-file.tgz
cd Data Management _Server
./install.pl -
Follow the installation instructions. Select Enter for each prompt. Data Management must run as the root user.
-
After installation is complete, stop the Data Management services.
-
Start the Data Management client and log in as Administrator.
-
In the repository Site Settings, select the Security tab and:
-
Enter the Default domain as your primary Active Directory Domain. This should be the "long form" like
DOMAIN.MYCOMPANY.COM, not justDOMAIN. -
Select Pattern to use for building OS logons. Your choice depends on how your system administrator set up Active Directory integration on your Linux host. The pattern should match how non-root users log into the Linux host using putty or similar terminal programs. The most common choices are
usernameandshort-domain\username.
-
-
Define a "Power users" group that has all privileges except Administrator.
-
Add each new user. The User name must be the same as the corresponding Linux host logon without the domain. Leave OS User blank.
Security and audit logging
Data Management logs information about site operations in four security audit log files. These files are located in the audit_logs folder under the Data Management installation folder.
|
Log file |
Logged events |
|---|---|
|
|
Site service start/stop, repository actions, user sign-on/sign-off. |
|
|
Execution service start/stop, client connect/disconnect. |
|
|
WebServiceProxy service start/stop, web service state changes. |
|
|
Project and automation load, run, and save operations. Abnormal exits. |
The audit logs may include the following columns:
-
Timestamp:
DateTimeof the formYYYY-MM-D\THH:mm:ss.fff. -
Level: One of
INFO,WARNING, orERROR. -
Source: Data Management module in which the logged action occurred.
-
Operation: Logged action.
-
Username: Entity performing the action.
-
Resource: Path to referenced resource.
-
Success: Whether the operation succeeded or failed.
-
Message: Message associated with the action, for example
User signed on from IP=127.0.0.1:63019orSite server starting. -
Details: Summarizes changes to non-versioned repository objects in a JSON document. For example:
{code}{ "new_properties" : { "enabled" : "Y", "timestamp" : "0", "url_path" : "/x" }, "old_properties" : { "enabled" : "N", "timestamp" : "1538428801020", "url_path" : "" } }"{code}
To change the location of the audit log files
-
Open the file CoreCfg.properties in a text editor and change the value of
audit_log_folderto the desired location. This path must be writable by the Data Management service user.
To change the maximum size of audit log files
-
Open the file CoreCfg.properties in a text editor and change the value of
audit_log_max_file_sizeandaudit_log_max_total_sizefrom the default values (1MB and 10 MB respectively) to the desired values.