

Overview
The toolbar is only enabled once you have clicked on an item in the top left-hand interfaces list. The following options are exposed by the toolbar:
Create a new [item]
Create a new item. The type of item is determined by the currently-selected interface - for example, if Joins is selected, a new join is added to the list of joins displayed within the workspace.
Delete selected [item(s)]
Delete the selected item(s). If you delete an item that has been saved previously, it is marked as Deleted within the list. Such deletions are not made permanent until you select Save. If you delete an item that has yet to be saved, it is removed immediately.
Please exercise caution when deleting items in the Configuration Workbench. When you delete an item that is in use elsewhere (for example, a database key that is used by a resolution level that is, in turn, required by an audience definition), no checks are performed, and you may precede with the deletion (to the detriment of the resolution level, which will no longer work!). This is in contrast with performing a deletion in the File System, where you are prevented from deleting a file that is depended upon by another file.
Save
Saves any changes to the item(s) within which you are working currently. Selecting Save causes the current item(s) to be validated to ensure they meet the item type's mandatory requirements. If validation fails, you are presented with a list of specific validation errors. Following a successful save, a message is displayed.
Note that save does not apply to user groups or users, details of which are written to the database immediately after their creation or update within a modal dialog.
If you are editing a configuration collection and another user has saved the same collection, on your invocation of save, the File Conflict dialog is displayed. You can choose to overwrite the existing file (causing the other user’s changes to be lost) or cancel your save.
Note that this feature is available at all configuration collections other than Catalog, System Configuration, User Groups and Users.
Review History, below, for full details of configuration collections and their versions.
Refresh
This option causes the current list of items displayed in the workspace to be reloaded from the operational database.
Import & Export
Having commissioned an RPI tenant, there may be occasions when you wish to utilize the same set of configuration objects in another tenant. Another circumstance where re-using configuration objects might prove useful is when you have a test environment that you wish to copy to a production context. Import & Export allows you to export one or more configuration collections before importing them into another RPI tenant or installation (for more details on configuration collections please see History, below).
Availability of Import & Export is controlled by the File System - Import and Export functional permission. Invocation displays the Import & Export Configuration Collections file system dialog.
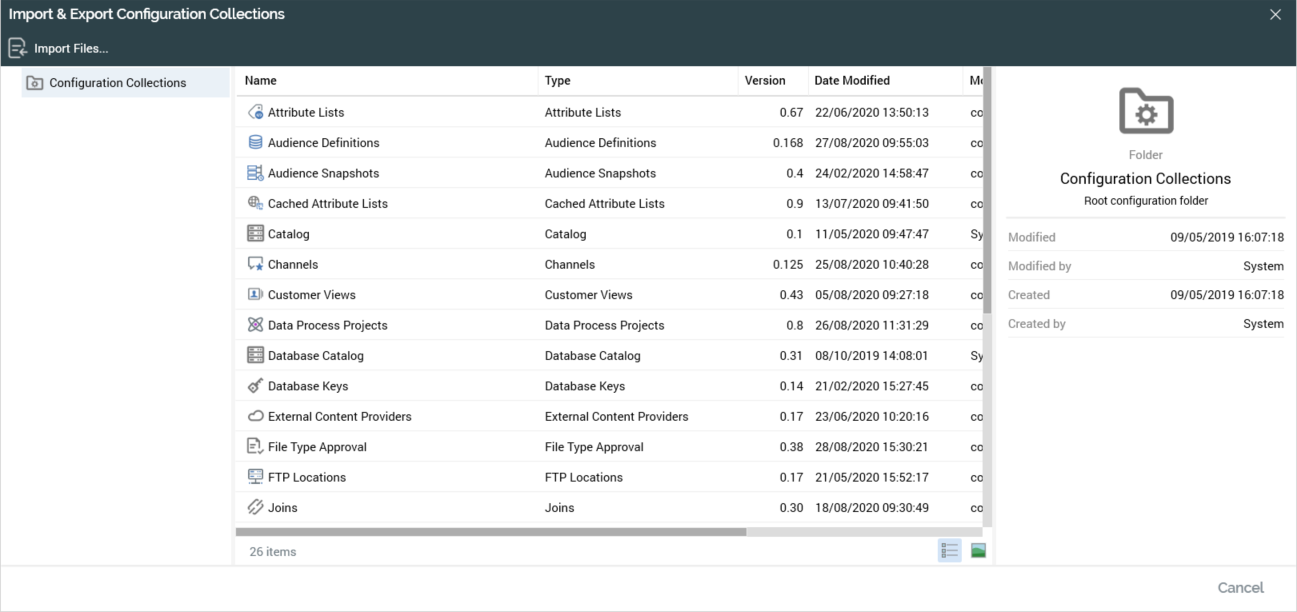
The dialog contains a toolbar, treeview, grid, and information panel. The toolbar exposes a single option, Import Collections.
Import Collections
Selecting this button displays the Import Configuration Collections... Windows file system dialog. The default file type is set to RPI Files (*.rpf).
A configuration collection (for example, database keys) is represented by a single .rpf file. In addition, certain configuration collections may require you to simultaneously import other, dependent, RPI files.
A single exported configuration item is represented by a *.rpc file.
You can select the files you wish to import and select Open to commence their import. Doing so displays the file(s) in the Import Files overlay (see below). You can also select a zip file containing exported RPI files. Selecting Cancel removes the Windows dialog and returns to the RPI File System Dialog.
The Import Files overlay contains the following:
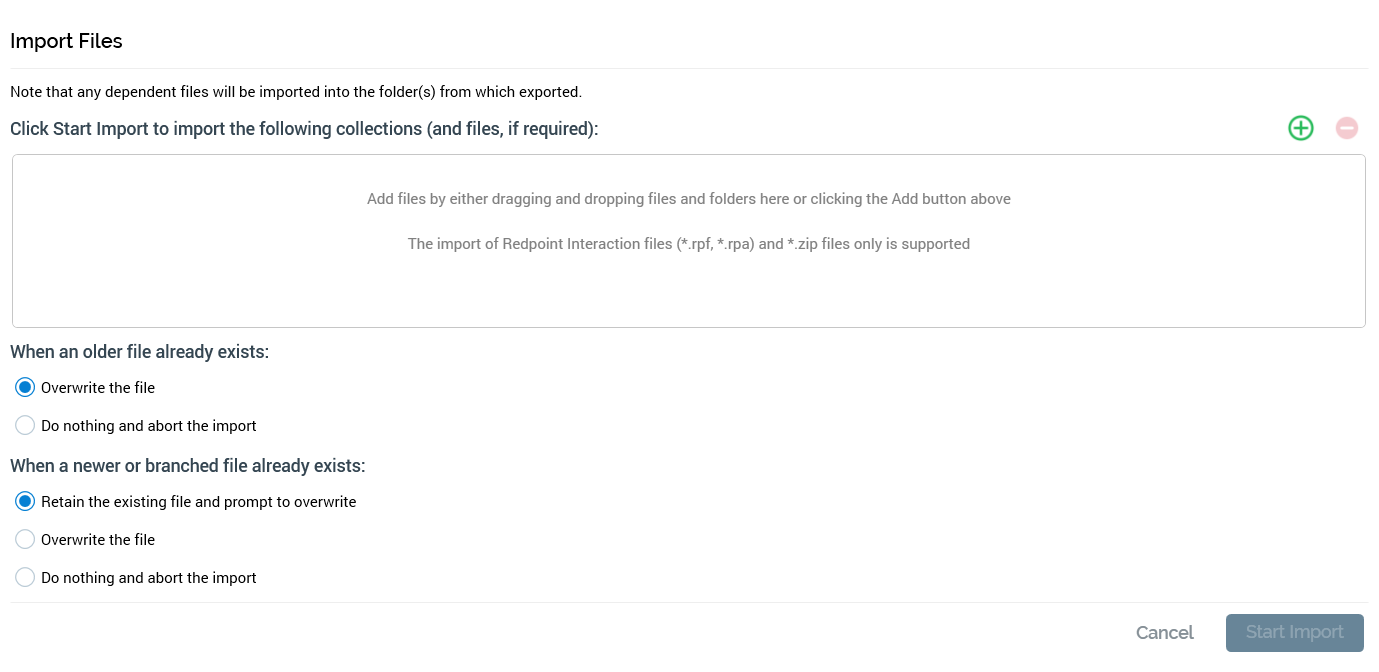
A message is displayed at the top of the overlay: “Add files by either dragging and dropping files and folders here or selecting the Add button above. The import of Redpoint Interaction files (*.rpf, *.rpa) and *.zip files only is supported.”
-
Add Files: this button is shown in a toolbar above the list. Selecting it redisplays the Import Files… Windows file system dialog, allowing you to specify additional collections and files to be imported.
-
Remove selected Files: this button is shown in the toolbar, next to Add Files. It is enabled when one or more collections or files are selected in the list. Selecting it removes the selected items without display of an ‘Are You Sure?’ dialog.
-
List: when empty, a message (‘Select Add Files to select the files you wish to import’) is shown in the list. The list is used to display the collections and files that are to be imported.
-
When an older file already exists: two radio buttons allow you define how the import is to behave when an older copy of a file being imported is discovered at the destination tenant:
-
Overwrite the file (the default option)
-
Do nothing and abort the import
-
-
When a newer or branched file already exists: three radio buttons allow you define how the import is to behave when a newer or branched copy of a file being imported is discovered at the destination tenant:
-
Retain the existing file (the default option)
-
Overwrite the file
-
Do nothing and abort the import
-
Note that this option does not apply when importing single configuration items.
-
Start Import: selecting this button imports the files, displaying the results in an overlay:
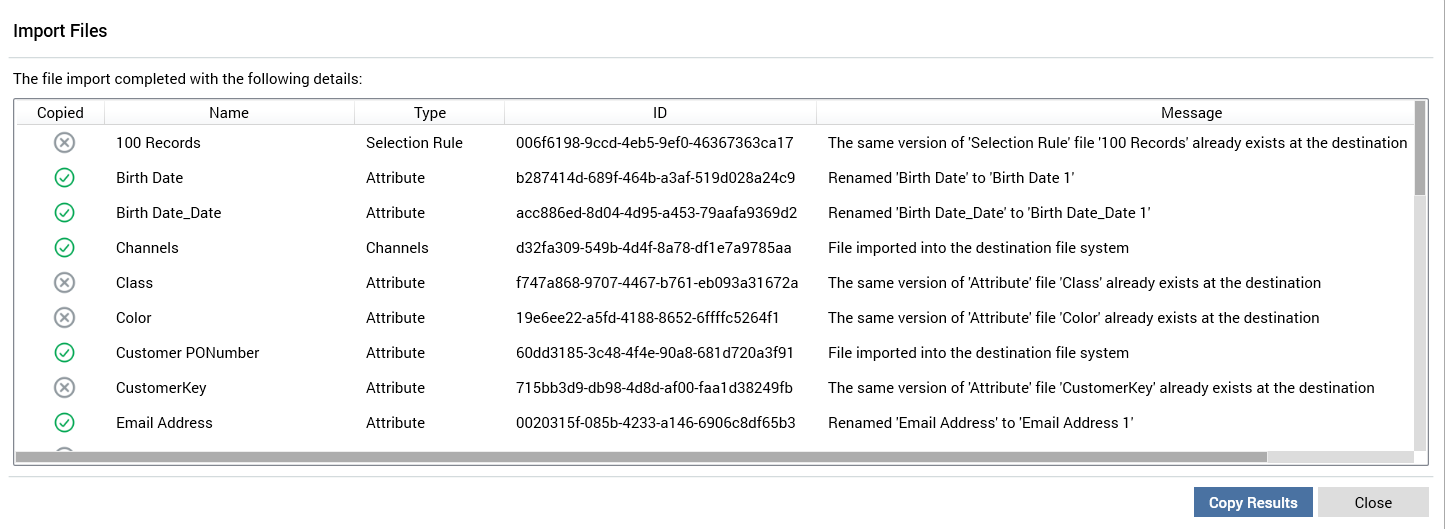
An advisory message is also shown when the task is complete.
You can select the Copy Results button to copy the results shown in the overlay to clipboard. You can also select the Close button to remove the Import Files overlay.
A treeview is shown to the left of the Import & Export Configuration Collections File System Dialog. It contains a single root-level node – Configuration Collections. Right-clicking the node displays a context menu with a single option: Refresh.
The grid to the right lists configuration collections. The System Configuration, User Groups and Users collections are not listed.
The following context menu options are available when you right-click a configuration collection:
-
View Information...: this option is available when a single configuration collection is selected. Selecting it displays the File Information Dialog. Its toolbar exposes only a Refresh button, and only the Details tab is shown.
-
History...: this option is available when a single configuration collection is selected. Selecting it displays the configuration collection’s history details in the History tab within the File Information dialog. Documented separately.
-
Export...: this option is available when one or more configuration collections are selected. Selecting it displays the Browse for folder Windows file system dialog. You can choose a folder to which the selected configuration collections are to be exported. Having done so, you can select OK to start the export. Doing so creates an ‘Export [n] file(s)’ job, on successful completion of which an Open Folder button is displayed. When you select the button, the folder to which the configuration collections were exported is opened in Windows Explorer.
Files are named as follows:
‘[Config Collection Name]_[GUID].rpf’
The GUID is unique to a given file. Files are overwritten if the already exist. Any dependent files are also exported.
If more than one collection is exported, all exported files are included in a zip file. If single file is exported, it is written to a single .rpf file. If the export was invoked in respect of single file that requires export of multiple files, the zip file is named '[Filename]_[DateTime]'. If invoked in respect of multiple files, the zip file is named 'RPIFileArchive_[DateTime]'.
You can also make a new folder within and cancel display of the Browse for Folder dialog.
You cannot invoke Export in the context of the Database Catalog configuration collection.
-
Copy to other Tenants...: this option is available when one or more configuration collections are selected. Selecting it displays the Copy Files to Other Tenants overlay. For details of the functionality available therein, please see the RPI File System Dialog documentation.
When copying channels to another tenant, relating channel synchronization tasks are not copied. Validating channels will ensure the tasks are created as expected.
You cannot invoke Copy to other Tenants in the context of the Database Catalog configuration collection.
An information panel is shown to the right of the Import & Export Configuration Collections File System Dialog. It displays read-only details of the currently-selected object.
The Import & Export Configuration Collections File System Dialog footer contains a single button:
-
Cancel: selecting this button removes the dialog from display.
The import, export or copying to another tenant of configuration files generates an audit record.
Export Item
This button is available in the following configuration interfaces:
-
Attribute Lists
-
Audience Definitions
-
Audience Snapshots
-
Cached Attribute Lists
-
Channels
-
Customer Views
-
Data Process Projects
-
Database Keys
-
External Content Providers
-
FTP Locations
-
NoSQL DB Collection Definitions
-
Realtime Queue Providers
-
Resolution Levels
-
SQL Database Definitions
-
State Flows
-
Value Lists
-
Web Adapters
-
Web Publish Sites
It allows you to export the selected configuration item, and is enabled when a single item is selected. Invocation displays a Windows file system dialog, in which you can select a folder and select Select Folder to proceed. Doing so creates an Export job to save an “[Item Name][GUID].rpc” file to the Windows file system. If “[Item Name]” contains characters incompatible with the Windows file system, they are removed.
History
This button is available at all Configuration interfaces except Catalog, System Configuration, User Groups and Users. Selecting it displays the configuration collection’s history details in the History tab within the File Information Dialog.
Configuration objects, like database keys, resolution levels and audience definitions, are stored in the RPI file system in file-like structures called configuration collections. All instances of a particular configuration object are stored in a single configuration collection – for example, all channels are stored in the Channels configuration collection.
As per its equivalent invocation at a file within the RPI file system, the dialog facilitates access to previous versions of a configuration collection, which could prove useful should you need to roll back to a previously-saved version.
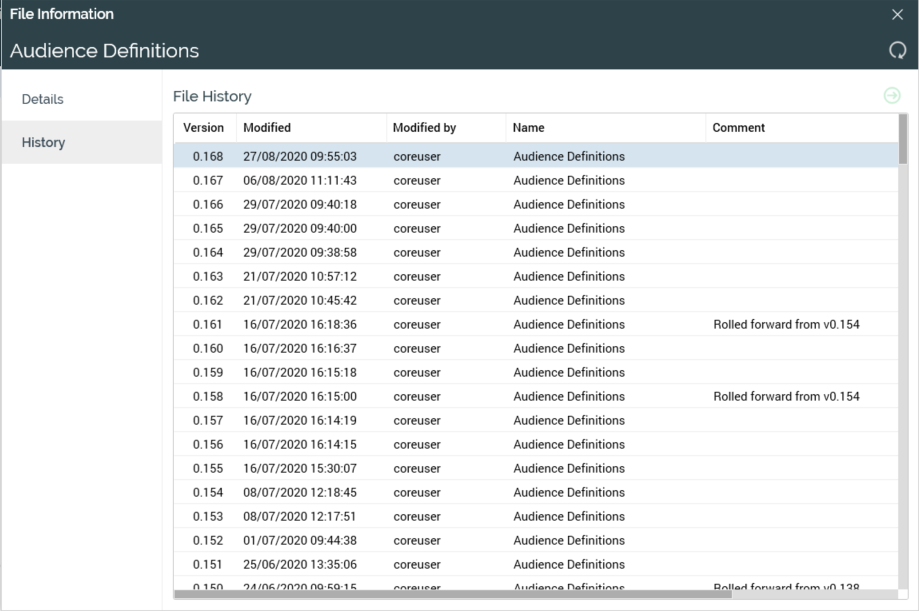
The dialog contains a toolbar and a grid.
The toolbar exposes a single option:
-
Roll Forward: this button is only available when a version of the configuration collection other than the current is selected. Its invocation is protected by an “Are You Sure?” dialog and creates a new current version of the configuration collection, based on the selected version. The new version’s version number is incremented accordingly. On closing the dialog, the configuration interface is refreshed to reflect the rolled-forward version. Note that, if you roll forward data process projects, any custom images will be lost at the new version of the configuration collection.
The grid contains the following read-only columns:
-
Version
-
Modified
-
Modified By
-
Name
-
Comment: populated e.g. when a configuration collection was copied from another tenant.
Entries in the grid are displayed in descending version number order.
Version number
The current version of the configuration collection being viewed is displayed to the right of the toolbar. Please see History for details of configuration collections and their versions. Note that version number is displayed at all configuration collections other than Catalog, System Configuration, User Groups and Users.
Tenant Template Export
This button is displayed at all configuration interfaces. It allows you to export items from the current tenant to use as a template for other Tenants. Access is protected by the 'Configuration - Tenant Templates' functional permission. Selecting the button displays the Tenant Template Export modal dialog.
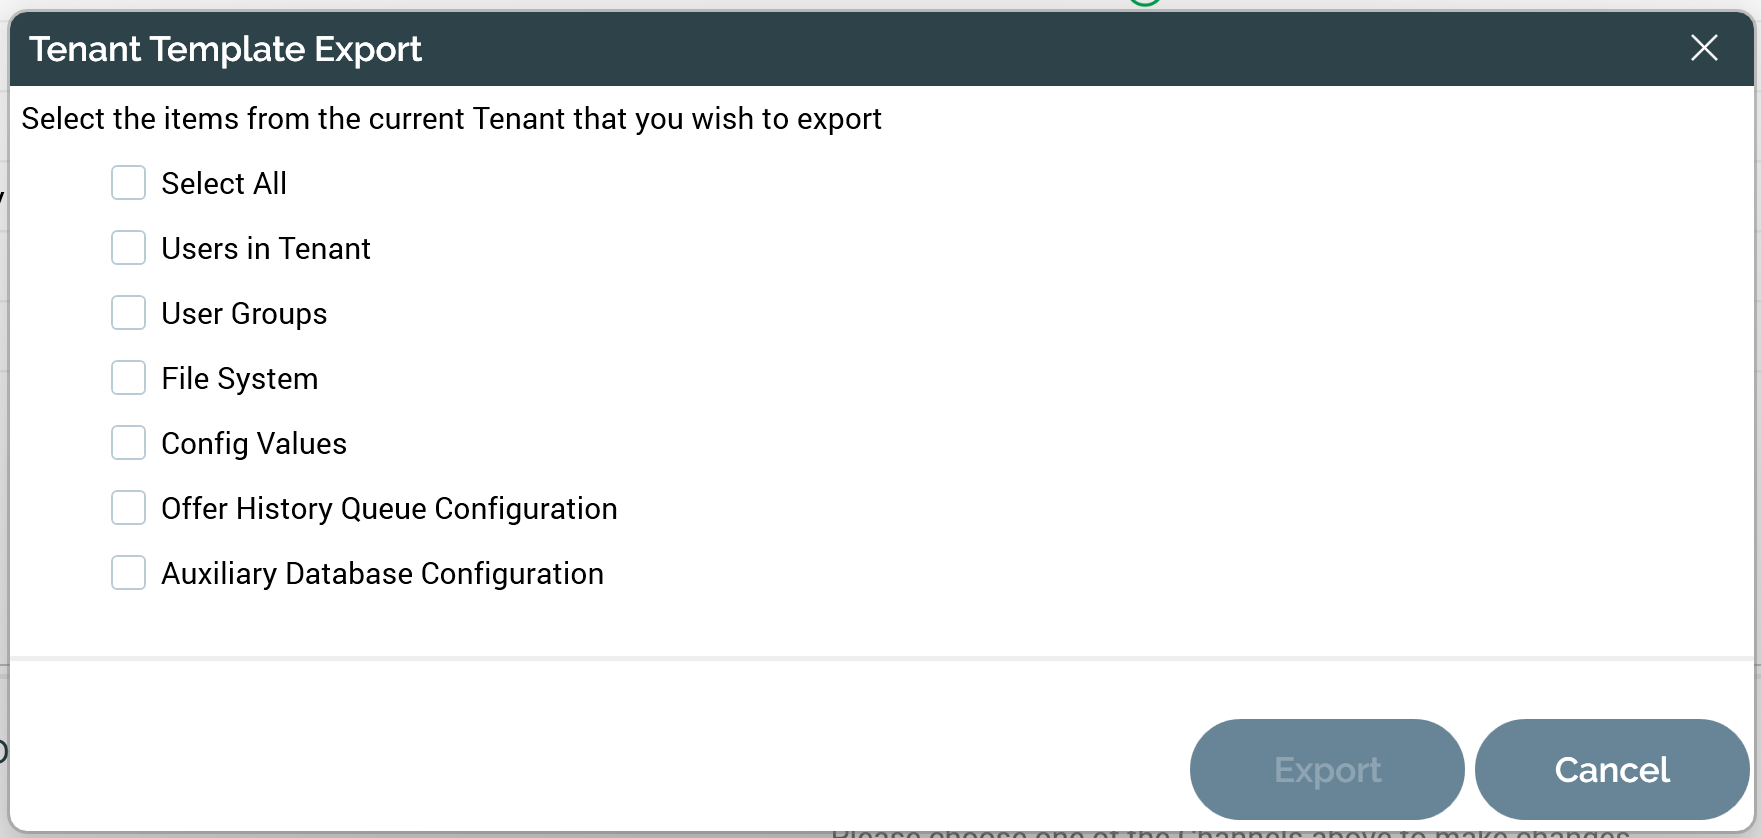
The dialog lists items that can be exported from the current template. Each list entry is accompanied by a checkbox, and all are unchecked by default. The following can be exported:
-
[Select All]
-
Users in Tenant
-
User Groups
-
File System
-
Config Values
-
Offer History Queue Configuration
-
Auxiliary Database Configuration
Two buttons are shown at the bottom of the dialog:
-
Export: this button is disabled until at least one checkbox has been checked. Selecting it displays a Windows file system dialog, within which you can select the folder to which files are to be exported. Two buttons are shown at the bottom of the dialog:
-
Select Folder: Selecting this button creates an Export Tenant Items job and displays it in the My Jobs interface (for more information, please see that section's documentation).
-
Cancel: selecting this button removes the Windows dialog from display.
-
-
Cancel button: selecting this button removes the Tenant Template Export dialog from display.