

Overview
The following features are available at all Realtime decisions when displayed in expanded mode.
Toolbox
The Realtime decision’s toolbox is shown to the left.
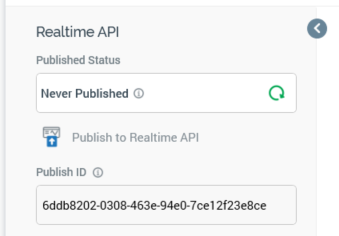
Its display is controlled using the Show/Hide Toolbox button. The toolbox is shown by default.
It contains a single Realtime API section, which, in turn, contains the following:
-
Published Status: read-only, and one of:
-
Never Published: tooltip states “This file has never been published. This file can be published to the Realtime API manually”.
-
Published: tooltip states “This file is currently published. This file can be published to the Realtime API manually” and includes the latest published details:
-
Published version
-
Publish method
-
Last published
-
Published by
-
Instance ID
-
-
Unpublished: tooltip states “This file is currently unpublished. This file can be published to the Realtime API manually” and includes the latest published details:
-
Published version
-
Publish method
-
Last published
-
Published by
-
Instance ID
-
-
-
Refresh: you must select this button to manually refresh the file's latest Published Status (published status changes are not displayed automatically).
-
Publish to Realtime API: selecting this button allows you to publish the file for use with the RPI Realtime API. It is available when the file is valid, and contains no unsaved changes. Invocation creates a Publish job and displays it in the My Jobs dialog. Following a successful publish, the file's Published Status is set to Published, and the Unpublish from the Realtime API button is displayed.
-
Unpublish from Realtime API: this button is displayed and available when a file is Published. Selecting it unpublishes the file, meaning it can no longer be used by the RPI Realtime API, and is protected by an "Are You Sure?" dialog. Upon invocation, an Unpublish job is created and displayed in the My Jobs dialog. Following a successful unpublish, the file's Published Status is set to Unpublished, and the Unpublish from the Realtime API button is hidden.
-
Publish ID: this read-only GUID is used to uniquely identify the Realtime decision during evaluation by the Realtime API. You can select it to copy it to the clipboard.
When a Realtime decision is evaluated directly using the Realtime API, if its decision criteria are satisfied, the returned ResultContent is true. If not satisfied, the returned ResultContent is false.
All/Any
This property allows you to define how a Realtime decision’s criteria are to be treated when determining whether a website visitor satisfies them or not.
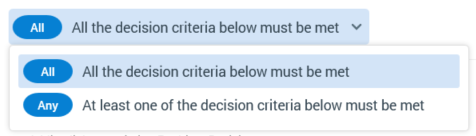
Two options are available: All (the default) and Any. You can change the property’s value using the dropdown field provided.
To give a simple illustration of how the property can be used to determine whether to display content, consider an RPI landing page that contains a smart asset. The asset determines whether to display a piece of content depending on whether a visitor satisfies the criteria defined within a web tracking Realtime decision.
(For more information on using Realtime decisions to determine smart asset applicability, please see the Smart Asset Designer documentation).
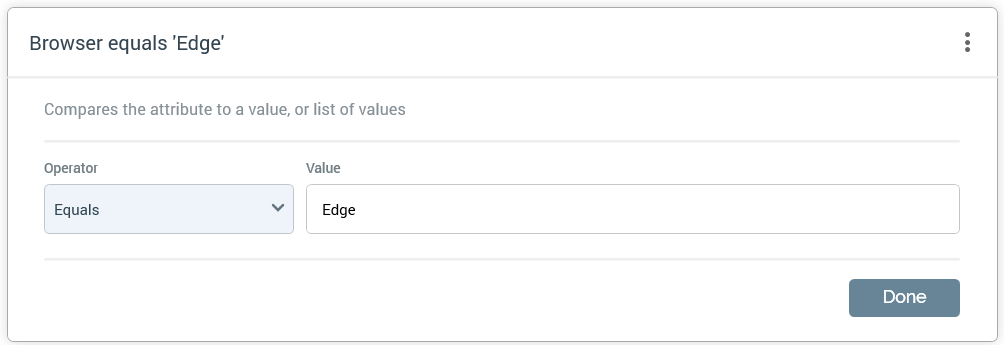
Let us assume that the criteria within the Realtime decision look like this:
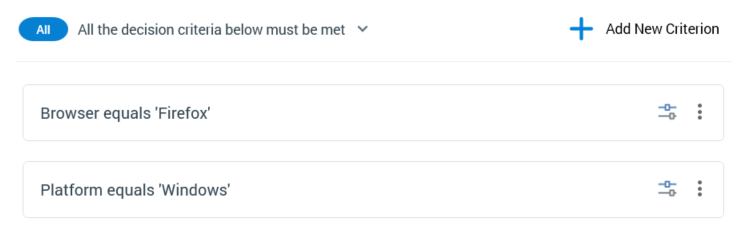
If All/Any is set to All, for the criteria within the decision to be satisfied, the visitor must be using Firefox to browse to the landing page and must be running on a Windows operating system.
If set to Any, only one of the criteria need be met for the Realtime decision to be satisfied.
Note that All/Any is always displayed, even if a decision contains only a single decision criterion. In this case it has no effect.
Add New Criterion Button
This button is used to add a decision criterion to a Realtime decision.
It is displayed to the right of All/Any. Selecting it displays the Decision Criteria panel to the right of the Realtime decision:
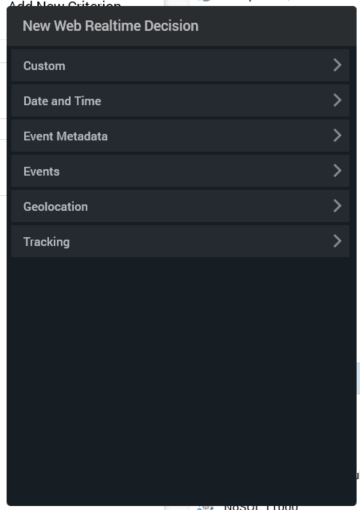
The panel allows you to select the type of decision criterion to add to the Realtime decision. The list of available criteria types differs by Realtime decision type; each is documented separately.
You can select a criterion type to add it to the Realtime decision. When you do so, a new criterion of the appropriate type is added to the end of the current decision’s criteria list. The new decision criterion is presented in edit mode.
Selecting off the panel causes it to be removed from display.
Canvas
A Realtime decision’s canvas initially displays a message that says “Build this Realtime Decision by adding decision criteria using the Add New Criterion button or Adding links to existing Realtime Decisions”.
The following options are available when you right-click a Realtime decision’s canvas:
-
Add New Criteria List: adds a new, empty criteria list to the Realtime decision.
-
Paste: only available if the clipboard contains something that may legitimately be pasted into the rule (e.g. a criterion or criteria list).
Decision Criteria
A Realtime decision’s criteria allow you to define the elements of the decision that collectively determine the audience to which the decision applies. For example, you might have content within a smart asset that is tailored to those users from a particular geographical location, or who have previously received a specific Redpoint offer; Realtime decision criteria are the medium through which the decision as to whether to display certain content at a website visit can be made.
The types of decision criterion available at a given Realtime decision are determined by the decision’s type (offer or web tracking). The criteria types available at each are described elsewhere. This section documents the features generic to all Realtime decision criteria.
A Realtime decision’s criteria are displayed in a list, shown below the All/Any property and above the Add New Criteria List button:

You can add a new decision criterion to a Realtime decision by selecting the aforementioned button (this is documented elsewhere).
A Realtime decision can contain a combination of:
-
Decision criteria
-
Criteria lists
-
Linked Realtime decisions
-
Linked basic selection rules
-
Linked NoSQL selection rules
-
Scorecards
The above are all discussed separately.
A Realtime decision’s criteria list must contain at least one decision criterion or linked Realtime decision.
You can order decision criteria within a criteria list using drag and drop. An indicator is displayed to show you where the dragged criterion will be dropped on releasing the mouse button.
Decision criteria can be presented in read-only or edit mode. Only a single criterion can be in edit mode at any one time.
When shown in read-only mode, the following are displayed at a decision criterion:

-
Plain text summary of the decision criterion’s settings, consisting of:
-
Decision criterion type name
-
Operator
-
Value(s)
-
The following is shown in the case of an Exists/Does not exist operator having been selected:

-
Configure: selecting this button places the criterion into edit mode.
-
Actions: selecting this button displays a context menu, which exposes the following:
-
Cut
-
Copy
-
Remove
-
Removes the criterion without displaying an "Are You Sure?" dialog.
-
-
Note that the same context menu is shown when right-clicking a criterion.
When in edit mode, the following are shown:
-
Textual criterion description
-
Operator: a dropdown field, the values exposed by which are data type-appropriate.
-
Value(s): the values supported at a criterion are appropriate for its data type. If a criterion supports the provision of values, a message is initially displayed at its value that states “No values. Click to select”.
-
If a string criterion type, if predefined values exist for the decision criterion type, selecting the value field displays the Choose Values dialog, in which you can select the values you require. More information on the Choose Values dialog can be found in the RPI Framework documentation. If predefined values are not supported, values are supplied using the Specify Values dialog. More information on the Specify Values dialog can also be found in the RPI Framework documentation.
-
If a numeric criterion type, a masked field restricts data entry to a numeric value. If one of the ‘Is in list’ or ‘Is not in list’ operators is selected, multiple values can be supplied using the Specify values dialog (see above for details).
-
If a date criterion type, display depends on the selected operator.
-
If “Equals” or “Does not equal” is the operator, a date or datetime picker, defaulting to today/now, is shown. Selecting the button to its right sets the value to the Current date/time
-
If “After”, “Before”, or “Within” is the operator, you can enter amount of time before or after a date/time.
-
-
If a Boolean decision criterion type, the following values are available:
-
Is True
-
Is False (the default)
-
Note that if an Exists or Does not exist operator has been selected, Value is not shown.
Custom Criteria
When adding a decision criterion to a Realtime decision, a Custom option gives access to the following:
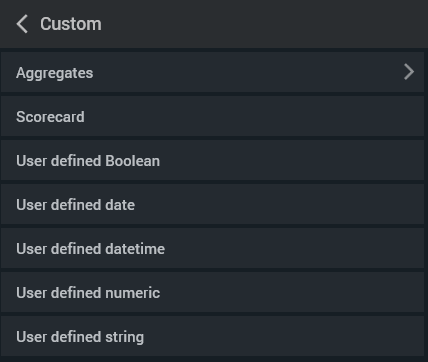
When you add one of the “User defined” criteria to a Realtime decision, its name is editable. This provides extensibility at decision criteria; if a given criterion type is not supported, a user-defined criterion can be used to fulfill a specific requirement.
The Aggregates group gives access to the following decision criteria:
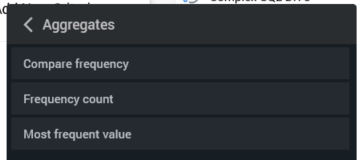
These allow you to calculate aggregates in respect of collection values stored within a visitor parameter.
-
Compare frequency: this criterion type allows you to specify whether value "A" is more frequent than "B" in a collection.
-
Frequency count: this criterion type allows you to specify the count of any value, or "A", or "A" and "B" in a collection.
-
Most frequent value: this criterion type allows you to specify the most frequent value in a collection.
The Custom aggregate menu also provides the ability to add a linked decision scorecard to a Realtime decision, using the Scorecard option. This feature is discussed in the Linked Decision Scorecard section.
Linked Realtime Decisions and Selection Rules
You can add a link to another Realtime decision within a Realtime decision. You can do this by dragging a Realtime decision file from the toolbox, and dropping it onto the outer Realtime decision’s canvas. You can also copy a linked Realtime decision and paste it into the outer Realtime decision.
A linked Realtime decision appears as follows:
The following are shown:
-
Include/Exclude: this setting allows you to specify that the linked Realtime decision's criteria should be met or not met for its usage in this context to be satisfied.
-
Realtime decision name
-
Open latest version: selecting this button opens the linked Realtime decision in the current Rule Designer tab.
-
Pop out: displays the linked decision in an independent, modeless Window. For more information, please see the Rule Designer documentation.
-
Actions: selecting this button displays a context menu, which exposes the following:
-
Cut
-
Copy
-
Remove
-
Removes the linked Realtime decision without displaying an "Are You Sure?" dialog.
-
-
Note that the same context menu is shown when right-clicking a linked Realtime decision.
The following keyboard shortcuts are supported at linked rules:
-
Ctrl-C: copy
-
Ctrl-X: cut
-
Delete: remove
You can also include links to basic and NoSQL selection rules within a Realtime decision.
Linked Realtime Decisions and Selection Rules
You can create a create a link to a decision scorecard file within a Realtime decision. When you do so, you are specifying that the scorecard be treated as a decision criterion; an operator and value are assigned to the linked scorecard, and are used to determine whether the “criterion” is satisfied or otherwise.
Decision Scorecards are documented separately elsewhere in the Realtime Decisions documentation.
-
Dragging a decision scorecard file from the Rule Designer toolbox and dropping it onto a Realtime decision’s canvas. When you do so, the linked scorecard is presented in read-only mode.
-
Selecting the Scorecard option from the Custom section within the menu displayed at invocation of Add New Criterion. When you do so, the linked scorecard is presented in edit mode.
-
Pasting in a copied linked scorecard.
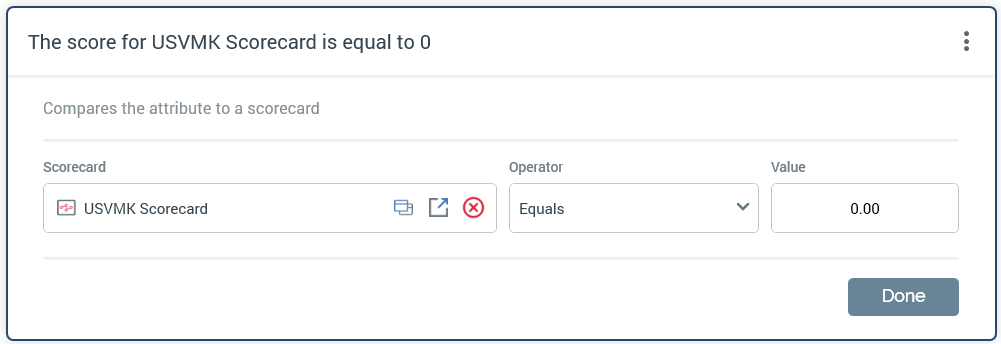
When in read-only mode, a decision scorecard appears as follows:
The following are shown:
-
Plain text summary of the linked scorecard’s settings
-
Configure: selecting this button places the linked scorecard into edit mode.
-
Actions: as shown at a read-only decision criterion.
When in edit mode, the following are displayed:
-
Textual criterion description
-
“Set Criterion using…”
-
Scorecard: provision of a decision scorecard file is mandatory in this context.
-
Open Latest Version
-
Pop out
-
Clear
-
-
Operator
-
Value: numeric.
-
Done: returns the linked decision scorecard to read-only mode.