

Create New Join
This action is carried out using the Create new Join toolbar button. You can select the type of join to add from either Simple join or Multiple join. The new join is added to the top of the list of existing joins and is selected automatically.
If you add a join when a filter is applied, and the new join does not match the supplied filter criteria, it will be visible when in an Added state, but will disappear from view when you select Save.
Configure Existing Join
This is carried out in the simple fields in Selected Join Details. You can select a join to view its details. If you update a previously-saved join, its state is set to Edited.
Delete Selected Joins
This is carried out in the toolbar. The state(s) of the join(s) are set to Deleted, and the row text color to red. You can no longer select a deleted row.
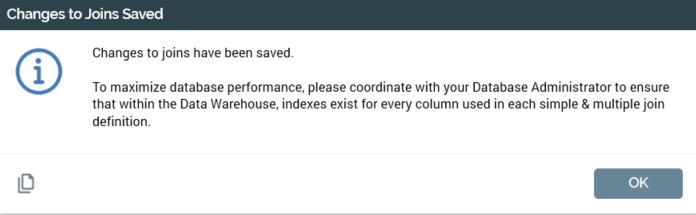
Save Changes to Joins
This is done using the Save changes to Joins toolbar button. Any changes are validated (e.g. it is not possible to create more than one identical simple or multiple join). Any validation errors are advised via a dialog and you may not proceed with Save until they are fixed. Following a successful save, all join States are updated to Unchanged. Any deleted joins are removed from display.
The following message is shown when saving joins:
Refresh Joins from the Database
You can refresh your RPI joins by automatically creating them based on existing joins in the data warehouse or an auxiliary database. This is carried out by selecting the Refresh Joins from the Database button in the Joins interface.
If no auxiliary databases are configured at the current RPI tenant, an “Are you sure?” dialog is displayed. Proceeding with the refresh creates a Joins refresh job and displays it in the My Jobs Dialog. Full details of the job and Dialog can be found in the My Jobs documentation. On completion, the data warehouse’s joins will have been refreshed. Existing joins are unaffected when you refresh joins; only new joins are appended during refresh.
If one or more auxiliary databases are configured at the local RPI tenant, a dialog allows you to select the database in respect of which to initiate the joins refresh.
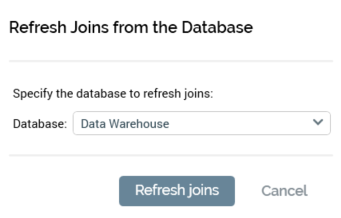
You can select the database using the dropdown, and then select Refresh Joins to proceed with the refresh (after confirming your intention at the “Are You Sure?” dialog).
Refresh
This option reloads the contents of the interface from the operational database. If changes have been made, a “Save Changes?” dialog is shown.
Export Joins
Invocation of this option displays the Save Join Details As Windows file system dialog. The file name defaults to “Redpoint Joins [date].txt”, and type to “Text (tab delimited) (*.txt)]”. Selecting Save exports details of the joins to a file in the specified location and closes the dialog. Selecting Cancel closes the dialog without saving.
The resultant tab-delimited file lists all joins (simple and multiple), irrespective of any filters applied in the Joins interface. The file contains the following:
-
“RPI Joins”
-
“Server: [external server name] (v[major].[minor] (Build [build]))”
-
“Exported: [date/time]”
-
“Simple Joins ([no.])”
-
For each simple join:
-
Table 1
-
Table 2
-
Key Pairs: “[Table 1.Key] to [Table 2.Key] and [Table 1.Key 2] to [Table 2.Key 2]]...”
-
State
-
Cardinality
-
-
-
“Multiple Joins ([no.])”
-
For each multiple join:
-
Table 1
-
Table 2
-
Table Joins: “[Table 1] to [Table 2], [Table 2 to Table n]”
-
State
-
Cardinality
-
-
Export Joins should not be confused with the generic ability to export (for later import purposes) configuration collections (including Joins) from the Configuration Workbench.
Audit Joins
Selecting this button creates an Audit Joins job and displays it in the My Jobs dialog.
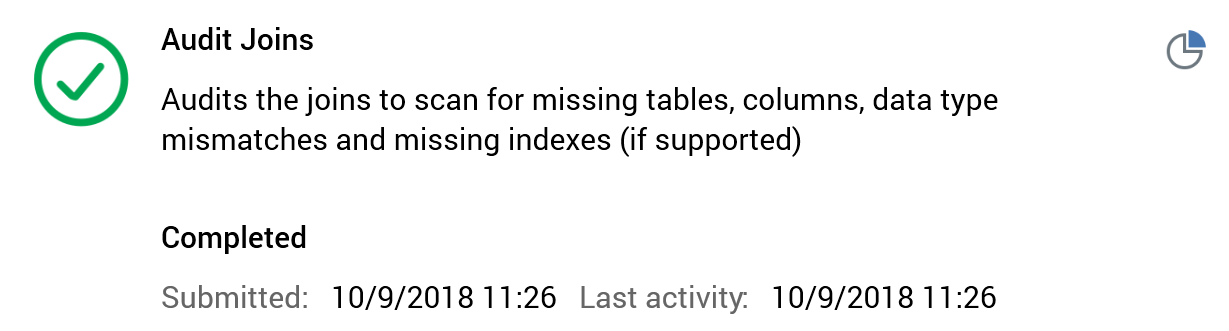
When the job completes, a View Results button is shown. Selecting it displays the Validate Joins—Results dialog.
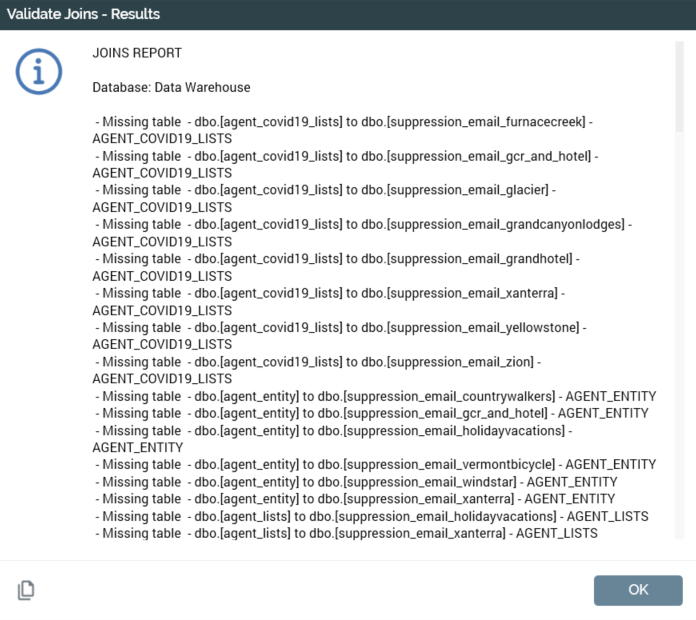
A Joins Report is displayed therein, documenting the following:
-
Missing tables
-
Missing columns
-
Data type mismatches
-
Missing indexes (SQL Server only)
A Copy Results to Clipboard button is available at the bottom of the dialog.
Some pointers on interpreting the results of a joins audit:
-
Missing table: recommended to delete the RPI join, thereby removing the orphan.
-
Data type mismatch: even if the left & right joins are indexed, there is a high risk of implicit conversions, index scan and table scans. Recommended to ensure that columns on the right and left of joins are indexed and have same data type and length.
-
No index found: highly likely to result in table scans. Recommended to ensure that columns on the right and left of joins are indexed and have same data type and length.