

Overview
This topic walks you through everything you need to do to get the Redpoint Identity Studio (RIS) app up and running.
Prerequisites
Before installing and configuring RIS, ensure the following are in place:
-
Snowflake access: You need an active Snowflake account with appropriate privileges (e.g., you need to have Snowflake
ACCOUNTADMINprivileges to install the app). RIS runs as a SnowPark Container Service within your Snowflake environment. -
Input data: Your customer data must have a unique ID column (or composite ID columns that can be combined), and must have PII data. Refer to the Input table schema for more information.
-
Supported browser: Use a modern browser (Chrome, Edge, or Firefox).
Step 1: Install and configure the app
You need to have Snowflake ACCOUNTADMIN privileges to install the app. You’ll see your current role in the menu on the left at the bottom. If you need to change it, click your initials and from the Switch Role menu, choose ACCOUNTADMIN.
-
Click Get.
-
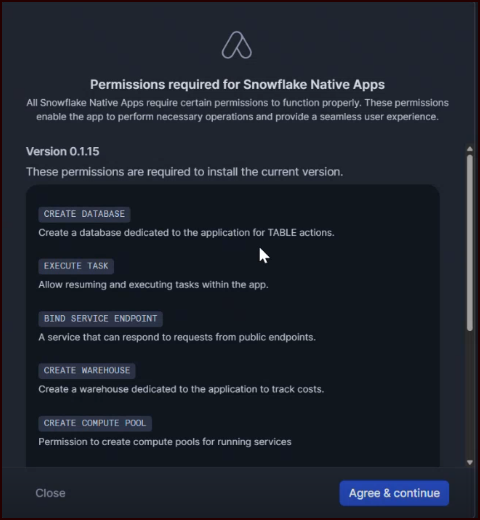
Review the Permissions required for Snowflake Native Apps and click Agree & continue.
-
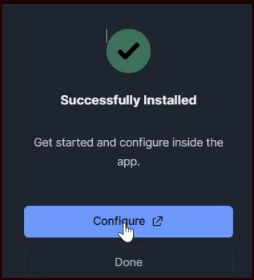
The app will install and send a confirmation email to you when the installation is complete.
-
In the “Successfully Installed” pop-up, click Configure.
-
In External connections, click Review.

-
In the “Review external access integrations” pop-up, ensure that “Connection to the Redpoint Hygiene Service API” is toggled on and click Save.
This access is required; refer to Data flow for more information about Redpoint’s Hygiene service.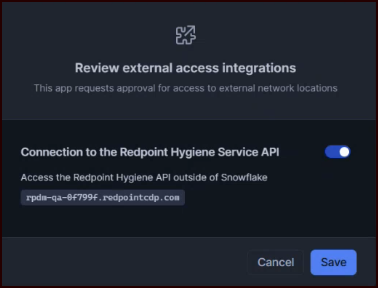
-
Click Next.
-
If you plan to use Cortex AI to draft your prompt and SQL to populate your
INPUTtable, click Grant. (If this option is not marked as “optional” along the left side, then you must grant it.)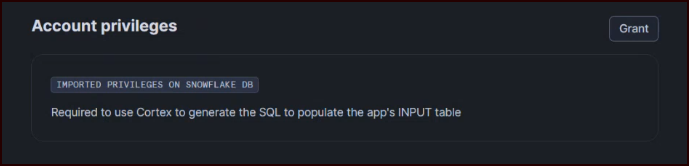
-
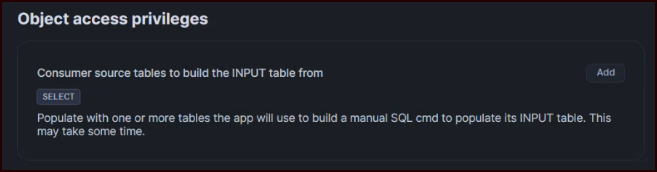
In Object access privileges, click Add.
-
The next pop-up allows you to select the source tables that you’ll use to build the
INPUTtable. Click + Select Data.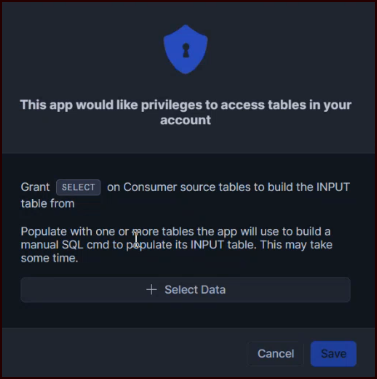
-
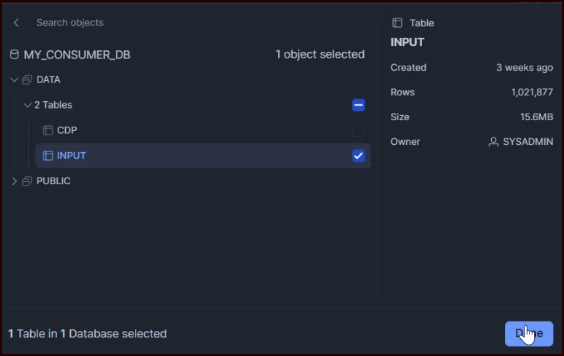
In the next screen, navigate to the table(s) you want to add, select them, and click Done.
-
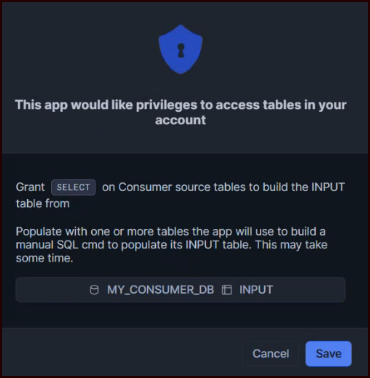
The next screen confirms the table(s) you’ve selected. Click Save.
-
Once that’s completed, click Next.
-
The next screen will confirm when the app is activated. Click Proceed to app and then on the next screen, click Launch app (you may want to open this in a new tab or window, since there’s additional configuration that you need to complete in the Snowflake web UI, detailed below).
-
You can choose to proceed to Using the onboarding wizard next and come back to Steps 3 and 4 below after. However, if you plan to use Snowflake Cortex AI to build the SQL prompt and script needed to populate your
INPUTtable, you’ll need to confirm Cortex AI is enabled before walking through the onboarding wizard, as detailed in the next step.
Step 2: Enable Cortex AI
If you plan to use Cortex AI in the onboarding wizard (as opposed to writing your own SQL script from scratch), you’ll need to enable it in Snowflake (if it’s not already enabled).
To enable Snowflake Cortex AI:
-
In the Snowflake web UI, navigate to Project > Workspaces.
-
Run the following SQL command:
ALTER ACCOUNT SET CORTEX_ENABLED_CROSS_REGION = 'ANY_REGION';
This change applies to your entire Snowflake account.
Step 3: Set up your application worksheet
There will be times that you want to run SQL in the Snowflake workspace to make changes or check the status of the app. You’ll need to create an application worksheet that you can use for running application-specific SQL commands.
We’ve provided sample SQL in the application readme; make sure to familiarize yourself with its contents.
-
Locate the SQL provided in the Redpoint Customer Identity Resolution application readme and copy it to your clipboard.
-
In the Snowflake web UI, navigate to Project > Workspaces and create a new worksheet named
RCIDR.sql. -
Paste the SQL from the app readme into the worksheet.
-
Run the following to set the application context once, at the top of the worksheet:
SQLSHOW APPLICATIONS; USE APPLICATION REDPOINT_IDENTITY_STUDIO;Every subsequent statement in this worksheet runs against the app.
Step 4: Enable roles
Next, you’ll create the RIS consumer_role, which contains all of the required GRANTs for the role to successfully run the RIS SNA.
-
Create a
consumer_rolewith theGRANTs that can install and run SNAs. In the Snowflake web UI, navigate to Project > Workspaces and in theRCIDR.sqlworksheet run:SQLCREATE ROLE IF NOT EXISTS consumer_role; -
Approve EAI (External Access Integration) for the role, since it'll allow the app to reach external endpoints, a security-sensitive action:
SQLGRANT CREATE INTEGRATION ON ACCOUNT TO ROLE consumer_role WITH GRANT OPTION; GRANT MANAGE APPLICATION SPECIFICATIONS ON ACCOUNT TO ROLE consumer_role; GRANT CREATE WAREHOUSE ON ACCOUNT TO ROLE consumer_role; GRANT CREATE DATABASE ON ACCOUNT TO ROLE consumer_role; GRANT CREATE APPLICATION ON ACCOUNT TO ROLE consumer_role; GRANT CREATE COMPUTE POOL ON ACCOUNT TO ROLE consumer_role WITH GRANT OPTION; GRANT BIND SERVICE ENDPOINT ON ACCOUNT TO ROLE consumer_role WITH GRANT OPTION; GRANT IMPORT SHARE ON ACCOUNT TO ROLE consumer_role;
For information about RIS roles and what permissions are associated with them, refer to Settings.
Step 5: Enable service standby (optional)
IDR runs inside a Snowflake SnowPark Container Service (SPCS). You can optionally enable auto-suspend (“sleep mode”) of the service container during periods of inactivity to conserve resources. When auto-suspend happens, the web application detects the suspended state and redirects all navigation to a full-page standby screen, which displays a “loading” spinner and a status message indicating that the service is resuming. No user action is required (i.e., do not refresh the page repeatedly); the web application polls the service status automatically and navigates away from the standby screen once the service resumes.
If you are programmatically launching match jobs, you will need to be aware of auto-suspend and issue a “wake-up” command (app_public.resume_app) before calling the job-start UDF.
If the service does not resume within a few minutes and the escalated message appears, contact your Snowflake administrator.
Manage service standby options
-
In the Snowflake web UI, navigate to Project > Workspaces.
-
In the
RCIDR.sqlworksheet run the appropriate SQL command (detailed in the following subsections).
Turn auto-suspend on
CALL app_public.enable_auto_suspend();
Turn auto-suspend off
CALL app_public.disable_auto_suspend();
Show the current state of services within the app
The status column will show RUNNING, SUSPENDED, etc.
CALL app_public.list_services();
Manually suspend the service
Preserves state; resumes on the next request or resume_app() call.
CALL app_public.suspend_app();
Manually resume the service after a suspend
CALL app_public.resume_app();