

Overview
Using macros is as simple as using any other Data Management tool. If the macro is available on the Palette (such as the pre-defined macros Consumer Match and Name Parser), you can drag it directly from the Palette onto your project window. Otherwise, you open the repository and navigate to the location of the macro within the repository tree, dragging the macro onto the project window from there. Once placed, you configure and connect macros like other tools. For example, consider the Business Match macro.
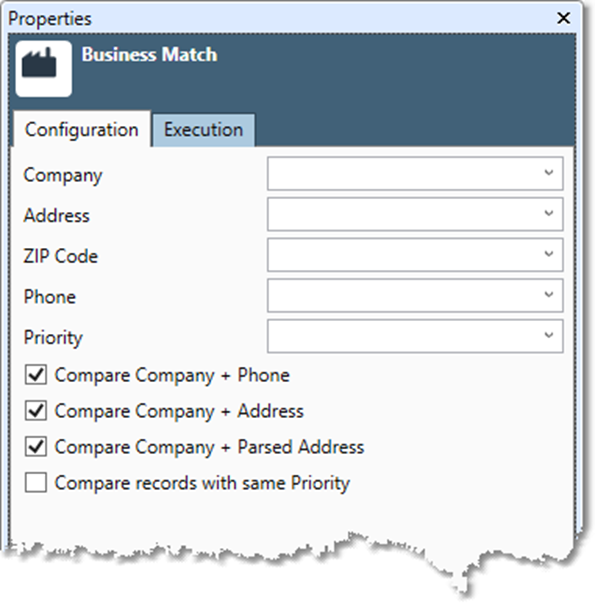
You must specify which input fields to match, and which matching combinations to use. Note that there is no match quality control in this macro—to provide that, the developer of the macro would need to create additional input parameters and logic for processing a match quality setting.
You can use macros within other macros, just like you would any other tool. However, you must be careful that no macro uses itself, either directly or indirectly—this produces a macro recursion error.
Developing macros
Macros are parameterized Data Management projects with input and output tools added. Macro development is challenging. You'll need considerable experience developing Data Management projects, and you should also be familiar with expression processing and XML configuration hierarchies. You must also develop an understanding of component reuse, management, and testing in order for users to make best use of your macros.
Development tips
Only use required fields in sample files. Macro sample data files should include only fields that will actually be processed by your macro (as opposed to being passed through unused and unchanged).
Use user-settable parameters to rename fields on input and output. In order to allow the user to attach any table to your macro, you want to let the user select the fields from the input table to be used in the macro. For example, in the Name Parse macro, the user can select the name field that will be used as input.
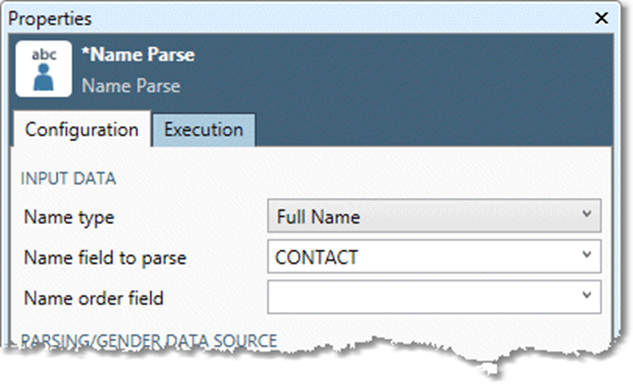
Make a note of the use of the Field select input type, which means the user will be prompted to select from a list of fields connected on the input.
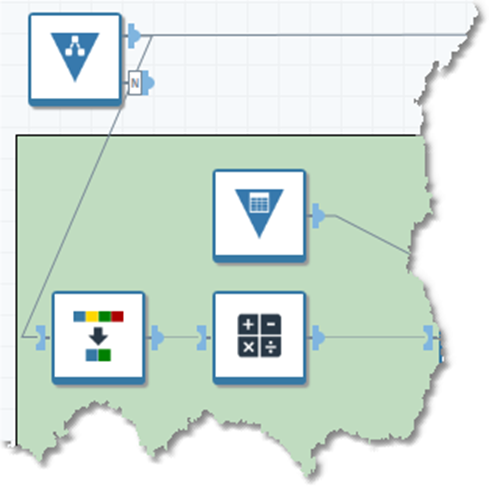
Once the user selects the fields, the macro must be reconfigured to use the user's input fields rather than the ones in sample data used for development. One way to do this is to use a Select tool to rename the input fields to something used internally. For example, in the Name Parse macro there is a Select tool near the top of the processing flow.
The Processing tab of the Name Parse macro specifies that the configuration is changed to reflect the actual input field that is selected by the user.
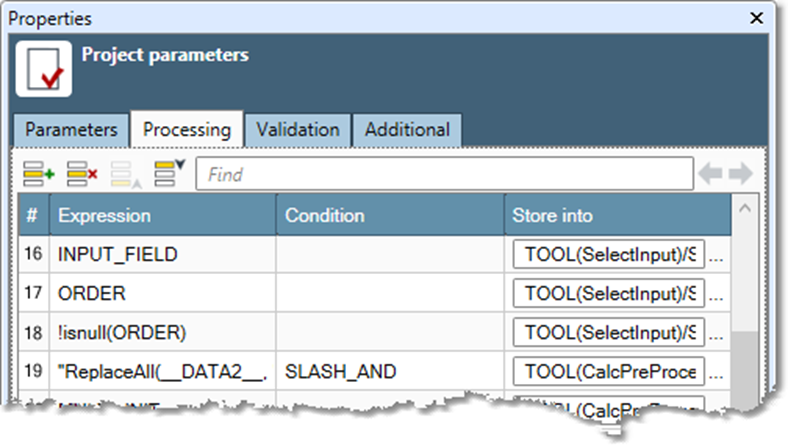
Tool(SelectInput) refers to the Select tool by the name specified on the Execution tab of the Select tool's configuration dialog.
It's important to understand what this setting actually does. If you look at the configuration of that Select tool, you'll see that the input field is renamed to the internal name __DATA2__.
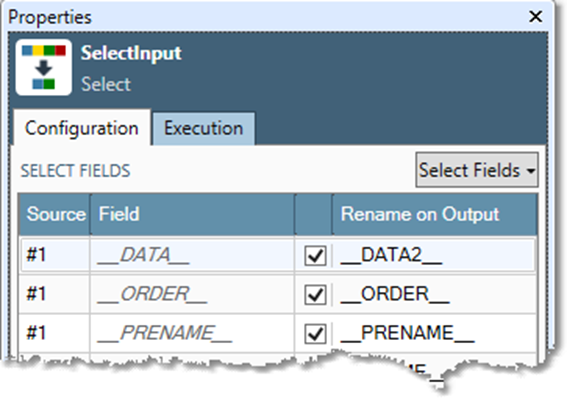
This renames an arbitrary input field to something the macro can use. However, the result of the macro processing will still refer to the internal field name __DATA2__ rather than the user's field name. The Consumer Match macro renames all input fields on all outputs, so refer to that macro for an example of renaming fields on output.
If you edit a macro used in an open project, you must reload the macro for the changes to take effect: right-click the macro in the open project, and then select Reload macro on the context menu.
Allowing an arbitrary schema to be routed to the output
Often you want the macro's input table to be reflected in the output of the macro, perhaps with some additional fields. If your macro produces a single output record for each input record, you can do this by following the example of the Name Parser macro, which uses the following steps:
-
At the Macro Input tool, route the input two ways:
-
The left direction goes directly to a Select tool upstream of the Macro Output tool.
-
The right direction performs all of the macro processing, and eventually connects to the Select tool upstream of the Macro Output tool.
-
-
Configure the Select tool just before the processing branch to select only those fields to be used for processing, and also to rename the input fields (as described above).
-
Configure the Select tool just before the Macro Output tool as follows:
-
Do not select the fields from the left input.
-
Do not select any "extra" fields that were created as a result of processing, but which you do not want to see on the macro output.
-
Check Automatically select new fields. This ensures that all input fields are routed to the output when the macro is used.
-
This recombines the input data with the results of processing. The left input connection comes directly from the Macro Input tool, and the right input connection comes from the main flow of the macro processing.
Making a new macro
The easier way to make a new macro is by using the Macro Creator.
To make a new macro from scratch:
-
Add Macro Input and Macro Output tools and define project parameters.
-
Select the

To modify an existing macro:
-
Open the macro by double-clicking its icon in the repository.
-
To modify the macro and replace its current definition, edit the macro and then select the

-
To keep the existing macro and save the modifications as new macro, select Save As on the File menu.
-
Specify a location and name for the new macro in the repository, and then select OK.
If you edit a macro used in an open project, you must reload the macro for the changes to take effect.
-
Right-click the macro in the open project.
-
Select Reload macro on the context menu.
To convert a project to a macro:
-
Open the project by double-clicking its icon in the repository, or selecting the file icon and navigating to the file location.
-
Attach Macro Input and Macro Output tools and define project parameters.
-
Select Save As on the File menu.
-
Specify a location and name for the new macro and then select OK.
Using the Macro Creator
The Macro Creator lets you select part or all of an open project and convert it into a macro.
To convert an open project into a macro using the Macro Creator:
-
On the canvas, select the tools and annotations you want to include in the macro.
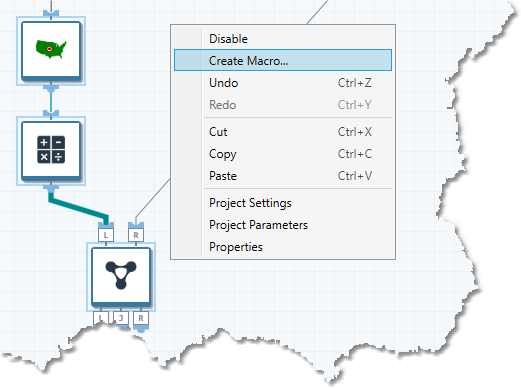
-
Right-click the canvas, and then select Create macro.
-
On the Overview tab of the Macro Creator, specify the Repository location for the newly generated macro, as well as any desired options.
-
Select Replace selected tools in current project with generated macro to substitute the new macro for the selected tools.
-
Optionally, you may specify a 32x32 pixel Icon (bmp, jpg, or png formats) for the macro.
-
-
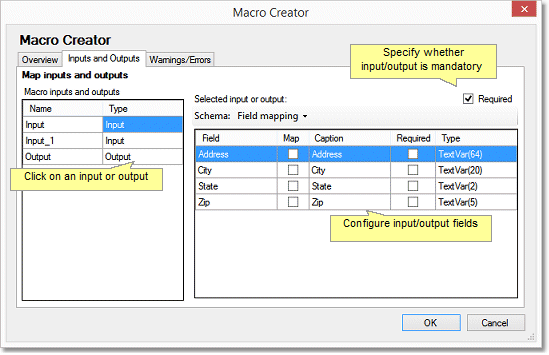
Optionally, select the Inputs and Outputs tab and configure Macro inputs and outputs. See Configuring the Macro Input tool and Configuring the Macro Output tool for details.
If the project from which the macro is being created has been run, the Macro Creator can use its throughput as sample data for automatic field mapping.
Using $exists to check input
On the Validation tab of the Project Parameters Properties pane, you can use a special expression of the form $Exists(FieldName, InputKind)where FieldName is the name of the input field that you want to check for existence, and InputKind identifies the input from the Macro Input tool whose connection you want to check. This function returns true if the field exists, and false if it does not exist.
For example, if you want to check for the existence of a field named ADDRESS on the input labeled Input, you would use $Exists('ADDRESS', Input).
Make note of the quotation marks around the explicit field name string.
If the address field you want to check is specified by the user-settable parameter INPUT_ADDRESS_FIELD, you would use: $Exists(INPUT_ADDRESS_FIELD, Input).
Macro error messages
If you misconfigure a macro, it will issue error messages, viewable in the Message Viewer. Macros issue both validation and internal errors, which can be confusing.
Validation errors are produced by the macro itself, and are error messages resulting from validations that the macro creator built into the macro. All validation messages begin with the words Configuration error. Validation messages are generally easier to understand because they alert you to problems that the macro designer anticipated.
The remaining messages are internal error messages. These are errors reported by the tools contained within the macro, and they indicate the specific configuration problems with each tool. These messages are useful when the validations defined in the macro are unable to detect everything that can go wrong. Most of the time these problems are fixed when the macro's validation error messages are addressed.
If you cannot solve a macro's problems by correcting the errors described in the validation error messages, you should contact the macro developer for assistance.
Migrating macros
The Use migration command is useful for making changes to a macro that would otherwise render it incompatible with previous versions of the macro. It is located on the Additional tab of the Project parameters pane. Normally, when you add parameters to a macro, you can give them default values that will make the macro behave the same as it did in the previous version where those parameters were not specified. However, there are some cases where this is not possible.
For example, suppose that in version 8.1 of a macro (i.e., the macro was developed using Data Management version 8.1.), you have a parameter called GOODNESS, which can have values of SOMEWHAT, MOSTLY or TOTALLY. But in version 9.2 you decide that you'd rather have parameter called QUALITY that is a number between 0 and 100. You can migrate the old GOODNESS values to the new QUALITY parameter by setting up rules like.
Version  Condition            Target       Value
-------  ---------------      --------   -------
9.2      GOODNESS="SOMEWHAT"  QUALITY      30
9.2      GOODNESS="MOSTLY"    QUALITY      60
9.2      GOODNESS="TOTALLY"   QUALITY      100
During a macro load, the lines of the macro migration specification are run in sequence. In the above example, the first line is interpreted thus:
If the version of the project in which this macro was originally saved is less than 9.2, and the value of the GOODNESS parameter was set to SOMEWHAT, then set the value of the QUALITY parameter to 30.
You can use the same parameter in the Condition, Target, and Value. For example if you had a THRESHOLD parameter that was a number between zero and 100, but you want to change that to a fractional value between 0.0 and 1.0, you can use the following. However note that the migrations are run in sequence, so once a parameter is changed subsequent lines in the migration specification will see its new value:
Version  Condition   Target      Value
-------  ---------   --------    -------
9.2      true        THRESHOLD   THRESHOLD * 0.01
Condition and Value are both expressions, so your migration instructions must put quotes around string values.
Version  Condition        Target     Value
-------  -----------      --------   -------
9.2      ANIMAL="HARE"    ANIMAL     "RABBIT"