

Overview
The Interaction Designer toolbar exposes the following options:
Create New Interaction
Create new Interaction: selecting this button displays the Interaction Designer Start Page. A close button is shown to its top right; selecting it removes the overlay from display. If an interaction containing unsaved changes is displayed at invocation of Create New, an “Are You Sure?” dialog is shown, from which you can:
-
Save the changes
-
Abandon the changes
-
Abandon creation of the new Interaction
Open an Existing Interaction
Invoking this option displays the Open Interaction File System Dialog, within which only files of type interaction are displayed. You may navigate through accessible folders within the RPI file system in order to locate an interaction to open. Having located an interaction to open, selecting OK or double-clicking the interaction displays it in the Interaction Designer.
If, when opening an interaction, an existing interaction to which changes have been made is displayed within the Interaction Designer, a dialog is displayed. You may:
-
Save changes and open the interaction.
-
Abandon changes and open the interaction.
-
Abandon opening the interaction.
When an interaction is opened, if one of its workflows has been played, its statuses and results bubbles reflect its most recent instance's execution. If a workflow has not yet been played, it is displayed in “design mode”—with no results being shown.
Save the current Interaction
This option is available whenever unsaved changes exist within the current interaction.
If the interaction has been saved previously, it is saved to the existing file and its version number incremented accordingly.
If the interaction has yet to be saved, Save behaves exactly like Save As….
You can save an interaction irrespective of the validation status of the workflows that it contains. When you save an interaction, any triggers’ active statuses are updated to “Inactive”.
Save the current Interaction As…
You may save an interaction and specify its filename and location within the RPI file system by invoking Save as…. Doing so displays the Save Interaction As… File System Dialog. You can navigate accessible folders within the RPI file system to locate a folder to which to save the interaction. Having done so, selecting OK saves the interaction; selecting Cancel cancels saving the interaction and removes the File System Dialog from display.
You can save an interaction irrespective of the validation status of the workflows that it contains.
A useful feature of Save as… is the fact that, when the new interaction is saved, all workflows’ statuses are reset to allow them to be executed in the new interaction. This applies even to workflows that have Completed in their original context.
Save the current Interaction as a Template
This button is only shown when a non-template interaction is displayed in the Interaction Designer. Selecting it displays the Save Interaction as Template File System Dialog. You can specify a name for the new template file and select Save. When you do so, the file is saved with a modified icon that indicates that it is a template. For more information on interaction templates, please see Interaction Templates.
Save current Interaction Template as File
This button is only available when an interaction template is displayed in the Interaction Designer. Selecting it displays the “Save Interaction Template as new Interaction” File System Dialog. Selecting a folder and selecting Save removes the dialog, and saves a new interaction based on the current state of the interaction template. The new file is shown in the Interaction Designer.
Remove the selected activities/connections
This option is only available when one or more activities and/or connectors are selected in the Interaction Designer workspace. Invoking this option removes the selected items.
Undo
This button is available when one or more actions that can be undone have occurred. A tooltip advises of the next action to be undone. Undoing an action may automatically trigger a refresh of the Interaction Designer (if appropriate). The button is disabled when an activity's configuration panel is shown. The history of the undoable actions undertaken within the current Interaction Designer instance is cleared when Save or Save As is invoked. The history is also lost when the Interaction Designer is closed. You can select Ctrl-Z to undo the most recent action. File metadata changes are not added to the history. You cannot make changes using Undo to an executing workflow (an advisory message is shown when you attempt to do so).
Redo
This button accompanies Undo. You can select Ctrl-Y to redo the most recent action.
Organization
Selecting this button allows you to specify whether the interaction has any explicit links to organization hierarchy nodes in the multi-line field displayed to the right of Name and Description. Organization hierarchy links are used to restrict access to interactions to users through the use of organization node user groups. For more information, please see the Configuration documentation.
If your user account is linked to any organization user groups, the associated organization hierarchy nodes are automatically linked to any new interactions you create.
If your user account is not linked to any organization user groups, an interaction is linked implicitly to the top node of each hierarchy in the organization. If you add a link to any hierarchy node below the top level, links to all other nodes within that hierarchy to which the interaction is to be linked must be defined explicitly.
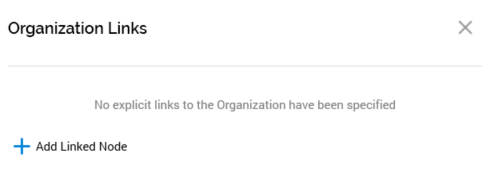
Selecting the Organization button displays the Organization Links overlay:
You can select the Add Linked Node button to add an organization node to the interaction. When you do so, the Link Organization Nodes dialog is displayed:
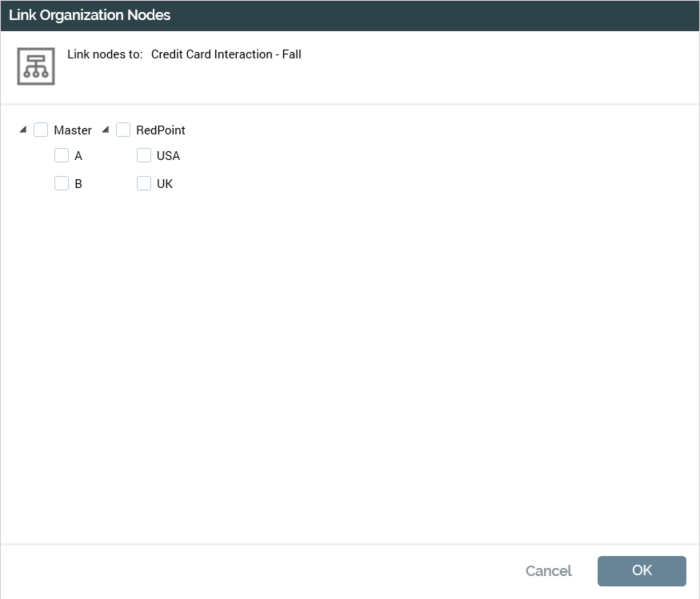
Organization hierarchies are listed in side-by-side treeviews. If your user account is linked to any organization user groups, treeviews are limited to display only the related organization hierarchy nodes, and any linked nodes.
You can select a nodes, then select OK to link the interaction to them. When you do so, linked nodes are displayed like this:
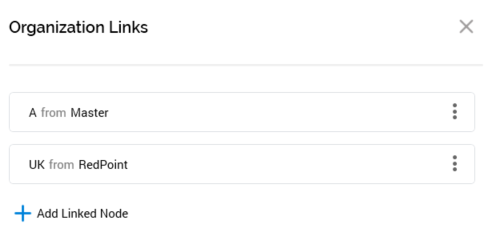
An inline Options menu at each node gives access to a Remove option.
Results
Invocation of this button displays the Results Window, providing access to the interaction’s results. The Results Window is discussed separately in the RPI documentation.
Realtime Results
Invocation of this button displays the interaction’s details in the Realtime Results interface. For more information, please see that interface’s own documentation.
Activate in Test/Production
This dropdown allows you to control in which mode—Test or Production—workflows will commence Playing when activated.
Activate all Triggers
Selecting this button activates all workflows within the interaction that are valid and can be activated. If in Production mode, an “Are You Sure?” dialog is shown. When an interaction contains no valid workflows, a message advising that no workflows are able to be activated is displayed.
Deactivate All Triggers
This button allows you to deactivate all triggers in the current interaction that are in a position to be deactivated. It is enabled when one or more triggers can be deactivated and applies at all triggers except a manual trigger which has no trigger constraints. Selecting the button deactivates all Active triggers. Note that an “Are You Sure?” dialog is not shown if invoked in Production mode.
Stop All Execution
This button allows you to stop all execution within all workflows in the interaction that can currently be stopped. It’s turned on when at least one workflow in the interaction contains at least one activity that is able to be stopped. At invocation, all workflows at which Stop functionality is currently available, and all activities in the same state, are stopped.
An “Are You Sure?” dialog is not shown if invoked in Production mode.
Copy Image to Clipboard
This option is available when at least one trigger or activity is present in the workspace. Selecting it copies the contents of the workspace to the clipboard (even if its full contents are not currently visible).
Refresh
Invocation of this option causes the currently-displayed interaction to be refreshed with its most recently-saved data (thereby picking up any changes made by other users), and its latest status information. You can refresh the display of an interaction in the Interaction Designer manually at any time.
Approval Panel
If interaction file approval is enabled in the current RPI installation, the approval panel is shown to the right of the Interaction Designer toolbar. Full details of the approval panel can be found in the File Approval documentation.
File Version, Follow/Unfollow File, File Options, Manage Metadata and Linked File Options
These options appear to the right of the toolbar. They are documented in detail in the RPI Framework documentation.