

Overview
The My Jobs dialog supports the display of the following job types:
Analysis panel refresh
An analysis panel refresh job is created on invocation of Refresh at an analysis panel (chart, crosstab, map or Venn diagram).
The My Jobs Dialog is not displayed automatically at creation of this job type.
Audit Joins
This job type is created on selecting the Audit Joins job in the Joins configuration interface.
When the job completes, you can select the View Results button to display the Audit Joins – Results dialog.
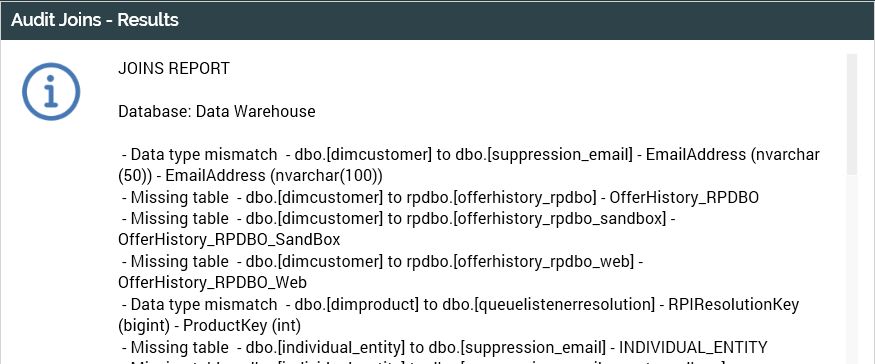
A Joins Report is displayed therein, documenting the following:
-
Missing tables
-
Missing columns
-
Data type mismatches
-
Missing indexes
A Copy Results to Clipboard button is available at the bottom of the dialog.
Cache attribute values
This job type is created on invocation of Start Loading Values when creating a compare to list criterion in respect of an uncached attribute.
Catalog re-sync
Invocation of Synchronize Catalog at the Configuring the catalog interface displays an “Are You Sure?” dialog. If you elect to proceed, a Catalog re-sync job is created.
During the job’s execution, the catalog representation of the currently-displayed database is updated to reflect its latest structure. Any tables or columns that include apostrophes in their names are ignored by the cataloging process (server log entries are created to advise of this fact).
If a table has been removed from the database in respect of which the catalog is being synchronized, any joins relating to the missing table will need to be removed manually in RPI.
On completion of the job, an orange advisory message is shown at the Catalog configuration interface. Selecting Refresh updates the interface with the latest table and column information.
Connectivity test
You can create this job type in three contexts.
Channel configuration
In the Channels configuration interface, select Create new job to test this channel at a variety of channel types (for further details, please see the Configuration Workbench documentation). Invocation in this context creates a "Test [channel name] channel connectivity" job.
On completion, the job assumes one of the following latest activity statuses:
-
Test completed successfully
-
Test completed with errors
-
Test failed
The View Results button displays the Connectivity Test Results dialog.
The tests performed are dependent on the channel type:
|
Channel type |
Tests performed |
|---|---|
|
General |
|
|
|
|
|
Mobile |
|
|
Data Onboarding |
|
|
CRM |
|
|
Web |
|
If desired, you can copy the contents of the dialog to the clipboard using the button at its footer.
FTP Locations configuration
In the FTP Locations configuration interface, select Create new job to test this FTP location. Invocation in this context creates a “Test [location name] FTP location connectivity” job.
On completion, the job assumes one of the following latest activity statuses:
-
Test completed successfully
-
Test completed with errors
-
Test failed
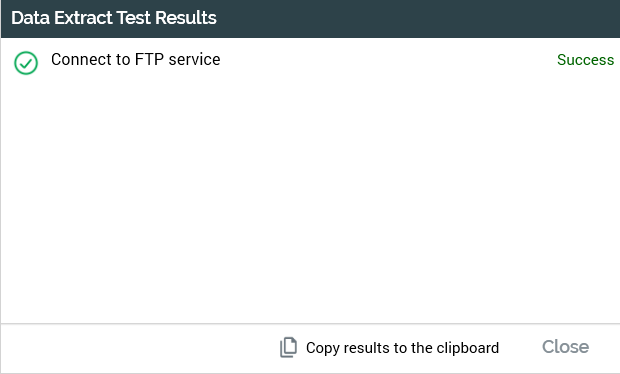
The View Results button displays the Connectivity Test Results dialog. A single test is performed:
-
Connect to FTP location
If desired, you can copy the contents of the dialog to the clipboard using the button at its footer.
Web Adapters configuration
In the Web Adapters configuration interface, select Create new job to test this adapter at Google Analytics, Bitly, Rebrandly, or Web Events adapters. Invocation in this context creates a "Test [adapter name] adapter connectivity" job.
On completion, the job assumes one of the following latest activity statuses:
-
Test completed successfully
-
Test completed with errors
-
Test failed
The View Results button displays the Connectivity Test Results dialog. The tests performed are dependent on the adapter type:
-
Google Analytics adapter: connect to Google Analytics, Validate metrics.
-
Bitly: connect to Bitly.
-
Rebrandly: connect to Rebrandly service.
-
Web Events adapter: load web event tracking page, Register test event on event queue.
If desired, you can copy the contents of the dialog to the clipboard using the button at its footer.
External Content Providers configuration
In the External Content Providers configuration interface, select Test connectivity. Invocation in this context creates a “Test [external content provider name] provider connectivity” job. On completion, the job assumes one of the following latest activity statuses:
-
Test completed successfully
-
Test completed with errors
-
Test failed
The View Results button displays the Connectivity Test Results dialog. A single test is performed:
-
Accessing root folders
If desired, you can copy the contents of the dialog to the clipboard using the button at its footer.
Queue providers configuration
In the Queue providers configuration interface, select the Test connectivity button at the queue provider (for further details, please see the Configuration Workbench documentation). Invocation in this context creates a “Test [Queue provider name] provider connectivity” job.
Select the View Results button to display the Connectivity Test Results dialog. The following tests are performed regardless of the queue provider type:
-
Write to the test queue
-
Read from the test queue
Customer view
This job type is created on invocation of Choose at the Search overlay in the Single Customer View interface. It is used to retrieve full details of a given record (typically a customer), which are then displayed in the Single Customer View interface. No results are available at the job.
Customer view search
This job type is created on invocation of Search at the Search overlay in the Single Customer View interface.
It is used to retrieve a list of records matching entered search criteria, which are then displayed in a list of Search Results. No results are available at the job.
Delete staged email offer content
This job type is created on invocation of Delete Staged Email Content at an email offer.
Download Asset from ECP
When you invoke Copy to folder at an external content provider (ECP) file, an External file download job is created.
On its successful completion, selecting the Open Folder button opens the folder to which the file was downloaded in Windows Explorer and highlights the file itself therein.
Email delivery test
In the Offer Designer’s Email tab, selecting OK at the Test Inbox Delivery dialog creates a Test email delivery for [offer name] job.
The dialog details the status of each link in the offer content.
On completion, select the View Results button to display the Email Delivery Results dialog.
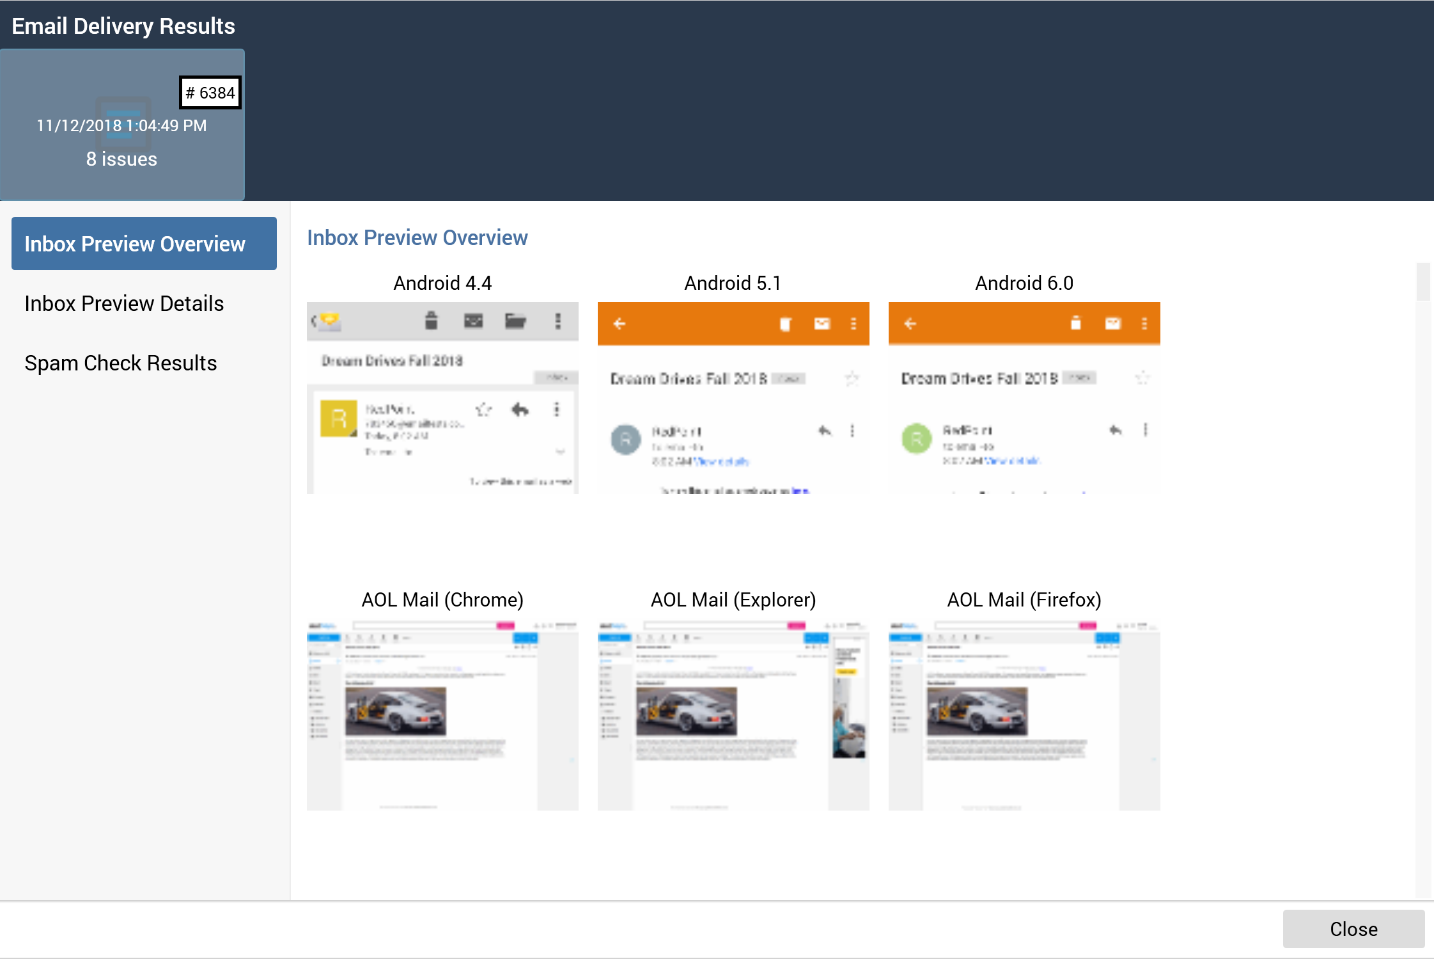
The dialog contains:
-
Inbox Preview Overview tab: this tab displays inbox preview images for a number of email clients.
-
If system configuration setting
EmailCheckerSandboxSwitchis set to 1, a series of sample images are displayed. -
If system configuration setting
EmailCheckerSandboxSwitchis set to 0, genuine preview images are displayed.
-
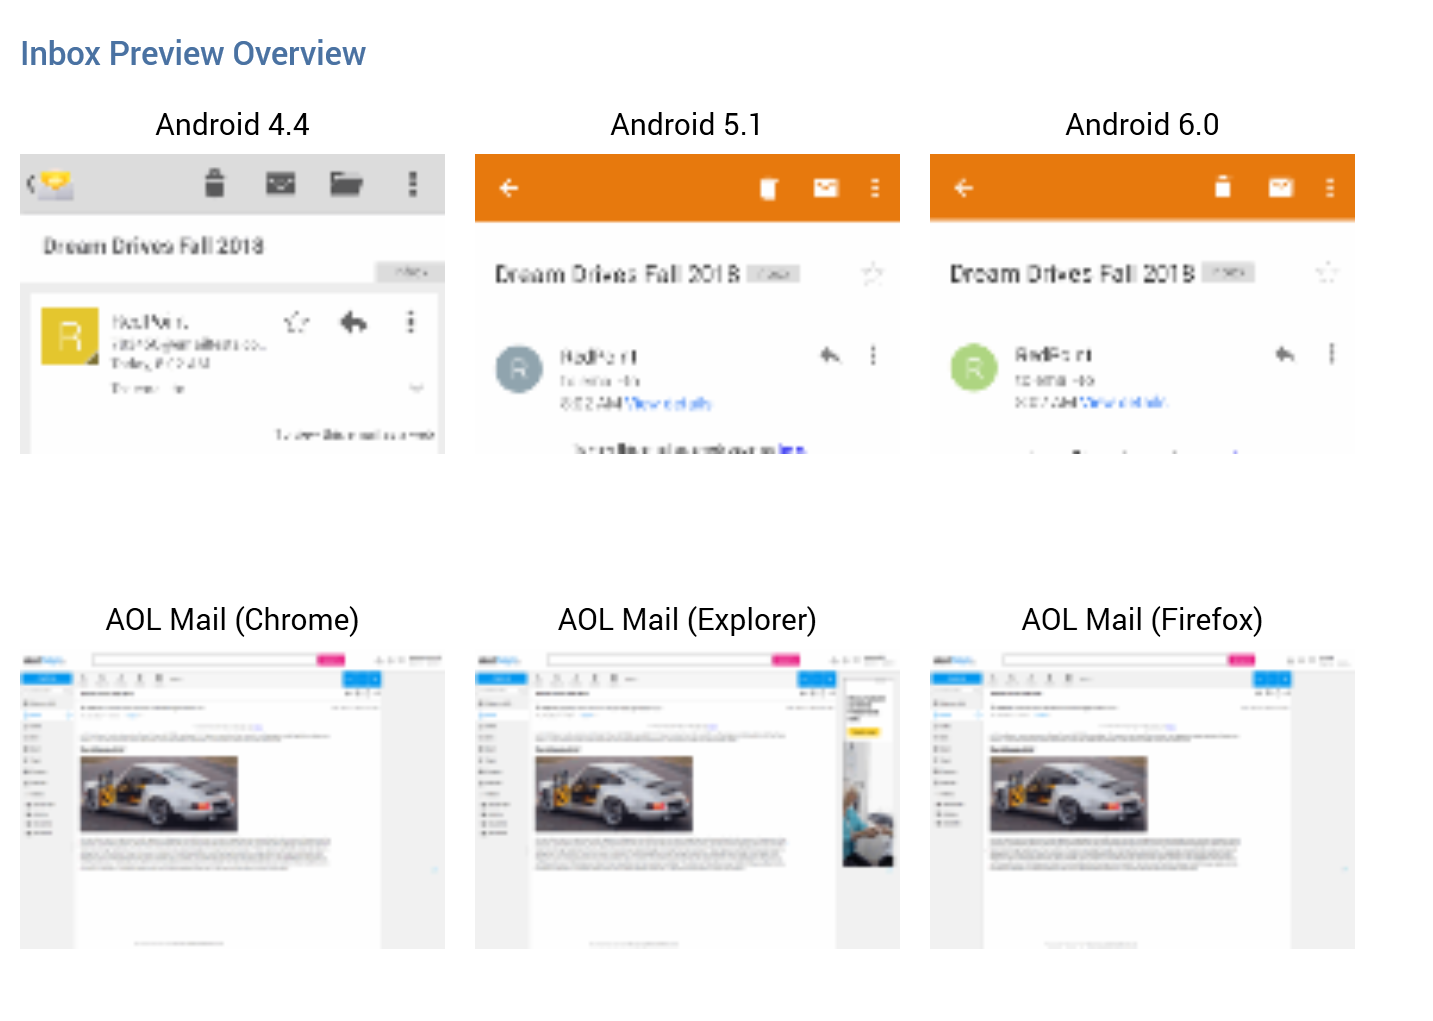
A Zoom image button accompanies each image on hover. Invocation displays a larger version of the image in a fixed panel.
If a test was failed, the image is not displayed and the legend “Failed” shown instead, accompanied by a cross icon. A warning icon is displayed if a test timed out.
-
Inbox Preview Details tab: this tab provides a more detailed view of inbox deliverability test results.
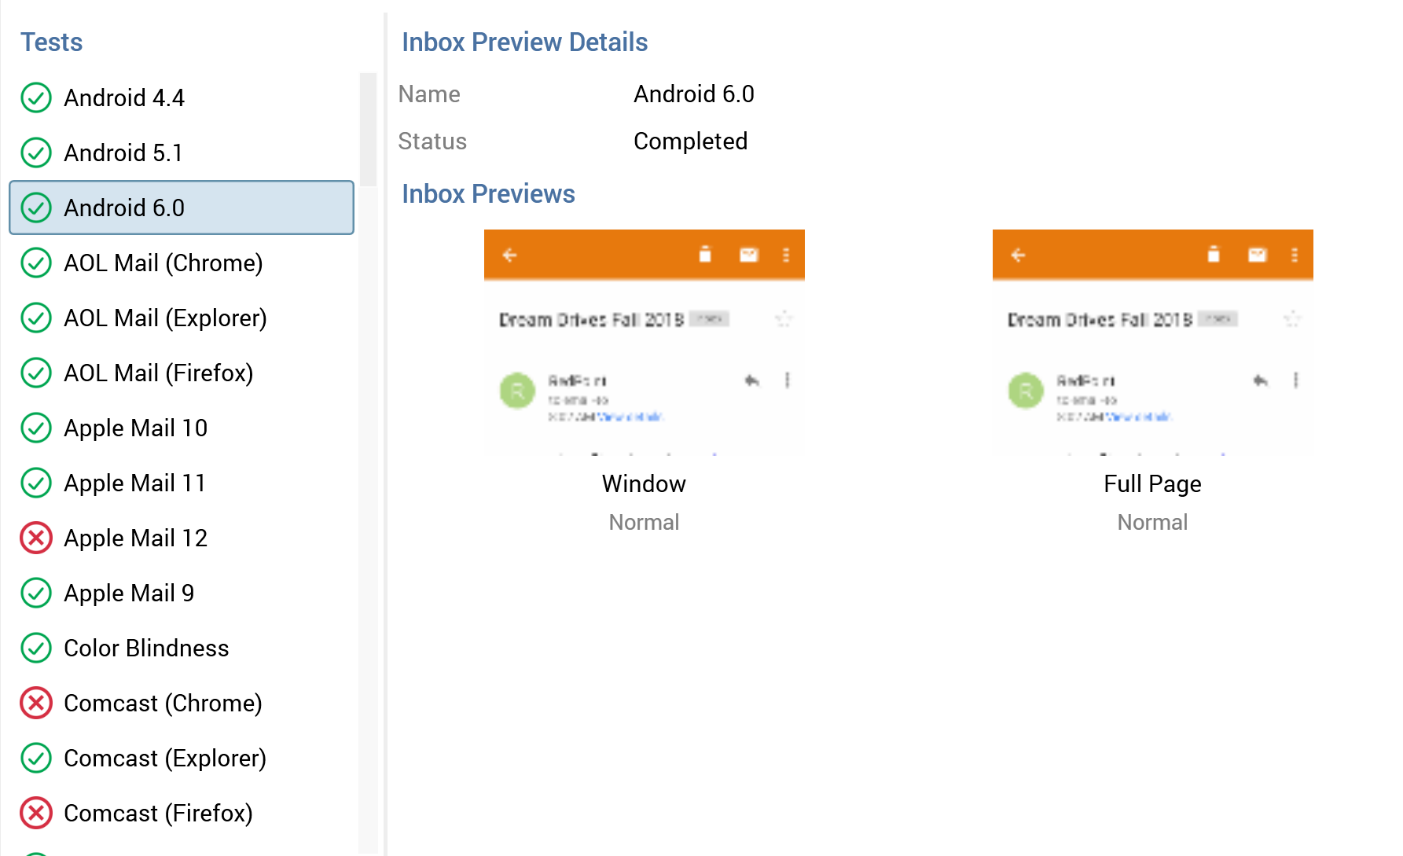
A list of email client-specific tests is displayed to the left. Successful tests are accompanied by a tick, and failed tests by a cross.
When you highlight a test, the right-hand panel is updated to display Inbox Preview Details. Preview images are displayed (sample images if EmailCheckerSandboxSwitch is set to 1, genuine preview images if set to 0). Window and Full Page images are displayed for both Normal and Blocked content.
A zoom image button accompanies each image on hover. Invocation displays a larger version of the image in a fixed panel.
-
Spam Check Results tab: this tab displays spam check results.
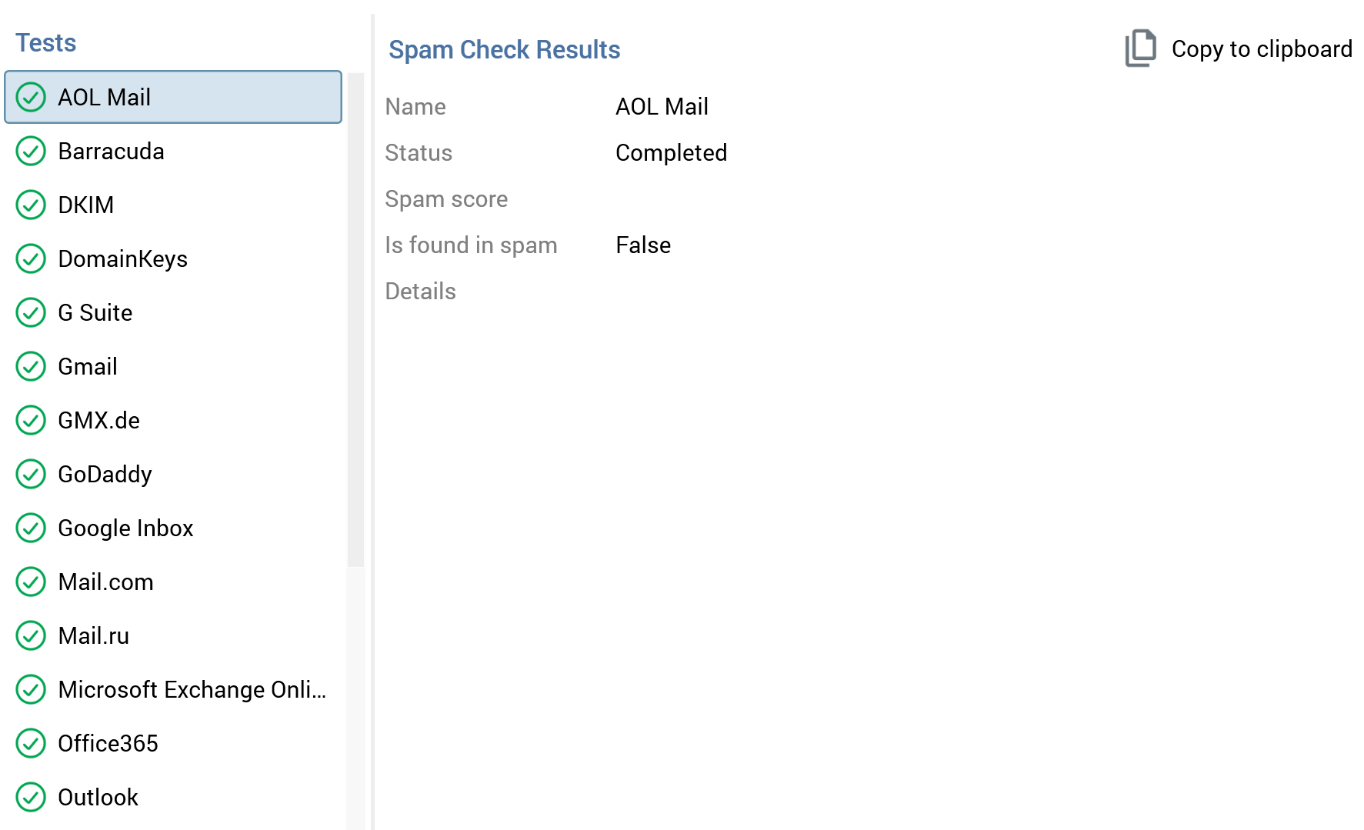
A series of spam checker tests displayed to the left. Successful tests are accompanied by a tick, and failed tests by a cross.
When you highlight a spam test, the right-hand panel is updated with the following:
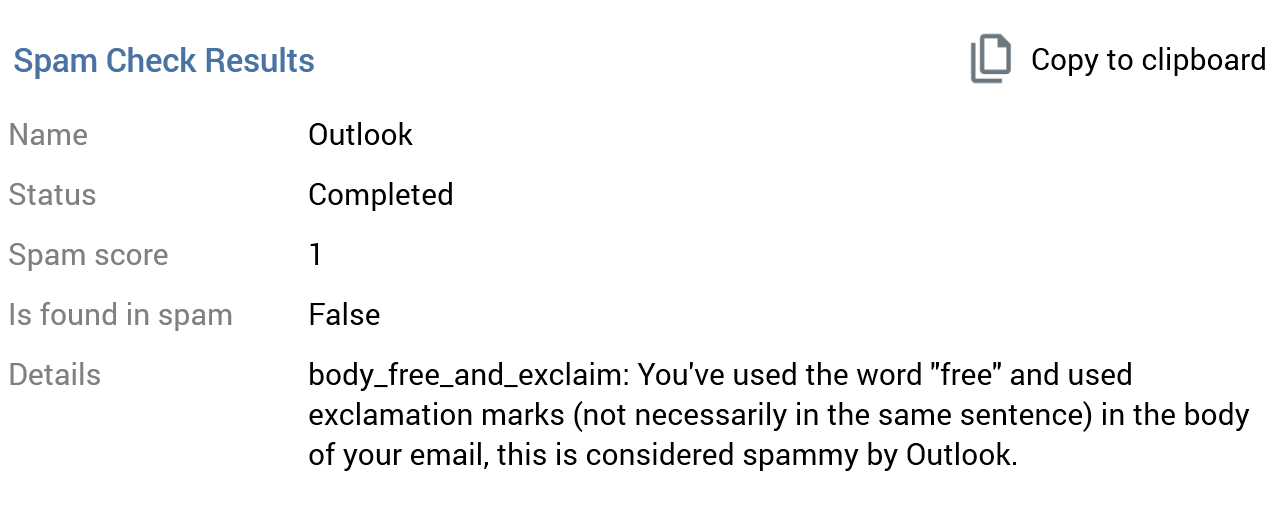
If you wish, you can copy the spam check results to the clipboard.
Email link test
In the Offer Designer’s Email tab, selecting the Test Email Links button creates a Test email links for [offer name] job.
On completion, the job’s status advises of the status of the links in the offer content.
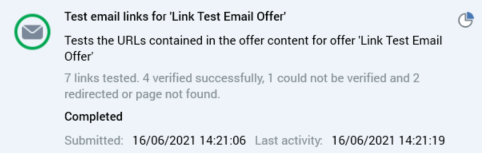
Selecting the View Results button displays the "Test email links…" dialog.
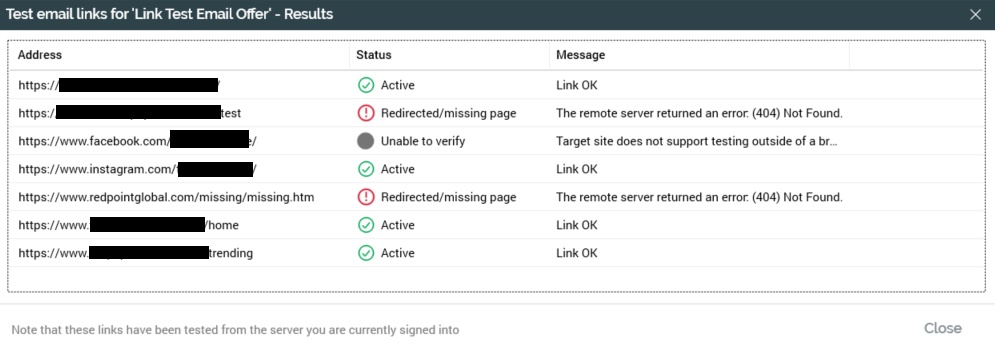
The dialog details the status of each link in the offer content. You can right-click an entry in the Address column to copy the link address to the clipboard.
A message at the bottom highlights the fact that the links were tested from the server to which currently connected (as opposed to the client on which RPI is running).
Export tenant items
This job is used to export items from a tenant so that they can be used as a template for the creation of other Tenants. The following can be exported:
-
Users in Tenant
-
User Groups
-
User Group Permissions
-
Users In Groups
-
User Alert Registration
Any existing folders at the export location are overwritten at the job’s execution.
For more information please see the Configuration interface documentation.
An Open Folder button is available on the job's successful completion.
File download
When you select Save at a "Save…" or "Download…" Windows file system dialog, a Download [file name] job is created.
On the job’s assuming a Download Completed status, an Open Folder button is displayed.
If you close and re-open the RPI client application, the Open Folder button is replaced by a Download button; you must save the file again before the Open Folder button is displayed.
Selecting Open Folder opens Windows Explorer and highlights the downloaded file.
File export
This job type is created when you export one or more files or configuration collections.
On its successful completion, selecting the Open Folder button opens the folder to which the file(s) was or were downloaded in Windows Explorer.
File external copy
This job type is created on invocation of Copy to other Tenants, which can be invoked both in the context of one or more files or configuration collections.
On its successful completion, a Copy results to clipboard button is available. Invocation copies details of the success or otherwise of the copying of each file (including dependent files) to each selected tenant.
Fulfillment test
This job type can be created in the following contexts:
-
Email: the job can be created by selecting Send Test Emails in the Email tab within the Offer Designer, or by selecting the same button in the Preview…Dynamic Content dialog. Doing so creates a Send test emails for [offer name] job.
Emails are delivered in accordance with specified options. Email addresses that appear in more than one seed group are de-duplicated. Any URL parameters defined by association of channels through which test emails are sent with PURL adapters, or any parameters added automatically to support web analytics adapters with which the channels are associated are not added to URLs contained within test email content. An audit record is created on the job’s creation.
-
SMS: the job can be created by selecting Send Test SMS Message in the SMS tab within the Offer Designer. Doing so creates a Send test SMS message for [offer name] job.
The SMS message is delivered in accordance with your stipulations. If duplicate cellphone numbers are targeted, they are deduplicated. Attributes are substituted in the delivered message where a seed column name matches the embedded attribute name.
Generate audience from [selection rule]
The Generate Audience From [Selection Rule] job is created when generating a clustered audience from a standard selection rule.
On the job’s completion, selecting the View Results button displays the clustered audience’s test execution results in the Insights Window.
More information on generating clustered audiences is provided in the Standard Selection Rule documentation.
Joins refresh
Initiating a joins refresh (in respect of the data warehouse or an auxiliary database) in the Joins configuration interface results in the creation of a Refresh Joins job.
On completion, any joins extant within the current database context that were not configured at the RPI server are created there. The job assumes a Notification Completed status. If shown, the Joins configuration interface is updated automatically.
Load data
This job type loads data from a file selected at an RPI data import file into a specified data warehouse table. On the job's commencement, if the data import’s Overwrite existing table property is checked, RPI drops the table if it exists already, then creates a new table in accordance with the data import's properties. RPI then loads data into the same. The following configuration settings control the maximum number of rows and columns that can be loaded:
-
DataImportColumnsMax: if exceeded, an error is thrown prior to load. -
DataImportRowsMax: if exceeded, an error is thrown when the limit is reached.
Data are loaded in batches, the size of which controlled by system configuration setting DataImportReadBatchSize. On completion of the job, a catalog refresh is performed, and you can select the Results button to show the number of rows loaded in a dialog. The creation (or otherwise) of RPI files and configuration objects (attributes, resolution levels, database keys and joins) is also reported in the job's results.
Publish to web
Execution of this job type publishes a landing page, or smart asset, to a web publish site or folder.
When objects such as realtime decision logic or images are published, if one or more values are supplied at string list system configuration setting RealtimeAPIPublishAddresses, objects are published to each address supplied at the setting. If no values are supplied for the setting, objects are published to the address specified at system configuration setting RealtimeAPIAddress.
Publish jobs are also created when saving realtime layouts, and when publishing smart assets from the Realtime Layouts interface.
Upon completion, a Copy published location to clipboard button is available. If invoked at a rule published directly to the realtime cache, a message advises that no published location is available.
Re-subscribe contacts
When an email channel is selected in the Channels configuration interface, you can create a Re-subscribe contacts job by selecting the Choose contacts to re-subscribe to this channel button, specifying the contacts’ email addresses in the Re-Subscribe Contacts dialog (as described in the Configuration Workbench documentation), and then selecting the Create job to re-subscribe these Email Addresses button in the same context.
Doing so creates a Re-subscribe contacts for [channel name] job.
The job removes the email addresses provided from the channel's email subscription table, and also from the email provider’s subscription records.
On completion, the job’s status advises of the number of contacts successfully re-subscribed at the channel.
Refresh value list
A Refresh Value List job refreshes a specific database value list with the latest set of values from the data warehouse.
It is executed on invocation of Refresh Value List in the Value Lists configuration interface.
Retrieve data viewer results
A Retrieve Data Viewer results job is created on population of the Data Viewer. For more information, please see the Rule Designer documentation.
The My Jobs Dialog is not displayed automatically at creation of this job type.
Rule count
A rule count job is created on running a selection rule in the Rule Designer. The job’s most recent activity status displays the count of matching records retrieved.
The My Jobs Dialog is not displayed automatically at creation of this job type.
Rule export
Upon saving a selection rule export file, an Export rule "[rule name]" job is created.
On completion, its most recent activity status is set to "Export [n] records". Its status is set to Download Completed, and an Open File button is displayed.
If you close and re-open the RPI client application, the Open File button is replaced by a Download button; you must save the report again before the Open File button is displayed. On selecting Open File, the export file is displayed.
Its contents are accordant with the associated rule, export template and export settings. If exporting a selection rule, and the selected export template contains one or more attributes from a joined table, and if the values of said attribute(s) are NULL, all rows targeted by the selection rule are exported, with blank attribute values in the export file as appropriate.
A rule export produces a single file on the RPI server, within the folder defined by tenant system configuration setting FileOutputDirectory or cluster setting GlobalFileOutputDirectory (as appropriate). The file's structure is defined by the selected export template. The data contained there is sourced from data warehouse records that match the criteria specified in the rule. If a selection rule, data is deduplicated in accordance with the selected export template's Deduplication property.
Save workflow diagnostics
This job type is created at invocation of Download Diagnostic information for this Workflow Instance in the Results Window. Its description is 'Saves workflow diagnostics for workflow instance ID [nnnnn]'.
The job controls the download of a diagnostics zip file, which contains a series of files that can be used e.g. in determining why a workflow failure occurred.
On the job's successful completion, selecting the Open File Location button displays the diagnostics zip file in Windows Explorer. The zip file contains the following:
-
AuditHistory.txt
-
ExecutionPlan.txt: used by the Execution Service to execute activity within the workflow.
-
ExecutionSchedule.txt: the state of activity execution at the Execution Service.
-
Interaction Workflow.json: a dump from the table of the same name.
-
QueryTrace.txt
-
ServerLog.txt
-
Summary.txt: high-level summary information.
-
SystemHealth.json
For each audience/fulfillment activity:
-
Audience: dump from the DataWorkflow table.
-
Instance: serialized activity details.
-
Log: relating to the current activity's execution.
-
-
Files: the exported interaction files.
-
Telemetry.txt: tenant telemetry information for a previous number of days defined by tenant system configuration setting
DiagnosticsTelemetryTimespan. The file includes the following information:-
File type usage in the last n days
-
Workflows in the last n days
-
Published files in the last n days
-
Configured channels
-
Selection rule waterfall
Upon saving a selection rule waterfall report from the Save Selection Rule Waterfall Report As… Windows file system dialog, a Waterfall for selection rule “[rule name]” job is created.
Following the job’s completion, and assumption of a Download Completed status, an Open File button is displayed.
If you close and re-open the RPI client application, the Open File button is replaced by a Download button; you must save the report again before the Open File button is displayed.
On selecting Open File, the waterfall report is displayed in Excel (which must be installed for the report to be run). A waterfall report contains:
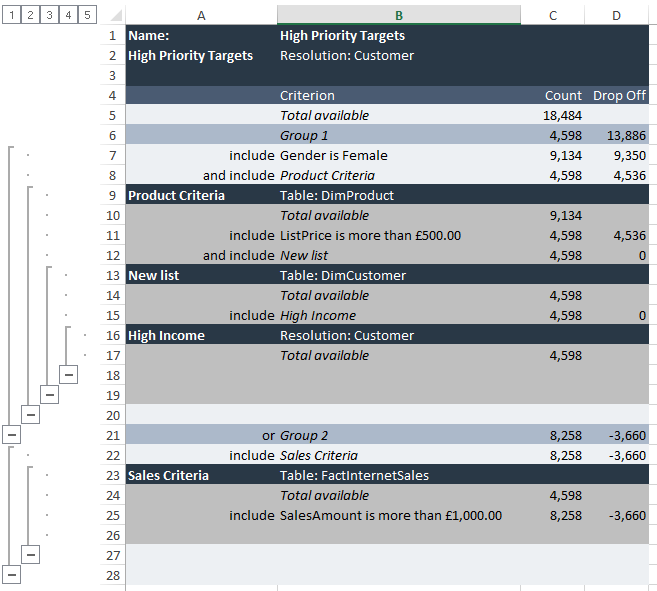
-
Initial header section, containing selection rule name and resolution level.
-
Summary grid, displaying, for each criteria list within the rule:
-
Name of the criteria list
-
And/Or relationship to the previous list (if not the first list)
-
Count after application of the criteria list
-
Drop-off after application of the criteria list (if not the first list)
-
-
For each criterion within each criteria list:
-
Name of the criterion
-
Count after application of the criterion
-
Drop-off after application of the criterion (if not the first criterion)
-
If configuration setting EnableNonNestedStyleWaterfallReport is set to true, the contents of the report that are rolled up using the controls to its left are instead shown inline.
Send Message to Model
This job type is created on sending a prompt to Redpoint IQ’s AI engine in a basic selection rule.
On the job’s successful completion, selecting a button displays a context menu, which exposes the following options:
-
Copy JSON results to clipboard
-
Copy search index results results to clipboard
-
Copy complete response to clipboard
For more information on using Redpoint IQ, please see the Basic Selection Rules documentation.
Stage email offer content
This job type is created on invocation of Stage Email Offer Content at an email offer.
Upon its successful completion, you can copy the publish location to which the email offer content was staged using the Copy published location to clipboard button.
Unpublish
Execution of this job type unpublishes a landing page or smart asset from a web publish site or folder.
An unpublished landing page or smart asset’s files are deleted; however, any relevant cached details are not removed from the realtime cache.
Update model attributes
This job type is created on invocation of Update AI Model in the SQL Database Definitions configuration interface. It allows you to update the AI model associated with the definition with details of the definition's attributes.
On successful completion of the job, selecting the Results button displays a window in which you can view a list of attributes, along with results for each.
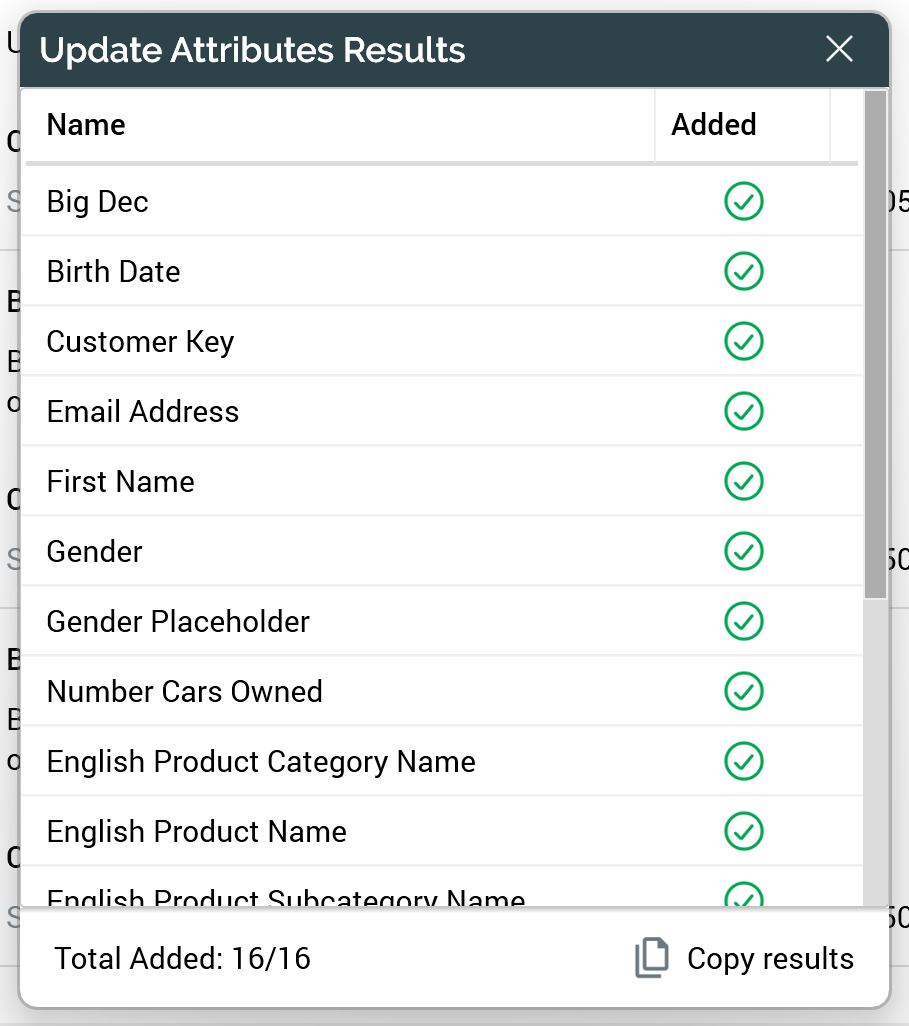
A Copy Results button is available at the Window’s footer.
Update table in the cache
This job type is created when you select Create new job to update the cache button in the Cached Attribute Lists configuration interface.
The job updates the realtime cache with the latest data for the cached attribute list's attributes from the database.
Upload asset to ECP
Invocation of Copy to External Folder at a file in the File System Dialog creates this job type (where "ECP" stands for "External Content Provider").
Upload file to ECP
This job type is created on invocation of Upload to Folder at an external folder in the File System Dialog (where "ECP" stands for "External Content Provider").
Validate and load file
This job type is created on invocation of Validate and Load at the Data Source Designer.
Validate channels
When you save a newly-created email channel, or when an existing email channel's Recipient email address field is changed, a Validate channels job is created.
The job creates a join is between the email suppression table (as defined by system configuration setting EmailUnsubscribersTable) and the Recipient email attribute's resolution table.
The following additional columns are added to the offer history table if they if do not exist already:
-
Selected
-
Sent
-
Delivered
-
Opened
-
Unsubscribed
-
ClickThrough
-
HardBounced
-
SoftBounced
These columns are used to store additional channel-specific state information-for example, indicating whether an individual selects a URL in an email delivered via an email channel.
Following the job’s completion its status is set to Completed, selecting the View Results button displays the Channel Validation Results dialog, which details the nature of any issues that occurred during the job’s execution.
Validate audience definitions
When you save a newly-created audience definition or make changes to an existing audience definition’s offer history table or transactional configuration, a validate audience definitions job is created.
It is the job’s responsibility to ensure that the offer history tables within the data warehouse match the stipulations made within the audience definitions.
Following the job’s completion its status is set to Synchronization Completed, selecting the View Results button displays the Audience Definition Validation Results dialog, which details the nature of any issues that occurred during the job’s execution.
Validate SQL expression
This job type is created upon validation of a SQL Expression attribute, or custom SQL expression within a standard selection rule.
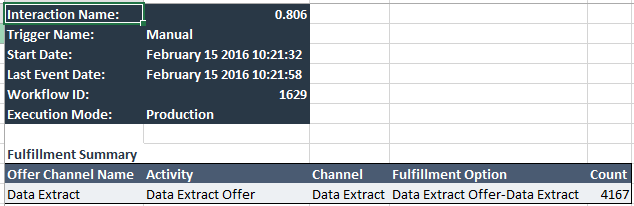
Workflow waterfall report
Upon saving a workflow waterfall file from the Save Waterfall Report As… Windows file system dialog, a Waterfall for workflow instance [ID] job is created.
On completion, its status is set to Download Completed, and an Open File button is displayed.
If you close and re-open the RPI client application, the Open File button is replaced by a Download button; you must save the report again before the Open File button is displayed.
On selecting Open File, the waterfall report file is displayed in Excel (which must be installed for the report to be run). It contains the following:
-
Summary tab: this tab displays the following information:
-
Interaction Name
-
Trigger Name
-
Start Date
-
Last Event Date
-
Workflow ID
-
Execution Mode
-
Fulfillment Summary: for each fulfillment activity, the following are shown:
-
Offer Channel Name
-
Activity
-
Channel
-
Fulfillment Option
-
Count
-
-
-
One tab per results-producing activity. The following are common to all activity tabs:
-
Activity Name
-
Activity Type
-
Start Date
-
Last Event Date
-
Input Activity
-
Total Count
In addition, the following additional information is displayed for specific activity types: -
Batch audience:
-
Audience Summary
-
Input Filters: Activity, State(s)
-
-
Segment Summary: one row is displayed per segment. For each row, the following are shown:
-
Name
-
One column per metadata attribute
-
Count
-
-
Audience Block Summary: one row is shown per audience block. For each block, the following are shown:
-
Name
-
Input
-
Count
The following additional information is shown at suppressions blocks: -
Total before suppressions
-
[Suppression 1]
-
[Suppression n]
-
Total after suppressions
-
-
-
Interactive activity: the tab is displayed as per a batch audience if the activity is configured with an audience. If not, the Audience Block Summary is not shown.
-
Offer:
-
Input Filters
-
Fulfillment Channels: the following are shown for each channel:
-
Offer Channel Name
-
Channel
-
Fulfillment Option
-
Count
-
State Results: the following are shown for each state result:
-
Name
-
Category
-
Count
-
-
[Email offer only] - Specific Link Clicks: for each specific link selected, the following are shown:
-
Name
-
Count
-
-
-
Export: the tab is displayed as per an offer
-