

Overview
Redpoint Interaction (RPI) is accessed via a Sign in to Redpoint Interaction dialog. Prior to display of the dialog, a splash screen is shown momentarily.
The table below show options available when you log into RPI:
|
Option name |
Description |
|---|---|
|
Location |
This combo box allows you to type in the name (and, optionally, port number) of the RPI server you want to connect to. Servers you have previously successfully connected to are listed in the dropdown. The most recent server you connected to is selected by default. |
|
Retrieve settings from the server to enable signing in using external authentication |
You can populate the combo box by selecting the key icon in the Location field. Selecting this option retrieves the latest Active Directory server settings and populates the chooser with any available Active Directory sign in methods. The button is disabled when signing in without saved credentials. When signing in using saved credentials, it’s hidden unless you select Cancel. |
|
Sign in using |
Depending on your current RPI server configuration, you can choose to sign in using at least one, and up to all of the following methods: You can select your method of sign in using the dropdown. This option defaults to its most recently-used value. |
|
Username/Password |
These fields display if you’re signing in using RPI Credentials. If available, they’re mandatory. |
|
Save credentials |
If displayed, this checkbox is displayed when signing in using RPI Credentials. It is unchecked by default. If you check this option, and cluster configuration setting When checked, the Sign in dialog’s credentials and server details are replaced. You are then signed in without the need to enter credentials again. |
|
Sign in automatically |
If displayed, this checkbox is unchecked by default. It is enabled when Save credentials is checked. When RPI starts up, if Sign in automatically is unchecked, the Sign in dialog is presented, allowing stipulation of your username and password. If |
|
Forgot password? |
This button is available if you’re signing in using RPI Credentials. Selecting the button opens a dialog to let you know to contact your cluster administrator to assist with a password reset. |
|
Cancel |
Selecting this button closes the Sign in to Redpoint Interaction dialog. When you click it the full Sign in dialog is displayed, allowing you, for example, to change the server to which to sign in. Note that, in this case, you must re-enter your password to proceed. |
|
Sign in |
Selecting this button starts the RPI sign in process. If you have saved your credentials and need to upgrade your client following sign in, you may do so without the need to re-enter your password. |
|
View License Agreement |
Selecting the link at the bottom of the dialog displays the RPI End User License Agreement in a separate window. |
|
RPI build number |
Hovering over this property displays the date and time the build was created. |
Refer to Sign in failures if your sign in fails.
Signing in using RPI credentials
To sign in using Redpoint Interaction Credentials:
-
Choose a server connect to from the drop-down list. You can also enter one manually (including a specific port number, if required). After each successful sign in to a new server, a new entry is added to the drop-down.
-
If cluster configuration setting
AllowSavingLoginDetailsis set tofalse, you must always select a server when signing in.
-
-
Enter your user name and password. Any preceding or trailing spaces are removed from the values you enter.
-
Click Sign in. A rotating icon is shown at the Sign in button while the client application attempts to connect to the server. Following a successful sign in, the RPI Home Page is displayed.
When you connect to the RPI server the connection is entirely secure, being made using the HTTPS (Hypertext Transfer Protocol Secure) protocol.
If you attempt to sign into an RPI server with a client application version number that is higher than the server, your sign in attempt will fail and an error message will be shown.
If Caps Lock is set to on when the Sign in dialog is displayed and the cursor is placed in the Password field, a message is shown. The message is removed from display when you switch Caps Lock off.
Signing in using OpenID Connect (OIDC)
To sign in using an OIDC provider, select OpenID Authentication at the Sign in using dropdown in the Sign In dialog. Enter your OIDC credentials in the Window provided to sign in.
RPI currently supports the following OIDC providers:
-
Okta
In general, you must create an RPI user for each OIDC user. Users are mapped on email address. Optionally, Keycloak users can be managed exclusively within that tool.
Signing in using Keycloak
The following considerations apply to Keycloak users managed within the Keycloak portal. Please refer to elsewhere in the documentation for details on the functionality cited in this list.
-
You can add Keycloak users to an existing tenant (either using Configuration > Users > Add Existing Users, or at tenant deployment).
-
When viewing a Keycloak user in the Manage User dialog, the following options are available:
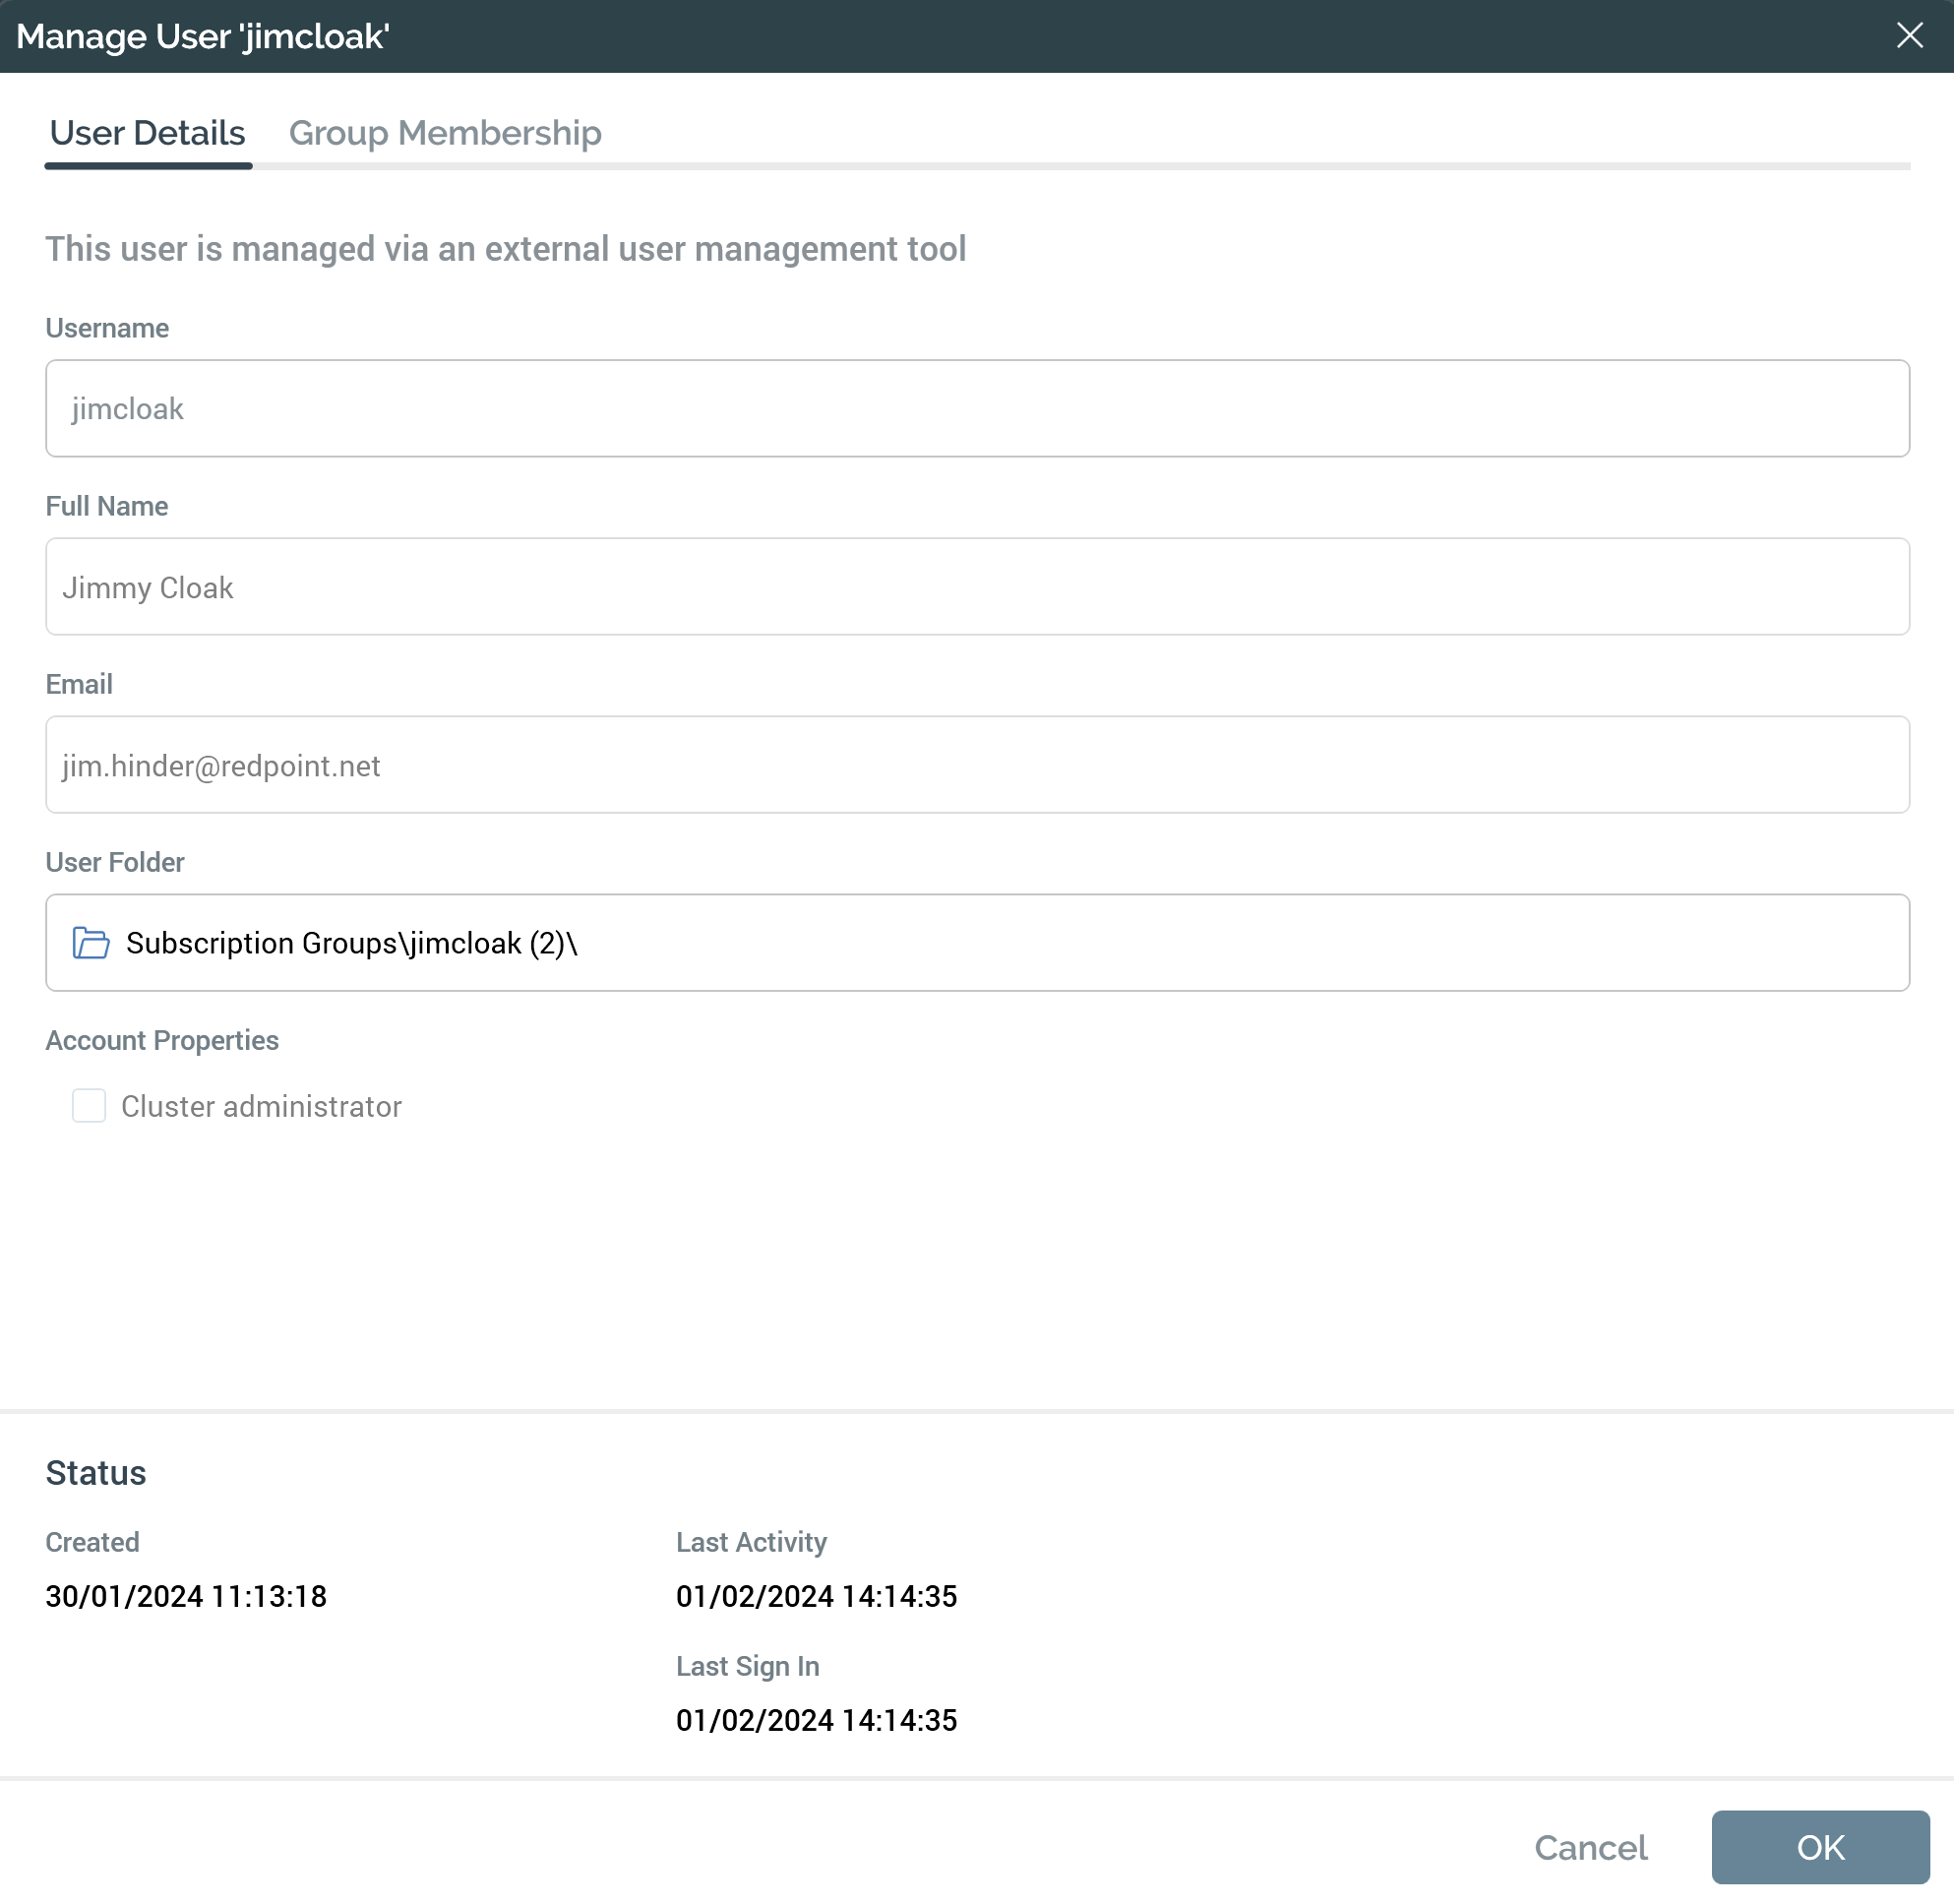
The following apply:
-
You cannot edit fields sourced from Keycloak.
-
Provision of a user image is not supported.
-
You can configure the user's User folder and User groups/permissions.
-
The user's Account properties are disabled.
-
The following Status properties are not shown:
-
Failed Access Attempts
-
Lockout Ends
-
When logged in as a Keycloak user, at the Preferences interface:
-
The following tabs are not shown:
-
Change Details
-
Change Password
-
-
A new Account tab is shown:
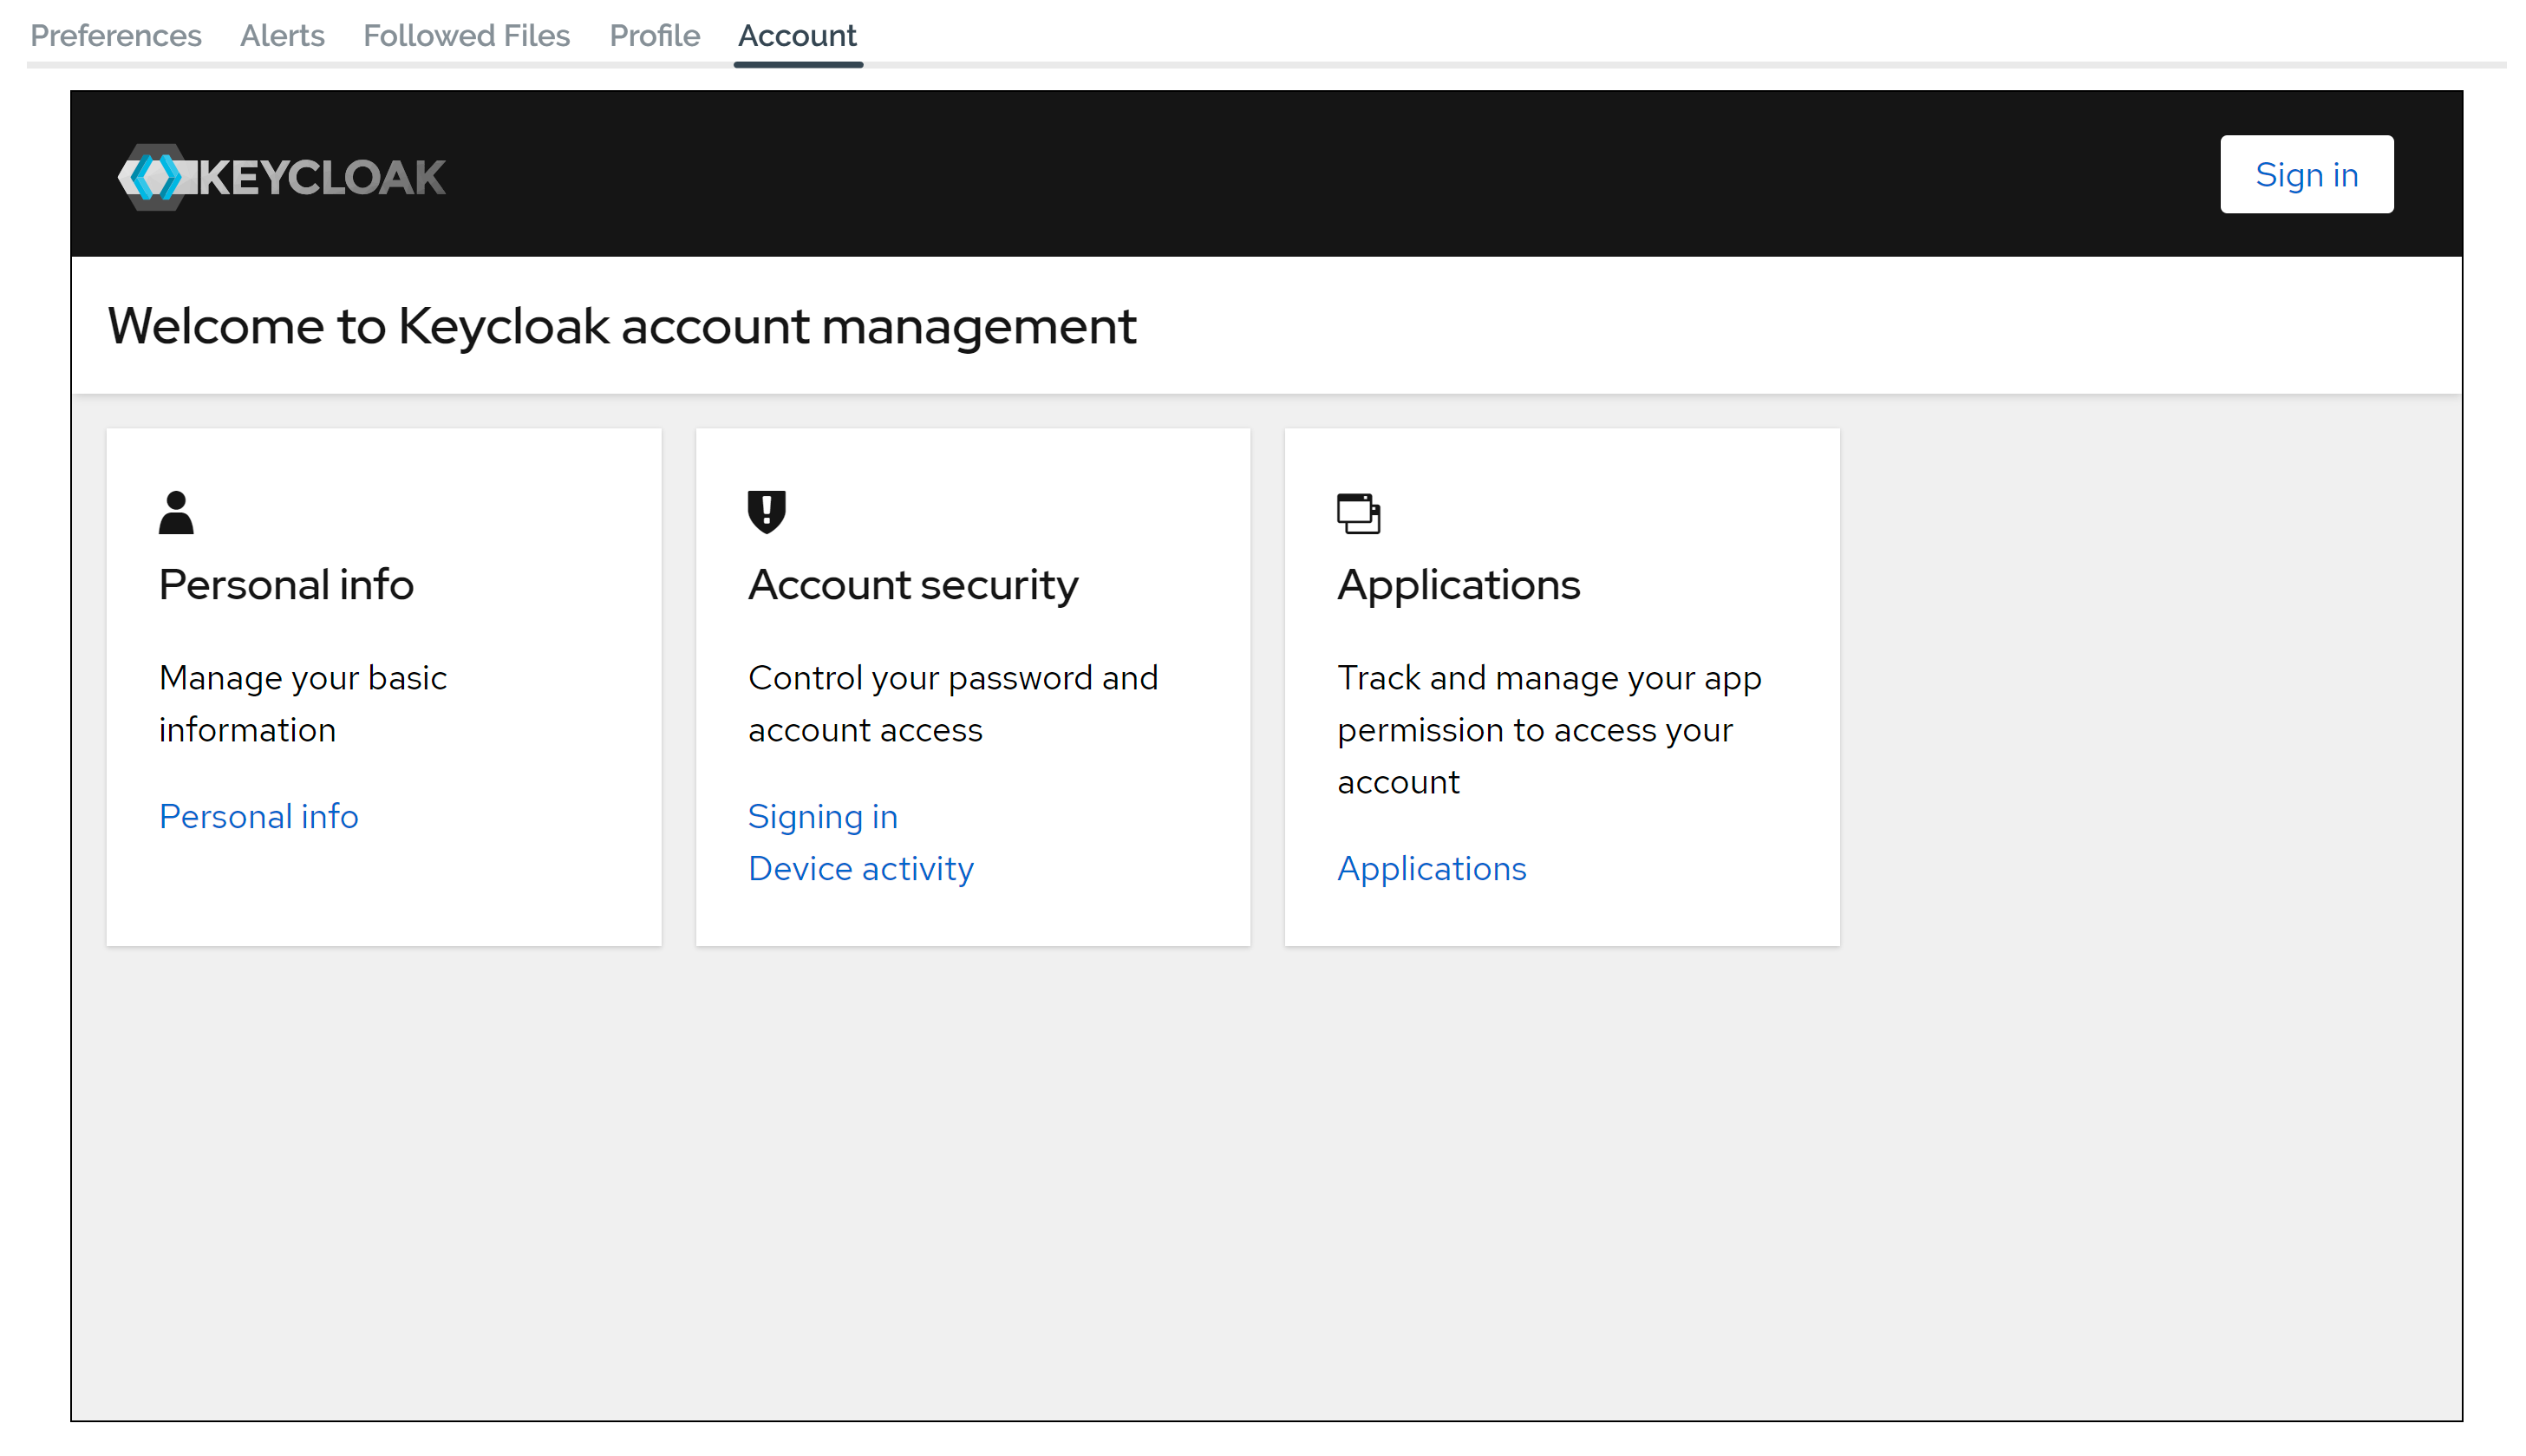
You can gain access to the functionality it exposes by re-entering your Keycloak credentials. Once you have done so, you can view or edit the following in the Keycloak portal:
-
Personal info
-
Account security
-
Applications
Signing in using a Microsoft account
When the “Microsoft” option is selected at Sign in, the following properties and options are not displayed:
-
Username
-
Password
-
Save credentials
-
Sign in automatically
-
Forgot password
When signing in using this option, you are signed into RPI as the user with an email address associated with the logged-in Windows user.
Multiple tenants available
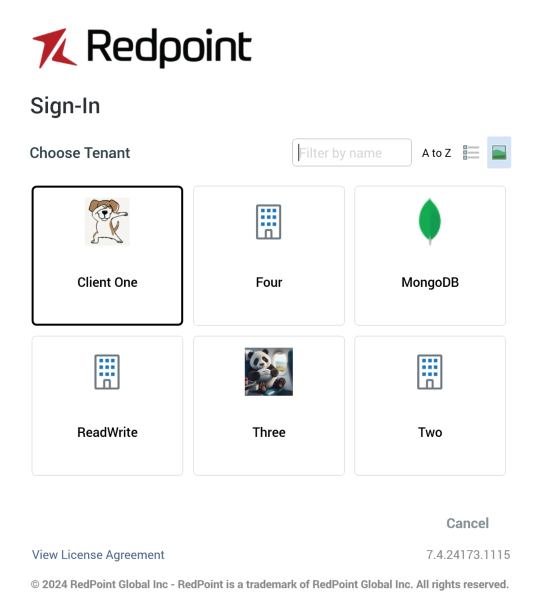
If you have access to more than one tenant within the current RPI server, when you provide your credentials successfully, a list of available tenants is shown in the Sign in dialog’s Choose Tenant overlay:
The Choose Tenant overlay is always displayed, even if only one tenant is available, if cluster configuration setting AlwaysShowClientsAtLogin is set to true. If the setting is false, and you only have access to a single tenant, the overlay is not shown.
You can click a tenant to sign into it. Hitting the Return key also signs into the currently-selected tenant.
You can enter text into the Filter by name field; as you do so, the list of tenants is limited to display only those with a name containing the characters entered. The first displayed tenant is selected automatically. If no tenants match the string specified, an advisory message is shown.
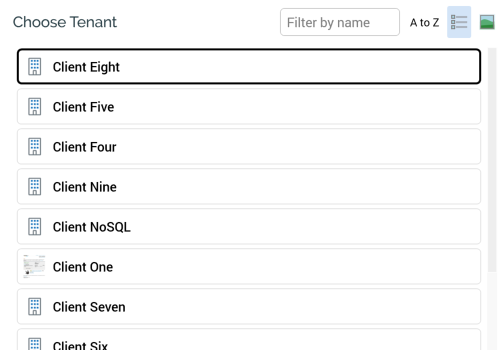
You can specify the manner in which tenants are ordered in the Sign in dialog using the A to Z/Accessed toggle button. The latter setting presents most-recently accessed tenants first.
Buttons also allow you to display tenants as a list…
…or as icons:
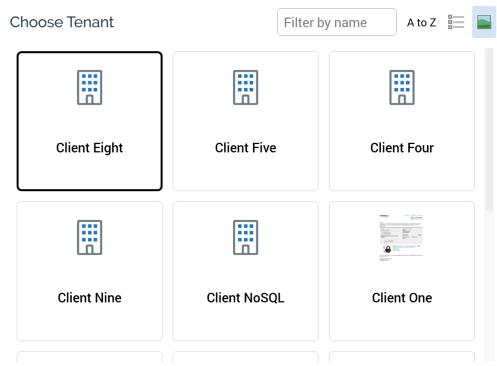
Your preferred setting is saved between RPI sessions.
If you choose to Cancel at the Choose Tenant list, the Sign in dialog is redisplayed, and a message therein confirms the cancellation:
All tenants hosted in a given RPI server installation are entirely autonomous, separate, and secure from one another.
Signing in when in maintenance mode
A server administrator can place an RPI server into “maintenance mode” – scheduled downtime that allows for system maintenance (e.g., a version upgrade) to be performed.
If you are not a cluster administrator, and attempt to sign into RPI when in maintenance mode, a message is displayed at the Sign in dialog:
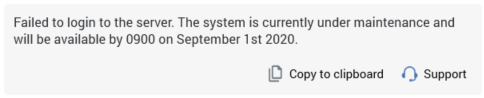
The maintenance mode message is configurable and can be set by a server administrator.
You can log in to RPI when in maintenance mode if you are a cluster administrator.
If you are not a cluster administrator, and happen to be working in the RPI client when the server enters maintenance mode, a dialog is displayed advising of this fact. Changes to any files you are working on will be lost when you click OK, at which point the RPI client is shut down. This does not apply if you are a cluster administrator.
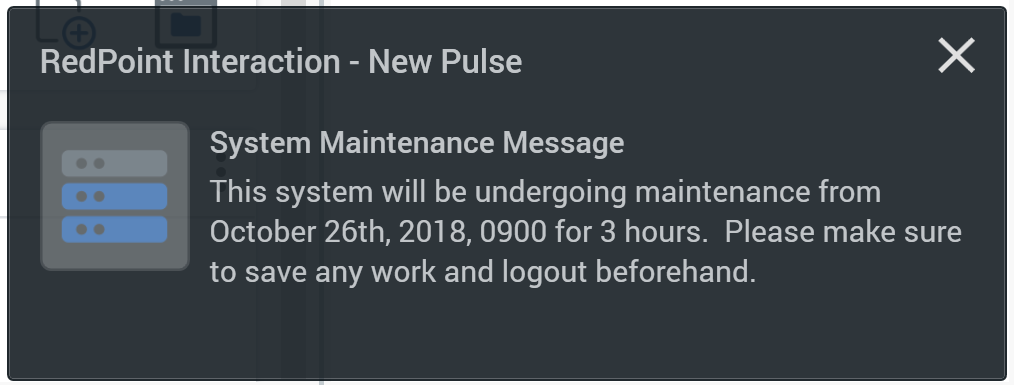
System maintenance messages
A server administrator can define one or more system maintenance messages. These are displayed when signing in, as Pulse notifications (if more than one message has been configured, each is shown in turn; notifications are not sent if system configuration setting EnablePulseMessages is set to false).
System maintenance messages have start and expiry dates, between which they are active. Only active system maintenance messages are displayed.
Active system maintenance messages are also shown if added by the server administrator when you are already signed in (similarly, messages are shown if they become active when you are signed in).
Refer to Pulse notifications for additional information.